Welcome to RennTech.org Community, Guest
There are many great features available to you once you register at RennTech.org
You are free to view posts here, but you must log in to reply to existing posts, or to start your own new topic. Like most online communities, there are costs involved to maintain a site like this - so we encourage our members to donate. All donations go to the costs operating and maintaining this site. We prefer that guests take part in our community and we offer a lot in return to those willing to join our corner of the Porsche world. This site is 99 percent member supported (less than 1 percent comes from advertising) - so please consider an annual donation to keep this site running.
Here are some of the features available - once you register at RennTech.org
- View Classified Ads
- DIY Tutorials
- Porsche TSB Listings (limited)
- VIN Decoder
- Special Offers
-
OBD II P-Codes - Paint Codes
- Registry
- Videos System
- View Reviews
- and get rid of this welcome message
It takes just a few minutes to register, and it's FREE
Contributing Members also get these additional benefits:
(you become a Contributing Member by donating money to the operation of this site)
- No ads - advertisements are removed
- Access the Contributors Only Forum
- Contributing Members Only Downloads
- Send attachments with PMs
- All image/file storage limits are substantially increased for all Contributing Members
- Option Codes Lookup
- VIN Option Lookups (limited)


jpflip
-
Posts
684 -
Joined
-
Last visited
-
Days Won
8
Content Type
Profiles
Events
Forums
External Paint Colors
Downloads
Tutorials
Links Directory
Collections
Store
Posts posted by jpflip
-
-
Loren's got it. The only key you have to use on your laptop are mostly F12 to accept or carry on, to return F11 and sometimes the bottom screen will show you f4 or...I can't remember the other's but some at the bottom like diode test etc. are useless
-
Your PST2 is exactly like mine, same interface card but I'm on a Dell computer. Have fun with it!!!! Good to know that you've found the sense line connection!
-
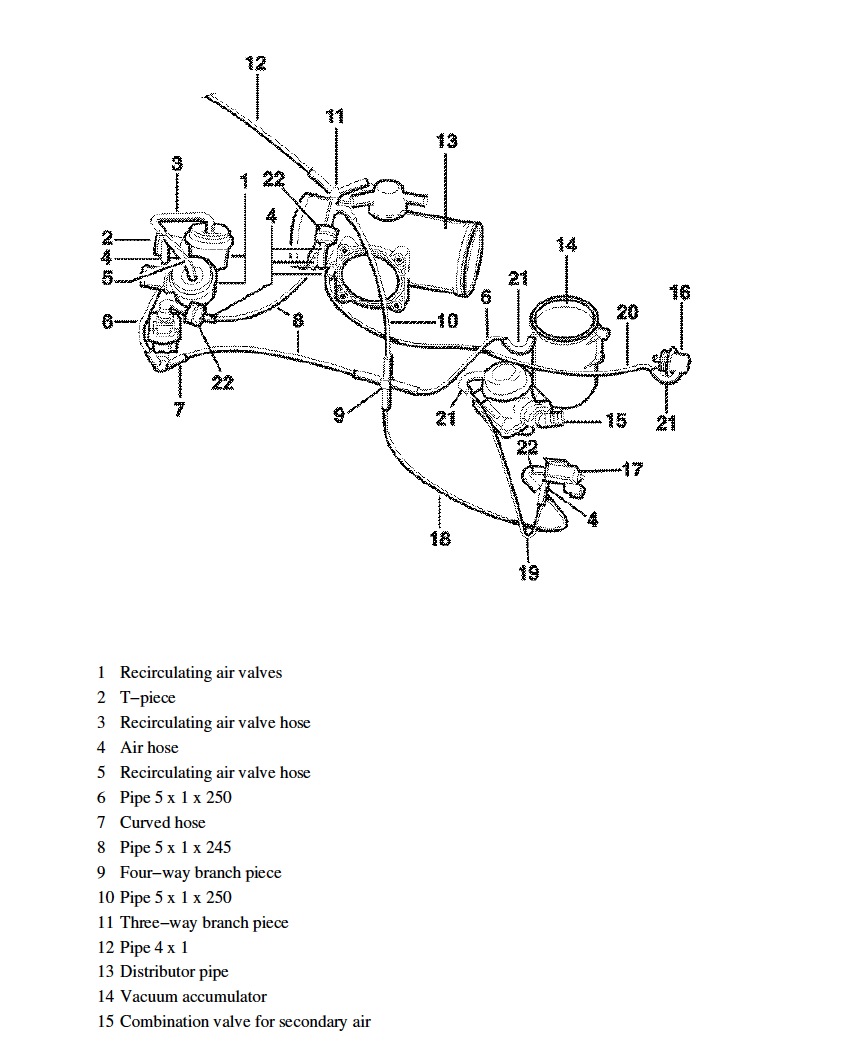
Can you be more specific about the hose. Are you talking about a sense line on the diverter valves? If it is a sense line, page 611 of the repair manual got a good routing of those lines....There is also a routing of the sense line on a sticker under the engine compartment cover.

-
The good thing is the coolant temperature sensor is not too far!!!LOL!!! You are going to be able to work on TT's with your eyes closed, at least one. :cheers: + rep for your fighting spirit (I got this french word "combativité" translated, hope it work!). You are going to have a PST2!!!! A real one or a clone like mine? It is a fantastic tool. It took me a while to get use to it because of the multiple functions but even today I still discover some new applications.... Good job Mike!
I did some key programming and let me tell you, follow every single step of the repair manual page 1155. It is really important to go step by step. Of course you will be able to do that only after you get, from your dealer, the IPAS code for your car. A series of code for programming different functions.....
-
-
I love renntech :thumbup: Good job g8rdmd !!!! The deposit of oil in the outlet pipe of the compressor, if it is not a mpuddle of oil, can be consider normal. The throttle body is really dirty but again not dramatic....Of course a good cleaning is required!
-
 1
1
-
-
LOL!!! I took the pictures of my engine when it was out for coolant pipes welding this spring. You don't need the engine out but you need to be patient :thumbup:
-
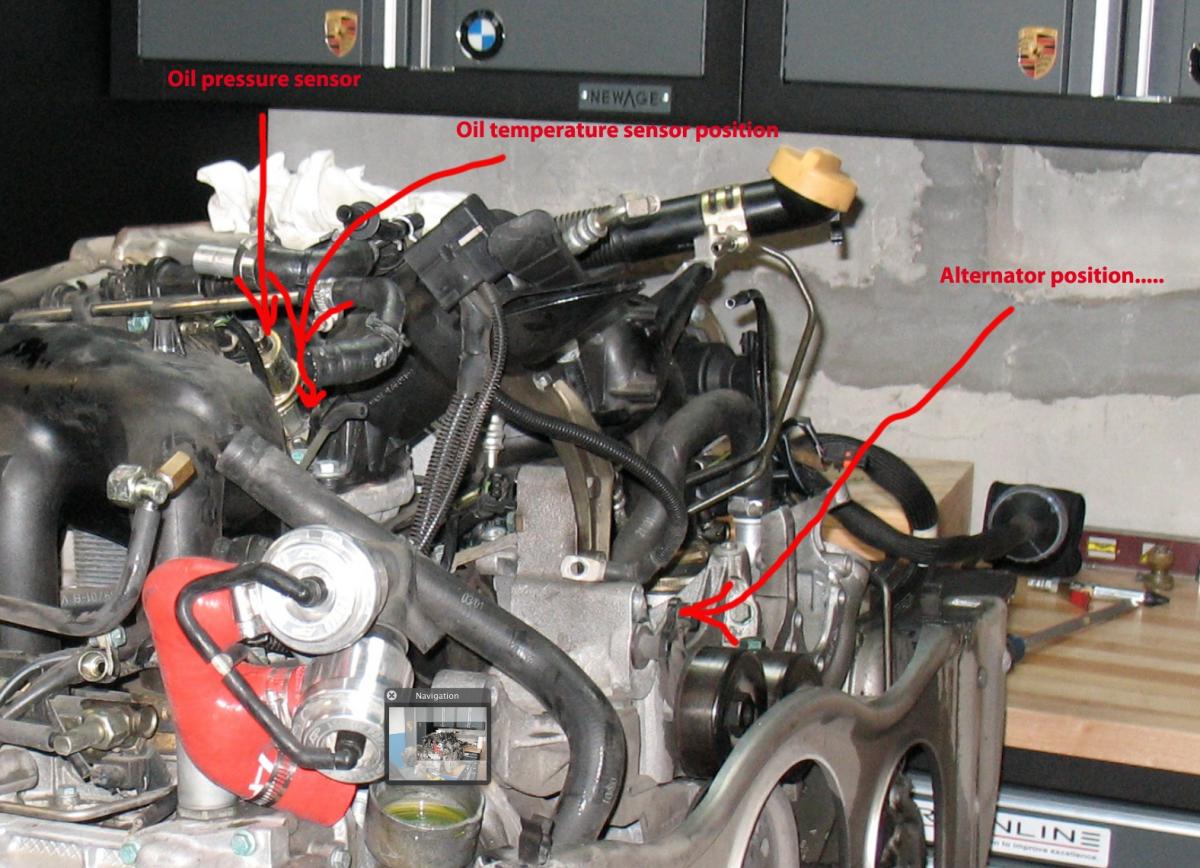
Sorry Mike, the alternator is behind the engine and the oil temperature sensor is bottom forward of the oil filter housing..... Removing the oil filter housing is not difficult but there is a seal under and it can be damage. If you can do it without removing too many things it is better....I know the repair manual did not use that route.....
-
Subscribe, anxious to see Loren answer on that one!
-
I was never able to found only the switch but if you do let us know!
-
Switch pack at fault on the right side. Look if it is not out of position. I had to tape mine to keep it firmly positioned.... If it didn't work operate the spoiler manually , once completely up force the right side up to see if it reach completely the deployed position.
-
12 volts indicated, while the engine is running is not sufficient. I you switch "on" the headlights + a/c you will probably drop below12 volts meaning battery power needed to provide electricity. You have to get at least 13 volts. You seems to have the exact problem I was having before regulator replacement. I went out, one day, and realized the voltage indication was exactly on the 12 volt. I've decided to select headlights on and the a/c ON and suddenly the voltage was 1/16" below 12 volts....Came back home to put a multimeter on the battery pole while the car was running to look at the precision on the car voltmeter and it was dead on...No other choice to replace the regulator and now I got a steady 14 volts on start and 13 to 13.5 with load.....
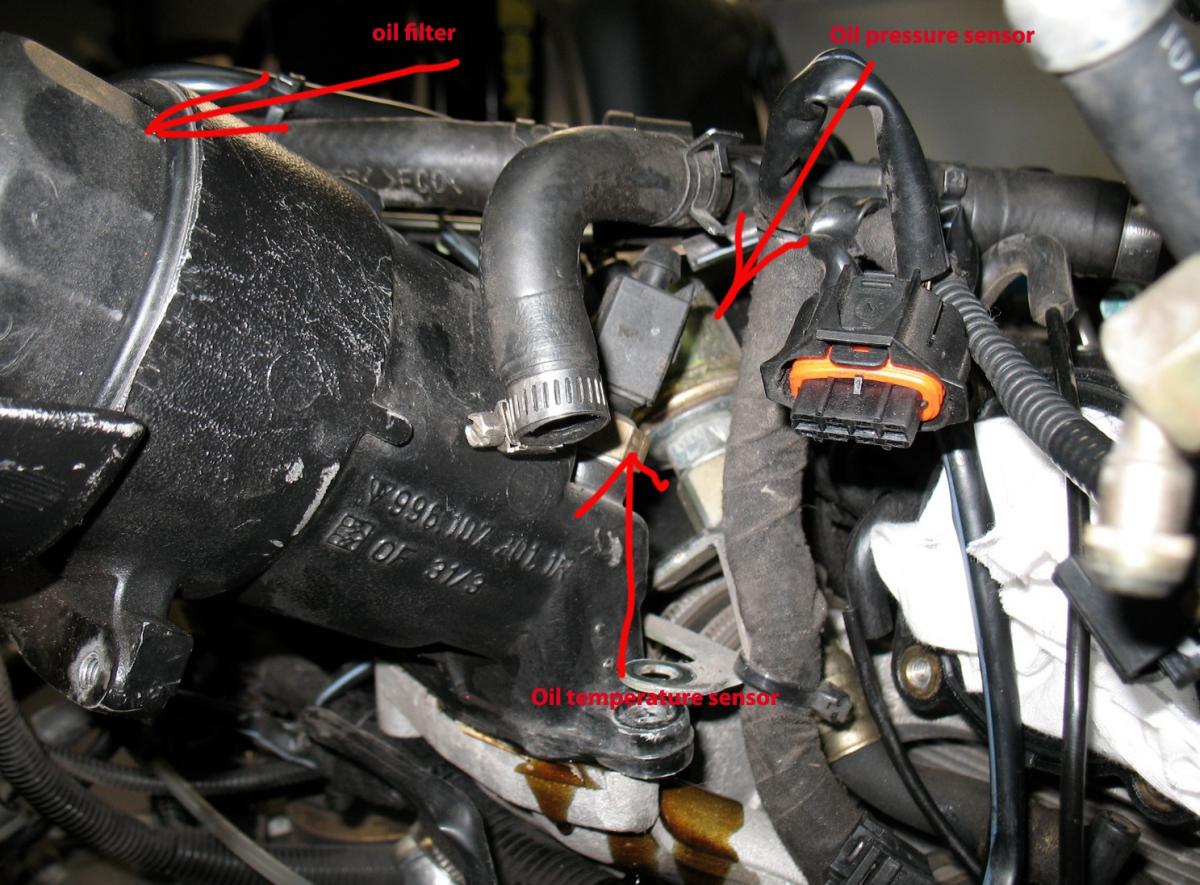
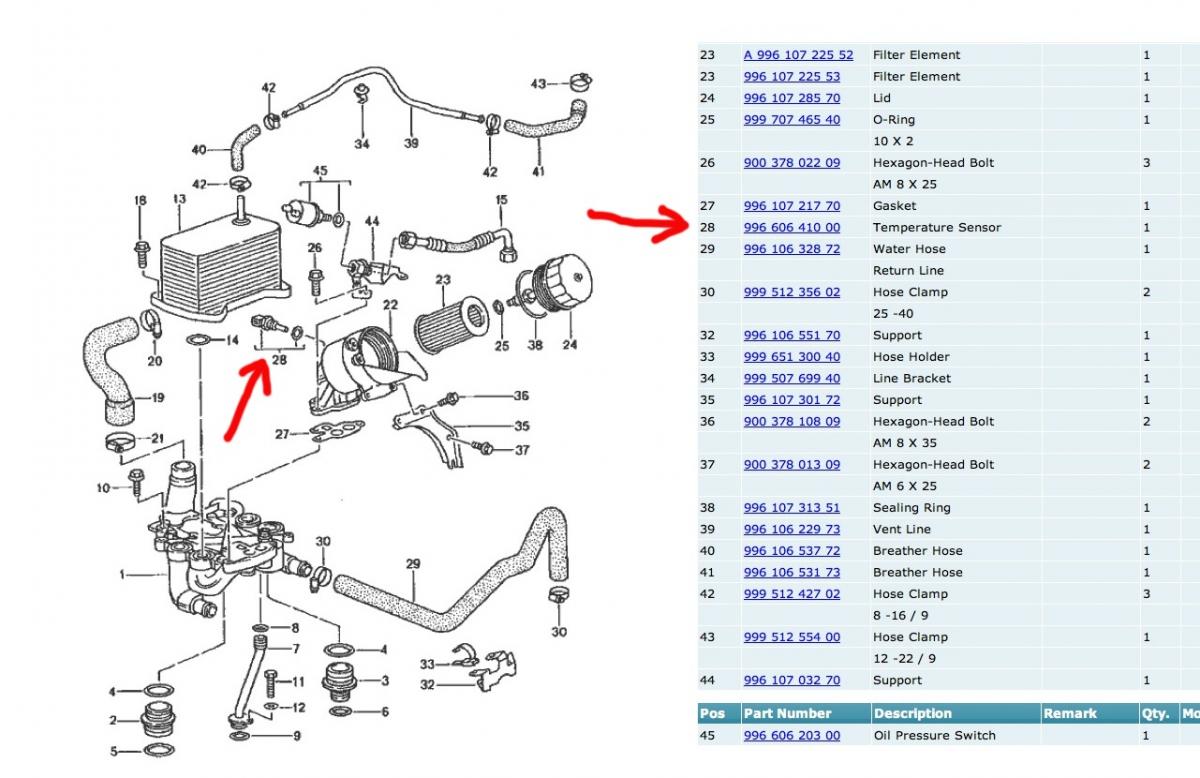
About your oil temperature sensor if the wires are correctly connected just replace the sensor as per repair manual page 502. Easy step to follow and not expensive unit...
-
1
-
-
Do not replace the complete alternator just do the voltage regulator. I replace mine last month. It was a 2 hours job and only $39.00 for a Bosch regulator...Now everything is perfect....You will found all the info you need here: http://forums.rennli...ad-alt-reg.htmlhttp://forums.rennli...ad-alt-reg.html
And also here: http://forums.pelicanparts.com/porsche-996-997-forum/408495-alternator-repair-regulator-replacement.html
-
Too bad this subject was discussed lots of times here on Renntech!!!! Sorry if we did not mention it before ;-(
-
It is at the beginning of the repair manual page 4. You can get the repair manual here: lhttp://www.6speedonline.com/forums/996-turbo-gt2/228714-ok-guys-here-link-shop-manuals.html
The weight is 572.7 pounds (manual transmission) and 557.27 (automatic transmission). (weight difference due to flywheel and clutch)
-
jpflip, the later on 996 Carrera use also those clips but have a different size, perhaps there is a misunderstanding in this matter.
Thanks for mentioning. It is, in fact, a possibility!
-
PM sent....
-
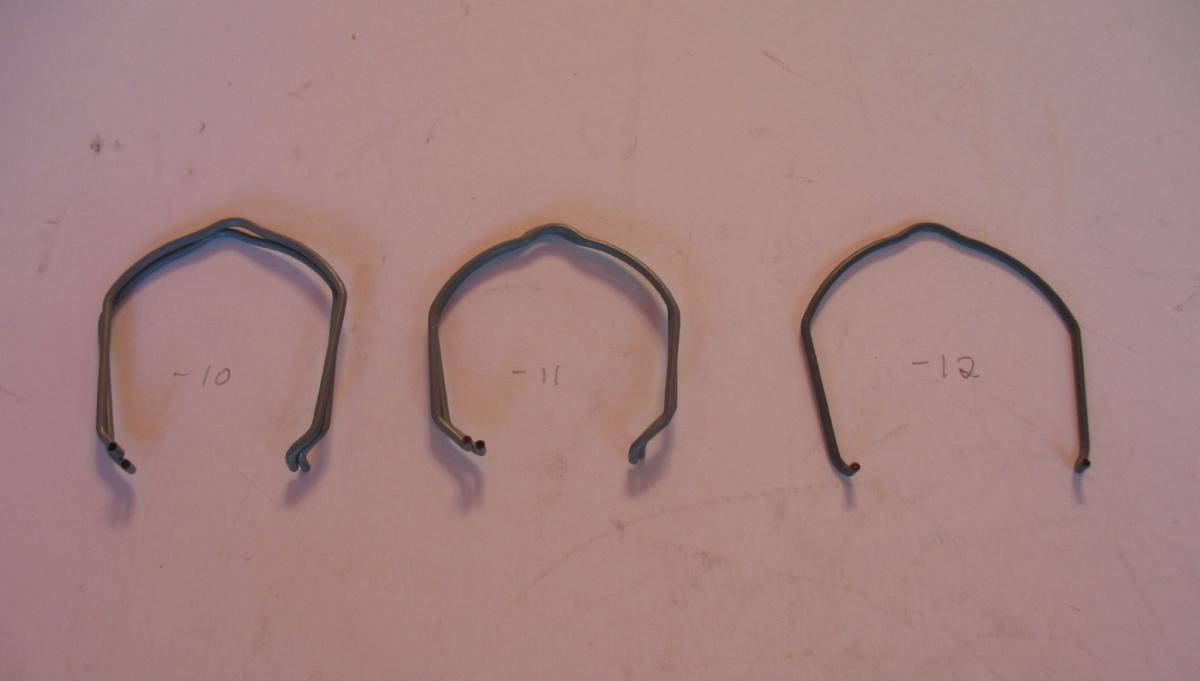
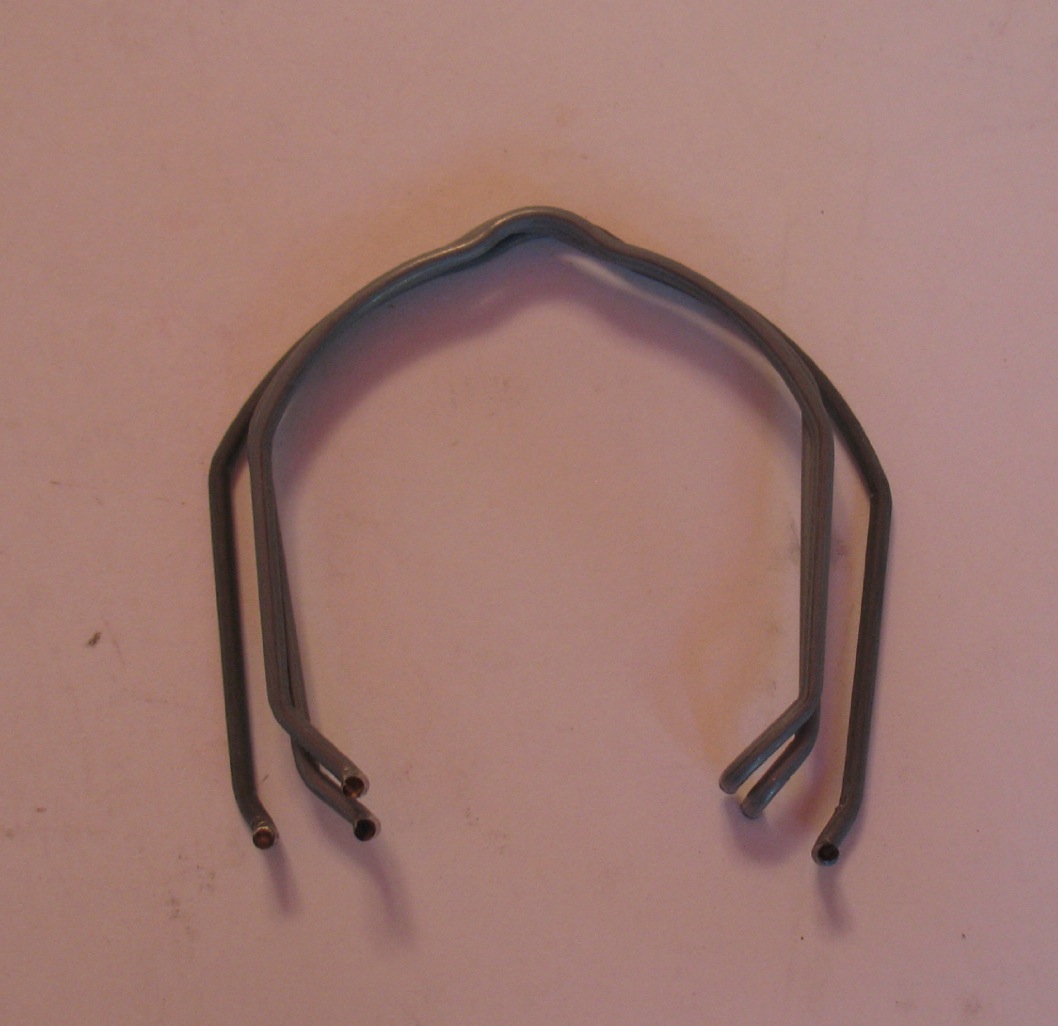
Just for your info. I have found, the hard way, there are 6 different sizes of clips on the TT . The numbers are 996-106-802-10 (-11,-12,-15,-16,-17) depending of the location on the car. Per example the -11 is a little smaller than the -10 ???? But the -12 is a lot bigger....I've made a mistake between two sizes (-10 and -11) and the clip did not hold properly.... Also i've purchase new ones and the clipping action was more firmed....In your case we are talking about -15 and -17, hope they were not misplaced...
-
Ouch!!! I really hope you just strip the plug....Order a new one and try to torque it! The number of the plug on the crankcase is 944 107 197 01 and the torque is 52 foot/pounds...Good luck!
-
1
-
-
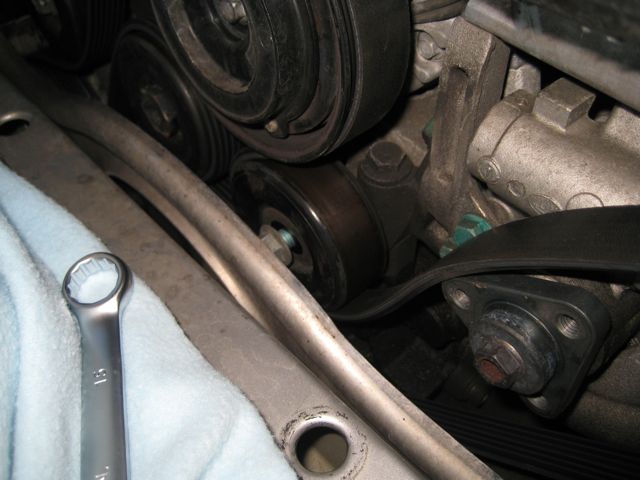
Ok, I can confirm that you cannot take that deflection roller out with the engine in place. The engne carrier is obstructing the srew, not much missing but not enough. I've added some lube and new srew-lock and the noise is gone for the moment...question is how long.
I finally got round to replacing the roller and as Fedmax posted, the bolt does indeed hit the engine carrier. I was about to start removing the exhaust to get at the engine carrier bolts and engine mounts when the idea of a long block of wood as a lever against the engine block moved the engine carrier enough to remove the bolt and fit the new roller. Hope this helps anyone intending to tackle the job.
Good to know, thanks for the info!
-
Minimum we can say, it is unique. But I have to admit, I came here six or seven time to look at it and I am getting use to this olive green and started to love it!
-
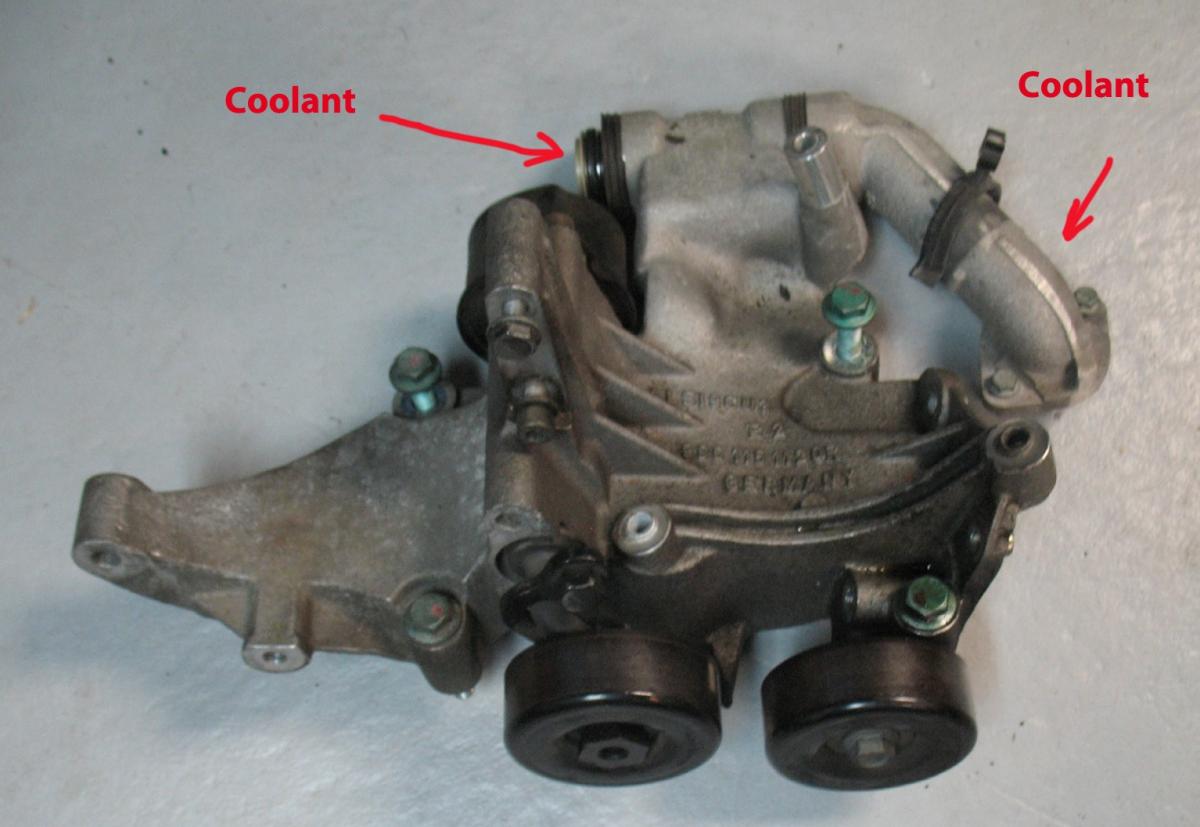
Fedmax was not able to take it out because the bolt is touching the engine carrier. But the engine carrier can be remove with the engine in place see repair manual for water pump removal page 529. And if the bolt is still too long you have to take the generator bracket out of the car and it is a big job but, of course, it can be done. Everything is in the repair manual , start at page 646. Just took mine off about two weeks ago. But my engine is out, and it is in fact a good job. You have to drain the coolant and remove one of the elbow in front etc....
-
Amazing. You are probably dreaming of a dipstick! I am sorry for you but the good part is you are really tenacious! Good luck with the re-flash!
-
Wow, in fact there was a lot of work done already. Anxious to see what Porsche will come up with! Please keep us inform!
No windows, sunroof, interior lights, central locking, etc
in 996 TT, 996 TT S, 996 GT2
Posted
Mike, I got a question about the ignition switch. I think your car is a 2002. Did you used the switch part# 4A0 905 849 B? Thanks!