Welcome to RennTech.org Community, Guest
There are many great features available to you once you register at RennTech.org
You are free to view posts here, but you must log in to reply to existing posts, or to start your own new topic. Like most online communities, there are costs involved to maintain a site like this - so we encourage our members to donate. All donations go to the costs operating and maintaining this site. We prefer that guests take part in our community and we offer a lot in return to those willing to join our corner of the Porsche world. This site is 99 percent member supported (less than 1 percent comes from advertising) - so please consider an annual donation to keep this site running.
Here are some of the features available - once you register at RennTech.org
- View Classified Ads
- DIY Tutorials
- Porsche TSB Listings (limited)
- VIN Decoder
- Special Offers
-
OBD II P-Codes - Paint Codes
- Registry
- Videos System
- View Reviews
- and get rid of this welcome message
It takes just a few minutes to register, and it's FREE
Contributing Members also get these additional benefits:
(you become a Contributing Member by donating money to the operation of this site)
- No ads - advertisements are removed
- Access the Contributors Only Forum
- Contributing Members Only Downloads
- Send attachments with PMs
- All image/file storage limits are substantially increased for all Contributing Members
- Option Codes Lookup
- VIN Option Lookups (limited)


The Hoth
-
Posts
66 -
Joined
-
Last visited
Content Type
Profiles
Events
Forums
External Paint Colors
Downloads
Tutorials
Links Directory
Collections
Store
Posts posted by The Hoth
-
-
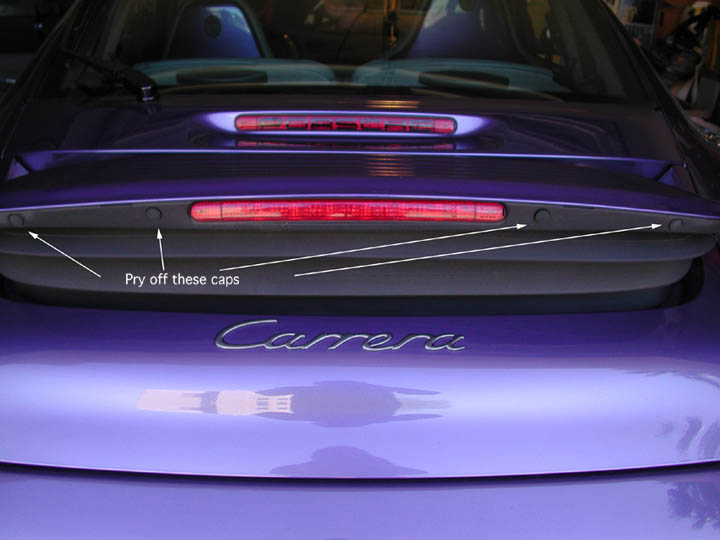
These rubber "accordians" can crack over time. Fortunately the rubber piece is only around $60, and can be replaced easily. You'll need to set aside about an hour and a half if you haven't done this before.
Tools needed:
Flat-bladed screwdriver
4mm allen wrench
Ratchet with short extension and 10mm socket
Parts needed:
The bellows
Two plastic expanding fasteners (might come with the bellows)
First, deploy your spoiler manually, and shut off the ingnition. No need to disconnect the battery.
You will see, along the rear edge, four caps, as seen below. These pry out easily with your fingers or with a flat bladed screwdriver. No paint to worry about, just try not to mar the plastic.

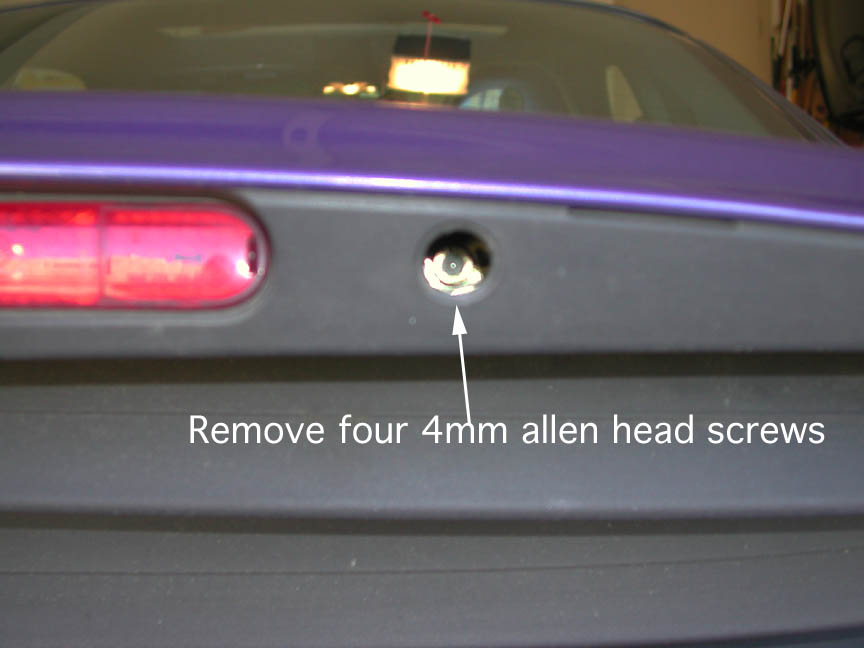
With the caps off you can access the 4mm allen head bolts:
I found these to be a bit tight due to exposure to the elements, but I was able to get them off with an allen key. A long allen socket would work better.
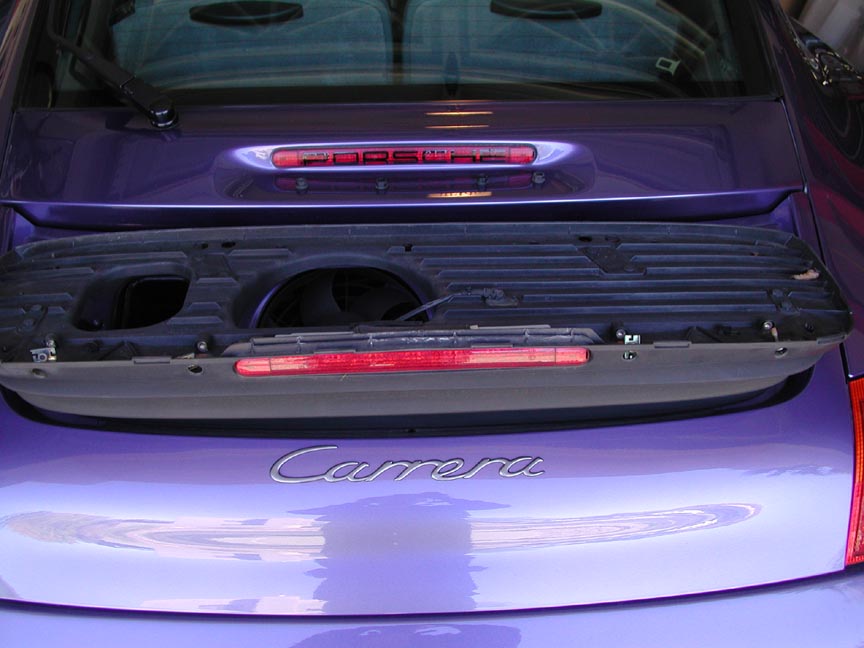
Once the bolts are out, the top tray (painted part) of the spoiler can be slid toward the rear and off. Put it somewhere where it won't be scratched.
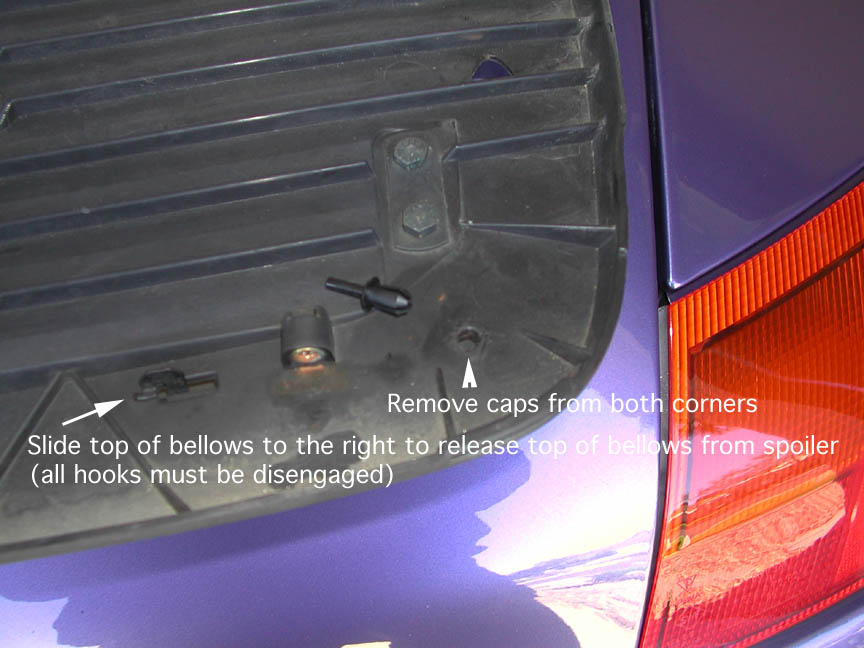
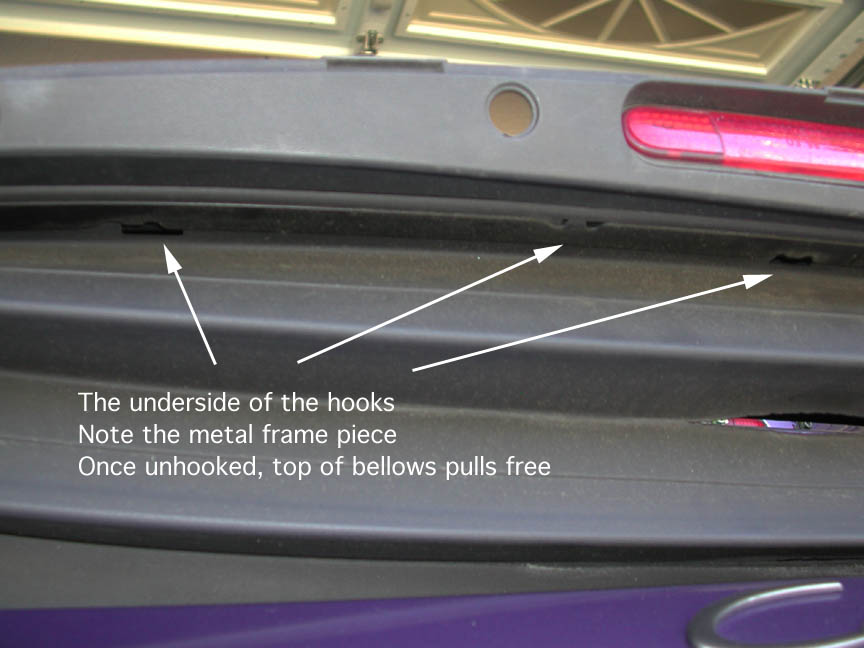
Now you can see the fasteners holding the top of the bellows to the spoiler. There are two explanding plastic fasteners, one on each corner, and several sliding hooks. I destroyed my plastic fasteners since my new bellows came with new ones. Just nipped them off with wire cutters.
With the two plastic fasteners off you can disengage the hooks and detach the top of the bellows by sliding it to the right, and down. The top edge of the bellows is actually sandwiched between a long metal strip and the spoiler. The metal strip has the hooks that go through pre-cut holes in the bellows.
View from below:
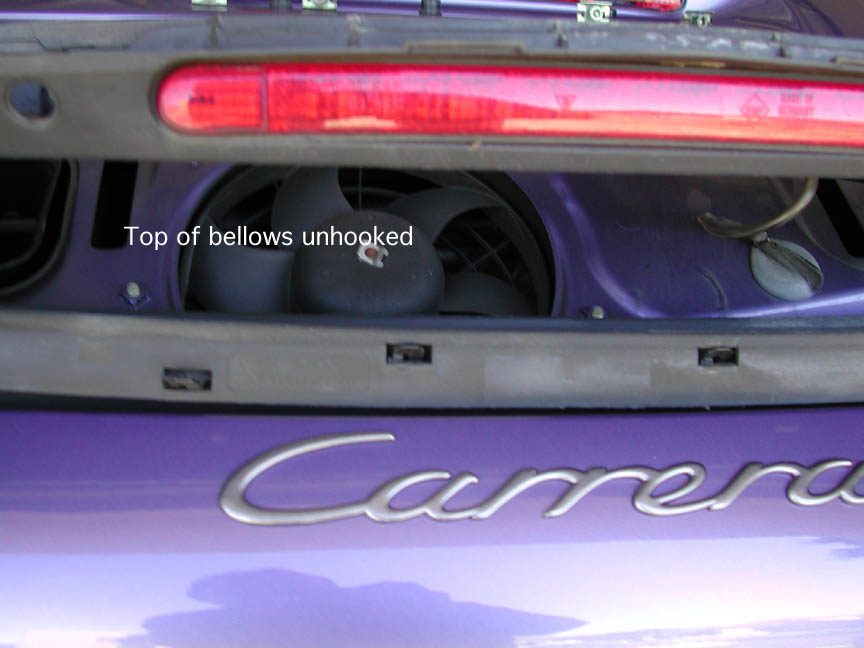
With top of bellows detached:
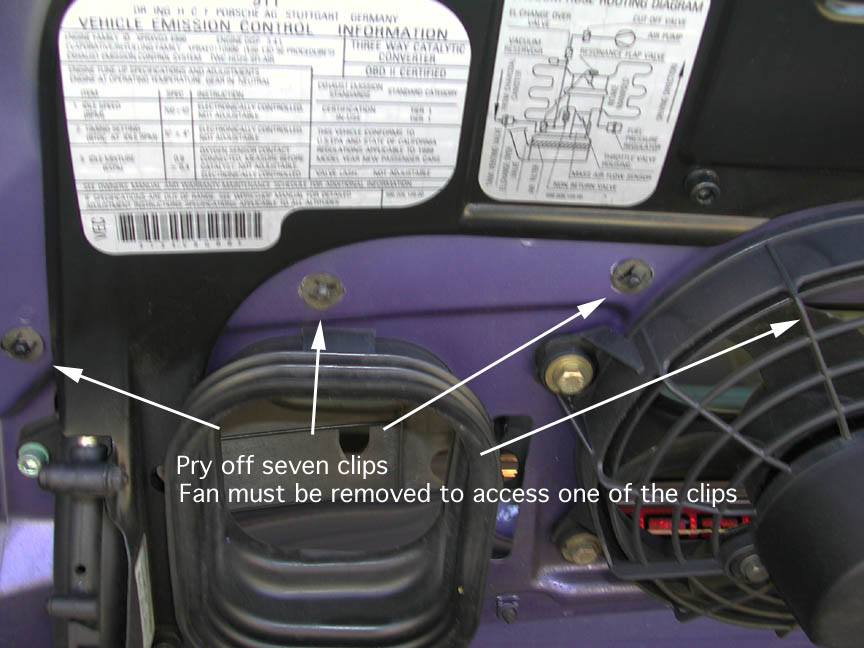
With the top of the bellows detached, open the engine lid. You will see several circular clips holding the bottom of the bellows to the engine lid:
There is one under the fan, so you will have to detach the fan. Just three 10mm bolts. Just let it hang by the cable, out of your way. Be careful not to scratch your paint while removing the clips. In my case, the clips themselves had scratched the paint a bit. Fortunately this is one of the body areas that receives only a "rough" paint job from the factory anyway. Save those clips. It is not necessary to replace them.
With the clips removed, you can pull the bellows out.
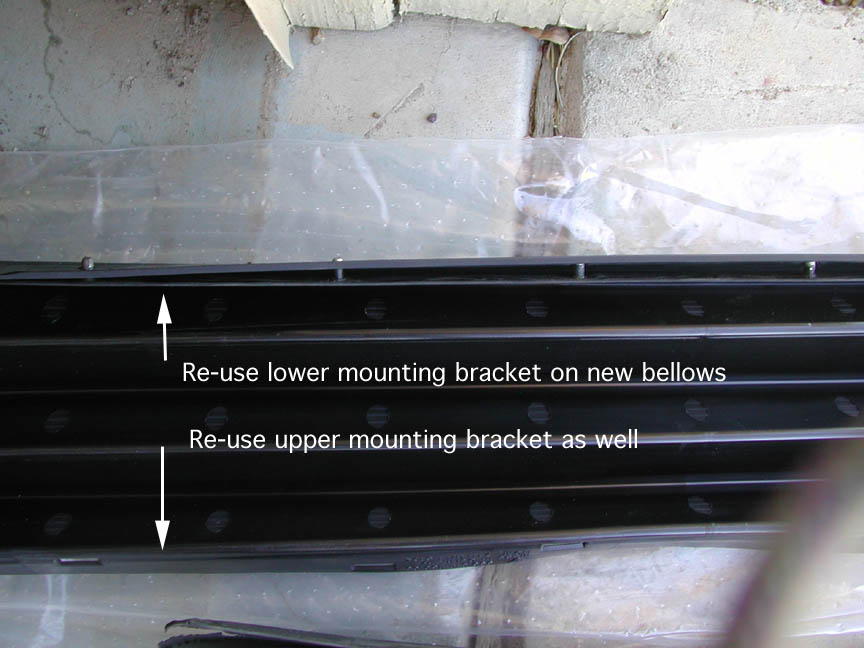
As with the top, there is another frame piece running the length of the bottom of the bellows. This sandwiches the bottom of the bellows to the engine lid. The bellows has pre-cut holes for the nubs on the metal strip:
Lay your old bellows alongside you new one, so that you can see how the top and bottom frame strips fit.
Reassembly:
Transfer your frame pieces to your new bellows.
Then attach bottom of bellows to engine lid with the circular clips. Push those numbs through and get those clips up as tight as possible. The idea is to clamp onto the lower bellows edge.
Re-attach the fan.
Close engine lid
Make sure the top frame piece hooks are threaded through the top of the bellows, push up through the corresponding holes in the spoiler, and slide to the left to secure. Make sure all of the hooks are engaged and snug. Then insert and secure the two plastic expanding fasteners in the corners. This step will confirm that you have the bellows and the spoiler snug and aligned properly.
Now grab your painted spoiler top, and look under it to make sure the locking tabs are lined up. Push down, and slide toward the front of the car to lock the tabs. The top and bottom of the spoiler should mate very well. If you feel gaps around any edges, check and adjust.
Finally, secure the top of the spoiler with the four allen screws. Put the plastic caps on, and manually raise and lower the spoiler to make sure you haven't left any tools in there...
Nice write up.
BTW, is there anything we can put on the rubber bellow to make it last longer?
-
Thanks Loren.
My friend and I finally did it. We didn't use the power bleeder, so it was a two men job. I found some Dot 4 brake fluids at a local Vdub dealership $7.50 per 500ml bottle. Instead of $40 a liter from our local Porsche dealership.
As soon as we started using a syringe to suck out the brake fluid, we realized the fluid actually looked pretty clear. We actually removed the plastic trim around the reservior to have a better view of the fluid level.
We continued the process, figuring out when we actually drained it out of the calipers, the fluid may be darker.
We were not entirely right about that. The fluid we drained out look a little milky (not as clear as the fluid in the reservoir).
I guess when we bought the car a year ago, the dealer properly flush the brake fluid as one of the things they do for pre-owned certification. Cus there is no way a 2003 996 with 20k would have brake fluid looks so new. Unless this particular brake fluid won't darken no matter how long it's been in the car.
The Dot 4 I got from Vdub dealership is yellow. Just like the original brake fluid. I swear, they may be the same stuff.
BTW, the fluid is really potent. I think we spill just a little to near the drain nut. The nut is not sliver instead of black. I have some black touch up paint for my other car. I think I am going to touch it up. It won't be a permanent fix, but it will do for now.
:D
We went through the checklist for the minor service. The only thing we did not do is reading the code (cus we did not have the tool).
My friend has a lift in his garage. Believe, everything was so much easlier with the lift.
I just saved myself a few hundreds dollars and I've learned a great deal of my car.
Thanks for the help from everyone here!
Loren's intructions was very helpful. I printed it out, studied it before we actually worked on the car.
Mission accomplished.
-
If you use the Motul RBF-600 be sure and do a complete flush (including the ABS). Motul RBF-600 is a 100% Synthetic brake fluid and should not be mixed with conventional brake fluids.
I went to see some brake fluid in autozone Dot 3/4 synthetic. It is awefully cheap. I was like, it couldn't be synthetic.
In addition, I saw some discussions, saying all brake fluids are synthetic. There is no such thing as conventional brake fluid. Although there is silcone based and not silcone based though.
Now I am completely confused...... :huh:
-
If you own a laptop..
Thanks, Loren! :)
-
If you use the Motul RBF-600 be sure and do a complete flush (including the ABS). Motul RBF-600 is a 100% Synthetic brake fluid and should not be mixed with conventional brake fluids.
Thanks Loren.
I think I read something about flushing the ABS system, it is kind of complicated(to me). I'd stick to conventional brake fluid then.
I will go check what our local autozone has in stock.....hopefully they have something decent. If not, I may have to to get some ATE super blue or Type 200 then.
-
Does anyone know what tool I need so that I can check this?
Thanks in advance! :)
-
It is certainly your call. I would buy the best you can afford.
But, some facts about the ATE Typ200...
ATE TYP 200 Brake Fluid (DOT 4) has a dry boiling point of 536F and a wet boiling point of 396F.
ATE TYP 200 is compatible and will mix with MOST DOT3, DOT4, or DOT 5.1 Fluids.
ATE TYP 200 Brake Fluid lies 20 °C over the DOT 5.1 standard and surpasses this standard in nearly all the other requirements as well.
As long as if I use other brand and it won't damage anything, that would work for me.
I have a few bottles of Motul racing 600 in my garage with dry boiling porint 593F and wet boiling point of 420F. I think it will work then.
The problem of me is I hate ordering online, pay extra and wait.........
-
The power bleeder sure is a handy way to bleed the brakes but can be don't with two people. I do not recommend bleeding the clutch (which is in the same circuit) without a power bleeder though.
Thanks! BTW, I know everyone recommends ATE brake fluid. Would it do any harm to the brake system, if I just pick up one of those DOT 4 brake fluid(any brand) from an auto parts store?
I hate to pay ten bucks shipping for 25 dollars worth of brake fluid(2 liters) and I have to wait for it.
The dealer is selling a liter of brake fluid for $39.11 plus tax. This is insane!
-
Hi all,
My brake fluid is long overdue for a flushing.
I have seen different type of fluid......blue and gold .......etc.
I don't track my 996 and I hibernate it every year for a good 5 or 6 months. I live in the Northeast the winter is cold here. Any recommedation of what kind of fluid is good for my 996?
I flushed other cars with the two men method. One was pumping the brake pedal and the other was handling the bleeding. It worked fine. I am sure it works on many other cars. Is P-car different than other cars in this aspect that I really need a power bleeder to do this?
I am a little confused with the clutch fluid flushing.......do the brakes and the clutch use the same brake fluid in the same reservoir? I saw the diagram in the DIY section and it looks like that.
:)
-
My 996 C2 had a similar problem, eventually traced to incorrect rear wheel alignment. The inside edges of the tyres had cupped and produced a wheel bearing like sound at around the same speed you mentioned, it decreased when the speed increased or as you said became less noticable. I had Bridgestone S02 at the time, new tyres and an alignment fixed the problem completely.
Thanks for sharing your experience.
I've changed the tire pressure back to 36F and 44R. Now the noise is gone!
False alarm.
I guess I read some internet post for correct tire pressure and I mistook the 17" tire pressure for my 18".
Not too bright on this one. :rolleyes:
Thanks for all your reponses. Looking forward to hangout with you all in the forum. :D
Now I have to work up my courage to fix my wheels as I curbed my wheel a few months ago. It is still an eye sore.
-
I run 32/36 on my Bridgestone S03's. The car handles much better (for my driving style) at those pressures. So far I have not had any unusual wear pattern. But then I really don't expect to get much more than 10,000 miles out of the rears...
What is your tire size? 17" or 18". Factory or aftermarket?
Mine is 18 factory. I am going to increase the pressure to 36f and 44r. Hopefully, it will take care of the howling noise.
I will keep you guys posted.
Thanks for all your inputs.
:)
-
Are you sure factory spec is 32/36? I have 18" Porsche Sport Design wheels and the manual says 36/44. I wouldn't expect your 2003 model to be that different. The 32/36 in my manual is for 17" rims.
It has got to be the tire pressure. The noise started after I dropped the tire pressure.
You are right, the spec is 36/44. I read some posts on the internet saying the factory spec is too high, so I tried using the lower tire pressure. I use this new tire pressure for the past three days.
Hopefully, it did not damage the tires. :o
They are kind of expensive......
-
Check the tires first - that is pretty low miles for a wheel bearing problem.
I have lowered the tire pressure from factory recommended spec to 32 front and 36 back. I wonder would low tire pressure generate noise like that.
By the way, how exactly could I check the tires? I mean, beside checking the tire pressure.
-
Hi all,
First of all, I am a newbie here. I did some searches already. If I miss any post like this. Please kindly post a link in your reply post. By the way, I meant C2. No idea why I typed CS instead.
Ok, here is the story. My 2003 996 C2 has 21k miles on it. It has the sport chasis + the 18 wheels from the factory. Recently, I noticed a howling sound coming from the back of the car. Very noticeable around 20 to 40mph. Any speed faster than that, it kind of got drown out by the road noises.
Does anyone have any experiences similar to this?
If so, please post here.
Thanks! :)
Thomas
What's your mileage?
in 996 Series (Carrera, Carrera 4, Carrera 4S, Targa)
Posted · Edited by The Hoth
21 kmiles. Our 2003 996 C2 runs like new. Dealer replaced the RMS around 10k miles and we just did a minor service on it.
Never track and will take good care of it.