Welcome to RennTech.org Community, Guest
There are many great features available to you once you register at RennTech.org
You are free to view posts here, but you must log in to reply to existing posts, or to start your own new topic. Like most online communities, there are costs involved to maintain a site like this - so we encourage our members to donate. All donations go to the costs operating and maintaining this site. We prefer that guests take part in our community and we offer a lot in return to those willing to join our corner of the Porsche world. This site is 99 percent member supported (less than 1 percent comes from advertising) - so please consider an annual donation to keep this site running.
Here are some of the features available - once you register at RennTech.org
- View Classified Ads
- DIY Tutorials
- Porsche TSB Listings (limited)
- VIN Decoder
- Special Offers
-
OBD II P-Codes - Paint Codes
- Registry
- Videos System
- View Reviews
- and get rid of this welcome message
It takes just a few minutes to register, and it's FREE
Contributing Members also get these additional benefits:
(you become a Contributing Member by donating money to the operation of this site)
- No ads - advertisements are removed
- Access the Contributors Only Forum
- Contributing Members Only Downloads
- Send attachments with PMs
- All image/file storage limits are substantially increased for all Contributing Members
- Option Codes Lookup
- VIN Option Lookups (limited)


amcleod1
-
Posts
69 -
Joined
-
Last visited
Content Type
Profiles
Events
Forums
External Paint Colors
Downloads
Tutorials
Links Directory
Collections
Store
Posts posted by amcleod1
-
-
Try some self adhesive clear teflon or PTFE tape.
-
Congrats from a fellow aussie owner. Had mine now several years. Try the TSB section - you'll need to be a contributing member to view. If you aren't highly recommend you join.
Here's a link to one TSB on tyre and wheel sizes for 996.
-
Hi, I had similar issue. I replaced AOS and no more smoke. I have video of pre and post AOS change if you want to compare to what you're seeing. PM me your email address and I'll send.
-
Hi, Does it connect to the vacuum solenoid, the light grey device also shown in the picture. The vacuum solenoid does not seem to have a connector.
-
As a followup.....removal of the right and left defroster grill apparently is a real challenge. This is the long thin grill at the base of the windshield and to the left & right of the center security node.....and they are held (securely) with clips on their underside.
Anyone with a trick or technique for prying these up.....much appreciated.
Yep - removing the windscreen defroster vents/grills was a challenge but can be done without breakage. They're in there tight. I think the real trick is to know exactly where the lugs and mating clips are on the underside of the vent/grille and then pry them out directly vertical ever so carefully with plastic trim removal tools and lots of protection on your precious leather dash. I was replacing painted with leather trim so was lucky to have the leather replacements handy so I knew where they were.
I got them out by working first from the middle prying straight up. When I got stuck around the speaker area, I then came at it from the A-pillar end. Using the trim tools, some I came at 90 degrees to the edge, others parallel.
Needs plenty of patience.
-
Other related instructions...
-
Hi, I've attached the workshop dashboard dismantle/remove/install instructions (this post), as well as other related instructions (next post).
I recently dismantled the dash (steer wheel, instruments, L&R side vents, centre vent, pass air bag, front defroster vents) to find and eliminate a number of creaks and squeaks. Workshop instructions were pretty good overall. My Centre vent area was a little different to the pictures but not hard to work out the differences.
Make sure you have the radio removal tool, and plenty of plastic trim removal tools. Be very careful when prying open all the plastic lugs that snap into the metal clips - take your time on each especially around the defroster vents. Be careful with the drivers airbag contact unit - break a prong and dig deep into you're wallet.
Suggest you also invest in various widths of felt and foam tape as well as teflon tape, for the trim re-install to avoid creating new creaks and squeaks - I was very generous in applying tape where ever I thought two surfaces would come into contact. Check out some of the TSB's on dashboard noises.
Hope this helps.
-
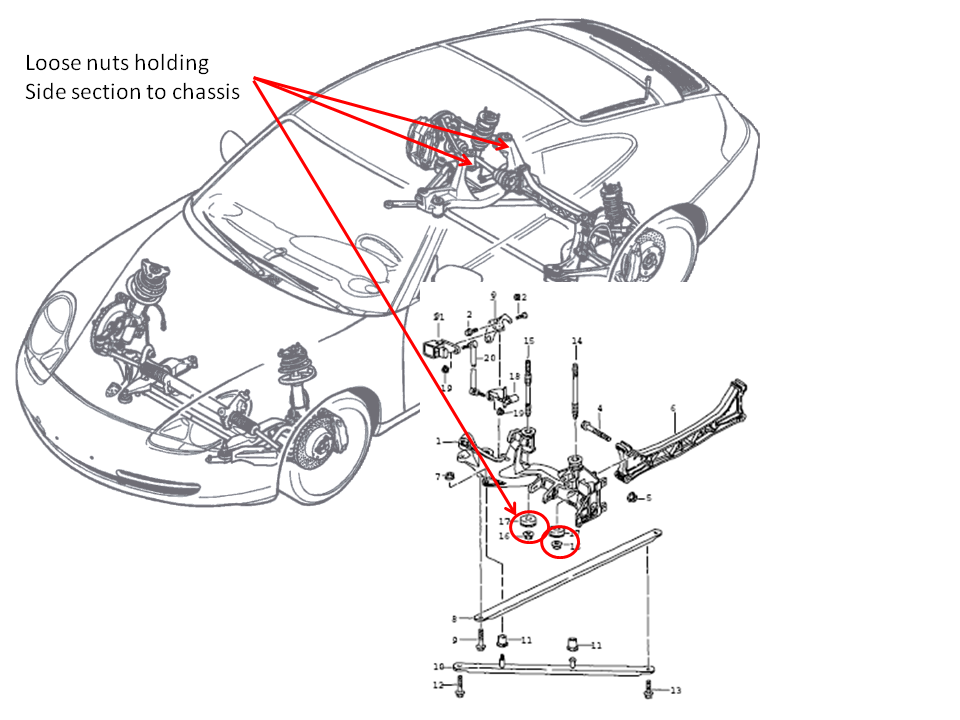
Hi, only bottom nuts. The bolt is actually a long stud into the chassis. The torque for the two nuts is 81 ft-lb. While I was there I check all the torques for the nearby nuts.
-
Rear Axle Torques attached....
-
Hi, I might have had the same problem. If the same it's a simple check and fix. The nuts on the studs holding the rear suspension side member had come off-torque. Re-torqued them correctly no more noise going over speed humps etc. See image.

-
Hi guys, I have the regulator ($40) and front bearing ($30) now. Just need the rear bearing.
Any fellow 996ers in US or Europe able to help me out by checking if the rear bearing (Bosch P/N F 00M 990 405) is available. If so, send me a PM with quote and shipping to (you and then to) Australia, post code 2120, will send you payment via paypal. Thanks in advance for any help.
-
Ok all fixed.
The original oil leak was the #4 Spark Plug Oil Protection Tube leaking.
Dropped the muffler, removed the coil cover plate, coil #4, spark plug #4, pulled the oil protection tube, replaced both inner and outer o-rings (bit of lube) and reinstall. 5 days later not a trace of oil. Presto.
Also On day 5 I replaced the AOS breather tube connection piece (with new o-ring) and new o-ring on the breather tube as well. Very tight under all those hoses, and cable bundles. Hopefully this will fix the small oil sweat around this area too. (suspect it was due to a loose bolt holding the connection piece to the cylinder head).
-
Thanks Richard - its good to know its smart enough not to allow down shift causing over-run. I went back overnight and agree, I found lots of Porsche literature saying its not possible. e.g. From the MY00 owner manual : "Gear changes which would exceed the upper or lower engine-speed limit are not executed by the controller." There is identical statement in the MY03. Now I can stop checking which gear it's in before down shifting and just drive it.
-
I have a 2000 tip, been manually downshifting for over 3 years without problem. Only thing I recall reading is that it is possible to downshift manually and cause an overrev situation - bad. Also read somewhere that under braking in auto mode if you briefly WOT the tip will select the correct gear for the speed. Not tried this.
Going the other way no problem. Launching a tip in manual mode from first to fourth or fifth with wide open will not overrev engine - ecu controls it all for you. Plenty of noise and Gs.
-
FYI...making some progress. I've found out the Bosch alternator P/N 0 124 515 042, written on the back of the unit next to the Porsche P/N 996 603 012 03. Using the Bosch visual identification guide/catalogue I now have the Bosch P/Ns for the regulator and bearings, plus everything else.
Regulator = F 00M 145 350
Front bearing = F 00M 990 410
Rear bearing = F 00M 990 405
I can find the regulator online. But not the bearings. Anyone able to help out ?
-
Ok - its not the freeze plug. But still hard to see exact source of leak as its not much of a leak. I'm now looking at either (1) spark plug #4 tube seal and (2) the AOS breather tube connection to cylinder head 4-6 as there is grimy oil residue there. Spark plug should be relatively easy to get to by removing muffler. The Breather tube is buried tight under a large coolant hose and many other smaller hoses cables. Need to find a clear weekend of no baseball.
-
Thanks. I had cleaned the area thoroughly, and saw no obvious signs of a leak from higher up. I'm hoping its not the freeze plug as it sounds like a fairly sizeable job to refit.
I will clean again and take a closer look again for a higher up leak.
-
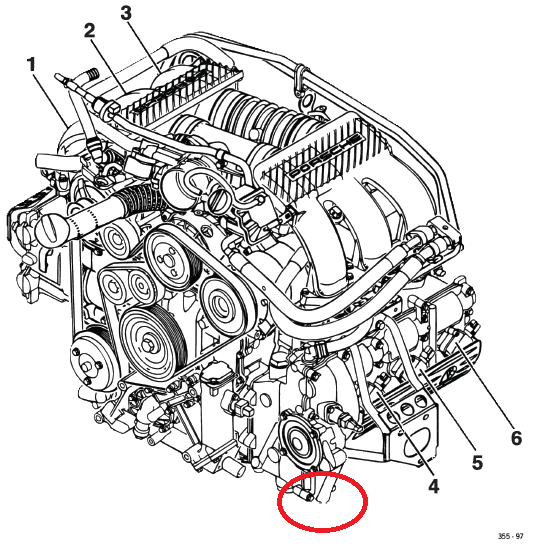
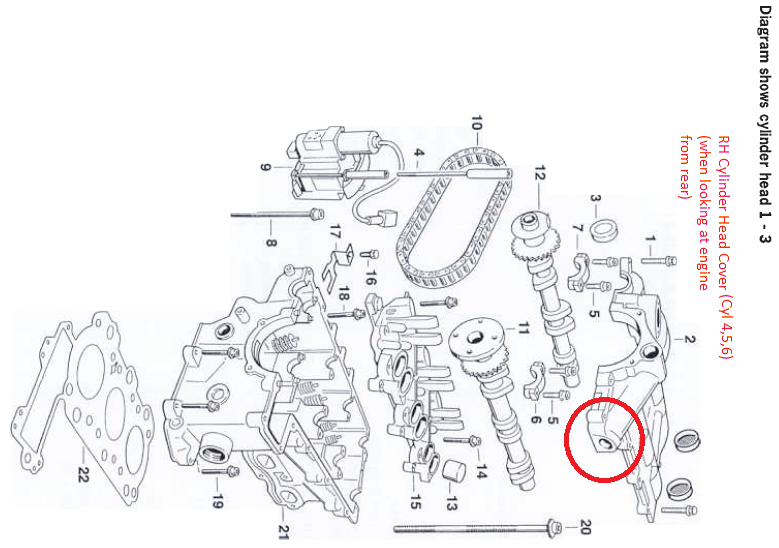
996 C2 MY2000 Tiptronic
I've just noticed a small oil leak coming from the Cyl 4-6 Cylinder Head Cover. No oil dripping to floor as yet. The exact location is shown in the following diagrams (front RH-bottom corner when looking at engine). I'm wondering if its just the cap (Item 48) that I need to remove and replace. I can't seem to find anything about them in the factory repair manual, so any suggestions on part nos. and how to remove and re-install would be greatly appreciated.
-
Hi Jeff, its a 2000 tip, does that help determine if I have a de-clutching front pulley ? I saw lots on the regulator, but nothing popped up on replacing the bearings / slip ring/brushes. Assuming its Bosch, does Bosche sell a repair kit ? Thanks.
-
:help:
Hi,
Does anyone know if you can buy alternator repairs kits for the 996 ?
I think the bearing is starting to go on mine, and I like to give it a new lease of life by replacing the bearings, the regulator and brushes/rings etc.
Thanks
Alex.
-
(edited 17/May/2012 - changed from question to the procedure I followed)
Hi Guys,
In case you're ever in the same situation, below is the procedure I used for re-starting my 996 3.4L TIP following about 3 months elapsed of dashboard work where all of the following items were removed and now re-installed with the battery disconnected for the whole 3mths.
- Radio
- A/C Control
- Passenger Airbag
- Drivers Airbag
- Steering Wheel / Clock Spring
- Combination Switch
- Instrument Pod
I broke the re-start into the following 3 steps which I've detailed below:
- Checks prior to starting engine
- Checks at engine start
- Checks post engine start
You will need a Durametric code reader or similar for this procedure.
1. Checks prior to engine start
Pre-condition - everything back together and battery fully charged and connected.
Key at Accessory Position:
- Radio - enter the security code / test all functions
Key at "ON" Position
- Perform DME adaption per workshop manual (WSM) procedure
- Passenger Airbag - read error codes/clear codes
- Drivers Airbag - read error codes/clear codes
- Steering Wheel - check horn operation
- Combination Switch - test turn signals, wipers
- Instrument Pod - test lamps and dial functions with Durametric
- Re-teach Power Window Stop Positions
- Re-teach Sunroof Stop Positions
- Set clock
- Read out all error codes from all controls units and clear codes
- Check for instrument warning lamps remaining on that shouldn't be
2. Checks at Engine Start
Start Car:
- Remove the fuel pump fuse and crank the engine - to pre-circulate oil (I did 2 x 10 sec bursts with 20seconds in-between)
- Reinstall fuel pump fuse
- Start engine
- Check for instrument warning lamps remaining on that shouldn't be (I had only the spoiler and seat belt lamps remain on which is fine)
- Allow to idle for 5-10mins to warm engine and complete DME adaptation
3. Checks post Engine Start (Driving)
- Check spoiler light goes out once moving.
- Perform tiptronic adaptation per WSM procedure
- Steering Wheel / Clock Spring - check horn, and tip switch operation
- A/C Control - test all functions - cool and hot
- Combination Switch - test OBC and Cruise
- Check for any post driving error codes
Luckily for me there were no problems and I'm now enjoying the driving once again.
Thanks
- Radio
-
Regarding the special nuts you refer to - they are shear-off nuts. The Porsche service manuals says you need a special tool 9259. Refer to Group 69 53 19.
-
Recognising this is an old topic, but today I resolved a very similar problem.
I had a clicking noise coming from between the centre vent cut-out and the passenger airbag cut-out just as described above. However I had the passenger airbag and centre vent out for other reasons so I know these were not contributing to the noise. After a lot of finger pushing around the area and dash shaking it turned out that noise could only be due to the separation of bonding between the two of the layers of the dashboard construction localised to a small section about 60mm x 60mm.
From what I can tell by looking at the airbag cutout, the 1-2mm thick dash leather is bonded to a 0.5mm thick black'ish coloured fairly rigid plastic-like substrate, which is in turn bonded to a 5-10mm thick greyish coloured plastic-like solid form work which then bolts/screws to the metal dash support frame. What I have deduced, is that the bond between the blackish substrate and the greyish form work had given way, and with the vibration induced by driving over bumps would open and close the bond as the glue must remains tacky - hence the ticking noise. If you take a close look at the contours of the leather in this area you can see that its all concave adding stress to the bonding.
To fix it, I drilled 5 holes through the greyish form work using a 1.3mm pin drill twirled between my fingers from inside the centre vent out area into the 60mm x 60mm section where the clicking seems worst. I drilled very carefully, (1) checking the depth often to ensure that I did not drill through the black substrate and the leather and (2) kept a finger on the leather above where I was drilling to ensure I'd feel if I was too close the drilling through. You can easily feel when you're through the greyish form work as I felt the drill bit enter an air gap and could feel the drill tip tapping against the harder black substrate. Once the holes were drilled, I then used a 19 gauge blunt needle to inject epoxy into the gap to fill and re-bond the surfaces. Be quick before the epoxy sets in the syringe.
After a few minutes to set, repeated the same finger pushing around the area and dash shaking and no more clicking noise.
Hope this helps someone else one day.
-
Thanks Richard. Much appreciated.

ABS PSM Fault code 4460
in 996 TT, 996 TT S, 996 GT2
Posted · Edited by amcleod1
My car (996 C2 MY2000 RHD) began showing ABS/PSM fault lights very intermittently after starting with foot on brake but before moving off. Turning off engine and restarting initially seemed to clear the issue for that drive. Some trips gave no fault lights at all. But progressively it got more frequent for the ABS/PSM fault lights to come on during each trip and at a random brake application. Durametric showed me code 4460. This switch is easy to remove, but a real PITA to install in the bayonet lock due to its position up under the dash, and with limited access due to HVAC ducting. I ended up removing the air duct feeding the side vent to give me access, then lying on my side on the seat and reaching unsighted up and under the dash to push and turn the switch 90deg in the mount then connected the wiring.