Welcome to RennTech.org Community, Guest
There are many great features available to you once you register at RennTech.org
You are free to view posts here, but you must log in to reply to existing posts, or to start your own new topic. Like most online communities, there are costs involved to maintain a site like this - so we encourage our members to donate. All donations go to the costs operating and maintaining this site. We prefer that guests take part in our community and we offer a lot in return to those willing to join our corner of the Porsche world. This site is 99 percent member supported (less than 1 percent comes from advertising) - so please consider an annual donation to keep this site running.
Here are some of the features available - once you register at RennTech.org
- View Classified Ads
- DIY Tutorials
- Porsche TSB Listings (limited)
- VIN Decoder
- Special Offers
-
OBD II P-Codes - Paint Codes
- Registry
- Videos System
- View Reviews
- and get rid of this welcome message
It takes just a few minutes to register, and it's FREE
Contributing Members also get these additional benefits:
(you become a Contributing Member by donating money to the operation of this site)
- No ads - advertisements are removed
- Access the Contributors Only Forum
- Contributing Members Only Downloads
- Send attachments with PMs
- All image/file storage limits are substantially increased for all Contributing Members
- Option Codes Lookup
- VIN Option Lookups (limited)


996noob
-
Posts
243 -
Joined
-
Last visited
Content Type
Profiles
Events
Forums
External Paint Colors
Downloads
Tutorials
Links Directory
Collections
Store
Posts posted by 996noob
-
-
What are your fault code(s)?
No fault codes. But I have bad surging and flat spots at WOT, especially at the last 1000 rpms before redline, the engine struggles to increase revs, so sometimes it doesn't even get to shift to the next gear.
Basically, the power gets released for a few hundred rpms, hangs on and struggles for a few hundred rpms, the advances again, then struggles again and get worse at high rpms.
-
What are your fault code(s)?
No fault codes. But I have bad surging and flat spots at WOT, especially at the last 1000 rpms before redline, the engine doesn't want to increase revs, so sometimes it doesn't even get to shift to the next gear.
-
I'm going to replace my O2 Sensors and Air Flow Sensor at one go.
Do I just reset the ECU by disconnecting the battery, and then just drive normally? Anything special I need to do when first starting up or on first drive?
I heard some mentioning doing a "drive cycle". What is that?
-
It seems the pads with and without the weights are interchangeable.
But I have many questions.
So do we know if one design supercedes another?
Which one is the newer design? And why?
What are the function of the weights?
Are they really weights? Or stops?
-
Are Porsche yellow calipers Speed Yellow?
-
err don't know - but I know it matches on my GT3 & Cayenne Turbo calipers !
Speed Yellow or Guards Red?
-
Has your vehicle been modified? Why does it not have a secondary O2 sensor??
Should there be one?
-
I just use a guards red touch up stick from Porsche
never had an issue with it not being high temp paint !
Did Porsche really use Guards Red on the calipers, or is it a close match coincidence?
Likewise, are the yellow calipers actually Speed Yellow?
-
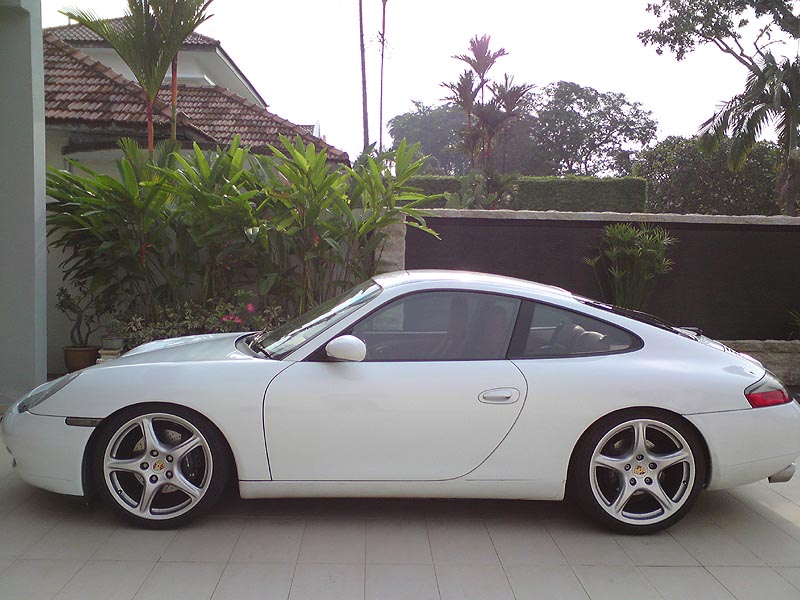
WOW, 113mm front with the PSS9s at the highest level!!! That's 44mm lower than stock or 1 3/4"!!! Are you SURE? That is LOW. I'd never get out of my driveway if mine got lowered that much when I put on the PSS9s. The rear on your car at 28 mm lower or 1 1/8" is right on the 30mm that Bilstein specs (I thought it was 25mm, but I checked again and they spec 30mm.) What are your fender lip to ground measurements, in inches? I'd always make both sides camber even, but you HAVE to do it with weight in the drivers seat. Pics would be GREAT!!
Here is the side view pic of the car after lowering.
I was wondering, if, since the final ride height is so low, as compared to many other 996's with PSS9's, the shock must be working in it's "lower" than normal position, in this specific case, would it be then allowable to raise the height above Bilstein's spec on the shock? Just wondering....

-
I have conflicting info that the Before Cat sensors for my car should be 993 606 128 01 or 996 606 168 01.
My car (1998 996 C2) has only Before Cat sensors, and no After Cat sensor.
Which one is the right one?
OK, I'm replying my own question, it should be 993 606 128 01 !
Thanks anyway!
-
I have conflicting info that the Before Cat sensors for my car should be 993 606 128 01 or 996 606 168 01.
My car (1998 996 C2) has only Before Cat sensors, and no After Cat sensor.
Which one is the right one?
-
Honestly, there was no reason really for choosing the right side over the left side, it just appeared to have a little more room to work with on the driver's side. Either way would have worked.
As far as why I tapped the reverse & illumination inside the car is easy. I did not want to tap the rear lights for that, and run 3 wires through the grommet. I wanted to run one wire through the grommet, the RCA output of the camera. Just a personal decision, but it was hard to get through there with one wire, and I didn't want to do two more. Of course, you would run them all from the one spot on the taillight assembly if you wanted to. There's more than one way to skin a cat, as they say!
I had installed the rear camera several weeks in advance of getting the AVIC-X90BT, and ultimately the AVIC-Z110BT.Here are some shots of the rear camera installation. Basically, you have to contort yourself to fit in the back seat area. I pushed the front passenger seat all the way forward, dropped the back seats down, and then sort of sat on the rear console lid while doing all of the initial interior work on pulling the back trim and getting to the engine compartment grommet.
One note for anyone who is going to pull the interior of covering the interior back wall of the car...make sure you take a picture or memorize where all the little soundproofing batting pieces go, and how they are arranged. They are like a jigsaw puzzle once you take them out, and figuring out how they were arranged is pretty **** tough all things considered. I had to sit there and figure out how one of the pieces was arranged, and it took longer than just about any other step.
At any rate, you'll see in the first couple of pictures, I dropped the back driver's side tail light, and tapped into the reverse light. I put all this in a small loom, to keep it neat (I don't like seeing wires hanging out) and ran it into the engine compartment, and over to the other side (passenger) to find the engine firewall grommet to the interior. I mounted the camera directly in the middle of the license plate area so it wouldn't appear offset in the image on screen. Since I didn't have the aftermarket head unit at this point, i hooked up an LCD monitor in the garage to make sure the signal was passing correctly, since I didn't want to run all these cables only to find out it didn't work! That would have sucked BIG TIME!!
From the next set of pictures, I've already pulled the passenger side rear panels, and I've pulled the BOSE subwoofer. After pulling the BOSE unit, you simply pry up the main carpet foam covering, and then pull out the two smaller pieces from either side of the BOSE mounting bracket. Next, unbolt the aluminum covering to get to the wiring harness, and tap the illumination and reverse signal cables for later connection to the head unit.
You can see from a couple of the pictures, the actual grommet from which I passed through the RCA cable of the reverse camera. This thing is tough to get a hand into, unless you have small arms. I managed to run a snake through there, and then commenced pulling the RCA cable through. I made the mistake of not making the puncture in the grommet big enough, so as a pulled it, it pulled the grommet off, and through! NICE!! :rolleyes:
So, now I had to stuff my friggin' arm in there and shove on this stupid grommet until it popped back in place. Not a big deal, but something I could have avoided if I'd just make the initial puncture a little larger. So, now I pulled the RCA and my illumination and reverse lead together and coiled them up (after testing again!) under the carpet until the head unit came in.
The main reason I took these pictures was to help out anyone who is having problems visualizing how this grommet deal works. It's not a huge deal, and most of the time was spent dealing with unknowns. It took me about 3 hours to do all of this from start to finish. If I was doing it again tomorrow, we'd be talking 2 hours. Definitely a time savings, knowing what you're getting into and where the stuff is at, but it is still a small space and you need to take your time, especially making sure the wiring is clean and in pulling the interior trim.
It is VERY easy to break some tabs on the interior trim if you don't do it right. There are a few articles / post on pulling the back plastic trim, so I'm not going to go into that again, but definitely take your time, and it should go just fine.
-B-
Just a question for you regarding the install. Why do you tap both the rear light wires and the wires in the car? You needed reverse signal and ground, and lights on (illumination). Which would be tapped from the light alone. I think I am missing something. I just want to understand the signals you required. Also, how come you chose to tap wires from the left side rear light and then go through the firewall on the right side, could you have chosen the reight rear light instead?
Just in case I do this DIY in the future, I wanted to know the reasons behind the choices made.
Thanks!
I see, thanks for the clarification!
-
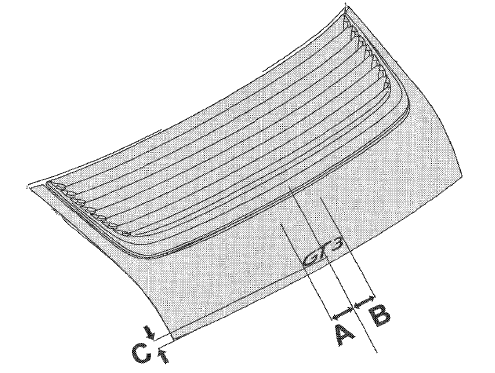
1. Find the middle of the lid.
2. Position the GT3 logo with the dimensions A and B = 78.2 mm- and -C = 28 ± 1 mm on the rear lid and affix.
Thanks!!
-
I moved the thread.
Just go to the 996 main forum and search for "logo" and author "Loren" - that should give you links to all of them.
I tried my best with the search function, but could not find the GT3 badge placement. I managed to find the Carrera one, Cayenne, Targa, etc. but could not find the GT3 placement.
-
I moved the thread.
Just go to the 996 main forum and search for "logo" and author "Loren" - that should give you links to all of them.
Thanks Loren!
-
Which do you want Carrera or GT3?
Carrera is here
Hi Loren,
I'm so sorry, I don't know why I posted in the 997 forum. I meant for it to be in the 996 forum, my mistake.
I would like to have the info for placement of both GT3 and Carrera, 996, if possible. I might go for a "911" badge on my Carrera, and would like to put it where they usually stick the "GT3". If I go back to "Carrera" after my re-paint, then I'll be able to tell the paint shop where to place it correctly.
Thanks!
btw, can threads be moved?
-
Is there a TSB or guide to placement of the GT3/911/Carrera badges on the rear deck lid?
-
At the risk of teaching you to suck eggs did you put in anti squeal shims in when you replaced the pads? I transferred the old ones when I replaced the ones on my 996, but there weren't any on the Boxster so I just used a smear of copperslip. You might want to try either/or/both of these if you haven't already.
PS Just read the original post -- the Porsche pads don't come with the antisqueal shims attached, they are a separate part that just ends up sticking to the pad over time. If you take a wallpaper scraper you can split them apart from the old pads and reuse.
The backing pads/pucks are adhere to the pad by adhesive, you peel off the wax paper and stick it to the pad, just like a sticker. I wasn't able to re-use the the old ones, as trying to pry them out and overcoming the adhesive more or less destroyed them. In anycase, I couldn't think of any adhesive I could use that would withstand the temps of the brakes without rendering it useless. I figured, if it didnt stick on, they wouldn't work, might as well do without them - or buy new ones.
So which is the new design and which is the old design? The ones with the "weights" or without the "weights"? The pad area of the pad without weights looks bigger though. From what I recall from Physics in university, is that friction is not a function of area, only the miu and the normal force, but then againt that is classical Newtonian mechanics, perhaps too ideal for the real world?
-
someone once mentioned Hawk (?) pads are low on dust.
Not mine. I have Hawk HP Plus. Great on the track for stopping, but lots of dust and brake squeal noise on the street.
This thread on brake pads is really quite interesting. Ive always wanted to know what those metal "weights" are on my pads. What made it even more curious is to see you guys have versions of the pad WITHOUT those pieces, especially original Porsche pads without them makes it even more curious. My car came with original Porsche pads, which had the weights and also Textar stamping on the backing plate. When worn, I replaced with Textar OEM which had identical stamping and also the weights, so I assumed that the weights were standard. I have never seen pads for 996 without them.
In anycase, what is the function? I always thought they were guides, rather than weights. With the spring pushing down on the pad within the caliper, it seems to me that the metal pieces on the top are pushed againts the caliper top, rather than the bottom edge of the pad pushing againts the bottom of the caliper.
-
I am sure that I have posted photos on this site showing that Brembo are just rebadged Textars. I can't find them so here you are:
This is also the case with Bosch pads. They are Textar too.
-
C2 MY99
The Brembo pads were quite dusty. I found my wheels covered with black brake dust after driving ~100 miles.
VTX promised less dust but after I installed them they were very noisy at stops. The VTX pad does not have a vibration shim adhered to it like OEM. The VTX pad also stops better after warming up.
Textars are quiet and somewhere in between the other two mentioned on the dust. They are not too dusty like the stock Brembo 996 pads but do shed some light brown powder after ~200 miles.
Both the Textar and the VTX have provisions for wear sensors and are counter balanced (front).
My 2 cents.
D.
What do you mean by couter balanced by the way?
-
The only comments I can find state that the Mk2 sensors have a new shape and changed locking mechanism. SO, they might not attach to your bumper without work.
But if I mounted a Mk2 bumper with the Mk2 sensors, and hook up, it might work if they only changed the shape and locking mechanism.
-
Sorry - reverse sensors?
What are you trying to do?
I would like to use the mk2 park sensors on the mk1 system. For example, if I installed a mk1 rear bumper with the park sensors, would they plug into the mk1 harness, and function properly. Do you think they are compatible?
-
I had installed the rear camera several weeks in advance of getting the AVIC-X90BT, and ultimately the AVIC-Z110BT.
Here are some shots of the rear camera installation. Basically, you have to contort yourself to fit in the back seat area. I pushed the front passenger seat all the way forward, dropped the back seats down, and then sort of sat on the rear console lid while doing all of the initial interior work on pulling the back trim and getting to the engine compartment grommet.
One note for anyone who is going to pull the interior of covering the interior back wall of the car...make sure you take a picture or memorize where all the little soundproofing batting pieces go, and how they are arranged. They are like a jigsaw puzzle once you take them out, and figuring out how they were arranged is pretty **** tough all things considered. I had to sit there and figure out how one of the pieces was arranged, and it took longer than just about any other step.
At any rate, you'll see in the first couple of pictures, I dropped the back driver's side tail light, and tapped into the reverse light. I put all this in a small loom, to keep it neat (I don't like seeing wires hanging out) and ran it into the engine compartment, and over to the other side (passenger) to find the engine firewall grommet to the interior. I mounted the camera directly in the middle of the license plate area so it wouldn't appear offset in the image on screen. Since I didn't have the aftermarket head unit at this point, i hooked up an LCD monitor in the garage to make sure the signal was passing correctly, since I didn't want to run all these cables only to find out it didn't work! That would have sucked BIG TIME!!
From the next set of pictures, I've already pulled the passenger side rear panels, and I've pulled the BOSE subwoofer. After pulling the BOSE unit, you simply pry up the main carpet foam covering, and then pull out the two smaller pieces from either side of the BOSE mounting bracket. Next, unbolt the aluminum covering to get to the wiring harness, and tap the illumination and reverse signal cables for later connection to the head unit.
You can see from a couple of the pictures, the actual grommet from which I passed through the RCA cable of the reverse camera. This thing is tough to get a hand into, unless you have small arms. I managed to run a snake through there, and then commenced pulling the RCA cable through. I made the mistake of not making the puncture in the grommet big enough, so as a pulled it, it pulled the grommet off, and through! NICE!! :rolleyes:
So, now I had to stuff my friggin' arm in there and shove on this stupid grommet until it popped back in place. Not a big deal, but something I could have avoided if I'd just make the initial puncture a little larger. So, now I pulled the RCA and my illumination and reverse lead together and coiled them up (after testing again!) under the carpet until the head unit came in.
The main reason I took these pictures was to help out anyone who is having problems visualizing how this grommet deal works. It's not a huge deal, and most of the time was spent dealing with unknowns. It took me about 3 hours to do all of this from start to finish. If I was doing it again tomorrow, we'd be talking 2 hours. Definitely a time savings, knowing what you're getting into and where the stuff is at, but it is still a small space and you need to take your time, especially making sure the wiring is clean and in pulling the interior trim.
It is VERY easy to break some tabs on the interior trim if you don't do it right. There are a few articles / post on pulling the back plastic trim, so I'm not going to go into that again, but definitely take your time, and it should go just fine.
-B-
Just a question for you regarding the install. Why do you tap both the rear light wires and the wires in the car? You needed reverse signal and ground, and lights on (illumination). Which would be tapped from the light alone. I think I am missing something. I just want to understand the signals you required. Also, how come you chose to tap wires from the left side rear light and then go through the firewall on the right side, could you have chosen the reight rear light instead?
Just in case I do this DIY in the future, I wanted to know the reasons behind the choices made.
Thanks!
Replacing O2 Sensors and Air Flow Sensor
in 996 Series (Carrera, Carrera 4, Carrera 4S, Targa)
Posted · Edited by 996noob
Sorry for the erroneous multiple posts.
No fault codes. But I have bad surging and flat spots at WOT, especially at the last 1000 rpms before redline, the engine struggles to increase revs, so sometimes it doesn't even get to shift to the next gear.
Basically, the power gets released for a few hundred rpms, hangs on and struggles for a few hundred rpms, the advances again, then struggles again and get worse at high rpms.
When I unplug the MAF, the car is like a rocket, but runs so rich I can smell the hydrogen sulphide from the cat.