Welcome to RennTech.org Community, Guest
There are many great features available to you once you register at RennTech.org
You are free to view posts here, but you must log in to reply to existing posts, or to start your own new topic. Like most online communities, there are costs involved to maintain a site like this - so we encourage our members to donate. All donations go to the costs operating and maintaining this site. We prefer that guests take part in our community and we offer a lot in return to those willing to join our corner of the Porsche world. This site is 99 percent member supported (less than 1 percent comes from advertising) - so please consider an annual donation to keep this site running.
Here are some of the features available - once you register at RennTech.org
- View Classified Ads
- DIY Tutorials
- Porsche TSB Listings (limited)
- VIN Decoder
- Special Offers
-
OBD II P-Codes - Paint Codes
- Registry
- Videos System
- View Reviews
- and get rid of this welcome message
It takes just a few minutes to register, and it's FREE
Contributing Members also get these additional benefits:
(you become a Contributing Member by donating money to the operation of this site)
- No ads - advertisements are removed
- Access the Contributors Only Forum
- Contributing Members Only Downloads
- Send attachments with PMs
- All image/file storage limits are substantially increased for all Contributing Members
- Option Codes Lookup
- VIN Option Lookups (limited)


996noob
-
Posts
243 -
Joined
-
Last visited
Content Type
Profiles
Events
Forums
External Paint Colors
Downloads
Tutorials
Links Directory
Collections
Store
Posts posted by 996noob
-
-
No problem, you've got it exactly right now...you understand it now more than 95% of the others!! I'll send you the pdf for the PSS9 and PSS10s, they are the same except the 10s have a much better diagram showing exactly what parts you can/have to re-use. (and the firmness adjustment knobs are different and backwards from each other...follow the PSS9 knob instructions). I'm putting together a pictorial instruction for the PSS9 installations, but it will be a few weeks beofre I really have the time to finish it up.
I've successfully installed the PSS9 on my 996. Setting the coilovers at the highest level within Bilstein's prescribed range, I landed on a ride height of 113mm Front and 135mm Rear, measured from the points prescribed by Porsche according to Loren's digrams, done after alignment. As the heights were close to X74 specs, I chose to run the X74 alignment specs. The only spec I could not get was the front camber. The most vertical I could get was half a degree negative on the left and 1 degree negative on the right. Would I be better off running half degree left and one degree right, or if I evened it out at one degree each side? I figured that in the end I should consider the Total Camber by adding them up, in this case one and a half degress, that's why I chose to keep half left and one right at that time. What do you think?
-
Sorry to report, but no revelations here.
Just got the car back this morning. The groaning noises are gone. My indy (www.cantrellmotorsport.com) simply greased up parts here and there. He tells me everything looks healthy.
While there, I had the engine mounts replaced. The original ones were fine (i.e. no leaks), but figured I'd just do it before they pop since I have about 57K miles on my 2002 now.
This car gets better and better, though sometimes I do wish for that V8 mid-engine F-car. :)
Hey Ben, didn't see that you solved your problem before I posted my solution. I think I was close. Haha. Anyway, I wanted to ask you what wheels you are on, and where I could something like that.
Thanks!
-
Yes, that was a while ago and the noise has come back, but slightly different, but still very similar.
Perry, your efforts and knowledge are invaluable here so thx, again. Anderson, thx for the link as well.
I'm just tired of the noise and just want it silent. I'm dropping off my car at the indy for inspection early next week. I'll be sure to post what I discover and leverage the info here to ameliorate or get rid of the noise all together.
Is it a creaking sound when there is suspension deflection at slow speeds? Well, I think it may be the rack end ball joint or the tie rod end ball joint, creaking. The grease gets dry, and even though there is no play, it creaks. I got this countless times on my BMW's and also my 996. For the tie rod end, I managed to use a screwdriver to pull the balljoint rubber boot slightly to put the straw of a can of Fluid Film in there. A quick squirt and some manipulation solved the sound. As for the rack end, you will have to turn the steering all the way to one side and then remove the rubber gaitors to get at the joint. Anyway, that's what has happened for me a couple of times. The only way to tell is to separate the ball joint of the tie rod to the hub carriers, then you will be able to tell if there is creaking when you move the joints by hand. Mine creaked and you could feel the "vibration" of the creaking. Alot of the time, this "vibration" comes through to the steering wheel when you have large, slow suspension travel. Do you get this sensation?
-
On a MY200 Tip - it will be item 1.

I've been wondering about this very issue for Tiptronic cars. If I tackled the rubber mounting replacement, what part do I buy, do I follow what is used on the Manual transmissions? The part is not listed in the parts diagram but I know the manual transmission guys use 996 375 055 05. Seeing as how the side plates are the same part number for both Manual and Tiptronic, I am guessing the also share the same rubber mounting. What do you think?
-
Why spend $300-$400 on a new MAF if cleaning will work?
Your readings are pretty close so it might just be dirty. Usually a bad MAF will not even change readings when the RPM changes.
Really nothing to lose by trying cleaning - except a few minutes of your time.
Great. I'll do that and report later.
-
Thanks for the replies guys.
The car is at porsche specialist and they have checked oxygen sensors and they are all good.
The tyres should not be the issue as they have been on the car since the start. they are 285/? turbo style 18 inch wheels
Car has fairly new idle valve.
More ideas? It may be transmission related, seems engine is ticking all the boxes.
Try unplugging the MAF and driving.
-
Hi Loren,
Your esteemed reply is sought on this matter. Based on my findings, is it sufficient to conclude 100% that the MAF is the culprit to my uneven power at WOT?
Should I then clean the MAF or don't bother and just buy a new MAF?
Thanks!
-
Yes, you can disconnect the MAF for testing. The car will not rev well past 4500 RPM without the MAF (and likely cause a CEL).
Since you have the Durametric software why not look at he idle MAF reading and the 2500 RPM no load MAF readings - if they are not between 12-24 Air mass ML in kg/h at idle and 40-70 Air mass ML in kg/h at 2500 RPM then you likely have a bad MAF.
At idle, 680 to 720 rpm, the reading was 17.75 kg/h. Holding the engine steady at 2,520rpm, the reading was 49.00 kg/h.
What step should I make next?
------------
Edited with Update - I went down to the car again to try unplugging the MAF. Went for a drive. Had what seemed to be full power restored at WOT!
There are 2 interesting things to note about running without the MAF connected.
1) it did not set off the CEL. But, I think there must be some errors registered if I check it with the Durametric. Will check later.
2) the aircon compressor was not allowed to engage. Re-connecting the MAF allowed the A/C compressor to run properly again. I think this is because running with the MAF disconnected also disconnects the idle control circuit and idle valve, and hence the A/C compressor is not allowed to run, otherwise the car would stall.
Ok, on to conclusions.
Is this a conclusive test that the MAF is on its last legs? Was my 2,520rpm reading of 49.0 kg/h bordering on the low end of the acceptable range and would eventually be off spec at higher rpms?
Do I....
A) try cleaning the MAF with contact cleaner
or
B) don't bother, just buy a new MAF.
Thanks again to the forum, its members, and the search function!
-
Some history on what had transpired before the problem:
A) Had broken vacuum lines for intake flap switchover and was running without them for a few months.
B) Replaced the vacuum lines, made sure they were connected to the right places.
C) Bought a Durametric to see if I had any codes, cleared them, and there remain no codes anymore for the engine management.
Symptoms:
Only during hard aceleration through the rev band, at WOT, the engine has difficulty climbing revs at certain portions of the rev range. There is no bucking or coughing or sudden loss of power that would cause jerking, but instead the revs just seem to struggle at certain revs, then continue, then struggle again, while the car tries to accelerate up to the red line.
There are no codes from the durametric.
Should I try unplugging the MAF and drive? Will I damage the car if I WOT with the MAF unplugged?
If it drives better without the MAF, does it mean conclusively that the MAF is bad?
What else can I try?
-
Hey Guys,
I have a 1999 996 3.4lt C2 Tip Cabriolet. It has been in the Porsche workshop for 3 weeks now entering the 4th week. My mechanic has tried many things without luck, so I come to you for help.
The issue is, when driving along and keeping at a specific speed, the revs will constantly surge up then down. It does not do this under accellaration but only when you sit at a speed and keep the throttle constant to stay at a speed, for example 60 km/h or 100 km/h.
We thought the 80,000 km major service would fix this but it didn't. New spark plugs did not change anything. Spark plug coils were check and no issue found.
It already had new MAF Sensor in Jan but we replaced this again to be sure and the issue remains.
Engine was checked for leaks including vacuum lines etc using smoke machine and no issues found.
Transmission was serviced in Jan, oil changed. He has also checked the oil again and cannot see any issues.
It may be the transmission but he doesn't think is so due to the above and also that this surge can occur in any gear.
We are out of ideas, and I am losing patience, if anyone has any suggestions that would be great.
My gut feel is look at the Oxygen Sensors.
The problem you are facing seems to be at part throttle, where closed loop operation of the ECU is usually happening, and the accurate information from the O2 sensors are required.
I'm new to Porsche's but I'm just basing my guess from common sense and some experience with other european cars that use Bosch engine management.
Let us know how you get along with the car.
Good luck!
-
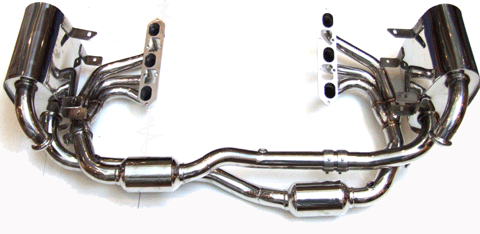
Well Guys,
BIG change of plan, on Thursday I made the order of not just the muffler's but the whole exhaust system.
After all I got them in time :rolleyes: Orient Express your comment scared me :D
Sports Exhaust Package (+18 to 27 bhp) Porsche 996 C2 / C4
Code: EXHAUSTKIT96
Sports Exhaust + Headers + 200 Cell Sports Cats Package (+20 to 27bhp)
DesignTek 996 Stage 1 Performance package. High Grade stainless steel exhaust system for Porsche 996 1998-2004. 14 - 16 gauge T304 stainless steel.
Includes sports mufflers, Equal length headers, 200 cell sports cats and fitting kit, giving +18 to +27 bhp that you can really feel and superb sports car sound.€2,106.30
The sound! on start up it's not as aggressive as my old OE exhaust? it's deep on idle, it's in the mid range it's more noticeable
it's a sharp grunt more high pitch! You cant definitely feel the power increase, also the car feel's more solid on idle,
(Odd to say this but it's like it has a new set of lungs & is breathing more freely) Also it's strange but the whole system is like half the size of the old, it's pretty small??? the cat's are half in size & muffler's a 3rd the size of the OE one's...
hey 996noob I will post a video on YouTube asap, when I make a good quality audio video of them.
So in about 12 hours I go on a ferry over night to continental europe for a 4 week 3695 mile (from Ireland to Poland & back) drive,
we even go to the porsche museum.
So I'll try to keep in touch with you all, on the car's progress B)
Wow, that's a major change!
Do let make the video clips for us. I have been considering this system too.
Are the Mufflers themselves, light weight or heavy, solid and dense? Did all the bits look exactly as pictured, or different? Sometimes internet retailers may use a picture that varies from the actual product.
We look forward to more review on the system. Enjoy!
-
You will need the proper tools, hoists and jack supports.
The engine MUST be supported when removing the transmission.
From the manual:
1. Remove underbody panels (middle and rear).
2. Remove cross member.
3. Support engine with special tool retaining device No. 9624/1 (e.g. engine supporting jack). To do so remove the stabilizer installation and pivot stabilizer forwards.
4. Assemble special tool retaining device No. 9624/1 on the body with the stabilizer fastening screws and adjust pressure screw so that the pressure disc is aligned with the crankcase.
5. Remove drive shaft on transmission side.
6. Separate electrical connection from the reversing light switch.
7. Unclip the hydraulic line for the clutch slave cylinder at the side
transmission case cover.
8. Unscrew clutch slave cylinder suspend on side. Do not remove
hydraulic line.
9. Remove switch cable from the transmission and pull it off the
transmission switch and selector lever.
10. Place transmission jack under the transmission and fasten fixing
strap.
11. Remove transmission container.
12. Remove transmission support.
Note: The transmission can be lower by a maximum of 25 mm to improve
accessibility.
13. Unscrew fastening screws (8) between engine and transmission.
14. Pull transmission to the front and lower.
Hi Loren,
Do you have the procedure for a Tiptronic?
I would like to change my transmission mounting, so the Tip has to come out.
Thanks!
-
Finally bit the bullet and adjusted my front camber. Will see at the autocross tomorrow if it makes a difference!
This is the right-front, which was WAY bad to start (slightly positive). The left wasn't so bad to start, and not quite so drastic an adjustment.
After loosening the nuts, how did you lever the shock to move?
Did you have to raise the car? One wheel off the ground, or both? Or none?
-
okay, i've read your thread Foster. I notice very similiar issues, so I'm fairly confident I need a new mount. But just to recap, I need to know if I can remove and replace without taking the trans out completely. Can I just lower the front end using a jack and do the work from there? Also, do you need a speciality tool/press for getting the new mount in? I don't want to have to go my indy, i always try to do repairs myself and have been very sucessful swapping components and whatnot, but the tranny is one i haven't touched yet. Yes, i'm a tranny virgin:) I appreciate your tips and advice dr914jr and Foster.
Unfortunately you'll really need to remove the transmission to replace the mount. The good news is that the transmission is quite easy to remove in a 996. And you'll really need to be careful to press the mount out so you don't crack the case. Another option would be to replace the entire tale cover that includes the integrated mount. Unfortunately that particular part just over $800.
I have been considering machining a special puller/press out of steel to do the extraction and pressing in of the mount, with the trans still on the car. Do you really think it is pointless to pursue this route? I'm figuring if there is enough space around the mount for the special tool it might be possible. But, of course I value you opinions on this.
If I remove the Transmission, mine is a Tiptronic, what is the procedure of removing a Tip instead of a Manual? Is it substantially more difficult? What do I have to look out particularly for?
If I remove the transmission, should I change the RMS? Is it more difficult to access the RMS with a Tiptronic? Most of the RMS tutorials I've seen are for Manual transmissioned cars.
Thanks to everyone for any advice!
-
Could it be a failing transmission mount? :huh:
How does one change the transmission mount? Does the transmission need to be pulled to press the new mount in, or can it be done on the car with special tools?
-
Thanks Loren,
(sorry forgot this info)
My car is a 2001 C4 cab, 3.4 liter.
I'm more now thinking a new muffler is the way to go & not a 2nd-hand one with unknown potential problems?
I just have to now get it next day delivery form the UK to Ireland in time, I leave in 6 days on vacation.
How long does it take to install the a new muffler system on the 996?
Many thanks.
Hey James,
If you decide to change the mufflers, do let us know how it sounds. I too have been looking at the offerings from Design911, been considering both those mufflers (DesingTek and Dansk OE Sport) but haven't decided which one either. But for me, there's no real need yet, maybe in a couple of months. I haven't been able to find any reviews on DesignTek products though.
-
Is the NGK BKR6EQUP a good one for my 996 03 3.6L?
Thanks
That's sounds like a BMW specific plug. But then again, perhaps they share the same plugs?
Just wondering, is there a list of plug references that are OE/factory installed on our 3.4 and 3.6 engines that can be found on this forum?
-
Can't help answer your question but I am due for some new cats. Which ones did you get? The old style two piece units or the single with the crossover?
I was wondering too, if the Fabspeed X pipe for 996 was worth looking into. I have not come across any reviews yet either.
-
Disconnect the negative cable from the battery for a few seconds and reconnect. Code is gone. Make sure you have your radio code.
Does this work for all fault codes?
-
After reading this thread and seeing the mention of a relationship bewteen the changeover valve and variocam, it should be made clear that there is no relationshup to the variocam, directly ot indirectly. The resonance control adjusts intake length, whereas the variocam adjusts valve lift. Resonance flap is controled by both vacuum and electronics and is normally open,
The butterfly valve (tuning flap) in the back crossover tube is controlled by the electric changeover valve (sits right above alternater) which recieves it's vacuum supply from a reserve canister on top of the engine. There is ALWAYS vacuum to the changeover valve.
The tuning flap is normally open and operates as follows:
Open from 700 to 3120 rpm and from 5120 rpm .
Closed from 3120 to 5120 rpm , if the throttle is also more than 30 % open at the same time.
I'm resurrecting this thread because I have not completely solved my problem with the vacuum lines.
Would someone help me out with the logic and see if I am interpretting this correctly?
The resonance Flap is normally open, which means that in rest state it is Open, which means that if there is no vacuum applied to the Flap, it is Open. Can I conclude that the Changeover Valve is closed?
Idle is between 700 to 3120rpm, during which Flap should be Open, which means that at Idle, Changeover Valve is closed. Can I conclude that there should be no vacuum if I pull off the side vacuum hose on the Changeover Valve?
I'm asking because ever since I broke those hoses, I've been having very uneven power delivery during WOT through the rev band.
And now that I have fixed the hoses (and connected them to the correct places), I still have the uneven WOT power.
Do I need to reset something?
Would buying a Durametric help me solve the problem I am experiencing?
Can I test if my changeover valve is working?
No. Open is OPEN. That means the flap is open when vacuum is not applied. Or, to put it another way, the flap is closed when vacuum is applied. Removing the side vacuum line that goes to the flap should not find any vacuum when at idle or when engine is off.
That's what I meant -
No Vacuum, Flap Open.
Vacuum, Flap Closed.
I wanted to further conlude if -
No Vacuum, Flap Open, Changeover Valve Closed.
Vacuum, Flap Closed, Changeover Valve Open.
so that I can diagnose the proper operation of my changeover valve.
Does a faulty changeover valve throw up any error codes?
Changeover valve is normally closed meaning that without electric signal to it, no vacuum will get to the side nipple. An electrical problem with valve with throw a code. A vacuum leak will not unless it is large enough to make you run lean and then you will get an O2 sensor code.
Thanks for the information and the clarifcation. I'm getting to know my car better everyday thanks to you guys.
Last question, I did try to suck on the Flap hose, and it did make a sound like it was flapping, but I have no idea if it flaps partially or fully. The amount of air needed to make the sound wasn't much. I keep feeling as though it should take more volume for a full swing, but I have no mental picture of how it works, so I can't judge properly.
Is the Flap ever known to fail, become stuck, move partially, or is it a part that in general never goes bad?
If there is really no way to tell unless i disassemble the intake, then I guess I will have to take it apart to check.
-
After reading this thread and seeing the mention of a relationship bewteen the changeover valve and variocam, it should be made clear that there is no relationshup to the variocam, directly ot indirectly. The resonance control adjusts intake length, whereas the variocam adjusts valve lift. Resonance flap is controled by both vacuum and electronics and is normally open,
The butterfly valve (tuning flap) in the back crossover tube is controlled by the electric changeover valve (sits right above alternater) which recieves it's vacuum supply from a reserve canister on top of the engine. There is ALWAYS vacuum to the changeover valve.
The tuning flap is normally open and operates as follows:
Open from 700 to 3120 rpm and from 5120 rpm .
Closed from 3120 to 5120 rpm , if the throttle is also more than 30 % open at the same time.
I'm resurrecting this thread because I have not completely solved my problem with the vacuum lines.
Would someone help me out with the logic and see if I am interpretting this correctly?
The resonance Flap is normally open, which means that in rest state it is Open, which means that if there is no vacuum applied to the Flap, it is Open. Can I conclude that the Changeover Valve is closed?
Idle is between 700 to 3120rpm, during which Flap should be Open, which means that at Idle, Changeover Valve is closed. Can I conclude that there should be no vacuum if I pull off the side vacuum hose on the Changeover Valve?
I'm asking because ever since I broke those hoses, I've been having very uneven power delivery during WOT through the rev band.
And now that I have fixed the hoses (and connected them to the correct places), I still have the uneven WOT power.
Do I need to reset something?
Would buying a Durametric help me solve the problem I am experiencing?
Can I test if my changeover valve is working?
No. Open is OPEN. That means the flap is open when vacuum is not applied. Or, to put it another way, the flap is closed when vacuum is applied. Removing the side vacuum line that goes to the flap should not find any vacuum when at idle or when engine is off.
That's what I meant -
No Vacuum, Flap Open.
Vacuum, Flap Closed.
I wanted to further conlude if -
No Vacuum, Flap Open, Changeover Valve Closed.
Vacuum, Flap Closed, Changeover Valve Open.
so that I can diagnose the proper operation of my changeover valve.
Does a faulty changeover valve throw up any error codes?
-
After reading this thread and seeing the mention of a relationship bewteen the changeover valve and variocam, it should be made clear that there is no relationshup to the variocam, directly ot indirectly. The resonance control adjusts intake length, whereas the variocam adjusts valve lift. Resonance flap is controled by both vacuum and electronics and is normally open,
The butterfly valve (tuning flap) in the back crossover tube is controlled by the electric changeover valve (sits right above alternater) which recieves it's vacuum supply from a reserve canister on top of the engine. There is ALWAYS vacuum to the changeover valve.
The tuning flap is normally open and operates as follows:
Open from 700 to 3120 rpm and from 5120 rpm .
Closed from 3120 to 5120 rpm , if the throttle is also more than 30 % open at the same time.
I'm resurrecting this thread because I have not completely solved my problem with the vacuum lines.
Would someone help me out with the logic and see if I am interpretting this correctly?
The resonance Flap is normally open, which means that in rest state it is Open, which means that if there is no vacuum applied to the Flap, it is Open. Can I conclude that the Changeover Valve is closed?
Idle is between 700 to 3120rpm, during which Flap should be Open, which means that at Idle, Changeover Valve is closed. Can I conclude that there should be no vacuum if I pull off the side vacuum hose on the Changeover Valve?
I'm asking because ever since I broke those hoses, I've been having very uneven power delivery during WOT through the rev band.
And now that I have fixed the hoses (and connected them to the correct places), I still have the uneven WOT power.
Do I need to reset something?
Would buying a Durametric help me solve the problem I am experiencing?
Can I test if my changeover valve is working?
-
Yes, that will put less stress on the other mount.
Just a little off topic, but still on engine mounts, I have a few questions I hope you could shed light on.
I've read alot of old threads about busted mounts from jacking the car from the engine.
It seems to me that from the design of the engine carrier and the mounts themselves, in normal circumstances the engine pulls down on the hydraulic filled mounts, and when jacked up, would put them under compression instead.
How would one be able to bust the mount under compression? The casing on the top side looks extremely robust and should constrain the compression easily. It seems more likely an issue if the top mounting bolts of the mounting can take the weight of the car, pulling the engine mounting up from the engine bay area.
-
Send me your email address. I will send you a pdf of the PSS9 instructions if you don't have them. They are pretty clear as to where you can adjust the spring perches for the strut springs. If you have the diagram that shows the parts breakdown for the front and rear struts, it shows where on the strut you measure (top of each spring perch to either center of bracket (F) or mounting hole ®). You must keep the perches in the specified range..it has NOTHING to do with the height of the car on the above charts. You car will end up where it ends up...that was the point of my post. SO you can adjust them to either the top, middle or bottom of the Bilstein designed range..I recommend the middle, and then install them. Or you can lower the perches all the way down to make installation easier, then adjust them back up to where they belong. You CANNOT "adjust your car 25mm lower" than it was, unless you car was(is) at the normal stock heights, ie 158mm front and 163mm rear for a C2 with 18" wheels. Then, because Bilstein has designed the struts to drop your car about 25mm, you will end up there. My car, with stock setup, is lower both F&R on stock struts, so my PSS9s, do not lower it 25mm. In GENERAL, the car will (can) be from 15 mm lower (if your car was at the bottom of the accepatable range from Porsche on OE springs, or around 26" from fender lip to ground) to as much as 45mm lower (if you were at the top of the acceptable range, or a fender lip around 27"), but you CAN"T adjust them to anywhere within that range, you can only very minorly (is that a word?) adjust them about 5mm within the range that they end up in. The fronts have +- 10mm of adjustment and the rears have +- 2.5mm, most of it primarily for corner balancing. Now you CAN use the illustrated measuring poins to rough in the corner balance of the struts, get both L&R sides even, and then get the fronts and rears proportional to each other, using the X73 or X74 numbers as a basis. Does this clarify it for you?
Crystal clear. Basically, I'll set the PSS9's in the middle range as a start point, install on car, see where I land in terms of ride height, then adjust the heights to, say, X74 specs, should I choose that as a reference, keeping in mind that I should not deviate out of the range that Bilstein has set on the strut perch adjustment range.
In essence, I should only be adjusting within Bilstein's range. I'll only use Porsche specs as a guide to alignment.
I've sent you a PM with my email address. I'll compare your instructions to mine. I think my instructions are incomplete, or some early version.


Mk2 Reverse Sensors on Mk1 ECU
in 996 Series (Carrera, Carrera 4, Carrera 4S, Targa)
Posted
Can Mk2 reverse sensors be hooked up to Mk1 Reverse ECU and work? I checked the ECU numbers and they weren't the same, but I was wondering if they will work. I like the smaller mk2 style sensors because they are smaller and was thinking of using them together with a mk2 bumper, but retaining the factory reverse system.
Any advice?
Thanks.