Welcome to RennTech.org Community, Guest
There are many great features available to you once you register at RennTech.org
You are free to view posts here, but you must log in to reply to existing posts, or to start your own new topic. Like most online communities, there are costs involved to maintain a site like this - so we encourage our members to donate. All donations go to the costs operating and maintaining this site. We prefer that guests take part in our community and we offer a lot in return to those willing to join our corner of the Porsche world. This site is 99 percent member supported (less than 1 percent comes from advertising) - so please consider an annual donation to keep this site running.
Here are some of the features available - once you register at RennTech.org
- View Classified Ads
- DIY Tutorials
- Porsche TSB Listings (limited)
- VIN Decoder
- Special Offers
-
OBD II P-Codes - Paint Codes
- Registry
- Videos System
- View Reviews
- and get rid of this welcome message
It takes just a few minutes to register, and it's FREE
Contributing Members also get these additional benefits:
(you become a Contributing Member by donating money to the operation of this site)
- No ads - advertisements are removed
- Access the Contributors Only Forum
- Contributing Members Only Downloads
- Send attachments with PMs
- All image/file storage limits are substantially increased for all Contributing Members
- Option Codes Lookup
- VIN Option Lookups (limited)


01986320S
-
Posts
16 -
Joined
-
Last visited
Content Type
Profiles
Events
Forums
External Paint Colors
Downloads
Tutorials
Links Directory
Collections
Store
Posts posted by 01986320S
-
-
Hello, I'm selling a like new OEM 01 top and OEM 01 frame on E-bay right now as a unit, just bolt it in with three bolts on each side. Also has the window protection cover sheet. Back window and head liner are MINT condition, car was mostly in storage. I also have other parts to llist from this car.I need a new top, my plastic window broke in the cold. I want to upgrade to a glass window, and have read a few people like the GAHH top for our models. GAHH has their top listed for $900.00 but I have seen them on ebay new for $600.00, and I was wondering if anyone has bought a top from ebay, and if so what their experience was. Thanks99 Boxster non S
Have you considered installing a used glass windowed top and frame from an '03 or '04 Boxster? It's much easier than stripping off the old top and installing the new canvas top from GAHH and there are a couple of other advantages over the GAHH or Robbins top as well.
I've done both (stripping and replacing canvas and installing a complete top and frame) and there is no comparison.
That said, the advantage of not having to get out to do "the chop" or to worry about the plastic cracking is very satisfying, whichever glass version you go with.
Here is a DIY that's got lots of information on the advantages/disadvantages of the various options available: http://sites.google.com/site/mikefocke2/in...ndframeona%2797
Good luck!
Regards, Maurice.
-
Can I replace the plastic window with glass and have no trouble putting the top down.
If your year 986 Boxster came with a plastic window and has a three bow frame, you cannot substitute glass for the original vinyl. The cutout for the vinyl window is too large for the rear section of the top to fold safely and for the glass to clear the roll bars at their rear surface, and the glass would crack.
The optimum solution is replacing the entire frame and canvas with a used OEM '03 or '04 top.
http://sites.google.com/site/mikefocke2/in...ndframeona%2797
Regards, Maurice.
thank you very much. It was very helpfull and quick.
Hello, I'm selling a like new black 2001 986 top and frame on e-bay now.. bidding starts at 550.00 or make an offer... includes the window protector sheet. Also have 2001 top motor and top trans that I will be listing if you or any one else is interested.
-
Anyone ever tried the OBX strut braces on ebay? $69.99 for rear and $89.99 for front seems like a fair price. Let me know what you guys think?
Seams like a quality product, I can send a photo if you want to see one installed. I used to have a slight shudder on rail road track crossings etc, it cleared that up, and the car seems tighter in drift type cornering. hope this helps.
-
Sebastian,
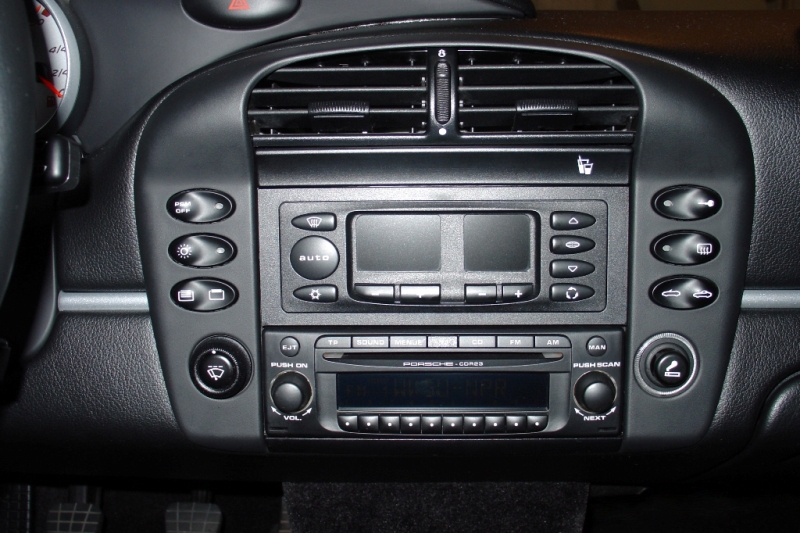
The Becker web site has the connection instructions and wire digram, also the same information is in the Porsche radio instruction BOOK in English on page 28... Becker also sells the plugs and even the individual wire connectors for Gale settings (etc) is you want your system to be car speed - volume sensitive, a nice feature with the top down (socket A on radio Pin #1) Harry
.
Hey Guys,My last posts/thread may have been a bit confusing as to info I would like to find, so here goes:
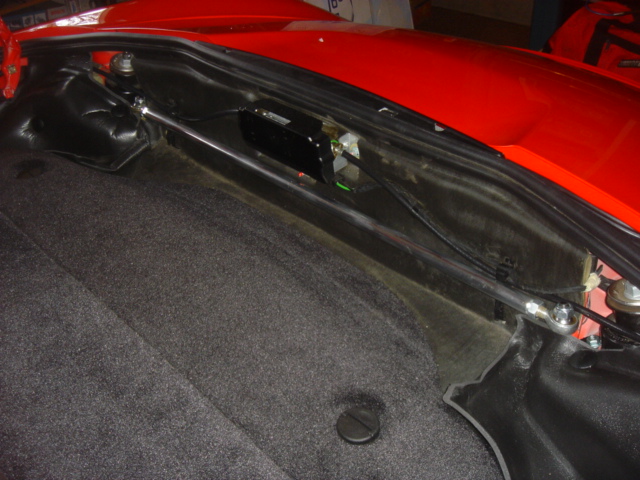
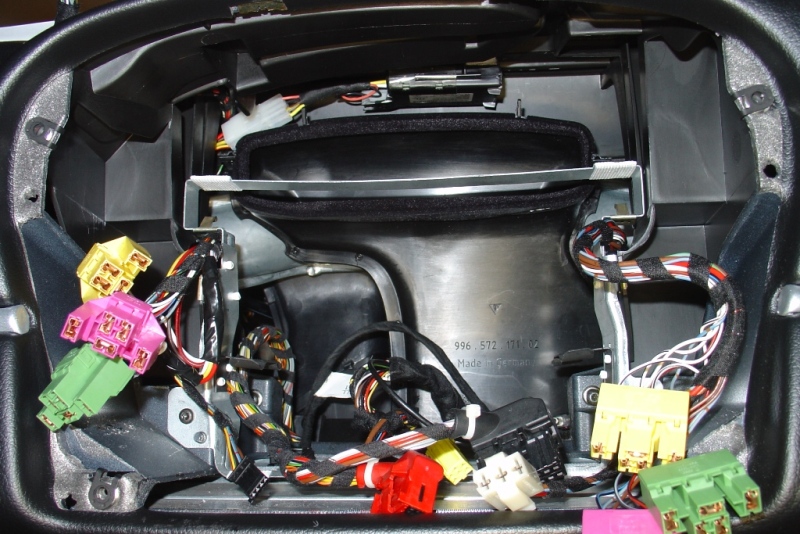
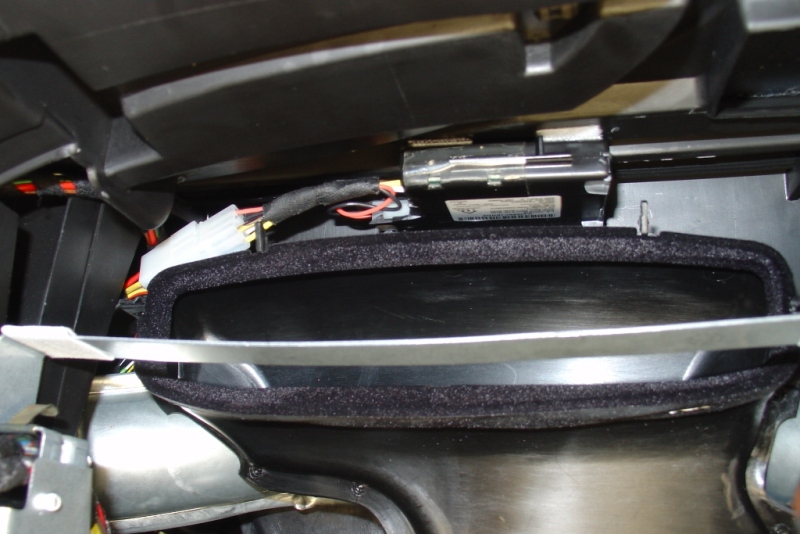
1) Does anyone know of a source or part number for the brown connector at the back of the CDR-220 radio for the rear speaker kit, OR a source for the whole harness? The Porsche dealer cannot locate any of these in their system.
2) While I am at it, anyone know of a source or the part number for the white clip that holds the harness to the roolbar in the back?
3) Last choice, does anyone know where to find the schematics so I can hardwire, if I cannot locate the harness/connector, the speaker wires to the back of the CDR-220?
Thanks in advance for any info!
Sebastian
-
Hello, I did 996 into 986 cluster swap after reading the article Bill Posted on this site. Since I have completed my project more information has been added. Everything you need to know and do is in the article Bill posted. If you have any specific questions I may be ble to help some but my car is a 2001 and there are some differences with model specs and features (We did get everything to work even the factory on board computer and factory cruse control) Hats off to Bill and Loren....
Sorry, first part number must be wrong as it does not come up on any of my lists.The second one (996.641.103.01.70c) was replaced by 996.641.103.02.70c and then 996.641.103.03.70c -- so it will work but it is likely from 1998.
-
1. I do not know - you will need to test it.
2. The Violet wire coming from the instrument cluster B4 (Blue plug) is the fuel sensor.
3. Use the reverse connection under the drivers seat. See the TSB on the Traffic Pro install for details.
4. Gray Pink wire (several to choose from). Try to pick one that is not already in use.
Thank you very much, especially the connection under drivers seat info, also I uninstalled the DPS a few years ago, so that connection is right behind the unit and empty now. You really saved me some time! Make it a great day!
-
Can you tell us what you are trying to connect? Shift computer? Lap timer?
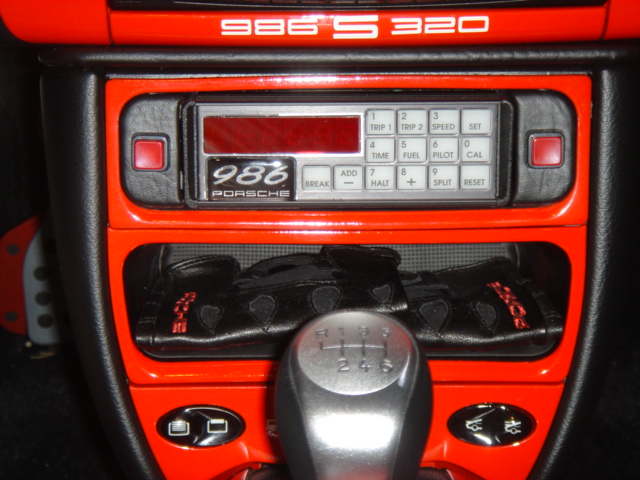
Hello Loren, Thanks for the reply and that is a good question. I was looking for a way to have the chrono option in a 986 (see photo) I found a Coralba C-rally computer that had two clocks that worked at the same time (each can be set to count up or down). Any way I also got some features that I really did not need, but rather than have three wire leads wrapped up behind the unit I thought I would see if I could hook them up also. The anolog fuel wire, the speed sensor wire (for speed and distance) and the back up light wire (which will make the trip meters run backwards when the car is in reverse) Like I said I really don't need these features. If some one is interested I have photos and could write an article, or at least if I get it hooked up I can let the passenge play with it while I drive. The two red switches (left/power & right/ resets any computer function that is presently displayed. Thanks for any help...
-
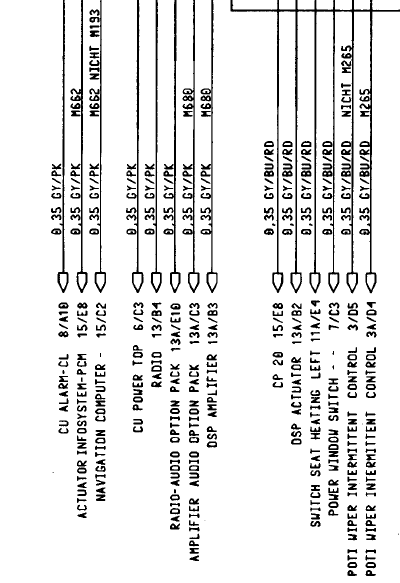
I hope someone can help me out with four questions that I have about 2001 986 S wiring.
1. Can someone confirm that the fuel gauge sending unit is sending an ANALOG not Digital signal?
(I don't have access to an oscilloscope)
2. Where would be the best place to tap onto the fuel gauge sending unit wire? (My first guess is behind
the gauge cluster but have not traced out which pin or wire color yet) anyone have a better location?
3. I would like to tap onto the reverse light wire (backup lights) with out going back to the transmission
reverse switch if possible to get an energized siganal when the back up lights come on. Anyone know
of a better location under the dash? (wire location and wire color?)
4. I need to tap onto the Speed sensor line. I know some people have used Pin 18 on the cabrio relay to
send speed sensor info to Becker Radios that are not getting sensor signals to activate GAL settings
Any better locations for doing this? Would behind the gauge cluster be a better place? pin and color?
Thanks in advance for any help,
-
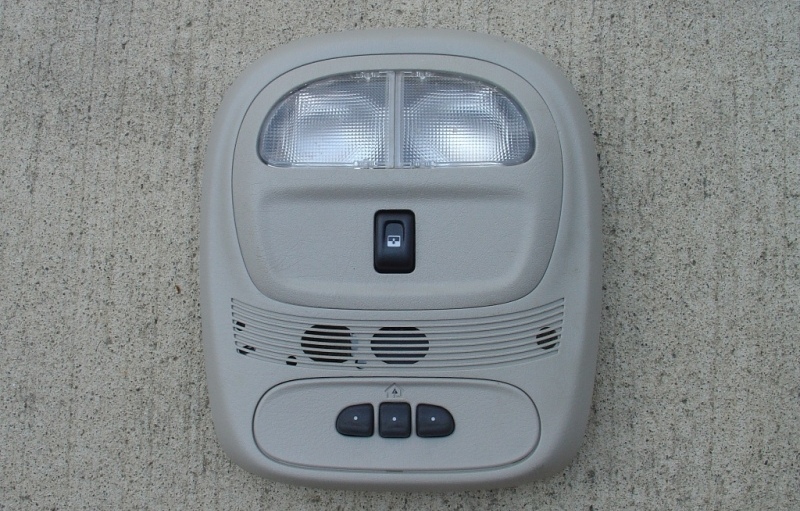
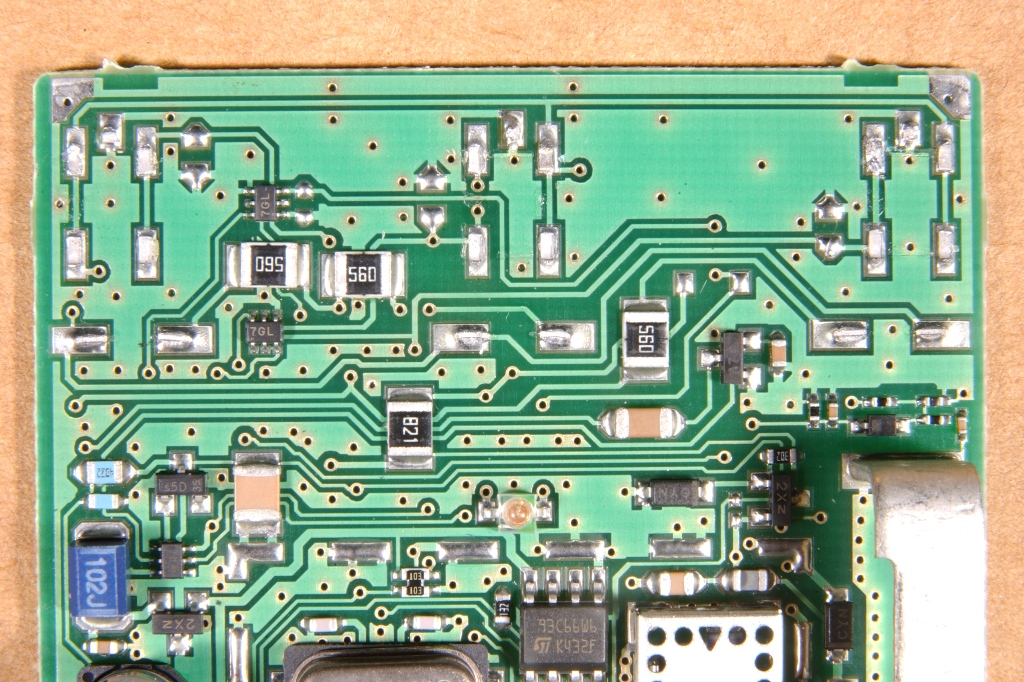
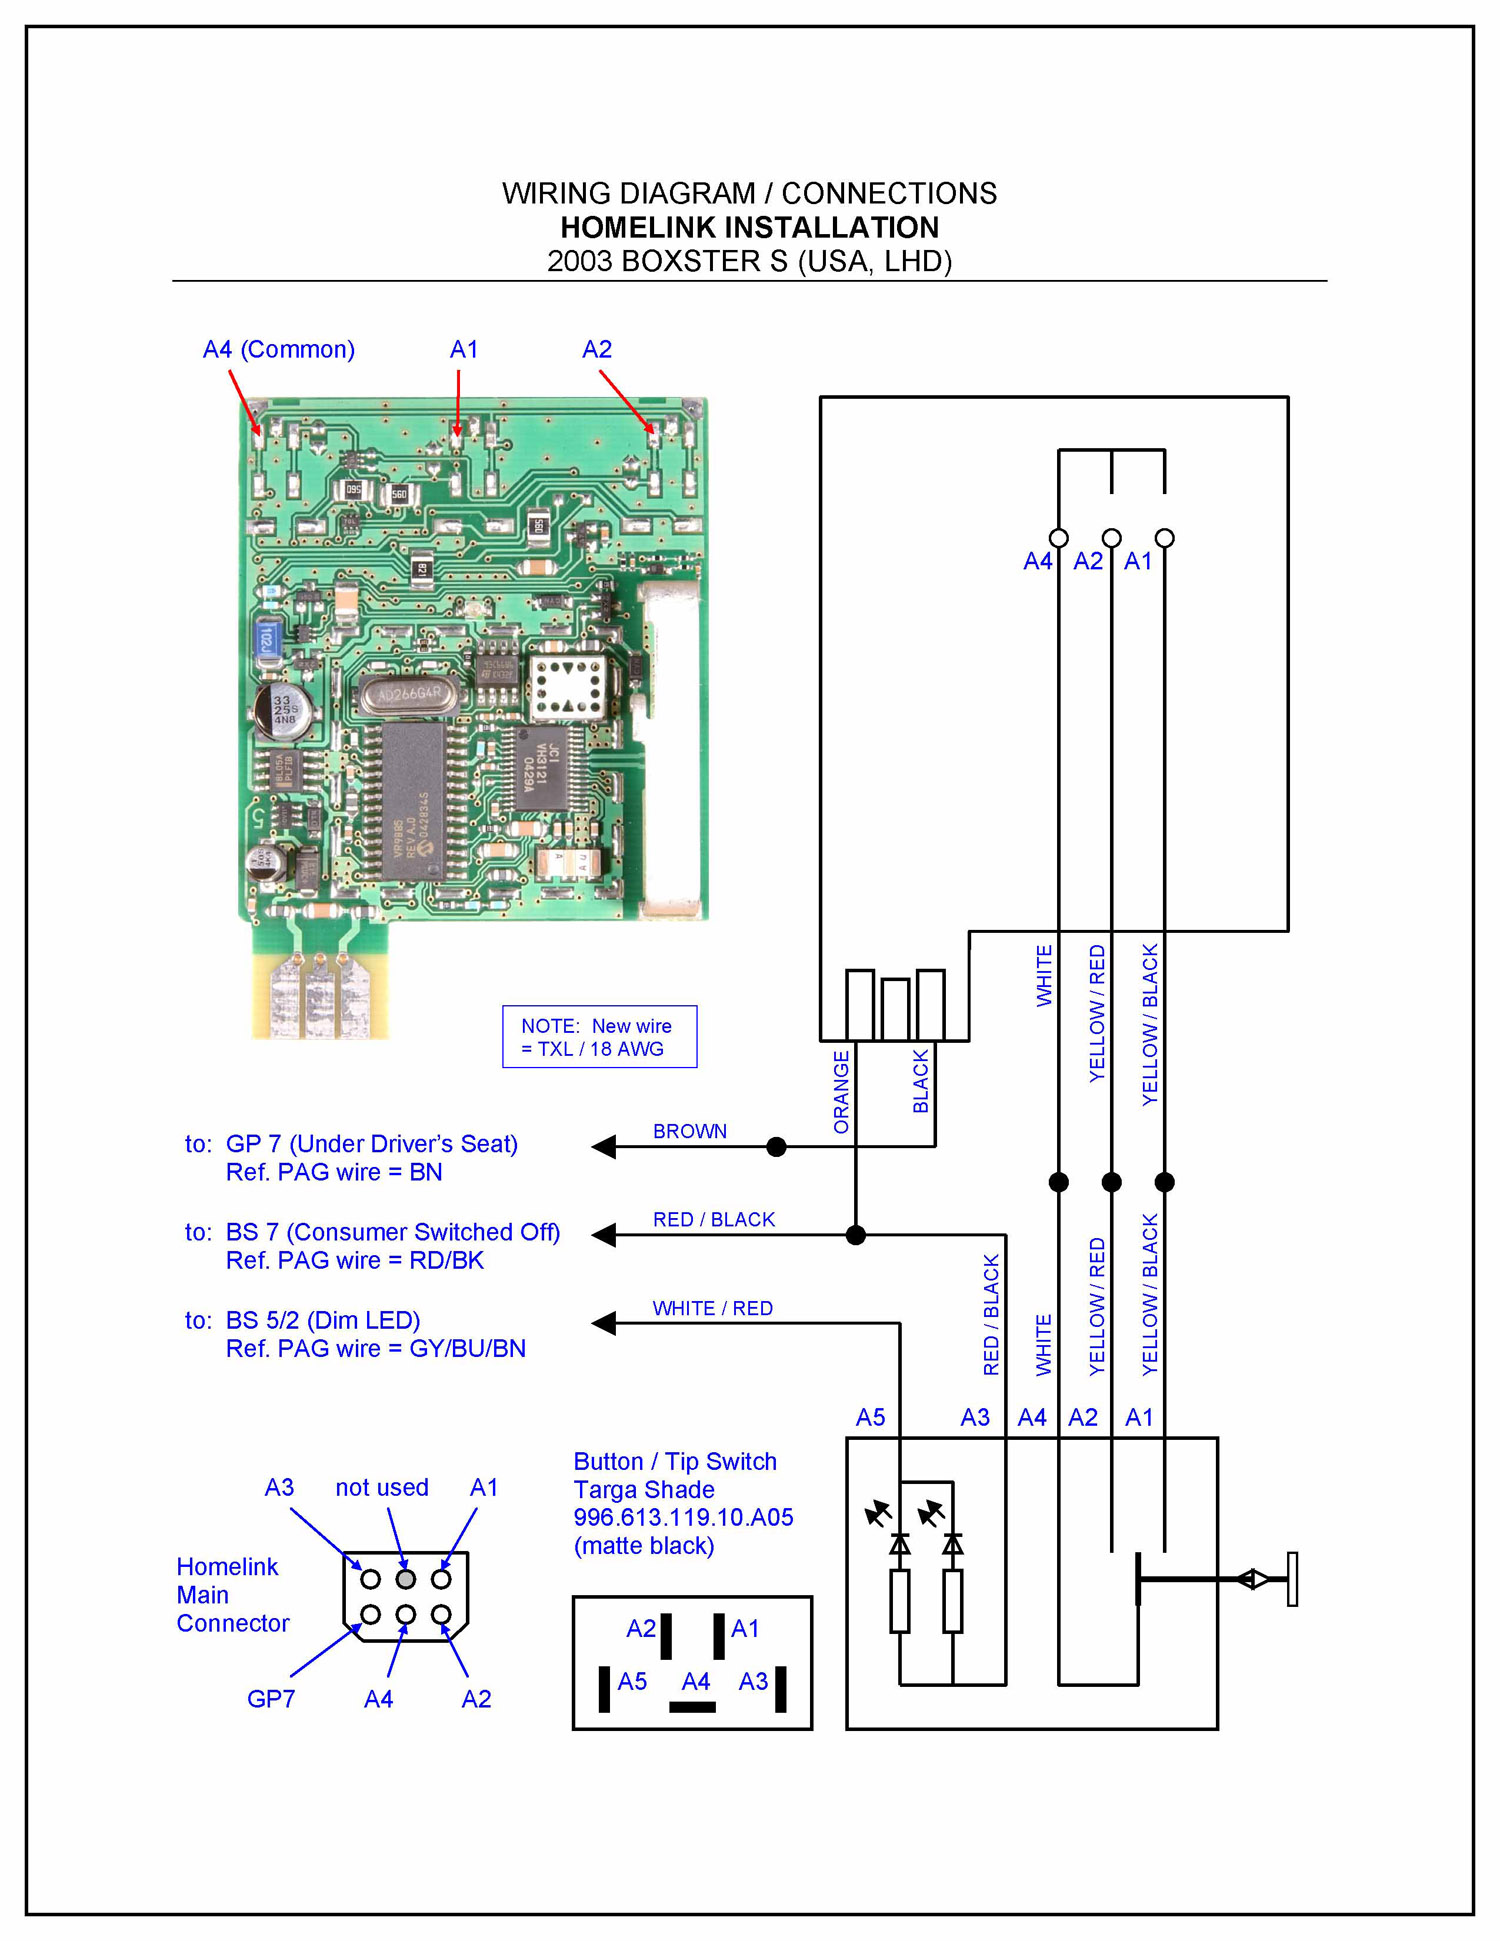
Thanks for the info, I mounted my targa shade switch on the bat wing (see photo)Some good ideas for integrating a garage door opener have been previously presented in these forums; this is probably the most popular: http://www.renntech.org/forums/index.php?showtopic=5770In this case, I installed a genuine Homelink device, tapping into two of its three channels which are actuated by a Porsche targa shade switch for near-OEM function and appearance. I went this route because it has the advantage of being programmable (and re-programmable) and there are no worries about power or battery life. Although this isn't an original idea, I went about it a little differently than I've seen before, so I thought I'd share here.
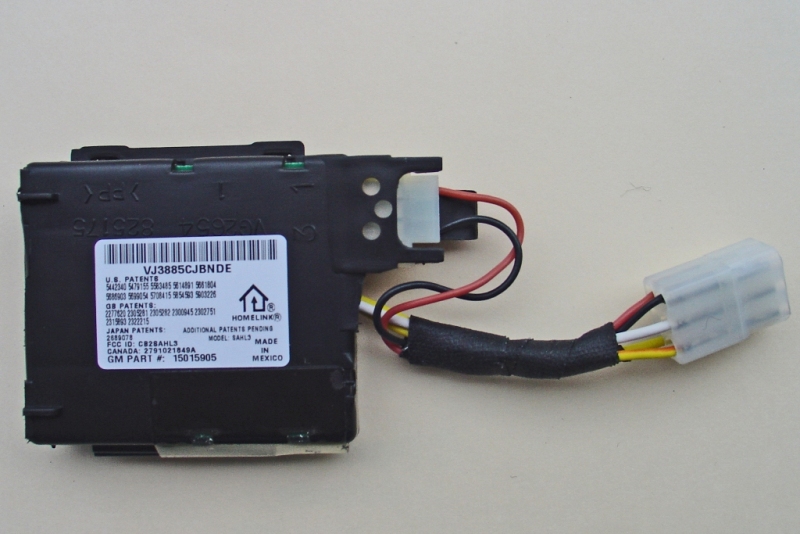
This Homelink installation was for my particular 2003 986S. Other vehicles may be different, part numbers change, and there are risks involved in doing mechanical and/or electrical work on a vehicle. What's presented here is a general overview of my DIY project, not a complete step-by-step set of instructions. Please obtain, understand, and follow the necessary repair and installation procedures in order to work safely, avoid damaging anything, and achieve a safe result.
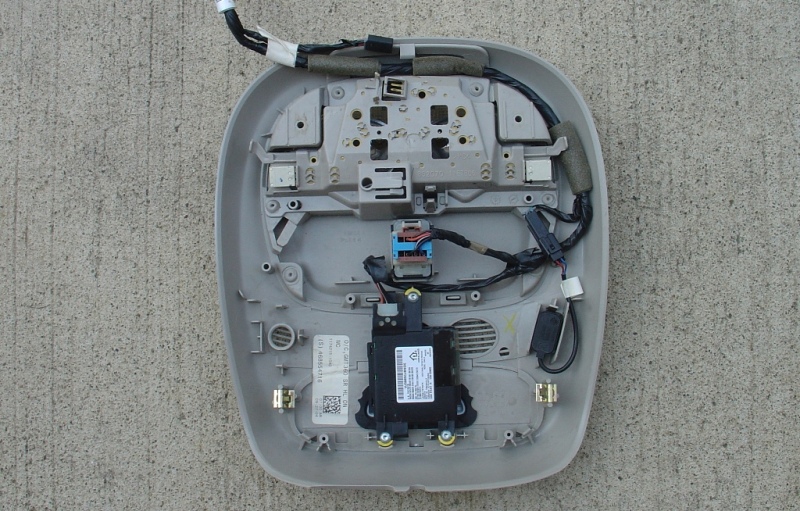
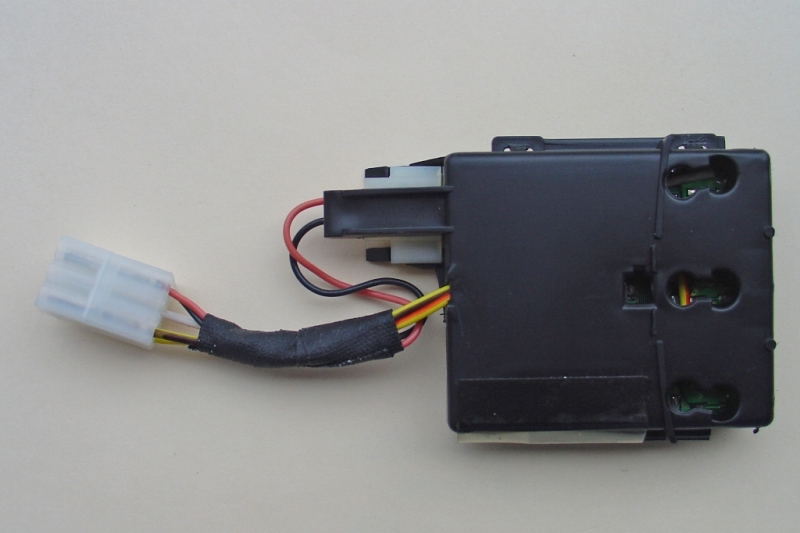
I obtained a Homelink device by purchasing a used overhead console unit from a late model GM vehicle. If I remember correctly, it was a 2005 Chevrolet Trailblazer. I bought it from an LKQ vendor on eBay for about $50. I wanted to get a device that I was fairly sure would have rolling code capability, so I took a pass on many of the units that did not have their date of production or vehicle of origin stated. Some photos of the console I bought:
The Homelink was simply screwed into the plastic console and was extracted easily. I saved the connector and a bit of the wiring harness attached to it. (Most of the rest was recycled.)
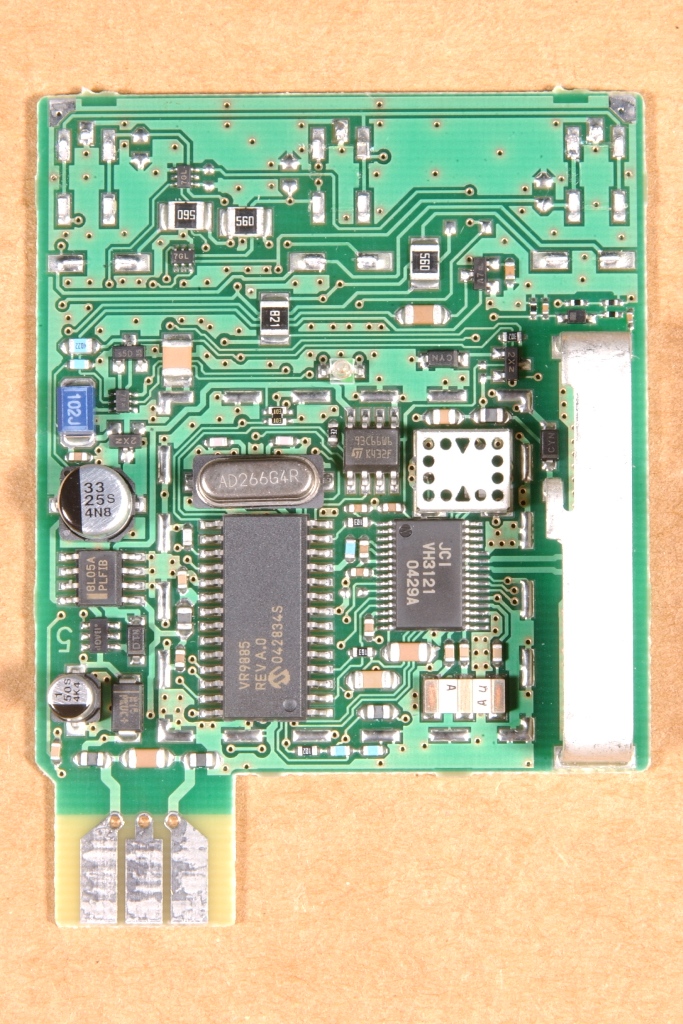
The three blue circles are actually tiny incandescent bulbs with blue, semi-transparent covers; these were for backlighting of the original console's pushbuttons, which in turn actuated the silver/white pushbuttons located just above the bulbs. I studied the circuitry and did some internet research. I found that not all Homelink boards will look like the one above, so if you obtain one yourself, prepare for possible differences.
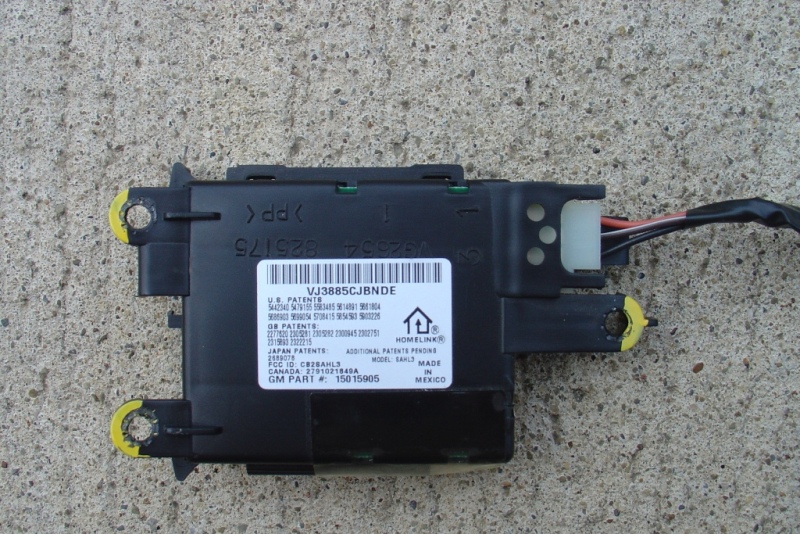
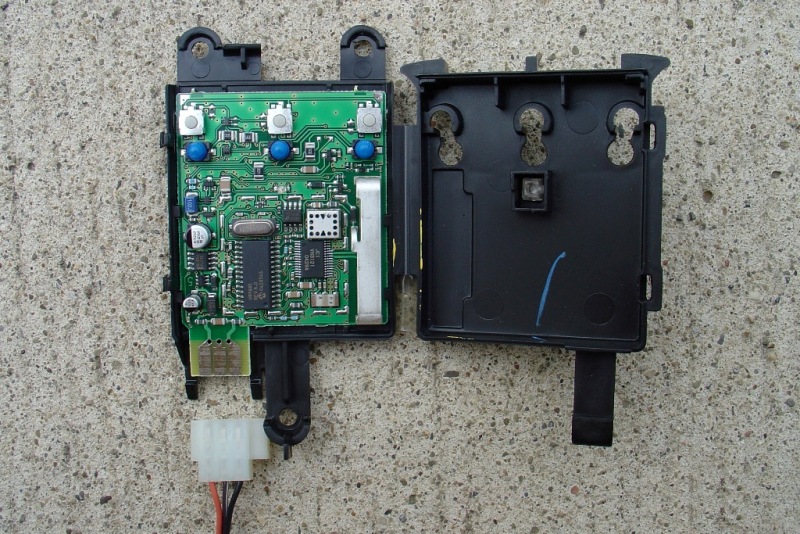
Anyway, I determined that the GM wiring harness connected to this device did the following: The orange wire was +12VDC for the transmitter, the black wire was the main ground, and the brown wire with the white stripe (the middle wire) was +12VDC for the three backlight bulbs. I carefully detached the three blue-covered bulbs and the three pushbuttons from the board. I suppose you could leave the bulbs, but I wanted them out of the way. After that, the board looked like this:
What I decided to do was keep the OE power/ground connector and solder wires to the appropriate tabs that formerly held the pushbuttons. The soldered ends are covered with glue for added durability. I trimmed the case a little, getting rid of the OE mounting tabs. A small hole in the case was made for the added wires. A Molex interlocking connector completed the assembly.
I did the installation while doing another wiring project (adding footwell lighting, another post in this forum). I first made sure the key was out of the ignition and then disconnected the battery. Among the things I ended up removing to do both projects: the driver's seat, driver's side rocker and kick panel trim, the dashboard relay carrier, the gauge cluster, all components of the upper center console (i.e. trim, radio, HVAC control, vents, cupholder, etc.), the lower center console, and other trim.
I connected the targa shade switch and the Homelink directly to the appropriate bridge plugs ("BS") and ground point ("GP"). I put together a wiring diagram for my records (see below). In my car, BS7 is for consumer-switched-off and BS5/2 is for the instrument panel LED lighting with dimming. These bridge plugs are in the dashboard relay carrier. GP7 is under the driver's seat. This way, the switch is backlit and dimmed the same as the other console switches. The consumer-switched-off circuit goes into standby mode about two hours after the car is turned off. Therefore, power to the Homelink is shut down, too. However, the Homelink retains its programming, regardless of the duration that power is interrupted. As soon as a door is opened, this circuit springs back to life and the Homelink functions as usual.
This wiring diagram applies to my car and the Homelink board that I tapped into, so use at your own risk.
There was a good place above the HVAC ductwork with plenty of room to mount the Homelink assembly. I used heavy-duty self-adhesive Velcro to adhere it to a flat spot on the underside of the dash. The purple socket on the left side is what I prepared for the targa shade switch.
The targa shade switch in the lower left position is easily reached without looking. Push one side to activate one channel, push the other side to activate the second channel. To program the Homelink, you hold the remote that you want to emulate near the center of the dash above where the Homelink is mounted. Press and hold the remote button. Press and hold the appropriate side of the targa switch. Count to ten. If your garage door opener is not rolling code, then you are done. If rolling code, you have to follow the instructions that came with your garage door opener. For mine, the final steps were to press a "learn" button on the opener itself and then press the targa switch three times (each time holding for a second or two), all within 30 seconds.
The range on the Homelink as I installed it here is acceptable to me; it works from 50-100 feet (15-30 meters), no matter what direction the vehicle is facing. I was going to try mounting it high up in the A-pillar as others have done, but the Homelink case was just too big to fit under the trim.
Porsche Parts List:
(1) -- 996.613.119.10.A05 -- switch, console, targa shade, matte black
(1) -- 996.650.111.40 -- plug socket, console switch (purple)
(5) -- 999.650.103.12 -- connector (for console switch plug socket)
(2) -- 999.650.320.22 -- connector (for contact bridge/bridge plug)
Regarding wiring, I used automotive-grade TXL 18 AWG wire, purchased online from KayJay Co. (http://www.kayjayco.com). You'll also need a ring connector for the ground wire and the Molex connector and pins that I mentioned above; these are items available at your local electronics store. I bought extra connectors for everything, because they are cheap and if you mess up during crimping/soldering, it is no big deal to just do another one. Also, you'll want to have high-quality friction tape, electrical tape, wire ties, and wire covering for neat and safe wire routing.
That's it; hope it was of interest.
--Brian
-
Hi, I love the dash on my 2001 986 and wouldn't want to change it. However, I would like to use a portable GPS unit. The usual place to stick these is on the windscreen. However this leaves an unsightly ring which is also a thief's invitation to break in and steal the GPS. I was thinking of mounting the unit to the dash using 3M velcro-type patches, but there's not a lot of room as one needs to keep the air bag area free. Does anyone have any nifty solutions for mounting a GPS to the 986?
What unit did you choose? I'm considering using the lower storage/cubby, that way the unit is out of sight when not in use, slide/pull out and fold up or down for use... have to pick a unit first, most units should fit, and the cable would go out the back of the storage unit...
-
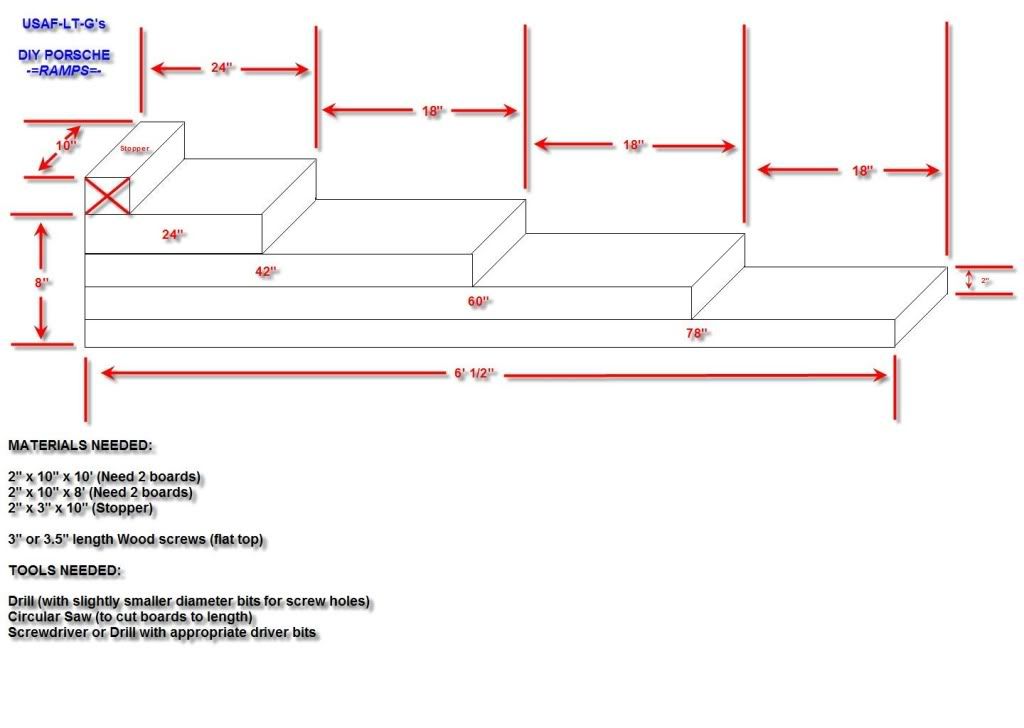
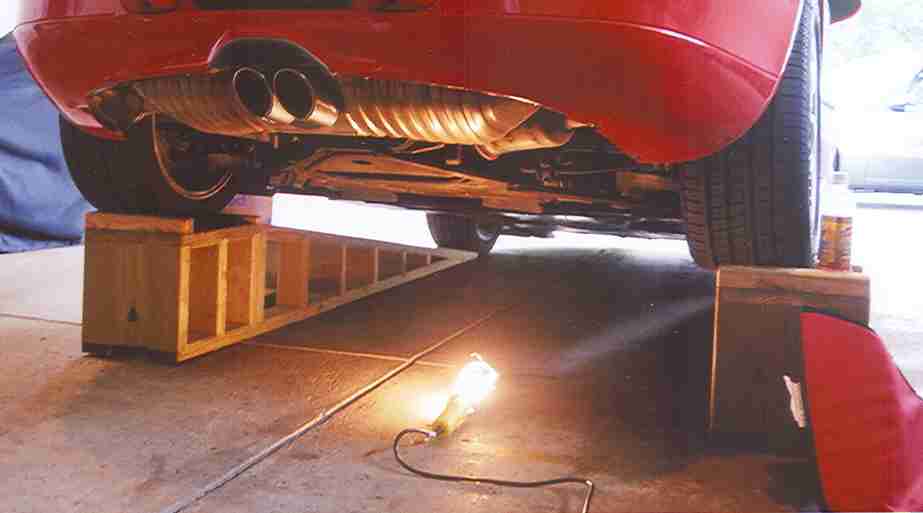
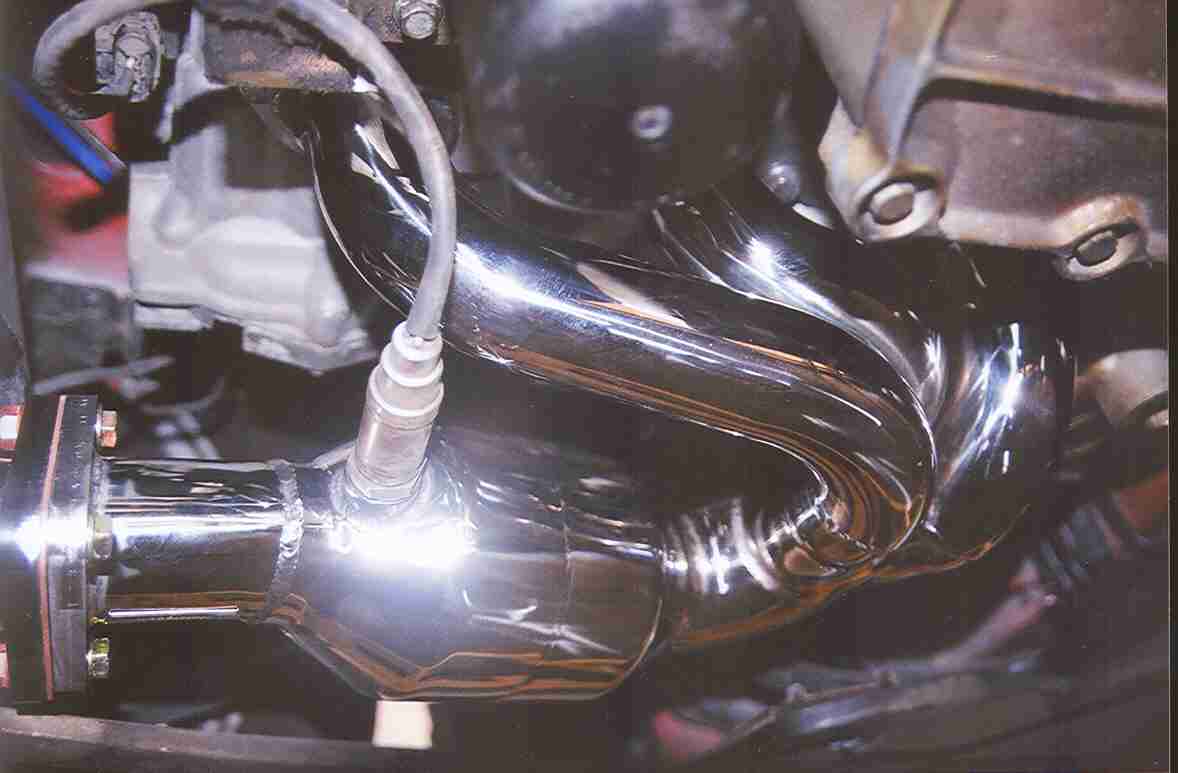
Here are some photos of the ramps I made to help install Fab Speed headers and exhaust, the only reason I'm add in my 2 cents worth is your ramp design looks a little heavy to move around to store!So I've been doing a lot of research on ramps for my car, looking up the various types, sports ramps, pricing etc..... when it hit me....HOW HARD CAN IT POSSIBLY BE TO MAKE MY OWN STINKING RAMPS!!!!
Why spend $200 + dollars on quality ramps, when you can make the same thing with basic materials and tool knowledge, that is JUST as sturdy (if not MORE sturdy) that FITS your oversized (and probably over-priced) tires, and that is LOW profile enough to get the job done.... all for under $30!!!!
Enter in.... (drum roll please)... my DIY Porsche Ramps design.
With some basic lumber, a tape measure, some good wood screws, a drill, and a circular saw (or a handsaw if you really want).... ALL of this can be yours in about 2 hours or less.
I've drawn up a little schematic for your own personal viewing pleasure. I plan to take some pictures this weekend to show you these babies in action.
ENJOY!!!!
-
Has anyone tried this on a 2001 Boxster S? thanks for any help.
:renntech: -


Tail Light Lens
in 986 Series (Boxster, Boxster S)
Posted
I have both types in like OEM new conditon, actually I don't think the red/clear set has ever been used. contact me I can help you beat $160.00.