Welcome to RennTech.org Community, Guest
There are many great features available to you once you register at RennTech.org
You are free to view posts here, but you must log in to reply to existing posts, or to start your own new topic. Like most online communities, there are costs involved to maintain a site like this - so we encourage our members to donate. All donations go to the costs operating and maintaining this site. We prefer that guests take part in our community and we offer a lot in return to those willing to join our corner of the Porsche world. This site is 99 percent member supported (less than 1 percent comes from advertising) - so please consider an annual donation to keep this site running.
Here are some of the features available - once you register at RennTech.org
- View Classified Ads
- DIY Tutorials
- Porsche TSB Listings (limited)
- VIN Decoder
- Special Offers
-
OBD II P-Codes - Paint Codes
- Registry
- Videos System
- View Reviews
- and get rid of this welcome message
It takes just a few minutes to register, and it's FREE
Contributing Members also get these additional benefits:
(you become a Contributing Member by donating money to the operation of this site)
- No ads - advertisements are removed
- Access the Contributors Only Forum
- Contributing Members Only Downloads
- Send attachments with PMs
- All image/file storage limits are substantially increased for all Contributing Members
- Option Codes Lookup
- VIN Option Lookups (limited)

zoomee
-
Posts
3 -
Joined
-
Last visited
Content Type
Profiles
Events
Forums
External Paint Colors
Downloads
Tutorials
Links Directory
Collections
Store
Posts posted by zoomee
-
-
I swap between the Hawk DTC pads (for track events) and the OEM pads all the time. It usually takes about 100 miles of city driving to clear the pads and bed them with the new material. After that no problems.
-
 1
1
-
-
Hi Loren
After looking at the diagram closely it seems as if the item in question might be #18, rather than #16. What do you think?
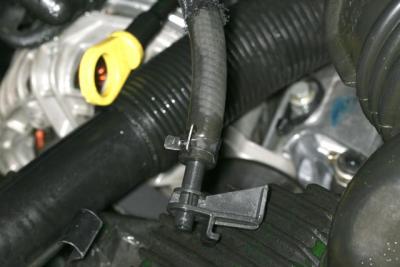
See this side-on picture:
Would #17, the bolt, then be the bolt in the background with the cable tie hanging from it? If so, should #18 (A 996 106 226 51 - Socket) be bolted down with the bolt in question?
Why are there 2 #18's? A 996 106 226 51 as well as 996 106 226 52?
Thanks very much
Etienne
I agree. The bolt with the tie wrap around it in your second photo is definitely backed out. It's possible that the tie wrap was used to hold the plastic fitting (#18) to the bolt instead of the fitting being properly secured. This poor repair eventually led to the failure of the fitting. Good Luck!


Resurfacing Drilled Rotors
in 996 Series (Carrera, Carrera 4, Carrera 4S, Targa)
Posted
Some cracking at the cross drilled holes is inevitable if you track your car. This "heat checking" won't harm anything unless the cracks link adjacent holes or grow to the edge of the rotor.