Welcome to RennTech.org Community, Guest
There are many great features available to you once you register at RennTech.org
You are free to view posts here, but you must log in to reply to existing posts, or to start your own new topic. Like most online communities, there are costs involved to maintain a site like this - so we encourage our members to donate. All donations go to the costs operating and maintaining this site. We prefer that guests take part in our community and we offer a lot in return to those willing to join our corner of the Porsche world. This site is 99 percent member supported (less than 1 percent comes from advertising) - so please consider an annual donation to keep this site running.
Here are some of the features available - once you register at RennTech.org
- View Classified Ads
- DIY Tutorials
- Porsche TSB Listings (limited)
- VIN Decoder
- Special Offers
-
OBD II P-Codes - Paint Codes
- Registry
- Videos System
- View Reviews
- and get rid of this welcome message
It takes just a few minutes to register, and it's FREE
Contributing Members also get these additional benefits:
(you become a Contributing Member by donating money to the operation of this site)
- No ads - advertisements are removed
- Access the Contributors Only Forum
- Contributing Members Only Downloads
- Send attachments with PMs
- All image/file storage limits are substantially increased for all Contributing Members
- Option Codes Lookup
- VIN Option Lookups (limited)


fab
-
Posts
33 -
Joined
-
Last visited
Content Type
Profiles
Events
Forums
External Paint Colors
Downloads
Tutorials
Links Directory
Collections
Store
Posts posted by fab
-
-
looks like oil filler tube could be replaced? Anyone know the part number? Any DIY or pics on how to replace?

-
No screwdriver.
On your year car there should be be two tabs that squeeze on each side of the connector.
Dunca! Loren
-
I'm having a hard time removing the wire connector clip from the MAF sensor. Is there a clip release? Do I use a screw driver. I tried pulling it off but that didn't work.
How did you guys do it?
-
hope i don't get blasted for replying but I just had these codes and mine was related due to a cracked seal in the oil filler cap...
So check your oil cap and the cap for the petrol first.
do we have an update?
-
Hi I own a 00 boxster what is my MAF part #?
Thanks
Fan
-
Have a look at your oil filler tube. Is there an oil accumulation on/around it, particularly underneath? How about an oil buildup on components below it? The oil filler tubes are prone to cracking (Porsche issued a TSB for this), which will cause a vacuum leak and set off various MAF codes. It will also cause the car's idle to surge at times.
I'm not sure where the oil filler tube is? But it's it where the spark plug is I just had my plugs replaced. No signs of oil. And the car runs fine, no idle surge.
I'm gonna reset CEL and see if this happens again. This is my second CEL on 1130 and it has hapen only when I'm in stop/go traffic. I suspect it will come back....fyi i did clean the MAF.
-
Hi
I own a 00 boxster w/approx. 38k mikes. My CEL light came on with code 1130. CEL 1130 point towards intake air leak or vacum air leak.
How does someone check for these leaks?
-
I replaced my MAF after a failure and I just wanted to share my experience. The car is a 2000 986 S, manual trans. The MAF failed right around 90,000 miles. I bought the car at 60K and immediately installed a K&N filter. At 80K I installed an EVO intake. No worries until 90K, when I got a CEL (typical MAF codes). The car lost power, particularly in the mid range. Cold also was also accompanied by a few backfires. I disconnected the MAF and the car ran better. The original MAF was part number 996 606 124 00. A TSB has been issued on this part, updating it to PN 986 606 125 01, which I installed. The TSB says that the DME must be updated to use the new part. I took the car to an indie who charged me $136 to do it. However, during the update (using a PST2), the DME programming code came up as 000000. I'm not sure if my DME was update or not, but the car runs better than it ever has. I wish that I had tried hooking up the new MAF beforehand to confirm that the DME was reprogrammed (and that my $136 was well spent).
I will update this post if there is a change for the worse. Hope the info helps someone! I've definitely had my fair share of help and savings from this board.
Cheers
Jeffrey
Please do update as I am chasing a CEL 1130 and it could possibly be my MAF on my 00 boxster (tip). with just over 38k miles on it.
-
Yes.
996.631.245.00 is for the left side
996.631.246.00 is for the right side
Thanks Loren...I'm a victim. Was given the wrong part. I needed the right side and was given the left side. BIG.....difference. Now I need a drink.
-
My Passenger side connector broke. Does anyone have any pics on how this fits? Does the part differ depending upon which side? I have this as a PN# 996.631.245.00.
TIA
-
I've finished painting my center console and was wondering if there any tips out there on how to put it back in without causing scratches?
-
I've had mine apart several times; I just don't recall any orange clips. Any pics?
I'll post some pics later @ work right now.
-
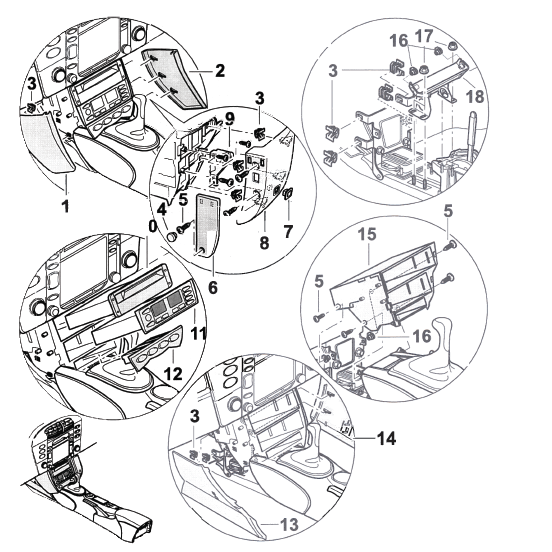
once you remove your cd disc and storge bin, inside the upper console there are these 4 orange looking plastic things 2 on each side. One snapped off, is it important that I need to replace?
Does anyone know how to replace?
bump
anyone know?
-
once you remove your cd disc and storge bin, inside the upper console there are these 4 orange looking plastic things 2 on each side. One snapped off, is it important that I need to replace?
Does anyone know how to replace?
-
you might want to remove the upper center console before removing the lower center console. I find it will be easy to take out the lower center console when you first remove the upper center console, I will attach the instruction on removing the upper center console.
I beleive it may take you 30 mins to complete the removal of both console
I'm stuck.
I took off the cd disc caddy and the storage. How do you remove the upper console frame? I can't seem to find any screws to remove.
Also, there are these 4 orange looking plastic things inside the upper console frame. One snapped off, is it important that I need to replace that one?
Someone must of haven taken off their upper console at one point in time? Any feedback?
-
I followed these instructions.
Okay, for starters, this isn't something you can rush. And if you have no experience using spray paint, don't even attempt this. Last thing I want is a load of hate mail sent to me because someone screwed up there door cover lids. Read the paint instructions like you normally would when using any spary paint from a can. So here it goes.1) Remove your lid covers(of course) you will need some needle nose plyers. There are 2 sets of steel rods on both sides that you will need to remove. Make sure not to loose them and the metal sleeves that they slide into. There are 4 sets of sleeves per door lid. Put them aside for later.
2) You will want to clean the lid covers as best as you can from any type of armor-all or cleaner/polishes you may have used on it in the past.
3) I used a wet sand paper 220/400. You will want to remove any access rubber-like paint that is still remaining. Keep sanding until it is all gone and then use a fine sand paper to make sure it is nice and smooth to the touch. Make sure to get all of the edges and smooth out the curved ones too.
4) Paint I used. (1) Can of Grey Primer – Kilz Crat-Cote (Brand Name) or any automotive sandable primer will work. 1) Can of SilverPaint - Dupli-Color(Brand Name) Vinyl & Fabric. 1) Can of Rust-Oleum(Brand Name) Crystal Clear Enamel Paint. All purchased at your local Walmart, except for Dupli-Color Silver Paint. I found it at Auto-Zone.
5) Spray 1 light coat of Grey primer down. I let mine dry for 1 hour before looking for any surface imperfections. If you see any, use your fine grade sand paper, I used 1000 sand paper to smooth it out. Repeat this step until you no longer see any surface imperfections thought the grey primer paint. I used 2-3 light coats of primer per lid.
6) You are now ready for your first shot of silver paint. I used several light thin coats of paint, instead of 1 or 2 heavy coats(again, use common sense) allowed for 1 hour drying time between coats. I used 3 coats of paint and make sure you get those curved edges.
7) Last, after letting it dry for 24hrs. you can apply the final clear glossy coat. Again, used several thin coats instead of 1 or 2 heavy coats of paint. This will keep the paint fron chipping/peeling off and it makes it look like that factory glossy finish. I used 3 thin coats. Let dry for another 24 hrs. before handling and installing.
8) Re-install the round metal sleeves into the holders of the lid and re-install them onto your door using one steel rod at a time. Then your done. Paint should cure in the next few days and should not be leaned on or used as an arm-rest. Hope this helps everyone!
-
you might want to remove the upper center console before removing the lower center console. I find it will be easy to take out the lower center console when you first remove the upper center console, I will attach the instruction on removing the upper center console.
I beleive it may take you 30 mins to complete the removal of both console
I'm stuck.
I took off the cd disc caddy and the storage. How do you remove the upper console frame? I can't seem to find any screws to remove.
Also, there are these 4 orange looking plastic things inside the upper console frame. One snapped off, is it important that I need to replace that one?
-
Yes.
Loren-
You have been so helpful and knowledgeable I have to make a donation.
Thanks again....
-
Those part numbers do not come up anywhere that I can find.
Are you sure those are the part numbers?
Loren-
I found the seller from this website. If you perform a search for 996 headlights his ad displays-
Front Headlights 996/boxter - pair, 996 front headlights - clear
Do you think these will fit my 2000 boxster?
-
I've found a pair of 996 clear headlights for sale. Part # 996 631 064 20 and 996 631 063 20.
Will these headlights fit/work in my 2000 boxster?
-
I'm purchasing a Valentine One V1 radar detector and was looking for instructions on how to hard wire the unit and have it shut when the car is not running and turn on when I start the car. Does anyone have the DYI on this?
-
the cheapiest I've every seen them @ Suncoast for 1395.
-
Jophn-
That seems pretty straight forward. I was told that panel needs to come off.
-
dj-
the cap that you replaced was it an original porsche part?

how to reset the DME
in 986 Series (Boxster, Boxster S)
Posted
This might sound like a stupid ? to some of you but.....how to reset the DME