Welcome to RennTech.org Community, Guest
There are many great features available to you once you register at RennTech.org
You are free to view posts here, but you must log in to reply to existing posts, or to start your own new topic. Like most online communities, there are costs involved to maintain a site like this - so we encourage our members to donate. All donations go to the costs operating and maintaining this site. We prefer that guests take part in our community and we offer a lot in return to those willing to join our corner of the Porsche world. This site is 99 percent member supported (less than 1 percent comes from advertising) - so please consider an annual donation to keep this site running.
Here are some of the features available - once you register at RennTech.org
- View Classified Ads
- DIY Tutorials
- Porsche TSB Listings (limited)
- VIN Decoder
- Special Offers
-
OBD II P-Codes - Paint Codes
- Registry
- Videos System
- View Reviews
- and get rid of this welcome message
It takes just a few minutes to register, and it's FREE
Contributing Members also get these additional benefits:
(you become a Contributing Member by donating money to the operation of this site)
- No ads - advertisements are removed
- Access the Contributors Only Forum
- Contributing Members Only Downloads
- Send attachments with PMs
- All image/file storage limits are substantially increased for all Contributing Members
- Option Codes Lookup
- VIN Option Lookups (limited)


Q-Ship986
-
Posts
232 -
Joined
-
Last visited
-
Days Won
1
Content Type
Profiles
Events
Forums
External Paint Colors
Downloads
Tutorials
Links Directory
Collections
Classifieds
Store
Posts posted by Q-Ship986
-
-
....so I took it home with the condition that the dealer will fix this later.
...
Anyway, they offered me free sport exhaust and one free service maintenance as a compensation for this trouble.
Do you think I should take this? What would do if you were in my shoes?
From what you mention, it seems you took delivery of your car will full knowledge of the blemish, with agreement for repair at a later date. This is key.
In addition, it would seem as if it was repaired in accordance with industry protocols. It does not appear that the method of repair was guaranteed to be one way or another. Besides that, a buffing is in no way a given superior cosmetic repair to a proper, professional re-spray with proper fill and prep, if applicable. Don't be alarmed that they took the time to remove a bumper, panel, moulding, tail lamp, or whatever to do the job right. You wouldn't want them to mask off everything like Earl Scheib.
Finally, it certainly seems they offered exceptional compensation for your inconvenience.
Look at the repair. If it is to your satisfaction, promptly forget about it and get back to enjoying your car.
FWIW. --Brian
-
Is there any documentation that supports this information?
You might try here...Philips Automotive Lighting Forum
--Brian
-
....Don't forget the clutch bleed.
I looked at the DIY.... Is the bleeder valve like the ones on the caliper? i.e. can you connect tubing to it?
Also, I have a G86.20 6-speed...same bleeder as shown in the DIY?
I'm planning on pulling the car out of storage and doing this first thing. Thanks for any help.
--Brian
-
This is a material property of rubber and other polymers. Essentially, a given rubber compound has a temperature (known as glass transition temperature, or "Tg") where a transition in the stiffness/modulus occurs. The change can be rather significant and can occur over a rather small temperature range, meaning the stiffness is one thing at 40 degF and altogether something different (i.e. stiffer) at 30 degF. Chemical/engineering trade-offs of Tg usually involve the wet/dry/snow traction parameters and are linked or correlated to hysteresis and other tire/rubber performance metrics.
--Brian
-
...why do people do it with the oil change?
For me, three reasons:
1) The mileage interval is about right. My 986S is about an 8000 mile interval (yearly, before storage); my other cars are bi-annual at about a 5000 mile interval.
2) It's easy to remember to buy it with the oil, filter, etc.
3) Possible automotive myth: Cleaning out the injectors and intake puts the stuff into the oil...dump in the Techron, run that tank of gas, then change the oil...everything's shiny and clean again!
Regarding the interval, not all vehicles/engines or fuels are created equal, that's for sure, so 3000 miles might be barely getting by with a treatment like this, or you could go 30,000 miles. It all depends.
--Brian
-
I use Techron just before every oil change in all my cars. --Brian
-
Thanks...I was beginning to wonder about that. --Brian
-
I have noticed this condensation, too. In the 5 months I have owned my '03, it was sporadic; hardly ever in the summer months but present more as fall arrived. (I have tucked my car away for the winter, so I haven't checked for a month.) FWIW, I don't have the bleeder valve.
Bear in mind, the trunk gets pretty warm during normal operation, but it is vented...the 'owner service center' that is sealed separately is not. I'm inclined to go with humidity and temperature differential on the sealed side versus the outer. That said, I'll be checking that expansion tank cap when I prep for the spring, though....
Could some Porsche techs, and some reading this, be unfamiliar with this situation if it is climatic?
--Brian
-
First, are you sure it is Super Glue? Is it raised a bit above the surface? Hard, or can you make an impression into it? Clear, I presume; or cloudy?
Super Glue is a brand name for cyanoacrylate glue, also available in other brands. CA glue, as it is sometimes called, can be dissolved with solvents sold as such by the same companies that make the glue. It may also be dissolved with acetone.
Frankly, before dousing your paint with chemicals, I'd try something simpler first: give it a gentle scrape. If you had a good coat of wax or your favorite polymer product on your car, there's a chance you can coax the stuff off with a fingernail or careful use of a plastic scraper. Do this while applying warm-to-hot water to the offending area.
You also might see if a fine-cut paint cleaner/scratch remover can buff it away.
Whatever you attempt, proceed cautiously and slowly; try not to do any more damage than already present.
Good luck,
--Brian
-
Jeff, do you know if the go/no-go tool is the same, considering the latest seal(s)? In other words, they haven't increased the tolerance on the shaft displacement due to the latest seal(s)? Just wondering.
--Brian
-
Unless they save the results in an electronic file (or hardcopy), if they didn't already give you the actual alignment settings after they made adjustments, they'll probably have to put it back on the rack to give you that info.
Vehicle drift/pull tendencies during steady state operation are usually tied to front axle cross-camber or cross-caster; it won't be toe. Could also be one or both of the front tires. The rear axle or rear tires are rarely an influence in this situation (even at the extremes for alignment and tire parameters)--so focus on the front axle and front tires.
--Brian
-
Right?
--Brian
-
A very, very good general purpose adhesive remover is vm&p (varnish makers and painters) naphtha. It slowly penetrates the offending material without, in my experience, damaging any non-porous painted or finished surface (an exception is flat latex paint, which can be a little porous and very difficult to clean without leaving a sign you did). It also works on plastic and glossy paper products (i.e. taking a price tag off of a 'Holiday' <_< gift). Other than sticky adhesives, it works on dried petroleum products (i.e. tar, asphalt). Always test an area and proceed cautiously with any cleaning product like this until you have experience and are satisfied with the potential results. That said, I would personally use it without hesitation for the task at hand here.
The reason I bring it up is that it is readily available (any Home Depot, Sears, Walmart, etc.--particularly if the store sells paint products) and inexpensive, like $4 per US quart.
Attached are some links to MSDS from 3M for a multitude of their adhesive remover/cleaner products, including 3M's product no. 08984, the one sold in the link previously noted above. You'll notice that 3M has a number of products that seem to do the same thing, but look at the ingredients. 08984 is mostly xylene. 3607 is mostly naphtha (surprise!), but is also xylene and ethylbenzene, with potential traces of toluene and benzene. Now, I, for one, would not use xylene on a painted surface without being REAL careful. Xylene can, and does, remove dried paint, particularly latex; it is pretty strong stuff, and overkill, IMHO for removing sticker residue. BTW, you can buy xylene off the shelf at Home Depot, too; also about $4-$5 per quart.
YMMV. Good, practical advice: Read and follow the directions on these products!
--Brian
3M MSDS Adhesive and Wax Remover 3607
-
Jeff's response seems in jest, but here is what Porsche says in my owner's manual:

You will learn your car's responsiveness over time and shifting will become intuitive based eye, ear, hand, and foot coordination (perceived speed, peripheral view of tach needle, engine sound, gear shift position, and throttle position). Plus smell, if you're burning your clutch.
I have a 3.2 w/6-speed. For leisurely upshifting, I shift at 3000-3500 RPM's. I tend to cruise at/above 2500. For more spirited driving, see above.
--Brian
-
I have had chip/crack repairs in four different cars over the years, each with very good results. My recollection is that they wouldn't perform any repair if the damage exceeded the size of a quarter or was essentially in the view of the road ahead. They basically inject an epoxy or resin of some kind into the damage. The result in my experience has been an improved appearance with no further propagation of the damage. Key point: The repair was covered entirely by my insurance company, w/o having to pay my comp. deductible.
--Brian
-
I tried the others and ultimately stayed w/ default. --Brian
-
Well, got the horns replaced and everything buttoned up.
What horns did you use? OE?
Just wondering,
--Brian
-
As for Drive Block..........tried locking car this morning........waited, then unlocked (all with fob)..........fired her up and still same thing.
Not sure, but Loren may have meant to lock/unlock it with the key, not the wireless.
--Brian
-
Isn't it possible that a small part of the 'qualified' success of this engine & drive-line....can be attributed to the fact that the owner of the 1998-on vehical is a tad different than 911s of yrs past?
Surely, no one would deny that post-993 that Porsche matched it's change in product with a calculated change in it's marketing direction.......with 'fair' success I might add.
To put it into context........can we honestly say the typical type of buyer for the MY2000 996 had directly comparable use & drive as the buyer of a new 911 964 or 993?
I'm not saying it's 'huge'..........
When I read Pasha's article, my first thought was to oil. My second was manufacturing improvements, i.e. methodology, tolerance, and material quality. These are heavy hitters on wear/tear, naturally. In addition, Pasha discusses a matter of fatigue related to the main webs of engines from generations ago.
Frankly, it's one article about one engine, and I wasn't that impressed. Not because of the statistical significance (or lack thereof), but because any modern engine reaching 100K with limited wear/tear after bathing in Mobil1 from new and benefitting from major advances in design/manufacturing just doesn't surprise me. Think of the gigantic leaps in available computing power alone.
But, it is lost on me what is meant in the quote above. (Am I that much of a newbie?) What marketing direction affects the longevity of the engine? Is the perception that current owners take better care of their cars than those in the past? I doubt that. Are they not tracked as often now as they were? Weekend racers among us are undoubtably slightly diluted (or, deluded ;) ). Something else?
--Brian
-
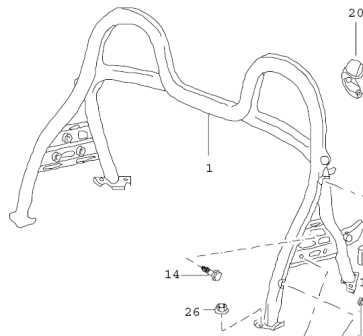
Strictly speaking, it is not safe to ride anywhere else but in the seat with the belt fastened.
That said, I think if you remove the wind deflectors (the vented ones within the hoops and obviously the lexan center) and add a few well placed towels or a pillow, I don't see a structural reason why a person whose behind can fit between the roll bars couldn't sit there. On the horizontal portion of the roll bar, mind you--not the canvas-covered roof behind it; I highly doubt the roof could support any such load.
I presume the parade will be at a walking pace, on closed roads, and that you're a steady driver who can smoothly accel/decel (hope you have a tiptronic for this). She should have one hand firmly grasping a roll bar at all times. Fashioning a supportive belt between the roll bars is also advisable.
A person could be fatally or otherwise seriously injured from a fall from a moving vehicle, even at a snail's pace. With the proper precautions, though, you and your niece could enjoy a fine slice of Americana. Congrats.
--Brian
-
I think when he said low beam, he meant the parking light. --Brian
-
Also I did the headlight amber removal from my litronics. However when I put my drivers side back in, the turn signal isn't working. It appeared that the bulb looked ok however. I have taken it out and back a couple of times to no avail, ideas? Thanks Sean
Swap the left and right bulbs. For instance, sometimes a break in the filament is not (easily) visible to the naked eye. If the problem follows the bulb, then you know (what Loren said); if not, carefully check the socket for a detached wire, bent contact, etc.
--Brian
-
I re-read the original post and see that you may be intending on getting into the trunk storage enclosure as well. There is at least one large grommet in the body behind the CD-changer. (If you don't have a changer, the area I'm referring to is on the right side--passenger side--of the trunk.) If so equipped, remove the CD-changer and its bracket from the firewall. If memory serves me, there are a few plastic caps that hold the trunk lining in place in this vicinity--remove them and pull the liner away from the firewall. This permits access to the grommet from both sides and enables you to route any wiring.
--Brian
-
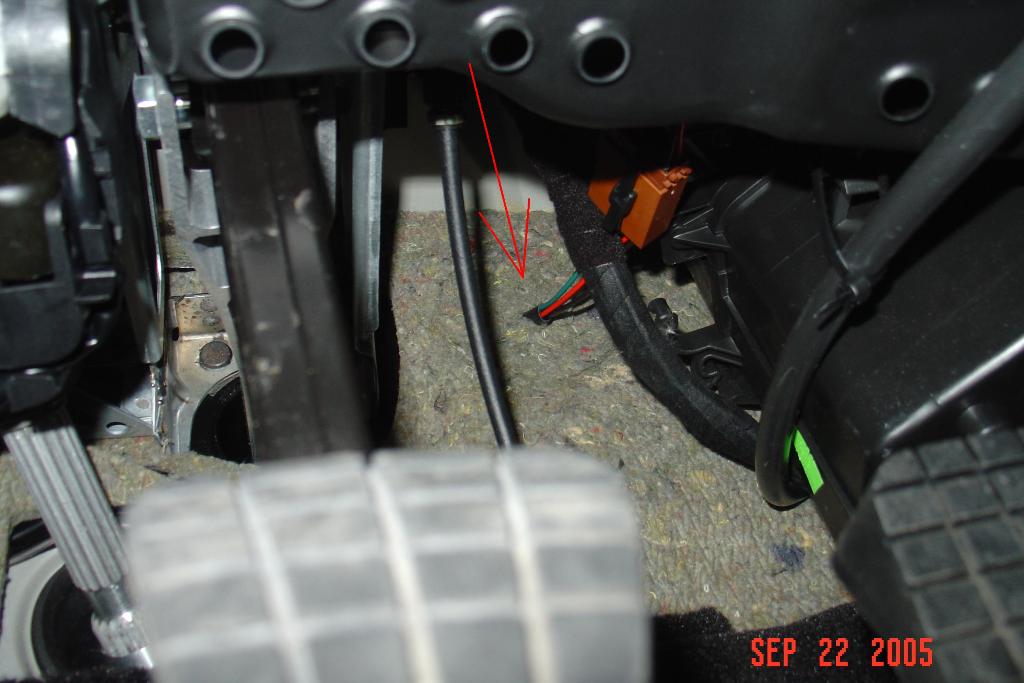
You can route through the firewall by way of a large body filler/grommet located behind the battery. I did this to get wiring to the amplifier in the trunk.
The photo below identifies the area. You'll have to remove the battery to gain working access.
The photo below is an attempt to show the grommet; it is the dark area behind the wires and tubing in the foreground (those particular wires do not pass through--I couldn't get a good shot of the ones that do).
The photo below is a view from the driver's footwell (brake pedal in foreground). The arrow identifies the wiring I passed-through. Also, note the circular outline in the sound-deadening material, about 10 cm diameter around the wiring. This is pre-punched into the fabric; it aligned nearly perfectly with the grommet on my car. Keep the hole punched into the grommet to a minimum size and add a dab of silcone sealant on either side when you're done.
Note that the area between the firewall and the trunk--i.e. where the battery is located--is not weather-proof. Bear that in mind if you are intending to mount the garage opener there.
--Brian


Plastic trim piece in front of rear wheels
in 986 Series Part Number Requests
Posted · Edited by Q-Ship986
The part numbers above are for the lips in front of the front wheels, item #4 below:
If you're really after the front wheel pieces, you might need #8 ("air duct" left: 996.504.603.00 and right: 996.504.604.00). These pieces are on 986S and 996.
If you want the trim pieces that fit snugly along the corner of the front of the rear wheel well, I think you are after part #10, which I think includes #11, or maybe you just need #11.... See below:
Part numbers for #10, "cover" in satin black (available in any color, as long as its black) are: left: 986.504.393.00.01C and right 986.504.394.00.01C
Part numbers for #11, "rubber lip" are: left: 986.504.893.00 and right: 986.504.894.00
--Brian