Welcome to RennTech.org Community, Guest
There are many great features available to you once you register at RennTech.org
You are free to view posts here, but you must log in to reply to existing posts, or to start your own new topic. Like most online communities, there are costs involved to maintain a site like this - so we encourage our members to donate. All donations go to the costs operating and maintaining this site. We prefer that guests take part in our community and we offer a lot in return to those willing to join our corner of the Porsche world. This site is 99 percent member supported (less than 1 percent comes from advertising) - so please consider an annual donation to keep this site running.
Here are some of the features available - once you register at RennTech.org
- View Classified Ads
- DIY Tutorials
- Porsche TSB Listings (limited)
- VIN Decoder
- Special Offers
-
OBD II P-Codes - Paint Codes
- Registry
- Videos System
- View Reviews
- and get rid of this welcome message
It takes just a few minutes to register, and it's FREE
Contributing Members also get these additional benefits:
(you become a Contributing Member by donating money to the operation of this site)
- No ads - advertisements are removed
- Access the Contributors Only Forum
- Contributing Members Only Downloads
- Send attachments with PMs
- All image/file storage limits are substantially increased for all Contributing Members
- Option Codes Lookup
- VIN Option Lookups (limited)


Q-Ship986
-
Posts
232 -
Joined
-
Last visited
-
Days Won
1
Content Type
Profiles
Events
Forums
External Paint Colors
Downloads
Tutorials
Links Directory
Collections
Store
Posts posted by Q-Ship986
-
-
Hi Kent,
I have a question on the inner CV joints. I'm replacing with new, and am worndering if there is an orientation for how the joint fits on the axle? Is there an exterior vs. interior side to the joint i.e. wheel side vs. transmission side? Thanks for the help.
Phil
Hi Phil, someone else might speak up, but I think I can at least partially answer your question. I just finished repacking the inner and outer joints on my '03 Boxster S because all four boots, almost simultaneously, tore open.
Anyway, I noticed that the inner race of both cv joints on the halfshaft had a ring grooved into one side of them. The rings faced inboard on the halfshaft, each towards the other. Before removing the joint from the halfshaft, observe the difference from side-to-side of the inner race and you'll hopefully see what I mean. I don't think the cage or the outer race had any special markings or orientation, but I think it is proper to be careful about the orientation of the inner race; Kent does state above:
Also, if you disassemble the inner CV Joint, remember that the ball hub has a camfered inner end that must face toward the axle after you re-grease it and install it into the ball cage, then into the CV Joint.
At the risk of stating the obvious, I would at least change the boot on the outer joint while you're at it.
Good luck, --Brian
-
A vehicle's "drift/pull" tendancy describes how it drifts or pulls to one side of the driving lane. It is customarily tested at highway speed on a straight stretch of road in the driving lane (usually the right lane) with nominal crown. "Drift" is observed if the steering wheel is judiciously released and the time to drift from one lane to the next is timed. "Pull" is customarily tested by holding the wheel at whatever angle keeps the vehicle driving straight, and measuring the torque required to hold the wheel in that position. Car companies have thresholds for either drift, or pull, or both.
"Clear vision" is the term that describes how the steering wheel is centered during alignment adjustment. Clear-vision is almost exclusively dictated by how the front toe settings are done. A good practice is to set the front toe with the car running at idle speed so the power steering system is pressurized. The steering wheel is centered and locked in place with a fixture (any shop with a decent alignment rack will have this). Then the left and right tie rods are adjusted so that the total toe is equally divided between both sides. I would not remove the steering wheel to correct a clear vision problem. If you can't center the steering wheel with the above procedure, something is really out of wack and vehicle handling and vehicle stability control systems could be seriously compromised. BTW, Porsche recommends a calibration of the steering wheel angle sensor when the alignment is adjusted for vehicles with such electronic systems as PSM.
Anyway, drift/pull is not the same as clear vision (a "centered" steering wheel), and their cause/effect relationships are (in most cases) totally independent from each other.
Obviously, I haven't even seen or driven the car in question, the alignment values have not been posted, and diagnosing things through the internet ether can be speculative at best, but it sure sounds like the complaint here is about drift/pull, not necessarily clear vision.
(1) Don't even worry about the rear wheel alignment settings affecting the problem described here. Not rear camber, toe, or anything else. Rear alignment settings are important to sports car handling characteristics (especially camber) and to a certain extent tire wear. Rear alignment settings do not affect drift/pull tendancies or clear vision characteristics.
(2) Front toe will not appreciably affect how much a vehicle drifts or pulls. This might sound counterintuitive. When driving straight on a straight road the front tires attempt to reach equilibrium and take the steering wheel with them, with essentially equal amounts of toe on the left and right. So if the front toe was set properly, then the steering wheel will be straight as the car drives straight. But even if the total toe is way off, and/or with wildly different toe settings on the left/right (poor clear vision setup), all that happens is the steering wheel is off-center, but there is no drift/pull and the car goes straight without unusual steering torque by the driver! This assumes there are no other mitigating factors such as (3) and (4) below.
(3) The problem here could be front cross-camber. This is the difference between the left and right camber settings. I am fairly certain the car in this case should nominally have equal camber on the left and right. A difference of 0.1 deg (such as -0.1 on one side and -0.2 on the other) is probably not an issue for drift/pull. A difference of 0.2 (such as -0.1 on one side and -0.3 on the other) could be borderline. More than that, and I'd be suspicious. Make sure the alignment tech checks the camber settings and corrects any differential between the left/right as much as possible.
(4) The problem here could be the front tires. Make sure the tires are the same size on the left and right (sounds crazy, but you did say this car was fairly new to you) and that the pressures are properly set. Correct anything that's out of spec and perform a road test. Also, irregular tire wear or a tire uniformity characteristic known as "conicity" can cause drift/pull. Check both tires for irregular wear, particularly wear on one shoulder more than the other. You can't "see" other causes of tire conicity, so they have to be measured on specialized equipment--a Hunter road force balancer can give you some data. A quick test/experiment (even if the tires are directional) is to temporarily swap the left and right front tire/wheel assemblies from one side to the other-- if the drift/pull you had is now drifting/pulling in the other direction, there is your answer...one or both of the front tires. Perform all road tests on the same stretch of road, in the same lane, at the same speed.
(5) There could be a stack-up of things. A little front cross-camber might be combining with some front tire factor(s) and causing the drift/pull.
In summary, I would: Check the tire sizes. Properly set tire pressures and check for apparent front tire wear irregularities. Check and rectify any front cross camber. Temporarily swap left and right front tire/wheel assemblies. Doing so will almost always help you figure this out.
Good luck. Let us know.
--Brian
-
I had a noise that I would call "creaking," too. At first, I thought it was coming from under the dash somewhere along the steering column. Ultimately, I had my wife turn the steering wheel left/right while I hunted around for the origin of the sound-- with an ear a few inches from the top of one shock tower or the other, there was no doubt it was coming from there. One was noisier than the other.
The bearings are relatively inexpensive, but require removing and disassembling the strut. In a nutshell, you have to remove the caliper, disconnect the tie rod and lower control arm from the knuckle, and remove the fasteners that clamp/hold the strut assemble. Pulling the strut out after everything is disconnected requires some technique. As for special tools, you'll need a spring compressor, a certain kind of ball joint removal tool, and a special socket to properly torque one of the nuts when you put it all back together. Some of the bolts are to be replaced, rather than reused. Even though I carefully marked everything, I performed an alignment afterwards and found some tweaks were needed.
After I replaced the bearings, the noise was gone. I highly doubt you can lube them in place and achieve a lasting improvement. --Brian
-
Do you ride the clutch or keep your foot on the pedal while waiting at intersections? This will greatly reduce the operating life of the thrust brng.
I think you're thinking of the clutch release bearing, also known as the clutch throw-out bearing. The crankshaft 'thrust' bearing surface(s) diagnosed above as causing the play in the crank are different from the clutch release bearing that can deteriorate from holding down the clutch pedal too long. However, note that the parts shown above are for a GT3 M96 engine, a different case from the M96 variety in the OP's 2001 C4. FWIW. --Brian
-
 1
1
-
-
Open the hood and have a friend turn the steering wheel while you listen near the top of the struts. I had a noise that fits your description, and at first thought it was coming from under the dash. I traced it to the top of one of the struts and ultimately replaced the relatively inexpensive bearing at the top of each strut assembly. --Brian
-
Adventures with an HVAC Refresh Kit
On occasion during the most humid months of the year, the air coming out of the vents of my nearly 8-year-old car would smell a little 'off.' Since the a/c condensation was draining just fine and the odor wasn't ever-present, it wasn't a major concern to me. However, surfing the web I found a variety of A/C refresh kits that seemed worth a try, if for no reason other than to experiment and see if it was any benefit. But, no good deed goes unpunished. There are a variety of kits out there, som
-
Author
-
Category
-
Submitted04/04/2011 06:06 PM
-
-
No, the problem was never solved.
When the dealership was troubleshooting, they eliminated the rear speakers as the cause. I think they did so by simply disconnecting it from the system and retesting. If it's important, the noise does not occur from ordinary radio music, only when playing certain songs on certain CDs.
They spent a lot of time trying to figure it out, including replacement of every part but the wiring harnesses. The service manager quipped that the technician was nearly going out of his mind listening to the same songs over and over again. He left it to me to decide whether they should continue trouble-shooting, including replacing parts (again) and even the MOST harness. I declined because I wanted my car back and a few pops here and there don't bother me that much, mostly because the music in this car is really the car itself. I am not that much of an audiophile anyway.
You can see from this thread that no one else has apparently experienced this problem, so who knows. You are the first to mention something close. I wouldn't just replace your amp without more cause; they tried that on mine...twice.
Good luck,
--Brian
-
If you suspect these parts are rubbing, I would apply some of the same silicone grease you used before (dielectric grease?) to the offending interfaces and screw the brackets back in. --Brian
-
The speaker mounts are supposed to be screwed in. In your photo, it looks like the screws are missing. --Brian
-
The Porsche-recommended lubricant is a Krytox-brand grease, which is a DuPont product. The lubrication is achieved by molecular bond to the applied surface, similar to Teflon. DuPont makes it in a variety of forms. I use Krytox GPL223, which is a white grease with anticorrosion additives. I bought a tube a 3 or 4 years ago from here. Krytox is inert and the grease carrier is non-petroleum based, so it is safe for rubber. A fact sheet from DuPont is attached.
Wipe the convertible top and body seals with a damp rag and mild soap. Apply the grease to the seals in very small amounts, spreading thinly until it is virtually gone. I do this every year, takes 10-minutes, and all is quiet.
--Brian
-
Installation of Hella Tire Pressure Monitoring System (TPMS)
Along with a new set of tires, I decided to install a Hella TC-400 tire pressure monitoring system (TPMS). For reference, another board member installed a system made by Orange Electronics (see http://www.renntech....ms-check-it-out). [Edit 12/9/2018: For sensor replacement, scroll down towards the end.] I settled on the Hella system after some research and experience. I like that it has a small, color-changeable display that results in a clean installation. The display u
-
Author
-
Category
-
Submitted11/26/2010 05:20 PM
-
Updated03/11/2017 06:19 AM
-
-
Today I updated the original DIY with a little more detail in the part numbers and photos. --Brian
-
There is an additional duct piece for Boxster S's (Boxster Esses?) not shown in the PET diagram for 986. It is in the 996 diagram, shown below, part #8. It seems to be the part that fits your description.
The Porsche part numbers are:
996.504.603.00 (left side / driver's side-USA)996.504.604.00 (right side / passenger side-USA)--Brian

-
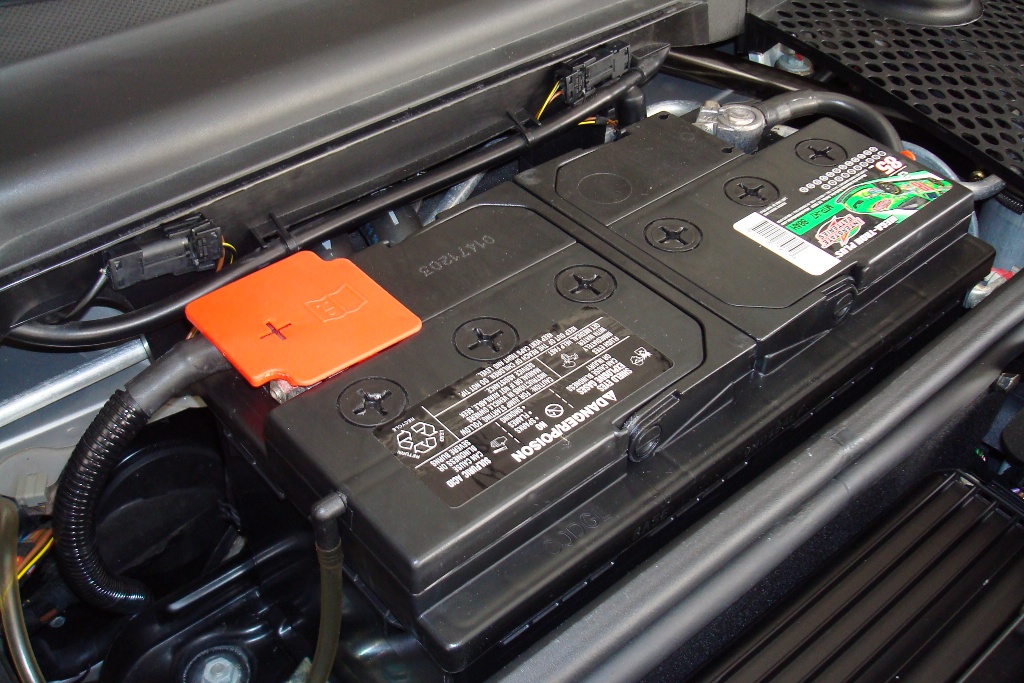
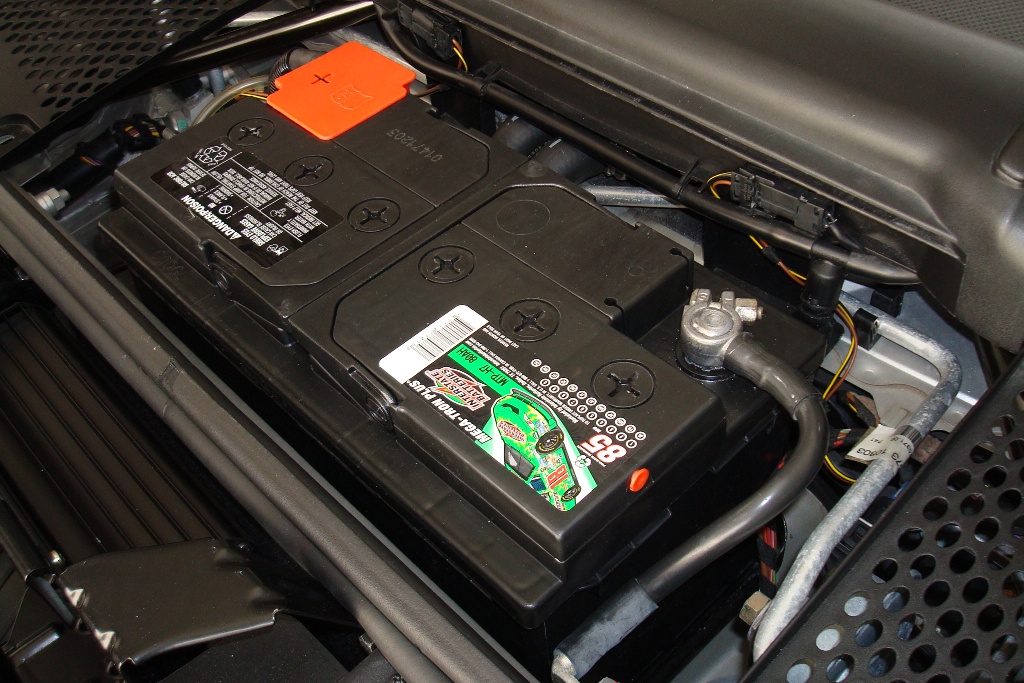
This is another vote for an Interstate MTP-H7, which I just installed in my 2003 Boxster S. I've had the car for 5 years and the dead Porsche/Moll battery was 6+ years old based on the date code. Not bad for a Porsche OE battery, from what I've heard. Anyway, the MTP-H7 was an exact replacement (see photos). Vent tube, hold-down position, perfect fit. Kinda looks OE, too. About $200; self-installed.
-
The switch requires a relay because it closes a circuit only when it is pressed. Once you let go of the switch, power flow through the switch ceases (except for the backlighting circuit of that particular switch). A lot of automotive switches work that way. When you press the switch, power energizes the relay to open or close. The relay is essentially the device that controls the flow of electricity in the circuit; the switch just tells the relay to open or close. You can do what you want to do, but just not with that switch alone.
-
... I checked the boxes for airbag discount, antilock brake discount, and passive alarm. When my policy declaration showed up, the airbag and antilock brakes discounts had been removed. ...
They didn't ask for proof of the passive alarm?
Could it be that they don't actually have a discount for the airbags and ABS for this particular model year and vehicle? Maybe you're being fed the wrong reason for the "denial" of these potential discounts by an uniformed agent?
I looked at my policy (from USAA). I get an nearly insignificant discount for "passive restraint" (airbag) in my '03 986S. I don't get any discount for ABS or passive anti-theft/alarm. No discount for PSM, either, for that matter. The airbag discount was larger last year, so I expect it to drop off next year if the trend continues.
As for my '06 GMC pickup, I get a more substantive discount for the airbags, even though it only has them in the front, not front and side airbags like my Boxster. I think your head could explode if you try to rationalize some of the things that can affect rates, discounts, risk, etc.
--Brian
-
FWIW, I use brake cleaner, usually CRC Brakleen, on this sort of thing from time to time... With a spray tube, it blasts out grease from hard to reach areas and it dries quickly. You can also try mineral spirits. --Brian
-
Whatever that stuff is, I've never heard a negative report about Sta-Bil. Use as directed. --Brian
-
That's a kit for 2003-2004 Boxsters with the glass rear window. It fixes a flapping noise that occurs at 75 mph. See TSB 4-04 6113 dated 1-27-05. Not sure why you'd need it for an aftermarket top, unless GAHH specifies it.
--Brian
-
P.S. Don't let LN/Raby find out that simply adding an extra quart is AOK...such advice negates the value of their $300 kit to add only 0.5 qt., see here.
Two different approaches. Jake's kit (as does the B_K kit add a small extension to sump (lower the engine) and provide oil at the pick up point.
While overfilling is just that 'overfilling'. You can usually tell an overfilled car at the track by the smoke they emit coming out of every turn.
Right, oil volume added at the bottom of the sump (LN/Raby, B-K kit) versus simply filling the sump further (overfill). My lame attempt at tongue-in-cheek commentary.
--Brian
-
I am with John on this. People get freaked out if they thing there is a drop too much or too little. If the engine was overfilled way, way too much, then you would notice it immediately. It would get sucked into the intake and you would have a smoke cloud behind you immediately, not 100 miles later.
But for you oil freaks. If you need to drain some oil you unscrew the plastic filter cannister ad dump the oil out. There is 1 1/2 cups of oil in it. Screw the cannister back on. Start the car and check the level. Repeat if you want to remove more.
I think the max level is dictacted by more than what the engine can tolerate on a level surface when idling or driving in a straight line. Don't know, just saying. I'd drain out to within tolerance if it was my car.
Anyway, the best thing about this is the measuring cup... we had the same one.
--Brian
P.S. Don't let LN/Raby find out that simply adding an extra quart is AOK...such advice negates the value of their $300 kit to add only 0.5 qt., see here.
-
What is the trick to disconnecting the coupling? Do you push on and squeeze the sides simultaneously, or something like that? Thanks,
--Brian
-
You might be surprised how little air in the system will make the pedal feel soft. I would bleed again until it is firm. Make sure you do each wheel position, first the outer, then the inner bleeder valve. You probably don't need to do the pedal pumping routine anymore, and since you seem to have it most of the way, I doubt now that you'd need more than another liter to do it again (especially w/o needing to do a clutch circuit). Never re-use any fluid.
--Brian
-
I think you might need to do a combination of things suggested above.
First, buy/rent a pressure bleeder. A lot of us use the Motive pressure bleeder; I'm very happy with mine--used it on all my cars. Also, since you've already filled with ATE blue, I would go back to ATE 200 (regular color). You'll need at least two liters, and I agree with TP that you'll probably need three.
Use a turkey baster to get as much of the existing fluid out of the reservoir as possible. Then top off the reservoir with new fluid and fill the pressure bleeder with at least two liters of new fluid. Connect the pressure bleeder to the reservoir and pressurize per its instructions (i.e. do not exceed 20 psi, check for leaks, etc.)
Note to others: If you haven't run the master cylinder dry, you don't need to do this particular procedure. Starting at the right rear caliper:
- Connect a drain tube to each of the fittings on the caliper. Drain into a suitable container (I use a gallon jug).
- Open the outer bleeder valve. When the fluid runs clean/new and bubble-free, close it.
- Open the inner valve.
- When the fluid runs clean/new and bubble-free, open the outer valve. Now both valves are open and fluid is flowing.
- Move to the driver's seat.
- Fully depress the brake pedal three times. Each time: hold the pedal to the floor for 2-3 seconds before slowly releasing it.
- After the third cycle, return to the caliper.
- Close the inner bleeder valve.
- Let the outer valve bleed for a while until you are absolutely sure the fluid is clean/fresh without bubbles, then close it.
- Open the inner valve again and make sure the fluid flows clean and bubble-free from there, too, before re-tightening it.
Check the fluid level in the pressure bleeder. Re-fill and/or re-pressurize as necessary.
Repeat the same procedure at the left rear. Then the right front, and finally the left front. You'll use a lot of fluid on the right rear, then less and less as you move through the other calipers. Don't re-use any fluid.
After the brakes, I would bleed out the old fluid from the clutch circuit, too. Not too easy on jack stands, let me tell you, but it can be done with patience. I used Loren's DIY instructions for 996.
Hope it works out for you.
--Brian

HVAC Display
in 986 Series (Boxster, Boxster S)
Posted · Edited by Q-Ship986
I recommend the kit from http://914rubber.com also. I bought mine from their ebay listing.
This replacement part is extremely close.
Before / After:
"MANUELL" is there, and, "OFf" is retained.....
--Brian
key words: HVAC climate control LCD screen glass repair