Welcome to RennTech.org Community, Guest
There are many great features available to you once you register at RennTech.org
You are free to view posts here, but you must log in to reply to existing posts, or to start your own new topic. Like most online communities, there are costs involved to maintain a site like this - so we encourage our members to donate. All donations go to the costs operating and maintaining this site. We prefer that guests take part in our community and we offer a lot in return to those willing to join our corner of the Porsche world. This site is 99 percent member supported (less than 1 percent comes from advertising) - so please consider an annual donation to keep this site running.
Here are some of the features available - once you register at RennTech.org
- View Classified Ads
- DIY Tutorials
- Porsche TSB Listings (limited)
- VIN Decoder
- Special Offers
-
OBD II P-Codes - Paint Codes
- Registry
- Videos System
- View Reviews
- and get rid of this welcome message
It takes just a few minutes to register, and it's FREE
Contributing Members also get these additional benefits:
(you become a Contributing Member by donating money to the operation of this site)
- No ads - advertisements are removed
- Access the Contributors Only Forum
- Contributing Members Only Downloads
- Send attachments with PMs
- All image/file storage limits are substantially increased for all Contributing Members
- Option Codes Lookup
- VIN Option Lookups (limited)


Q-Ship986
-
Posts
232 -
Joined
-
Last visited
-
Days Won
1
Content Type
Profiles
Events
Forums
External Paint Colors
Downloads
Tutorials
Links Directory
Collections
Store
Posts posted by Q-Ship986
-
-
I think the comments in the carcareonline link are more or less correct. Regardless of your methodology--whether you use clay, glaze, polish, 2500-grit sandpaper, whatever--you will in effect remove microns of good paint/clearcoat along with the surface blemishes, contaminants, etc. that are your real target. Use the least abrasive means to an end. My cars are all daily drivers and their paint picks up all kinds of Northeast Ohio environmental and operational fallout. I like Meguiar's mild detailing clay, used before their machine glaze #3 or hand glaze #7 as necessary. I am convinced these products are worth the time and expense to use because in my experience they clearly improve the appearance of the paint and help the wax last much, much longer (up to a year, in my case). --Brian
-
I don't know what post you read or what the negative(s) alleged regarding using the clay bar, but I have no problems using it myself. Heed the advice about immediately disposing of any clay dropped on the ground or otherwise potentially contaminated. The stuff is relatively cheap, so additional advice from me is to not to try to extend its use; considering the time/effort you will put in, using fresh clay is a small price. Also use fresh rags to wife the surface clean. I doubt you'll regret the results from the plan you outline. --Brian
-
What's Krytox?
It is a lubricant made by DuPont that comes in numerous forms, including many different greases. See here. I bought a tube of GPL-223, which has some corrosion inhibitor(s), from these guys. I bought it specifically to use it on the rubber seals of my Boxster's top and cover/lid, as Porsche suggests. But I also use it in situations such as this one. --Brian
-
I had this exact same rattle; I applied some Krytox to the chrome loop (is it the latch, striker, or ??) and it has taken care of it for the time being. Bob, please let us know how you move the loop...up, down, in? Thanks, --Brian
-
Silicone is harmless to most rubber/plastics. The key is not to use something that is petroleum-based, which silicone itself is not. Other choices for this situation are dielectric grease and Krytox. --Brian
-
I've used the black one - worked fine except for the time I forgot to take out the white plug.
Likewise, but I knocked the drain plug into the hole and did not notice until it overflowed.
Griot's has a nice one I'm going to order. 16 quarts (I think) and a free replacement white plug. Great to reduce trips to oil recyclers. Yep, I lost my plug at the recycler's.
FWIW, I pour the used oil into empty washer fluid containers (they have a nice tight cap) and/or the 5-quart containers that the new oil came in. Our county hazardous waste collection center likes to just collect the containers of used fluid, rather than emptying something and giving it back to you. --Brian
-
I have the black one in Jeff's photo on the left; it is about 15 years old and has many, many oil changes under it's belt. The flow of oil into the container is much better if the yellow pressure relief cap is open; I've never had it back up. This type is also good for holding the removed filter, filter housing, and drain plug (the large drain hole in the center has a screen to prevent the drain plug from falling in). I just let these things drop into the catch pan upon removing them. Since it is enclosed, moving the catch pan virtually eliminates spilling. --Brian
-
If you use the Motul RBF-600 be sure and do a complete flush (including the ABS). Motul RBF-600 is a 100% Synthetic brake fluid and should not be mixed with conventional brake fluids.
Do you mean 100% synthetic, or 100% silicone? If it is DOT5 silicone, it is probably inadviseable to use it, period. I don't know anything about Motul RBF-600 fluid, I'm just wondering if this needs to be clarified. --Brian
Nevermind. I see that this Motul fluid is a DOT4, non-silicone. --Brian
-
If you use the Motul RBF-600 be sure and do a complete flush (including the ABS). Motul RBF-600 is a 100% Synthetic brake fluid and should not be mixed with conventional brake fluids.
Do you mean 100% synthetic, or 100% silicone? If it is DOT5 silicone, it is probably inadviseable to use it, period. I don't know anything about Motul RBF-600 fluid, I'm just wondering if this needs to be clarified. --Brian
-
no no in the hood
i remove from the passegers side in front of the seat under the console the black foamy cover to see the motor of the flap . this foamy cover holded by 2 plastic small screws with "big head" this screw screws on the plastic climate box where inside is the ventilalation rotor of the passengers side foot heating
Loren, she's talking about a foam sound absorption panel under the passenger side of the dash. I think the plastic screws are 1H0.819.943. My version of PET is not very descriptive. --Brian
-
Does anybody have the schematic for the floor lighting switch 996.613.980.06.A05? I'm trying to figure out how the LED is wired in the switch. It doesn't have any more pins than a switch without an LED....
Simon
About half way down in this thread...
http://www.renntech.org/forums/index.php?s...ic=2227&hl=
Even though Sandy's diagram is for 996.613.980.00, the pins and function are the same for 996.613.980.06. There are two sets of LEDs, one each for the backlighting and the "on" indicator.
--Brian
-
I haven't seen it. As I'm sure you are aware, it's not currently listed on USA mobiloil.com (here).
After an oil change, it seems my 3.2L would have lifter clatter for a second or two. I have been programmed to use Mobil1 over the years, so I would have liked to find an M1 5W-50 on the shelf. In its absence, I was leaning towards an unapproved oil change, a la Jeff (http://www.renntech.org/forums/index.php?s...unapproved++oil).
Instead, I sort of split the difference and at my last change I used 6 quarts of 0W-40 and 3 quarts of EP (gold cap) 15W-50. I think this equates roughly to 5W-45; I base this on very rudimentary knowledge gleaned from various internet oil-gurus (allegedly, anyway) and an oil blend calculator at Shell.com (which I can no longer find). Anyway, no clatter at start-up this time. YMMV.
--Brian
-
Update
.....should I use THREAD LOCK on the spark plugs? .....
I remember reading in this forum that nothing should be used on the threads; you might want to search on that topic. --Brian
-
aaa / bb R cc
aaa = tire width (not tread width), exclusive of ornamentation (i.e. "whitewall" stripe or raised lettering) when tire is mounted on a theoretical rim of a certain size (depends on the tire).
bb = aspect ratio of section height to tire width, in other words, (aaa)(bb)=section height. This height includes the bead portion, which when the tire is mounted, is hidden.
cc = nominal rim diameter, in inches
---------------------
So, 285/30R18 would have a strictly calculated section height of 85.5mm.
225/40R18 has a strictly calculated section height of 90.0mm.
For a difference of 4.5mm (about 0.18 inch).
Tire industry standards have a little rounding in them, and tire manufacturers may spec slightly different values, depending on design, but the above are the basics.
In this case, the 40-series tire is "taller," but if the 30-series tire was a bit wider, say a 305/30R18 (if there is such a thing), then the 30-series tire would be "taller." You can't judge strictly by the aspect ratio.
As for PAG selecting these sizes, the choices are typically made based on load capacity and desired vehicle performance attributes.
--Brian
-
According to PET, looks like XAH is for the rocker panel/sill covers. --Brian
-
Confirmed: a 305/30R19 should go on a 10.5" wide rim at a minimum; 11.0" is nominal recommended for this size.
Widest 19" 30 series tire recommended for a 10" wide rim is a 295.
--Brian
-
Just bought some iForged 19x8, 19x10. I know a 285/30/19 and 285/35/19 is possible, but what about a 305/30/19?
From memory, it is not recommended to fit a 305/30R19 to a 10" rim; I think 295 was the max. I will check the relevant tire standards in the morning to make sure. If the rim is too narrow, the sidewalls and tread arc are inappropriately distorted and the air cavity created by the tire and wheel is too small. --Brian
-
OK, I feel bad. What wheel diameter and application? That might help get a more useful response. --Brian
-
What is the largest tire I can fit on a 10inch wheel?
Probably a 320/90R54.
At nominal 78.0" in overall diameter and 12.6" wide, for an R-2 designation (cane and rice tread depth), this rear tractor tire can carry up to 7600 lbs at 52 psi.
;)
--Brian
-
Thanks a lot Q-ship!
Don't give up on the HAES amp you are looking at; I wonder if they mis-read the part number or typed it incorrectly when they sent you the info. --Brian
-
Info provided...
HAES
6X40W Verstarker
996 Coupe M490
996.645.311.00
harmen 49134 70192/01
Serial - Nr which is the serial number
date: W949
made in sweden
996.645.311.00 is not a current part number.
For 996 (coupe only--targa and cabrio may differ) with M490, the part numbers in PET (update 203, about a year old now) are:
996.345.301.01 through 2000 model year
996.345.321.00 for 2001 and 2002 model years
996.645.331.01 for 2003-on
996.645.331.02 for 2003-on (supersedes 996.645.331.01)
996.645.331.03 for 2003-on (supersedes 996.645.331.02)
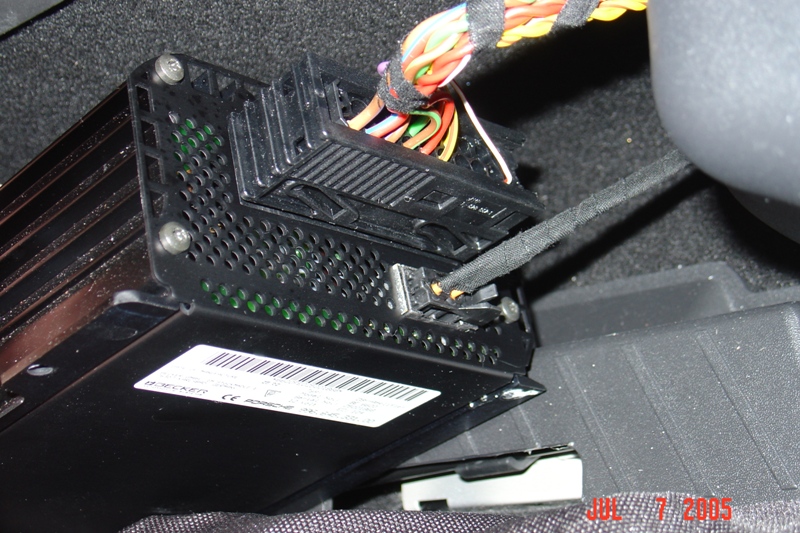
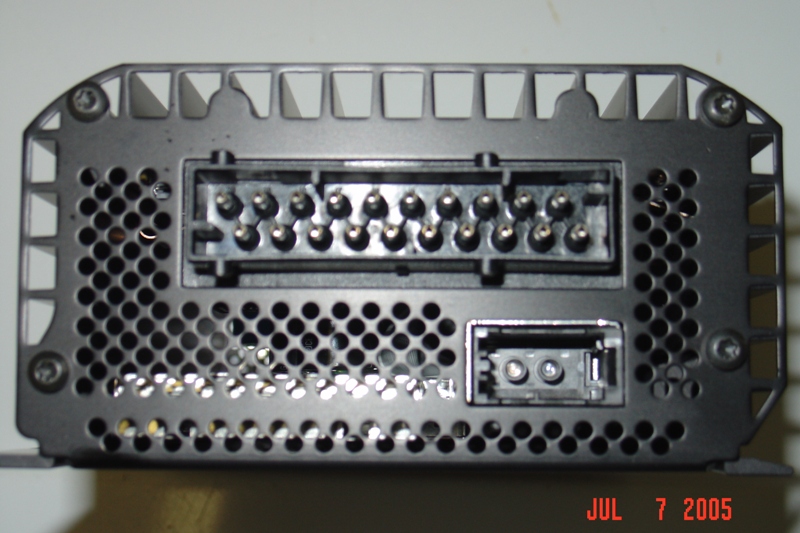
The last three, 996.645.331.xx, are MOST and are the same amps used in Boxster with M490 for 2003-2004. The connections for these amps should look something like this (sorry, one pic is a little blurry):

The optical connection is the one on the bottom.
--Brian
-
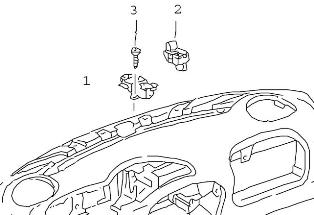
You might need to buy the sensor itself. The part they have provided you is the cover/surround rose (not shown below).
Item 1 is the "mounting light" and item 2 is the "sensor." I can't tell for certain which you would need; you should consult with your dealer again.
--Brian
-
CRAP! Now that you mention it, there was a spot for a third wire in mine, but nothing was there. I didn't even think about backlighting until I was on my way home the other night and couldn't see it.
I think I'm going to have to go back in there and see if I can get lucky with that third spot, but yes, the wiring on yours does have a different connector than the one I got. Yours looks newer.
No, you have nothing to fear/regret. The device you bought does not have backlighting built into it.
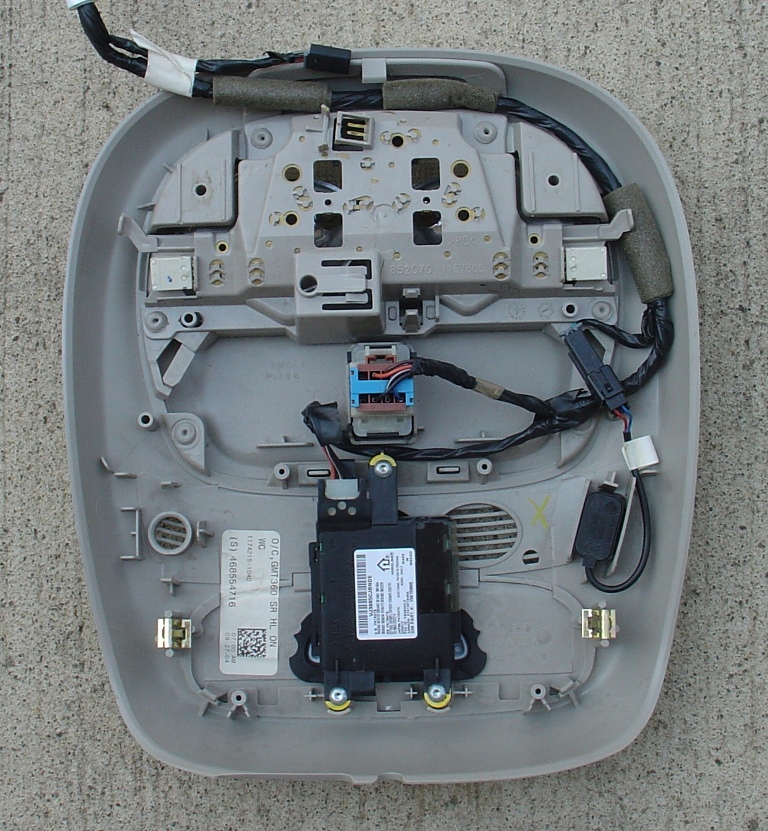
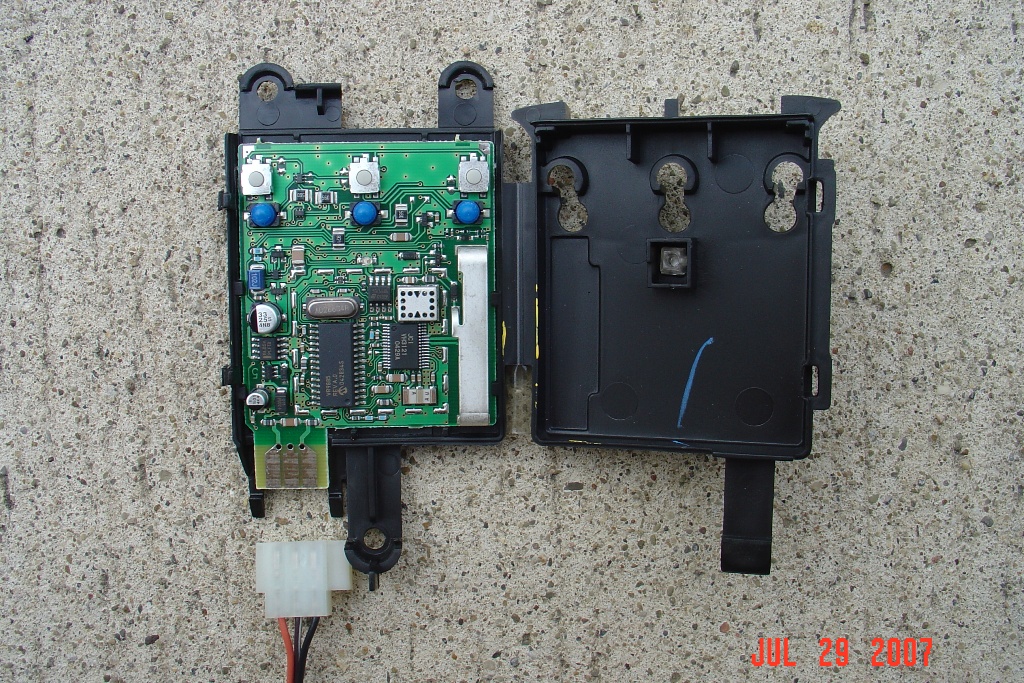
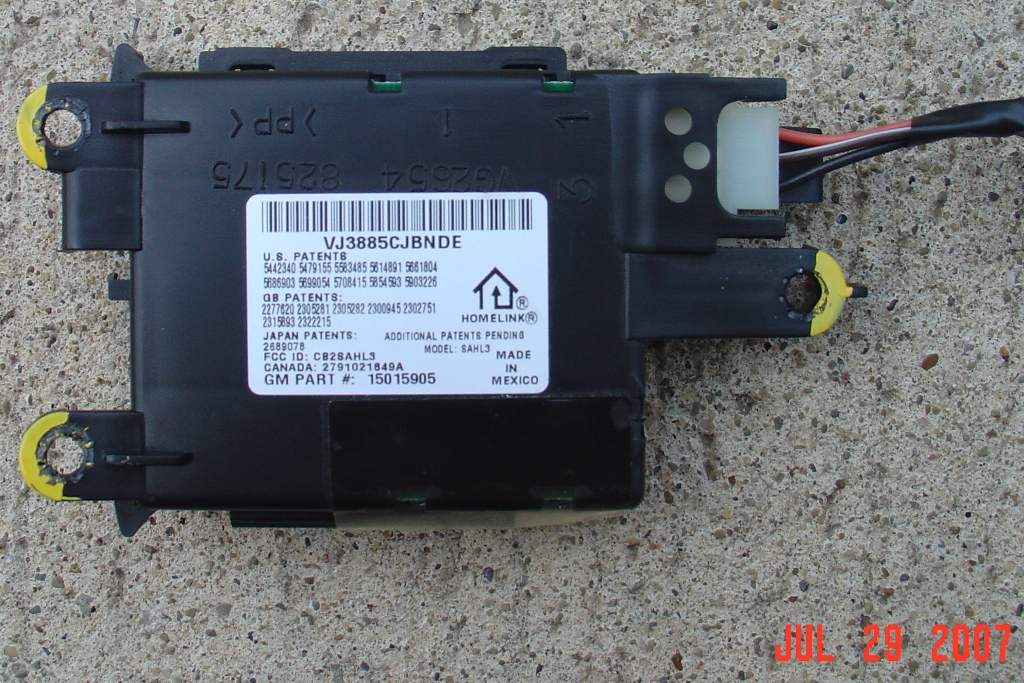
I pulled a homelink unit out of a GM overhead console. It is a different module from yours. The console had buttons that were backlit by tiny blue-covered bulbs inside the homelink device. See below.
I scoured the internet and determined that there are many variations of these devices, depending on their vintage and original installation. However, I noticed the ground and +12vdc connections seem to be the same from device to device, but don't hold me to it.
Anyway, I think your installation is all good.
--Brian
-
The number of wires and what they do depends on the homelink unit. I am finally installing a homelink in my 986, using a unit harvested from a GM overhead console. This particular homelink had three wires:
black= ground
orange= +12VDC
brown w/white stripe= switch/button backlighting
I like the solution presented in this thread, which I originally considered, but I don't have the headliner. That lead me to my current endeavor.
--Brian

Filter locations
in 996 Series (Carrera, Carrera 4, Carrera 4S, Targa)
Posted
I think that is foam from a seal on a flap/door within the HVAC system. Someone on this board did a deep dive into this within the last year or so. --Brian