Welcome to RennTech.org Community, Guest
There are many great features available to you once you register at RennTech.org
You are free to view posts here, but you must log in to reply to existing posts, or to start your own new topic. Like most online communities, there are costs involved to maintain a site like this - so we encourage our members to donate. All donations go to the costs operating and maintaining this site. We prefer that guests take part in our community and we offer a lot in return to those willing to join our corner of the Porsche world. This site is 99 percent member supported (less than 1 percent comes from advertising) - so please consider an annual donation to keep this site running.
Here are some of the features available - once you register at RennTech.org
- View Classified Ads
- DIY Tutorials
- Porsche TSB Listings (limited)
- VIN Decoder
- Special Offers
-
OBD II P-Codes - Paint Codes
- Registry
- Videos System
- View Reviews
- and get rid of this welcome message
It takes just a few minutes to register, and it's FREE
Contributing Members also get these additional benefits:
(you become a Contributing Member by donating money to the operation of this site)
- No ads - advertisements are removed
- Access the Contributors Only Forum
- Contributing Members Only Downloads
- Send attachments with PMs
- All image/file storage limits are substantially increased for all Contributing Members
- Option Codes Lookup
- VIN Option Lookups (limited)


gcp
-
Posts
177 -
Joined
-
Last visited
Content Type
Profiles
Events
Forums
External Paint Colors
Downloads
Tutorials
Links Directory
Collections
Store
Posts posted by gcp
-
-
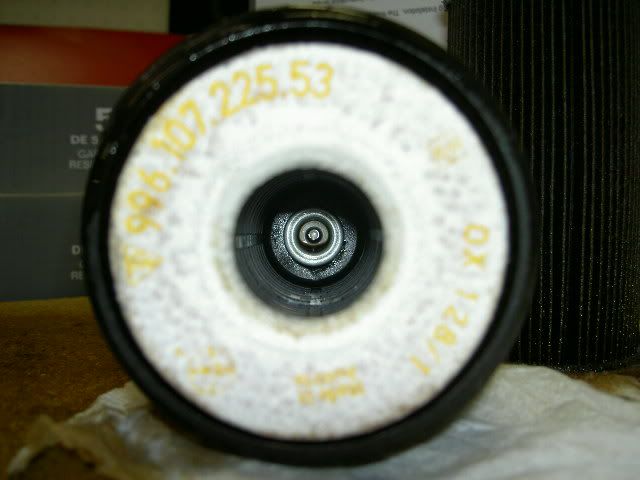
Well, the first DIY oil change on my 996 is now history. Simple enough task but I was wondering if any of you first press the filter into the canister and then screw it onto the block. I tried doing it like the DIY instructions but it was impossible for me to start the threads. Please see pic below (sorry about the focusing but oily hands...).

Your input will be appreciated,
-
Hi guys,
This thread is very timely because I'd also like to adjust the windows for eliminating wind noise as much as possible. So, have any of you figured out which screws do the side adjustment (increased pressure to the door seal)?
Thanks,
gcp
-
Needless to say, I'm happy again. I am all for SSK in a 996 again.
Still no one who has driven both the rear SSK and the inside SSK?!?!?! Someone at B&M must have. Does the inside kit also feel unbalanced? Searching for the elusive driver who can set this record straight...
Saturday I drove an MY 2K with the inside EVO SSK and IMHO I like my rear/under B&M much better!
-
Indeed a bad design, thanks for verifying.
-
eastriver, did you try the radio programing yet and if so did it work? I am out of town till next Tuesday so I've not tried it yet.
Thanks,
-
According to Becker tec support their directions are right in that after selecting a radio station one must hold the particular program button in, and hold it in even if/when in doing so the station still reverts to the original setting the next few secs.
Wouldn't it be more intuitive if it didn't return to the undesired "old" station before the new station is stored? Just like all other radios I've used so far? User friendliness comes to mind, and standardization, but what do I know!
-
ix ix vi, thank you for your kind words.
I've not driven a Porsche with the inside short shifter but all I can say is I love my new install! The throw is considerably shorter and the gears seem to be more definite...albeit it requires more effort to shift (but not a real problem for most of us I'd suspect).
I was told that the under the car shifter mod is preferable because it's easier to install and if you don't like the 30% reduction you can relatively easily drop it to 20% or even 10% reduction.
Truth be told I lucked into mine in that I won it on ebay thinking I was getting an inside job and got this instead. Plus what I won was a B&M for a GT3 (which I was told was the same but it is not). After talking to them they were able to find the correct part for my 996 and shipped it to me ASAP....the Gods were watching out for me on this particular transaction :clapping:
Hope this helps,
-
There must be something wrong with my radio then because I've tried that very thing a few tens of times but it won't program. How simple can this task be, but then again maybe not if something is malfunctioning :censored:
I'll call Becker I guess, thanks Kim!
-
Is it just me being dense on this or did others have problems when attempting to program specific stations onto their radio? The steps specified in the Becker manual I downloaded are not working and for the life of me it has yet to become apparent, no matter how many buttons I push.
What gives? :(
-
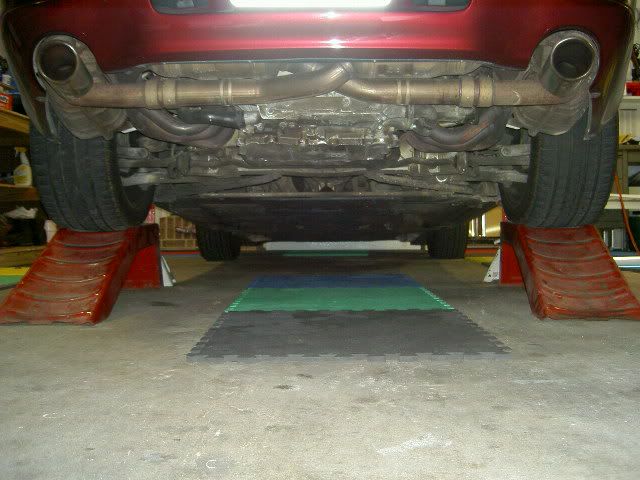
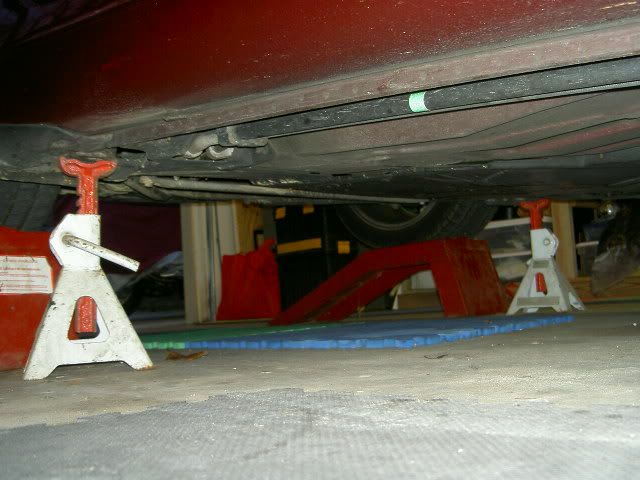
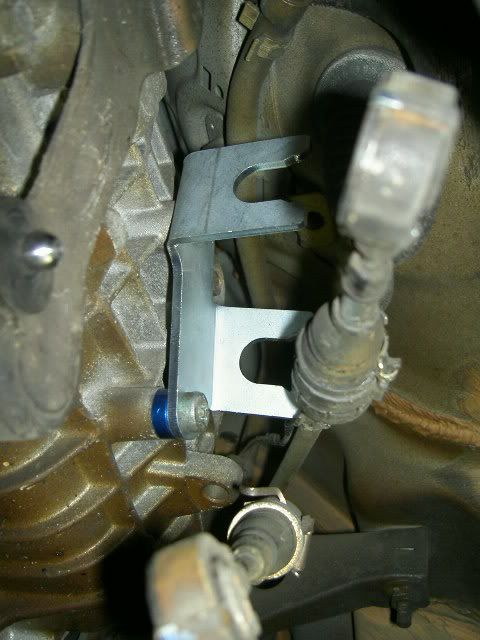
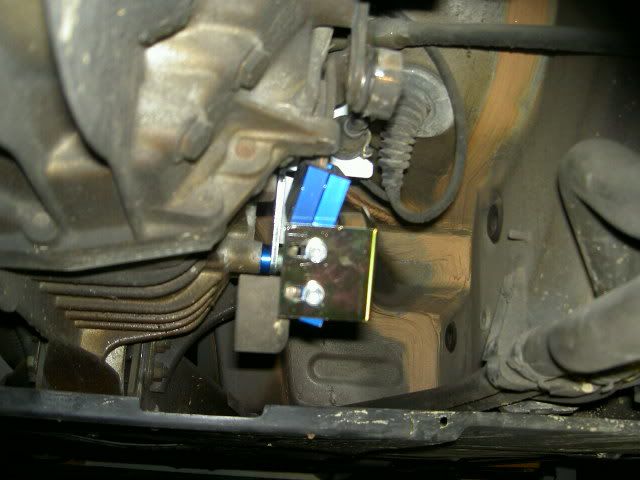
Guys, after scratching the slow part of me, and using a few choice words in 4 languages (darn German engineers try to force you into having to use their dealer's lift for under the car work) I decided to jack-up the rear of the driver's side until I could slide a ramp under the wheel and then released the jack. I did the same on the passenger’s side and then used jack stands for a bit of extra safety (activate the emergency brake to make sure car does not roll frontward or backward).
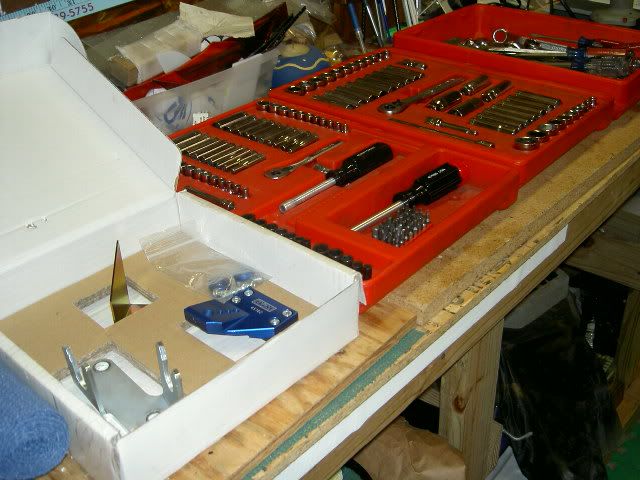
I then got my tools and parts ready, I’m the orderly type.
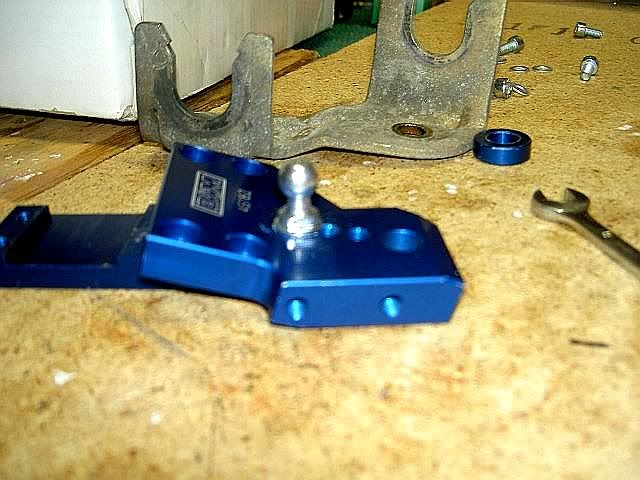
I crawled under the car, removed the cross bracket and set it aside. I then un-snapped with a straight screw drive the ball joint connectors of both shifter cables, un-mounted the cables from the OEM bracket and removed/replaced it with the B&M bracket, making sure I used the spacer provided for the lower hole (once you compare the shape of the two brackets you will understand why).
Then I installed the ball joint onto the blue flat wedge plate (I used the hole closest to the center of the assembly since this hole provides for 30% reduction but there are two other hole you could also use for more shifter throw....but in my mind at least this defeats the purpose of the install).
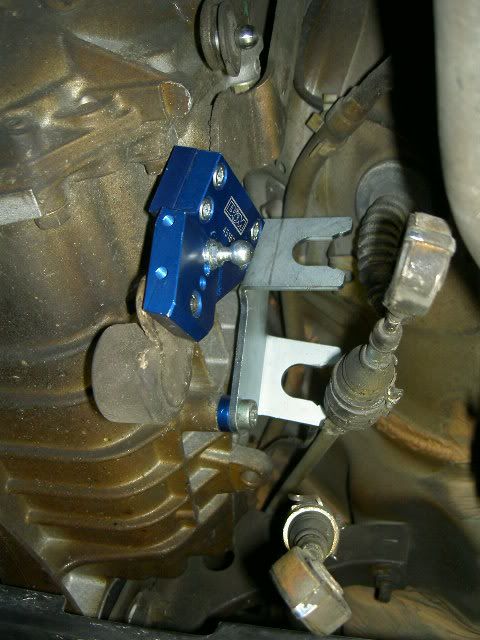
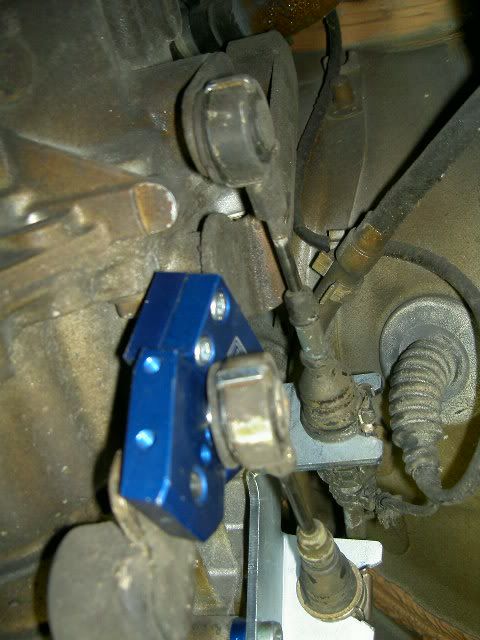
I secured the wedge plate to the lower ball-joint arm and re-attached the cables onto the 2 ball joints (one new one old).
Installed the protective bracket and tested the shifting to make sure all is well, before I started the car.
Lowered the car, (didn't test drive it yet since it was raining last night), patted myself on the back for a job well done and then went in to enjoy the beer & grilled wild pork my wife prepared for me while I was playing mechanic. I’d like to add that the shifting difference is next to amazing, crisp, short and precise!
Hope this helps someone...and BTW the directions I attached to my first post above (PDF file ) do work.
-
Well guys, it took me maybe an hour to install the under the car B&M short shifter, and I am pleased to report that it worked out like a charm :clapping: I LOVE the 30% reduction setting, it was very much worth the purchase price and the install effort!!
BTW, it took me more time to figure out how to jack-up and secure the car than it did to perform the actual task. I'll post pics in the am.
-
That would be a long drive from Alabama. Seems the locals have been too busy for a work on cars day.
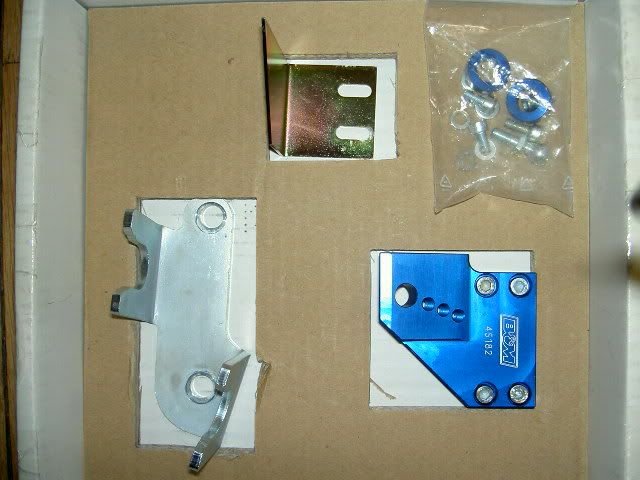
Make sure you have the right shift. Looks like you have 45182.
http://forums.rennlist.com/rennforums/show...23&page=1&pp=15
Toolpants, I am not driving from Alabama I am flying :D
I'll check the part when I get back home but I think it's the right one for the year. Thanks for the link.
-
Always wanted to put one in at our work on cars day. When this unit first came out a local 996 guy bought it and we were going to put it in but then he traded his car. I would have bought it from him but the Boxster unit is different.
Another local guy named Poursha/Russ has it. Make sure you have the correct unit beause he is not the only one that was sold the wrong unit.
Toolpants, I plan to install the B&M shifter Friday night so I will pass on my experiences.
I will also be in Sunnyvale the following weekend, are you California guys getting together for any Porsche installs? If so please let me know when/where so I can attend.
Thanks,
-
Always wanted to put one in at our work on cars day. When this unit first came out a local 996 guy bought it and we were going to put it in but then he traded his car. I would have bought it from him but the Boxster unit is different.
Another local guy named Poursha/Russ has it. Make sure you have the correct unit beause he is not the only one that was sold the wrong unit.
Thank you for the information and the link toolpants. I'll give it a go some time soon and report back, if I can ever stay home long enough :(
-
Where do you live?
I live in Alabama but come to San Jose quite frequently. I'll be there next week and the following. Why?
Thanks,
-
I can't believe no one has done this before, Lauren any inputs? Looks pretty straight forward from the write-up I just wanted to know how effectively it compares with the inside shifter.
Thanks,
-
B_M.pdfGuys I won this B&M shifter on ebay and am getting ready to install it. Have any of you performed this mod and if so any words of advice? Do you prefer it over the inside shifter mod? This is adjustable for 10%, 20% and 30% depending on your setting of preference.
BTW, attached are the directions from B&M.
Thanks,
-
Does operating the top while in motion cause it to require more adjustments / lubes / alignments? It can't be great to operate a complex mechanism while in motion. The manual says only to operate top on flat surface.
I find it a pain to fix rattles and would rather not operate top if it makes the top more rattle prone.
Although the Smartop allows operation up to about 20 MPH ( as does the factory wiring of the later model 996), the typical way I find myself performing up/down on the fly is NOT running down the road .... rather its pulling out of my driveway, or into the garage, or into a parking lot where I know I'm going to leave it up. The big plus is not so much on the road, as it is in not having to sit in a parking lot or the garage and raise lower it after parking or before starting out.
Now, with the RemoteTop, I have a choice .... park with it down, and watch it raise, close the windows, and lock up as I walk away. I love it.
Kim
2000 Cab
Kim, you forgot the red lights, I can now start the top down/up operation while I am approaching a red light without having to stop first. Makes the whole thing more convenient. In my opinion snipping the wire is a great little mod (and did I mention the price is right??) that provides much greater soft top operation flexibility.
-
Well, the trimming of the antenna is completed and the key remote works at a greater distance for sure. I just ordered the switch for the garage door opener mod, should be here next week. All's well that ends well I guess, thanks for your help guys :clapping:
-
-
So you doing the daylight running lights next or the side blinkers? Or the decklid switch? How about the extended length remote?
This is cool site, all that information can be found with explanations and pictures. Have fun, and take pictures for the rest of us.
izzy, I obviously have not been doing my home work around here so, please tell me about your suggested modes or please point me to them, they all sound interesting to perform :help:
-
...the smarTop does leave the car intact, and that is important to a lot of people.
Well, obviously not to me 'cause I snipped the wire as soon as I got home and went riding to test. I am happy to report that it was a successful mode, thanks guys for guiding me through it :clapping:
And izzy I like the plug idea to allow operation of the back windows, any pics of this plug available? BTW why did the Porsche engineers design the quarter windows to be inoperable with the top down?
Have I told you I love this forum?
-
Interesting advantages that I did not know, thanks Kim. How much will this set me back?
-
Sounds like I'll be doing some snipping tonight :clapping:
Yes, MY99 and MY00 share all the same wiring colors.Loren, I assume I will be looking for the gray/pink wire to snip for MY2K?
Thanks,
Thanks,
First oil change
in 996 Series (Carrera, Carrera 4, Carrera 4S, Targa)
Posted
But how do you get the filter to stay onto the engine without out it falling down while you are trying to screw the canister in place? I found it a tricky business....
And shouldn't the filter seat properly once the cainster is torqued in place (19ftlbs)?