Welcome to RennTech.org Community, Guest
There are many great features available to you once you register at RennTech.org
You are free to view posts here, but you must log in to reply to existing posts, or to start your own new topic. Like most online communities, there are costs involved to maintain a site like this - so we encourage our members to subscribe or donate. All subscriptions and donations go to the costs operating and maintaining this site. We prefer that guests take part in our community and we offer a lot in return to those willing to join our corner of the Porsche world. This site is 99 percent member supported (less than 1 percent comes from advertising) - so please consider an annual subscription or donation to keep this site running.
Here are some of the features available - once you subscribe RennTech.org
- View Classified Ads
- DIY Tutorials
- Porsche TSB Listings (limited)
- VIN Decoder
- Special Offers
- Paint Codes
- Registry
- Videos System
- View Reviews
- and get rid of this welcome message
It takes just a few minutes to register, and it's quality Porsche information at a low cost.
Contributing Members also get these additional benefits:
(you become a Contributing Member by subscribing or donating money to the operation of this site)
- No ads - advertisements are removed
- Access the Contributors Only Forum
- Contributing Members Only Downloads
- Send attachments with PMs
- All image/file storage limits are substantially increased for all Contributing Members
- Option Codes Lookup
- VIN Option Lookups (limited)


jersinger
-
Posts
1 -
Joined
-
Last visited
Recent Profile Visitors

jersinger's Achievements
Member (1/1)
0
Reputation
-
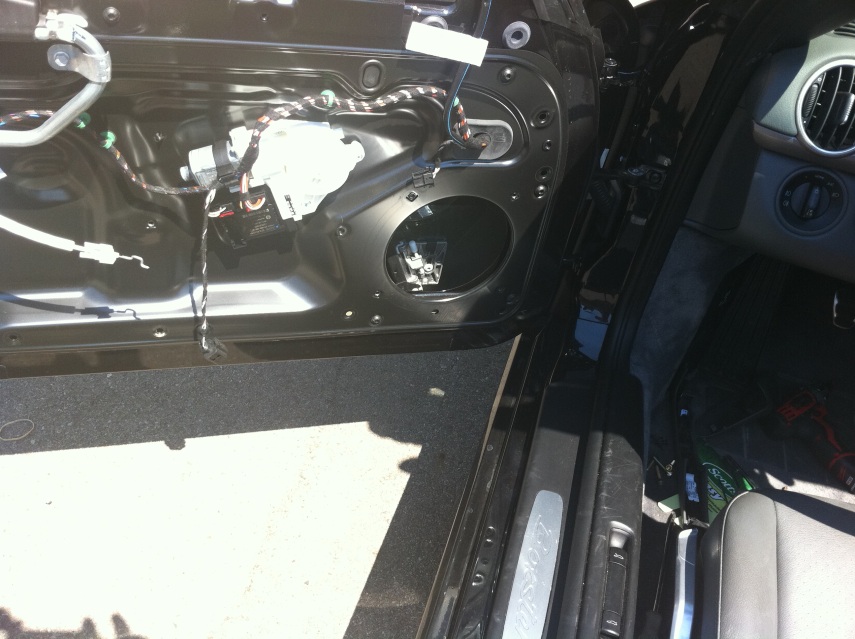
So... I just purchased my second Boxster. My first was a 2003 Boxster 986. That was one of the easiest audio upgrades I have done. Single Din Stereo, Amp in Front, Sub Box in the trunk. My 987 presented a challenge. Boxster 987 Custom Audio Upgrade... I decided to post this in parts because... well, my wife tells me I am only allowed to care more about my car than her on Sundays. Which limits my time. I am starting with the speakers because this was the most challenging part with the most customization. I went with Boston Acoustics Z6 Pro series. This component set is now discontinued and replaced with PRO60SE. The reason I searched these out are QUALITY. These were rated one of the best audio speakers in its class. They MSRP’ed for $1499 and sold for around $1000. I picked them up 2 years used for $275. The best DEAL EVER. If you know these and have heard these speakers tuned....You’d agree. The challenge was fitting a 2 component speaker set into a 3 component, odd sized housing, OEM speaker set. (Please note that I am not considering the Center Channel speaker a “REAL” speaker). OUT WITH THE TOOLS. Thank you for an amazing post in this forum, I was able to take the door panels off with EASEEE. Once I had them off, I was able to see what I was dealing with. I believe the factory Mid-Bass/Woofer is a 7” speaker mounted into a plastic, molded grill (Mounted to the door). Then there is a 3.5” speaker that mounted on the door panel. Finally there is a 1” tweeter mounted on each side of the dash. I will not be using the factory tweeters or center channel (in the middle of the dash). The hole for my 6.5” boston Accoustic woofer is too big so I took the plastic woofer housing and traced the pattern onto a ½” piece of MDF. I also centered the traced the Boston woofer onto the MDF. Cut and sand... Cut and sand, Cut and sand... BOTH SIDES. The Tweeter took a little more thought and design. Once again I traced out the OEM housing onto a piece of MDF. The trick here was to make sure the MDF cut out laid flat in the door panel. There are 2 screw tabs that are raised which meant I had to cut more than just a 2 dimensional piece of wood, but now accommodate for the height. I highly suggest you buy, borrow, steal a dremmel. As you can see in the pictures, I cut the tabs down. The next step is important if you really care about your sound. You don’t want rattling from your door panels when your speakers are playing lower, punchier frequencies. Use some sort of sound dampening material. I used Dyno-Mat. The truth is I would have used HushMat, but the store that I buy from was closed and this is all I could find. It is still functional and does its job.... It is just a preference. (I will open up the door panel again and HUSHMAT the rest. First, I put Dyno-Mat around the opening and then covered the woofer MDF panel. I screwed the wood in, turned on the radio and cranked the bass. Now I was able to hear and feel rattles and vibrations in the door. I put Dyno-Mat on those spots. (It’s also important to DYNO in the door, On the magnet of the speaker and behind the speaker). At the end of the day, you get clear, crisp sound with no rattling. My last step of my custom speaker install was running the wires through the rubber water-proof wire housing. IF YOU DON’T HAVE PATIENCE, BRING YOUR CAR TO A HIGH END CUSTOMER AUDIO SHOP. I think it took me 4 hours to run those wires. You can’t use the existing wire because there is only 1 lead coming in. You need 2 leads one for the tweeter and one for the woofer (4 wires 2X+ 2X-). I also do not recommend using existing wire if you want to maintain the consistency of CUSTOM audio. Use a good wire 14G - 16G is recommended. I stopped after I finally got my wires fished though and put the car door panels back together 11 hours later in 40 degree weather (104F). Part 2 will show the best method to fish the wires through the firewall and Amp installation. Part 3 will be a custom sub-box inside the car (not in the trunk) Part 4 will be the head unit installation