Welcome to RennTech.org Community, Guest
There are many great features available to you once you register at RennTech.org
You are free to view posts here, but you must log in to reply to existing posts, or to start your own new topic. Like most online communities, there are costs involved to maintain a site like this - so we encourage our members to donate. All donations go to the costs operating and maintaining this site. We prefer that guests take part in our community and we offer a lot in return to those willing to join our corner of the Porsche world. This site is 99 percent member supported (less than 1 percent comes from advertising) - so please consider an annual donation to keep this site running.
Here are some of the features available - once you register at RennTech.org
- View Classified Ads
- DIY Tutorials
- Porsche TSB Listings (limited)
- VIN Decoder
- Special Offers
-
OBD II P-Codes - Paint Codes
- Registry
- Videos System
- View Reviews
- and get rid of this welcome message
It takes just a few minutes to register, and it's FREE
Contributing Members also get these additional benefits:
(you become a Contributing Member by donating money to the operation of this site)
- No ads - advertisements are removed
- Access the Contributors Only Forum
- Contributing Members Only Downloads
- Send attachments with PMs
- All image/file storage limits are substantially increased for all Contributing Members
- Option Codes Lookup
- VIN Option Lookups (limited)


j-mann
-
Posts
8 -
Joined
-
Last visited
Content Type
Profiles
Events
Forums
External Paint Colors
Downloads
Tutorials
Links Directory
Collections
Store
Posts posted by j-mann
-
-
Are there any differences between the 99 in this DIY compared to an 01 cabriolet.
-
I would add the following to help others attempting this ... please read the above and the below completely BEFORE starting your work. You'll thank yourself !
Getting the tank out
- I'd remove the air pump instead of tying it to the side as above. Its very simply and takes 30-40 seconds. It gives you room you REALLY need. Plus you won't break the air hose by bending it too much.
NOTE: There are two screws that hold the air pump in place - at the bottom. In my case I found out that the nut thse screws go into had fallen off during removal. The nuts are 'suspended' in a rubber tube and age/temperature had made the rubber brittle and the nut had just fallen when I took the screw out. I simply got new speed nuts (2x : part number: 999.500.078.00 : $2) and used them to fit the air pump back again. Its worth taking the air pump off even if you now need to buy $2 more of nuts when ordering your tank - it gives you a lot of room you need !
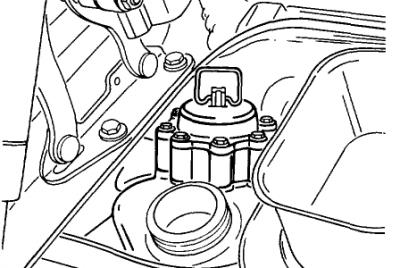
- To remove the coolant reservoir easily out of its harness, slide it towards the engine (i.e. move right) by around 1/2 to 1 inch. Then move it DOWN and out of its rail/holder. There is no need to slide it COMPLETELY (3-4") towards the engine completely as it first appears. The railings have tabs and gaps to facilitate such removal/installation. You probably won't even have that much room to slide it out completely !
- When draining the coolant from below the car, you'll need a bucket to keep most of the coolant and may need to empty the tray below into the bucket. Use 2 trays so you can empty one when the other is below the car. The coolant drains fast, so you can't use just one without making a mess. Also, there is a lot of coolant, almost a bucketfull.
- Coolant is a corrosive liquid - keep it off the paint. If you drop some on the paint, don't panic, just wipe it off with water and a cloth. Use gloves if possible.
- The drain plug for the coolant is close to the rear bumper, don't search too deep inside near the transmission etc !
- There is a coolant level sensor at the bottom of the coolant tank. Its deep and tough to see and you may break it manupulating the tank of get it out of the engine compartment. I'd recommend you reach down and remove it as follows.
- when reachable, turn the sensor by 1/4 turn from towards you to towards the engine.
- pull the sensor out from the bottom (it needs 2" to fall out, its 2.5" tall).
- keep it somewhere !
If you do break it (likely), its around 10-18 bucks, so don't panic !
- Lastly, be patient in getting the tank out. Its not difficult but simply time consuming. Be careful not to bend/break other hoses while you try getting the coolant tank out.
Putting the new tank back in place
- When installing the new tank, I found it easy to first install the sensor at the bottom and then twist-lock it (1/4 turn). The electrical connection should point towards the right taillight.
- First try to get the entire tank in the volume reserved for it in the engine compartment. Don't try to directly fit it in.
- Make sure you don't leave any tubes/connectors behind the tank during installation. The last think after installation is to realise you need to get it out to rescue a forgotten tube.
- Now you want to get the tank back in its harness. The harness' as well as the tank's railings have gaps to ease removal/installation. What worked good for me was
- rotate the tank anti-clockwise by 10-20 degrees when inside the cavity/volume of engine compartment
- position the right most tab of the tank sticking out of the harness while keeping the other two tabs (on the tank's top) positioned to fall in the gaps between the harness' tabs. Try feeling the gaps with your finger to know where the tank's tabs should land.
- Slide a 1.5" diameter metal tube at the bottom (running front -> back) slightly to the left (or right?) so that the level sensor wouldn't be obstructed upon rotation. It should gently slide out of its holder.
- Now level the tank (i.e. rotate it clockwise by 10-20 degrees). The tank's tabs should have fallen where the harness' gaps are and the tank will be one tab sticking out (out = towards the engine)
- Finally move the tank gently away from the engine, in its final installed position
[*] Slide the metal pipe back into its clamp
[*] Connect everything else just the reverse as removal.
After everything is installed
Once you have the new tank in place, you will need to refill it with coolant and 'bleed' the coolant system. Fill the coolant tank with existing/new (porsche recommended) coolant to the max level and close the coolant tank lid. I simply filtered my existing coolant with a old (but clean) cotton t-shirt and poured it in using a funnel. Then, to quote Loren, "Lift the bleed valve."

"Start the engine and allow it to get to full operating temperature (I also ran the air conditioning to force circulation). The coolant warning light will likely start to flash. Shut the engine off and WAIT until the engine and coolant has cooled enough to remove the coolant tank cap. Then add coolant to the tank and repeat the process. You made need to do this 2-3 times. When the coolant level fails to fall then the system is bled and you can close the bleeder valve."
About bleeding the coolant system.
- Close the bleeder value after about 40 minutes (total) of good driving. You shouldn't ride with it open for more than this (my Porsche tech told me this).
- You MUST wait for the coolant to cool between your 2-3 tries, else you won't be filling the tank completely (coolant contracts as it cools). I've had to wait for over 3 hours to cool. If you try before this then the coolant will spill off when you open the cap.
- You may get a coolant light even with the bleeder valve closed after a few days. This is ok and doesn't mean you cracked your tank or something again. Basically there was some air trapped and the car "burped" it into the coolant reservoir, triggering off the coolant light. Wait for 4 hours for the car to cool and then top off with coolant+water (replacing a lot) or just water (replacing just a little).
- If even after 3-4 top offs/"burps" you need to keep adding coolant, have it checked for other leaks in the coolant system.
In the end, once you've done it, please pat yourself on the back !! Great job :thumbup: !! Even my service tech. at the local dealership said its not a simple job. Its worth doing it on your own if you suspect you're losing coolant.
:cheers:
Sid
- I'd remove the air pump instead of tying it to the side as above. Its very simply and takes 30-40 seconds. It gives you room you REALLY need. Plus you won't break the air hose by bending it too much.
-
Welcome. Pretty new to the forum as well. Purchased a 2001 Cab (Rainforest Green / Savanna) 3 months ago. Absolutely love these cars. Has previous 911 - '77, '79, '87 - all great fun. Love the history of the marque. Sounds like you have a nice color combo - enjoy
J
-
It seems like I need to remove the rear seat backs, then the rear seat back center mount, then the vertical rear panel and that should give me access to 2 screws for the cover that runs the whole width of the car. Does this sound about right - anyone done this?
-
I had a similar situation whereas I just purchased (December '11) an '01 996 Cabrio. I went ahead and did the IMS upgrade and clutch while we were there. I Love my new car and feel good to have the upgrade since I plan to keep the car long term.
-
I have a 2001 Carrera Cab. The rear piece that covers the pop-up roll bars is loose on the driver side. I have accessed an online repair manual that says to remove the interior rear trim behind the rear seat backs.
The manual says to simply remove the two screws hold the trim panel and then "detach the auxilarry frame" (don't know what that means). Once the panel is out, I should be able to see the fasteners that hold the roll-over cover in place. Has any one had experience with removing this cover or the interior trim?
Any help appreciated,
Thanks
j-mann
Coolant res bottle replacement on 01 vs 99
in 996 Series (Carrera, Carrera 4, Carrera 4S, Targa)
Posted
I read the DIY tutorial for coolant reservoir bottle replacement for the 99 model. Anyone know there are any differences compared to an 01 model?
.