Welcome to RennTech.org Community, Guest
There are many great features available to you once you register at RennTech.org
You are free to view posts here, but you must log in to reply to existing posts, or to start your own new topic. Like most online communities, there are costs involved to maintain a site like this - so we encourage our members to donate. All donations go to the costs operating and maintaining this site. We prefer that guests take part in our community and we offer a lot in return to those willing to join our corner of the Porsche world. This site is 99 percent member supported (less than 1 percent comes from advertising) - so please consider an annual donation to keep this site running.
Here are some of the features available - once you register at RennTech.org
- View Classified Ads
- DIY Tutorials
- Porsche TSB Listings (limited)
- VIN Decoder
- Special Offers
-
OBD II P-Codes - Paint Codes
- Registry
- Videos System
- View Reviews
- and get rid of this welcome message
It takes just a few minutes to register, and it's FREE
Contributing Members also get these additional benefits:
(you become a Contributing Member by donating money to the operation of this site)
- No ads - advertisements are removed
- Access the Contributors Only Forum
- Contributing Members Only Downloads
- Send attachments with PMs
- All image/file storage limits are substantially increased for all Contributing Members
- Option Codes Lookup
- VIN Option Lookups (limited)


Chad_Pgh
-
Posts
25 -
Joined
-
Last visited
Content Type
Profiles
Events
Forums
External Paint Colors
Downloads
Tutorials
Links Directory
Collections
Store
Posts posted by Chad_Pgh
-
-
Thanks for the quick reply! So 34ft lb is still applicable for the cat sleeve, even with it's now M8 nuts/bolts?
-
I updated the DIY Tutorial to be more clear. It now says "The tailpipe 22 ftlb. (30 Nm ), cat sleeve 34 ftlb. (46 Nm), and the muffler bracket 17 ftlb. (23 Nm)."
Loren -this DIY was very helpful on my 996. Do you know if the torque specs changed for the 997? I noticed the 997 cat sleeve has a redesigned bolt/nut combo (nuts are now 13mm)? Any assistance would be appreciated! thanks
-
This is an old thread, but I'm hoping someone can help me...
I plan on facelifting my '08 997.1 to 997.2 (both front and rear bumper using OEM LEDs). I got the front conversion all figured out and almost done with the project..
My question is specific to the rear LED tail light wiring:
I've read every post I could find on this topic, but it's not clear what needs to be done for a non-turbo models (the most detailed posts were from Turbo & GT2 owners).
In summary I have the following:- 997.2 OEM LEDs
- 997 618 260 08 updated rear control unit (already has this as mine is a late-model '08)
- Waiting to buy 997.2 rear oem bumper (hoping to get the wiring figured out first)
From my research, next steps should be:
- Code rear control unit to 'LED' option instead of the 'incandescent'...done by dealer w/ PIWIS or Durametric Pro (wish I had one to borrow)!
- Swap PINs in front control unit A11 to A36 and A42 to A31). I believe the pins have to be moved from the regular bulb output to the LED output in the front module.
My questions are:[/font]
- Do I also need to have the front control unit / updated and/or coded for LED? The turbo/GT2 owners did this, but wasn't sure if it's because the front DRL's have LED turn signals or not? One person stated this needed to be done even thought they didn't update front DRLs.
- Can anyone confirm if these are the correct PINs to swap., there was also a mention of swapping other PINs, but could be related to front DRLs.
Any insight would be greatly appreciated!
-
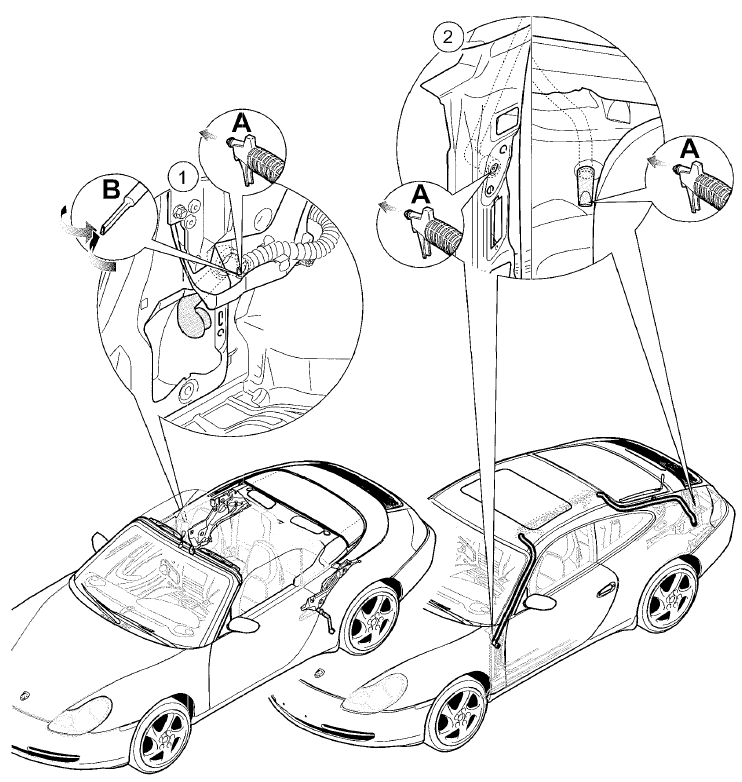
Here are the rear drains - don't forget the front ones too.

These diagrams are great! I cleaned out my rear drains which were clogged as well on my 997 Cab (which I assume uses the same system of drip trays). Now that my tray and drain tube is clean, I wanted to test it - so I carefully poured a good bit of water in side section water channels (#4 in Cab drain diagram) but didn't notice any water flowing into my clean trays- it simply ran out fore & aft the rear wheel. So- the million $ question is - what does the black corrugated tube that ends in the tray shown here attach to up above? What area of the car feeds water that ends up in the trays?
-
Ahh haa, you got the connections to the vip lists- thanks for sharing...The wiper puller worked great!
-
Where can I acquire this updated list? Is it the US/Canada version? I just downloaded what Porsche has on their website.
Any tips on removing the wiper arm when replacing the cowl (besides buying a wiper puller)? Mine won't budge with the bolt off...
Thanks again for the help!
-
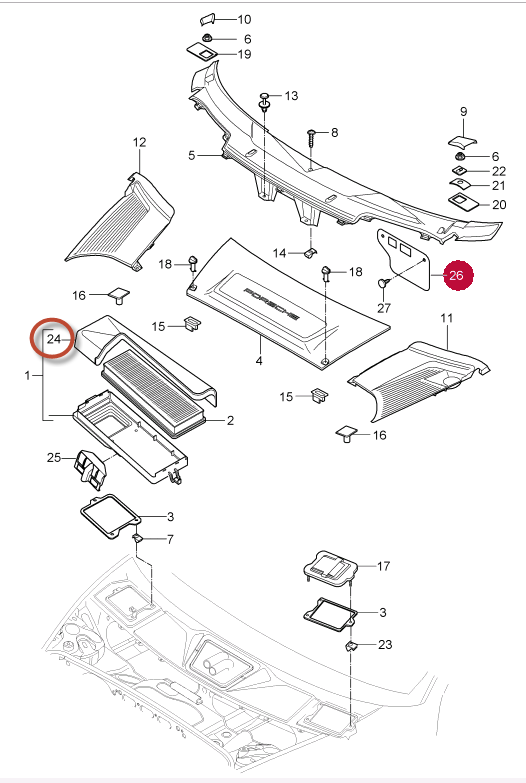
The part you referenced (997-572-763-00) is item 26.
From what you are saying you want item 24? (997-572-729-02 Cover -- US MSRP $59.12)
No, that's it, #26! It's not pictured on the USA/Canada PET (06.02.2010) version I have. Where did you find that illustration? I'm guessing its a ROW version since it shows in on drivers side? I'd like the tabs #27 too if you have the #....awesome, thanks!
-
As far as I am aware the foam cover was part of the bottom housing on some models. So it is not a separate part.
If you go to a dealer and ask to see 997-572-019-04 housing you will see what they sell today (US MSRP $68.08)
Thanks for the quick reply. I was referring to the thin cover/flap that covers the cabin filter that is attached to the cowl. I found part # 997-572-763-00 in PET called "cover", thinking this may be the part I'm looking for as the Pos is "-" which I now know means it's not pictured in the illustration".,,
-
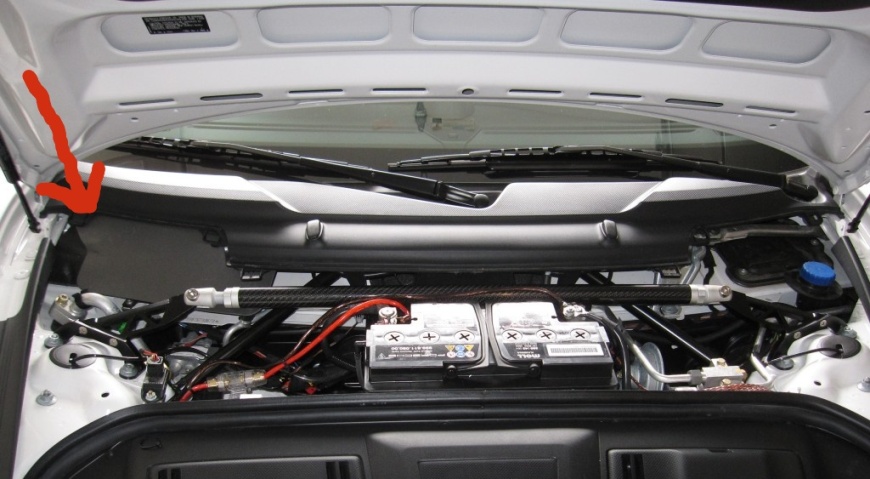
All your covers are missing - including the one over the battery and the brake booster on the other side.
The strut brace is why - someone put it on the car and took all the covers off because they don't fit with the (useless in my opinion) strut.brace
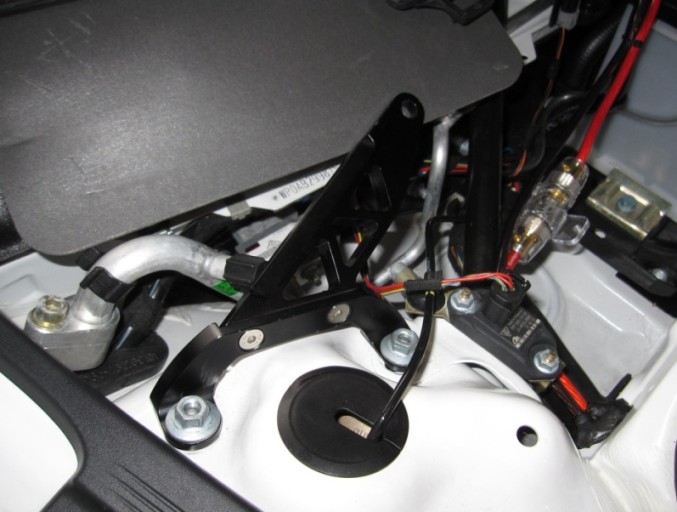
Loren - do you have any idea where I could find the part # for the foam cover (as seen in the first picture by the OP)? I looked in PET and can't find it listed anywhere! The part itself doesn't have a number., I ordered a new Cowl panel and it was not attached. Apparently it's quite the elusive part! Did Porsche forget to list this part maybe? Of are there ancillary parts that just aren't in PET sometimes? Mine is torn and I'd like to replace it along with the my new cowl cover. Thanks!
-
Hello everyone,
I have a problem on my Carrera 3.6 of 2005.
After washing, the windshield fogs up in an unusual way.
I found that this happens because the absence of the cover of the pollen filter.
This part has been forgotten or lost, in the past during a service.
May be they have forgotten to put the part in its place, it's so important because the particular function.
The filter absorbs water and transmits the steam in the cabin and must be replaced because loses its shape.
In practice, on my car, after removing the filter compartment cover, the element appears directly instead of the grey rectangular shaped cover (as shown in attached photos).
Please could anyone tell me the part number of this cover.
Could anyone kindly checks on his Carrera because I didn't find it on my PET file.
Unfortunately last week PCS ordered a wrong part (external cover) so my problem wasn't solved. They have misunderstood what I needed.
Thanks.
Did you ever find the part # for the thin foam cover? It's not listed in PET or anywhere I can find. I ordered a new cowl panel and it didn't come with this!
-
I have a related water issue on my '08 C4 Cab...I just noticed my passenger footwell area is soaked under the carpet (the foam pads), noticed this while removing my bose subwoofer for some new trim. I noticed the AC drain tube is in tact, but it terminates under the car with a grommet attached. There is noting on the other end....however after looking at PET I noticed they show a J-shape "connecting piece" (part #996 573 797 02), which I apparently don't have connected..Has anyone else noticed they have this connecting piece? Is it possible that if mine fell off that the force of driving could allow water to accumulate there? I did notice the drains under my cowl area were blocked up a couple months ago, I cleaned them out - so it's possible it's still wet from water finding it's way into the cabin??
-
Thanks for the tip! After the (-) battery terminal is disconnected, if I put the key in the ignition (and turn) I wonder if it prevent the wheel from locking up?
-
That is correct - 37 ftlb.
When torquing down the bolt- do you need to hold the wheel or is it ok to apply pressure if column locks up? Wasn't sure if tightening the bolt affected this. Also, any idea what the torque spec is on the 4 torx screws that hold the airbag bracket on? Thanks!
-
I got my original cans and tip back from Darin @ FD Motorsports and put everything back on this weekend. I gotta say that I'm very happy with the results! I also got everything coated with the velvet back ceramic and it turned out really nice. Most importantly., the sound is awesome! Exactly what I wanted., the car now has a nice tone / growl to it when you open up the throttle (especially with quick revs), however it's not too loud when you ease on the pedal and when cruising at a steady speed on the highway. I put together a quick DIY which includes some before and after pictures as well a guide to install these yourself. Thanks again Darin, another satisfied customer!
-
Yes leave well enough alone, i'm sure it's fine.
I've torqued the p-car prob as much as 25ft lbs and never a problem.
You would know if you had a problem if you stripped a thread. Then the head would have to come off. !!!!! :)
If you look at the instructions for the plugs it actually has a degree angle measurement you are supposed to follow, and how accurate do you think that is? (actually more accurate if you have a degree angle measurement device, but I think most people just say "aaaahhhhh good enough")
I do the plugs in my boat by feel and I've never had a problem.
Thanks, that makes me feel better about the job. I re-checked the torque wrench I used against another one I have and feel more confident that the setting was close. I guess if I were off by 20 ft lb or stripped the threads as you mentioned I'd know it.
-
Be a little careful with new digital torque wrenches. Most are +- 4% at 30 ftlb and above -- and +- 7% below 30 ftlb.
For engine parts I am happy to stick with my 30 year old (but often calibrated) Proto torque wrench +- less than 3%.
The plugs just might be a little harder to get out the next time.
Thanks, so do you think I'm better leaving well enough alone- even given that they might be 7 ft lb too tight (not sure how much 7 ft lb equates to, maybe 1/4 turn)? The original 10yr old plugs I removed were in there really tight! Given the ambigious torque wrench settings, I'm afraid to do more harm than good by loosening and re-torquing, even if I can verify the calibration. I should've splurged for a quality torque wrench that I too can keep for 30 years!
-
I got my new coils and managed to put everything back together, and torque everything to spec -thanks again for the help! I started the car up and let it idle for a couple of minutes, no CEL and seems to run fine.
Now that I'm done, I am questioning the torque wrench I used and I'm concerned about it's calibration and possibly over-tightening the plugs! The wrench I used (like another one I have) the "0" on the handle doesn't line up with the hash marks on the wrench, for example @ 20 ft lb, it was about 7 ft lb shy, so I had to turn the handle to increase by 7 ft lb to get it to line up with the hash mark to "now" be at 20 ft lb, so technically it was reading 29 ft lb. (I tested this vs a new digital one I got as comparion and that seemed to be the correct setting) and I didn't feel like I was over-tightening really, but it was hard to tell. Should I be concerned? Would the (possible) extra 7 ft lbs be of real concern? To be safe should I loosen the plugs and then re-torque when I'm sure my wrench is working properly? If I do re-torque, would I then do the 18.5 ft lb even though the car wasn't driven? Thanks!
-
Since yours is a 2003 car there are no spark tubes to change, so I would just do the plugs and replace any coils that are cracked or don't pass the resistance tests.
As for gapping the plugs you shouldn't need to gap them if they are multi ground, but they should be checked to ensure they were manufacturered correctly.
I'm not sure how you could bend the prong on a multi ground plug to set the gap (I've tried and only ended up ruining a plug). So if it is not set correctly from the factory it should be replaced with another new one. If it is single ground absolutley you need to gap them properly.
Thanks, I went ahead and ordered all new coils to be certain. I also noticed that my coolant overflow drain tube was aimed directly at the #1 coil which had the most cracks, I ordered the new design cap but wonder where the drain hose should be directed (or if it is supposed to clip onto something)?
-
I think I answered my own question, but wanted to confirm (I was confused as the intall guide says to "tighten down all of the nuts and the tailpipe 22 ftlb.", so I thought all should be 22 ftlb., guess a comma was implied)..
All 5 M8 nuts should be torqued to 17 ftlb.(3 that attach muffler bracket and 2 that attach muffler to the bracket)
Tailpipe clamp 22
Cat sleeve 34
Correct?
Thanks again!
I updated the DIY Tutorial to be more clear. It now says "The tailpipe 22 ftlb. (30 Nm ), cat sleeve 34 ftlb. (46 Nm), and the muffler bracket 17 ftlb. (23 Nm)."
Thanks, crystal clear now! I assumed that the two longer bolt / nut combo which attach the muffler to the bracket are also to be torqued to 17 ftlb. since they use the same nuts...
-
I think I answered my own question, but wanted to confirm (I was confused as the intall guide says to "tighten down all of the nuts and the tailpipe 22 ftlb.", so I thought all should be 22 ftlb., guess a comma was implied)..
All 5 M8 nuts should be torqued to 17 ftlb.(3 that attach muffler bracket and 2 that attach muffler to the bracket)
Tailpipe clamp 22
Cat sleeve 34
Correct?
Thanks again!
-
Thanks again guys.
I'm assuming since the plugs are a multi-ground type they don't need to be gapped, just inspected to make sure the electodes weren't damanged duing shipping, etc.?
Any other suggestions of things to replace while I'm in the area?
-
Your torque wrench prob has more deg of error than 1ft lb so I wouldnt sweat the discrepancy.
Good point, I noticed my new digital torque wrench (and most others) are accurate within 4%, but only at > or = 20% of capacity- so a mute point I suppose.
Yes, for MY2003 those were the wrong plugs (or perhaps never changed).
The correct plugs are FGR 5 KQE0.
Yes, 22 ftlb. is correct for new plugs - with no anti-seize. If you were removing the plugs and re-using them then it would be 18.5 ftlb.
I think the new 997 coils are better - but you need to remember that your car is almost 10 years old and plastic parts are going to be getting brittle and break.
Thanks Loren... I'm pretty sure the plugs were never changed, so the Beru's must've been the original plugs installed at the factory. I guess Porsche had issues with them (didn't see details of the TSB)?
So 22 ftlb. is the Porsche spec and the 28 nm is Bosch (suggested) torque?
In regard to the coils, it made sense to replace them now since I'm this far along. Curious what ill-effects the cracked coil could cause? When putting them back in, do I just push as far as they go and snug to 7.5 ftlb., or should I kind of twist to the R then back to make sure they are seated all the way (noticed they have spring action inside).
Thanks again guys, great info on this site and you guys are like the Porsche Yoda's!
-
I'm new to the forum and wanted to thank everyone for the excellent instructions and tips! I successfully managed to remove all 6 plugs on my 2003 996 (with 54k miles) pretty easily thanks to all the advice. I already had my mufflers out (getting the Fister D mod) so I decided to give this a try. The plugs I removed were Beru 14-FGR 6 KQU, not sure if these were the original plugs (which I see are no longer recommended) or if a previous owner put the wrong plugs in as they look pretty trashed (althought the car seemed to have been running fine, just a bit of vibration at idle). At any rate- I'm replacing with the recommended Bosch FGR5's, The box shows 28nm (20.65 ft lbs), however the manual (and DIY) shows 22 ft lbs, obviously not a big difference, but which is correct? Is the 22 ft lbs based on the old plug spec? All of my coils had cracks, so I'm waiting for the new ones (Beru oem replacement from Pelican was much cheaper vs oem), I see the coils now have a 997 part #, wonder if they are now designed better (less prone to cracking)?
-
Is there a metric equivalent of the torque settings described above by Loren - I am having my exhaust fitted in Spain and I am not sure the guys will understand lb/ft ..............
I edited my first post and added the metric Nm values so you can go back and check it now.
You can also convert and foot pound setting with: 0.7376 * NM = FT/LBS.
Hello, new to the forum here- lots of great info! I wanted to clarify the torque specs per the install guide you posted. Should all 5 (M8) nuts be torqued to 22 fl lbs (3 that hold muffler bracket and 2 that attach muffler to bracket)? I was not sure as there was mention of the muffler bracket being torqued to 17 ft lbs., or is this referring to the actual bracket with 4 bolts that attaches to the vehicle? Thanks!

PSE (Porsche Sport Exhaust) Install
in DIY Articles - Carrera (996) - Mods
Posted
Thanks again., that also answered my question on the cat fastening clamp! Much appreciated!