Welcome to RennTech.org Community, Guest
There are many great features available to you once you register at RennTech.org
You are free to view posts here, but you must log in to reply to existing posts, or to start your own new topic. Like most online communities, there are costs involved to maintain a site like this - so we encourage our members to donate. All donations go to the costs operating and maintaining this site. We prefer that guests take part in our community and we offer a lot in return to those willing to join our corner of the Porsche world. This site is 99 percent member supported (less than 1 percent comes from advertising) - so please consider an annual donation to keep this site running.
Here are some of the features available - once you register at RennTech.org
- View Classified Ads
- DIY Tutorials
- Porsche TSB Listings (limited)
- VIN Decoder
- Special Offers
-
OBD II P-Codes - Paint Codes
- Registry
- Videos System
- View Reviews
- and get rid of this welcome message
It takes just a few minutes to register, and it's FREE
Contributing Members also get these additional benefits:
(you become a Contributing Member by donating money to the operation of this site)
- No ads - advertisements are removed
- Access the Contributors Only Forum
- Contributing Members Only Downloads
- Send attachments with PMs
- All image/file storage limits are substantially increased for all Contributing Members
- Option Codes Lookup
- VIN Option Lookups (limited)


rallygabe
-
Posts
52 -
Joined
-
Last visited
Content Type
Profiles
Events
Forums
External Paint Colors
Downloads
Tutorials
Links Directory
Collections
Store
Posts posted by rallygabe
-
-
'99 c2 6spd 167000mi
Okay guys, Finally got my new water pump up on the engine. I go to torque the bolts and I get around to the last bolt only to have it bottom out!
I jump back into the porsche parts Katalogue and sure enough it lists a 30mm and 25mm long bolt! can somebody illustrate for me which locations receive the shorter bolt? they all looked the same when I pulled them out :( rookie mistake for the old guy! :D
thanks in advance all!
-
I tried looking through the wiring diagrams in my Bentley to no avail.
I went down and cut back a bit of insulation and the wires appear (to me) to be Violet and Violet/Blue. Another look over the wiring diagrams and I didn't see any two wire sensor the feeds the ECU with that color combo?
Could be red, it looks like red/violet is the 5V feed out of the ECU?
-
give the head a couple good whacks with a small hammer, right next to the actuator, while idling... :D I did actually do this and haven't got the code since! (actually I did more than that but the impacts are what seemed to sure the code)
-
1999 C2 6spd
Hey guys, I have known of this connector but recent repairs let me finally get my eyes on the plug itself and some wiring.
The plug is the same plug as is found on the vacuum control valves. (both valves have wires plugged into them)
The wires come out of the engine harness bundle between the vacuum reservoir and the driver side intake manifold, with the wires extending forward to the point that the wires can be seen coming forward of the AOS and the cylinder head, when viewed from below.
I didn't have my phone on me to snap a picture sorry!
Thoughts on what this connector is supposed to be plugged into? Engine runs just fine without it connected (or as fine as it always has!)
thanks all!
-
I have had good luck with the CRC MAF spray on other vehicles. Haven't had a reason to try it on my 996 yet.
-
Sorry, but I cannot recommend buying anything important or expensive from a business that is run that poorly..........
I have never bought anything craftsman or sears via the interwebs. ****ty that you had such a poor experience! :cursing:
-
Unfortunately, with Sears slowly "circling the drain", both the quality of their tools and their once ironclad warranty have started to suffer. I would be very cautious about buying tools for the long term from them as they may not be long for this world.
True about Craftsman/sears quality, but just the same: They are still better than the crap I see a lot of people trying to use from Northern and other "discount" tool outlets.
-
I use Green coolant because I can get it anywhere in the USA...which is good when there is a high risk of having road side problems, which is likely when you are me! LOL :jump:
I use it in all of my vehicles even though it is not on the "recommended" list. the only coolant I would strongly avoid is Dex-cool at this point.
-
I get that all the time when I am out running errands.
All it means is that if you want an accurate reading, wait a long time.
If you are using the dash as your primary oil indicator perhaps you should wait? Sorry, that is a flamer comment but I could not resist the urge to type it!
Seriously though- non-issue unless that happens every time you start your car.
-
Craftsman had their 3/8 and 1/2 clickers on sale right before christmas. They are great for the shade-tree mechanic.
Keep in mind that they are cheaper and should be calibrated once purchased. The high accuracy torque wrenches cost way more than most "recreational" mechanics are willing to pay.
Avoid the really cheap quality ones that you can buy at Harbor Freight or similar. They have *****-poor precision AND accuracy.
-
my '99 had 19x11s on the rear when I purchased it. Not sure of the offset/ET but they looked great and fit like a glove. Will have to go check.
If your able to check that would be great.
So I forgot all about this. Just sold the rims a week ago too.
If memory serves correct the rears were 19x11 with an ET65?
Dont recall the front ET.
My 996 is not lowered at all and is a 99 so I can't speak for other years or modified suspensions.
-
Loren, and others-
If the MAF is not reading at all, as might be the case when unplugged=same performance, have you seen that not CEL-out? I think I am going to go try with mine unplugged as a test as well but curious about CEL as I only get P1123 right now.
I really wish my move was over so that I could get my durametric out and pull some numbers! :D
-
I'll talk with Reno Rennsport regarding options of having my injectors refurbished/cleaned, but should that be cost prohibitive or the injector be not salvageable, does anyone have any experience with Beck Arnley refurbished fuel injectors? Looking online, it seems like I can replace the whole bank of injectors with them for the price of one new Bosch injector. And since the fuel rail would be removed, I'd prefer to clean or replace all three rather than guess which injector is the problem based on the burn condition from reading the spark plug.
Being a Parts professional at major parts chains for several years while in college I would strongly suggest you avoid anything re-badged by Beck-Arnley.
When companies like RCInjector and Marren are easily reachable through the internet I don't think anything besides cleaning the injectors off your engine make any sense. I used to have access to an injector cleaner at school and I brought back injectors that were so bad that they didn't react to any pulse at all. (I got that set to flow within 10% so it is very doable)
Just my input. :)
-
Yeah, that is the sound of your Bendix not retracting in time and over-spinning the starter mechanism.
complete agreement with fixes listed above!
-
Could as simple as worn tire(s).
ESPECIALLY at those listed speeds.
-
Alright guys,
Trying to do a little troubleshooting without all my books, so hoping you smarty pants on the forum can help me out.
What sensors does the ECU look at during WOT?
I have some serious stumble/stutter under WOT when I have smooth operation under partial throttle.
Thanks in advance!
-
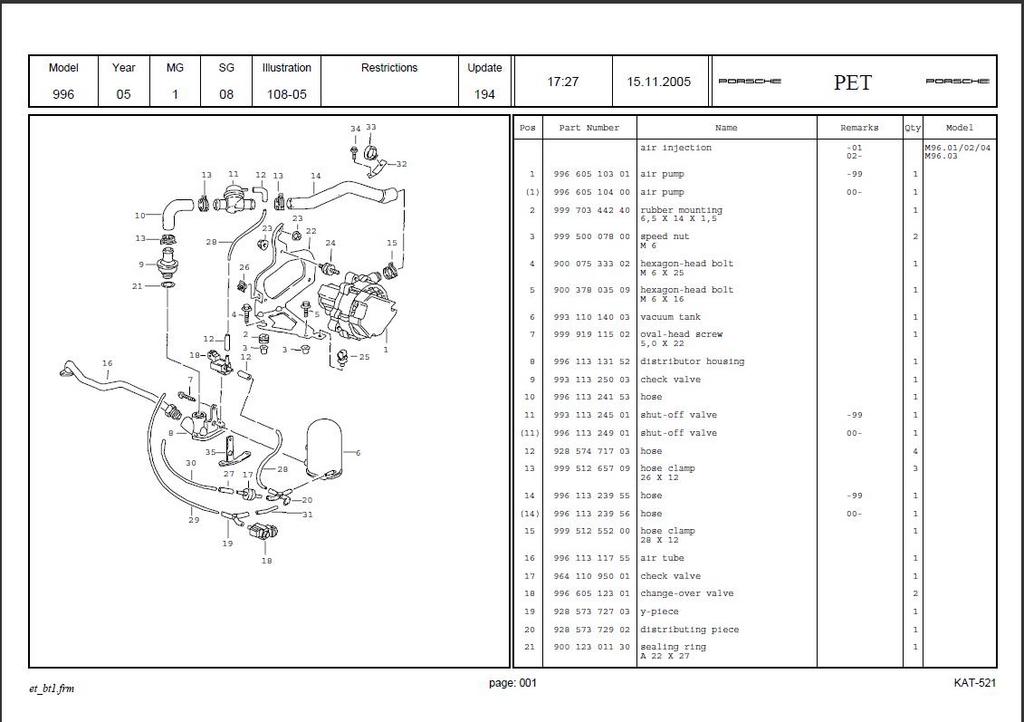
So my actual question is: Where does #18 mount to and what does it connect to? I am trying to determine if it is even on the engine and this particular diagram doesn't help much.
I suppose I should clarify- the LOWER #18. what does it control and where else is it plumbed into?
-
99 c2
I read exactly 15"
cold idle, no fluctuation
I also suspect some leakage though have not been able to find it at this moment
-
I was the part about the engine mount oozing fluid if in need of replacement. Is this noticeable from inside the car or from underneath?I have been wondering about my '04 w/56k miles on it and wether to replace them although car sits correctly from what I can see.Comments appreciated. Thx
Well, I had no signs of leakage, though I am guessing any signs would have been long since washed away and covered in road grime.
I took a picture of the old and new mounts next to each other and the old ones studs were nearly 1/2" extended. Both sides were this way so the car looked fine, no lop-sided exhaust tips or anything like that.
I have been wondering if the dual mass flywheel failing would feel like this lurching that I am experiencing? I have never dealt with a said type of flywheels so I have no idea what happens when they wear out, or whatever happens. Can somebody shed some light there?
-
Okay guys, mostly related question so I thought I would just add to the post.
I read through the P-car write up, then found this post on rennlist

So I found that my resonance flap was not connected to anything, and the diverter valve for the resonance flap had both lines plumbed into #19.
I reconnected the lines for above valve into what I believe to be the correct orientation. BUT when I did that I was left with one of the branches of #19 not connected to anything. Upon further inspection I found a 2 wire plug lying in the same area as these vacuum lines. The plug is on wires that appear to run between the furthest two intake runners.
So my actual question is: Where does #18 mount to and what does it connect to? I am trying to determine if it is even on the engine and this particular diagram doesn't help much.
Thoughts?
-
Sorry to revive an ages old thread.
I also have tilt handles that do not work on my drivers seat. I just spent about an hour trying to figure out how to get my seats cushions apart.
on my MY99 standard issue seats the center back cushion unwraps at the bottom rear and unclips at the top. This, I thought, would be very helpful. It was not. It appears that the cable release mechanism is either on the outside of the shell, or inside a hollow on the outsides.
What I did finally discover at the end of my time with that #12 is a Torx bolt that can be adjusted. Why does this matter? because the way the release works is that it pulls UP on a pawl.
SO, I believe if you adjust the Torx bolt inward (viewed form the bottom of the seat) I believe that will help in correcting the problem. I will report once I find the appropriate torx driver and try it on my seats.
Cheers!
-
I was thinking fuel pump. At least pump related since the gauge and pump (i think) are all in one assembly. as logray pointed to- power to the pump unit a culprit maybe?
Weird set of circumstances for sure.
-
Update:
I replaced both engine mounts this morning. It seems pretty clear that they needed replacing BUT, on the test drive I have made no progress in the "lash" department.
I did find a hole on my fuel tank vent line which, when "patched" seemed to help both smooth out the idle, and even reduce the "lash" a little bit. (maybe it was just a perception thing though)
Any more thoughts guys? I don't have the facilities to do the tranny mount right now, still contemplating a way to diagnose that with it in the car.
-
I do dig that GT2 wing as well, haven't found one around these parts though...
3.4L NA water pump bolts
in 996 Series (Carrera, Carrera 4, Carrera 4S, Targa)
Posted
Thanks Ahsai, that was indeed the case!