Welcome to RennTech.org Community, Guest
There are many great features available to you once you register at RennTech.org
You are free to view posts here, but you must log in to reply to existing posts, or to start your own new topic. Like most online communities, there are costs involved to maintain a site like this - so we encourage our members to donate. All donations go to the costs operating and maintaining this site. We prefer that guests take part in our community and we offer a lot in return to those willing to join our corner of the Porsche world. This site is 99 percent member supported (less than 1 percent comes from advertising) - so please consider an annual donation to keep this site running.
Here are some of the features available - once you register at RennTech.org
- View Classified Ads
- DIY Tutorials
- Porsche TSB Listings (limited)
- VIN Decoder
- Special Offers
-
OBD II P-Codes - Paint Codes
- Registry
- Videos System
- View Reviews
- and get rid of this welcome message
It takes just a few minutes to register, and it's FREE
Contributing Members also get these additional benefits:
(you become a Contributing Member by donating money to the operation of this site)
- No ads - advertisements are removed
- Access the Contributors Only Forum
- Contributing Members Only Downloads
- Send attachments with PMs
- All image/file storage limits are substantially increased for all Contributing Members
- Option Codes Lookup
- VIN Option Lookups (limited)


Paul Ri-Chard
-
Posts
26 -
Joined
-
Last visited
Content Type
Profiles
Events
Forums
External Paint Colors
Downloads
Tutorials
Links Directory
Collections
Store
Posts posted by Paul Ri-Chard
-
-
Thank you for your replies, and attempted replies. Just asking for a manual to borrow for a few days. I am a former writer and understand copy right laws. Specifically needing to look at wiring for DME terminal 30 pinouts and leads and supplies. I have a fault code P1602. See my post on hunting idle made worse. Can phone or text me. 916-622-4125.
Any help that doesn't get the forum members and administrators in possible trouble is welcome.
Again,thanks in advance,
Paul Ri-Chard
-
If any local members in the Roseville-Sacramento area own a 986 Bentley manual (1998 Boxster) that I can borrow over the weekend, I would really appreciate it. Need to trace a possible wiring issue that may be contributing to a P1602
(Terminal 30) and subsequent idle control valve problem.
Thanks in advance,
Paul Ri-Chard
Roseville, California
-
Thanks, I will get my trustee voltmeter out on Saturday. I'll do a fresh post to see if any forum members in my area would want to loan their Bentley manuals out for the weekend.
-
Thanks JFP. I used my Durametric to clear the codes and left the key on the on position for 1 minute. My little base Boxster ran a little better today but consistent idle at < 800 rpms hasn't happened yet. I'll drive around a bit this week and get some miles on it to see if the P1602 code returns and/or if the idle smooths out.
By the way if I have to resort to tracing the terminal 30 wiring, is there a logical way or logical pathway on how to proceed ? I looked at my DME-ECU and not even sure on how to disconnect it properly, or where terminal 30 is located on the DME-ECU. Do I disconnect my battery when removing the DME ?
Thx, Paul Ri-Chard
-
The ICV is New, less than 40 miles, so unless the new ICV is sticking,could the code could mean something else ? Also can a disconnected battery cause it to fault to P1602 ? I was doing some work on the seats recently < 50 miles ago and disconnected the battery so I wouldn't trip the air bag light.
Also maybe I didn't wait long enough for the DME to 'teach' the ICV the new values. How long is a typical adaptive 'break-in' period ?
Do I need to clear the old codes first ? Before the new adaptive values can be re-learned ?
-
Well the idle problem is not resolved: Here are my car's 'symptoms' :
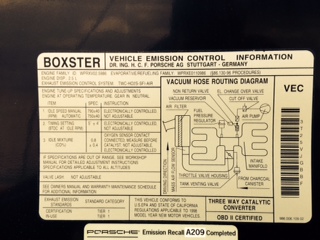
When I do a cold start the car idles evenly at about 850-900 until it starts to warm up to its operating temperature. Then the idle increases to about 1140-1200rpms but never returns. I replaced the ICV with a new one... yes the part # was correct. the vacuum lines appear to be all correct except I never had a non-return check valve as the picture to the side (it ran better than it did now but with occasional stall).

My Durametric gives me codes P1602 = Supply Voltage Open and P0506 = IACV control problem.
Any help from the group ?
-
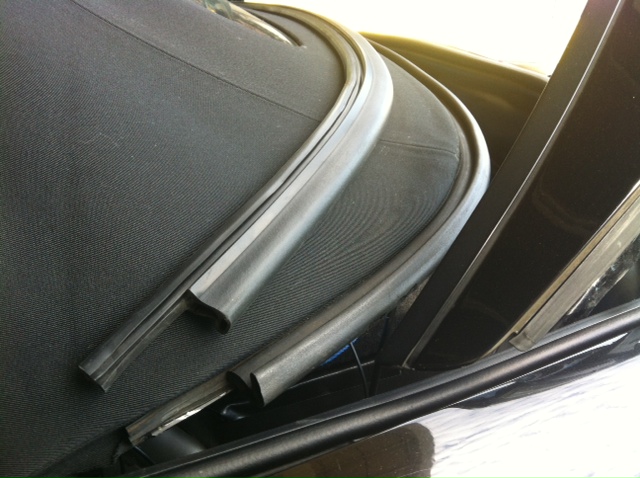
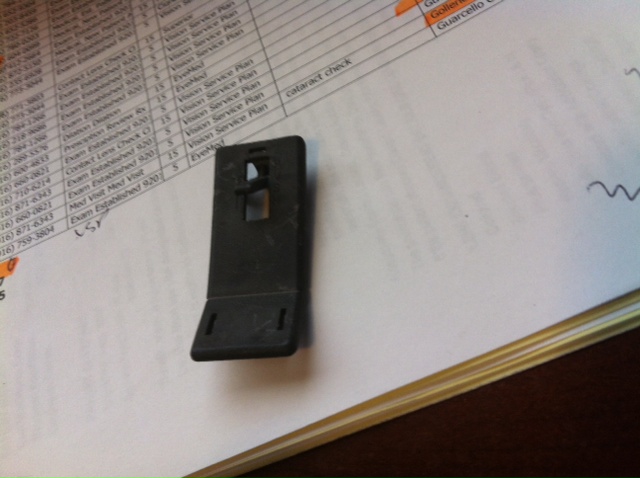
Clarification, the top photo is "before", the bottom photo is after the added bend.
-
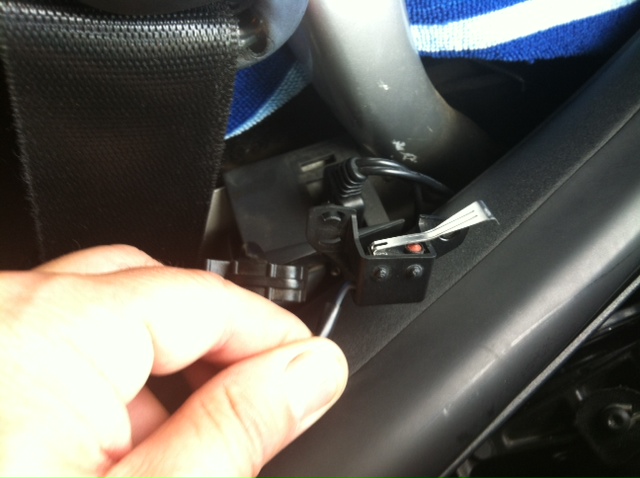
Finally got the dash light to go off with top in the closed position thanks to the tip Maurice gave. Following the microswitch trouble shooting guide, there was no signal from terminal 29 ( the b-pillar microswitch). The switch has a simple two wire quick disconnect located at the base of the roll bar. Using a voltmeter, I tested the switch and it worked fine when I manually closed it. I checked the two wires going to the relay carrier. The brown one is a ground, and the brown with green stripe goes to terminal 29 on the carrier. The wire showed good continuity. . I took the switch out and compared it to my old one. What I found was that the spring was a bit weaker than my old one and was not making contact in the same position or perhaps with the same force. I put a little more bend in the spring and re-installed it and viola! No more stupid red light staring at me .
this is before.I "added" about 2mm to the bend. It's pretty subtle, so take a second look at both pictures and compare. It was enough difference to close the switch ( and turn off the light) when I put it back into the car and closed the top. -
Thanks Maurice, I will trouble shoot and let you know what I find out.
-
.A few comments on your top operation:
2. Putting a small foam block on the underside of the clamshell triggers (presses down) that switch a split second earlier and that turns off the motor and the dashboard light a little bit earlier in the rotation of the V-levers on the transmissions.
4. The B-pillar microswitch serves mostly to reverse the direction of the rotation of the V-levers by reversing the direction of the spinning of the electric motor.
5. If your top appears to be retracting (i.e. the leading edge of the top pulls away from the top horizontal edge of the windshield frame) before it has completed the cycle, the overall length of your pushrods must be adjusted to the optimal length. The optimal length will result in the leading edge of the top meeting the top horizontal edge of the windshield frame at the completion of the cycle.
Regards, Maurice.
Thanks the replies,
I did the foam trick and the rear motor switch turns off the light only in the top down (open position), but not in the top up (closed position). In the top open position the b-pillar switch is open, right ?
When closing the top, the convertible top frame meets the windshield frame exactly and snugly when the clam shell is tight and sealed even when pressing the motor for another 1-2 seconds, so I think I have the pushrods in their optimal position, however the dash light still stays on. If I lock the top down, the windows will roll up, but the dash light still stays on.
Why do the the windows roll up but the dash light stay on ?
Does the front microswitch have two separate signals?
One that controls the windows and one that turns off the light ?
The mechanism looks too simple for that. If makes more sense to me that the b-pillar microswitch is in the closed position, with the top in the nearly closed position, that the relay is now waiting for two signals: one from the closing of the clamshell, then waiting for the latch to close.
If that is the case, perhaps I have a short in the b-pillar wiring or the second signal wiring in the top latch microswitch.
Does any one have circuit wiring diagram that elucidates the relationship between the switches and relays ?
It is amazing how one red light on your dash can make a Boxster owner nutty!!!
-
I had removed my clamshell and put it on a perfectly straight and level workbench.it was less than 1/2 mm out of true at all four corners. I did resort to the foam trick and now in the open (top-down) position the light goes off, however in the closed ( top-up) position the light will still not go off unless I pull the double relay. Do you think it is my b-pillar microswitch lever ?Hi Paul.
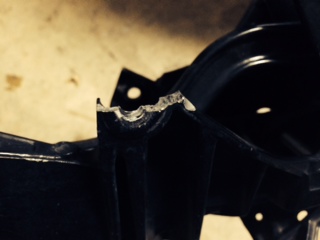
I am guessing the last guy broke the metal on the frame because he used a metal joiner rather than the plastic OEM unit - which are known for breaking. And so some people have created the metal ones to prevent it from happening. The thing is, the plastic is designed to be a deliberate weak point in case there is something wrong with the top mechanism - usually dyssynchronised operation (left vs right). This can happen if any of the clips on the clamshell comes lose and things don't move about in the way they are designed to. I imagine if the plastic joiners don't let go, the metal on the frame does, as did in your car with the previous owner.
Anyway. There should be no danger of causing the same if you use those plastic joiners. Also, if you "over press", the top transmission should just run out of teeth - again a safety mechanism. The gears inside the top transmission is a half circle rather than a full circle. So over press results in the transmission disabling itself. It's a pain in the arse to resynchronise as you will need two people - one to press the top switch while the other pulls on both top transmissions to get the gears to engage at the same time.
I think the light is staying on because the clamshell is bent out of shape over time - you can try "flattening" the clamshell so that when it closes, it pushes down the contact switch earlier. Or you can just use a piece of foam under the clamshell to push on the switch earlier, like kbrandsma suggested.
I personally have a piece of foam stuck there and it's been functional for the last 7 years.
I'm thinking that the lever is making contact too late and the runtime is too short before the clamshell is tight and top fully closed.
Should I try to bend it forward a bit and see if that works ?
-
Fred, I replaced my top too last summer on a 98 boxster. A Robbins top with the heated glass window. Mine had a similar gap, maybe 3/16". I left the car outside and the top mostly closed. I never could see daylight and the top never leaked when it rained a few times, although it rattled a bit. Suspicous, I checked the blind nuts under the top window frame where the visors and center latch bolt into. There are six total. 4 of 6 of mine were broken. I replaced all the broken ones via instructions on Mike Focke's website. That closed the gap a bit and stopped the rattle. It looks great right now. Still fussing trying to get the guide wires to fall in their tracks properly.
As long as yours is watertight and the blindnuts are not broken, I would just wait it out.
-
Thanks neighbor.... It was hard enough to crawl under there once. Doing it again in another 5-6 years will have to be the next contorsionist problem. Grrrr.
-
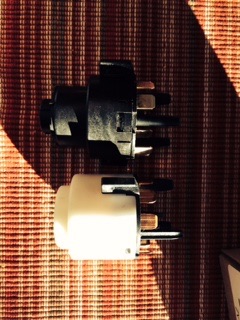
Thanks JFP,
I'm sure that the black GP replacement part is not compatible with my current lock assembly. The white Audi switch fits perfectly. When I was researching on-line, Pelican Parts had an alternative part Number (4B0-905-849-M56) that looks like mine.It says it works for Boxster ignition/lock assemblies 996 347 017 07 only . See link: http://www.pelicanparts.com/catalog/SuperCat/1042/POR_1042_ELIGNT_pg2.htm#item6. Says something like " Boxster (1997-04) FROM 04". Did Porsche service replace failing assemblies on the early models with '04 assemblies? I guess I should have looked at the ignition/lock assembly part number. When I was in the not-so-comfortable Houdini position I didn't want to spend another 5 seconds looking.
-
Every once in a while, my '98 Boxster ignition switch fails to engage the starter. I mean there is no electrical response at all. If I try again, sometimes on the 3rd or 4th attempt it will start, but sometimes it takes as many as 8 times. I was thinking it was maybe a faulty ignition switch so I ordered a replacement from AutohausAZ. Getting positioned on my back for access was hard, but I sure could have used a lot shorter arms. Finally I got the little bugger out of there. But my replacement looked like it was already replaced with an Audi switch part # 4B0 905 849.
When I tried to put the new switch in ( part # # 4A0 905 849B0E) I noticed it didn't seat correctly because it was too tall. plus the female end of the new switch wasn't oriented in a manner that it would insert when the key was in the "0" or off position.
. You can see in the photo that the porsche switch in black is taller and doesn't seat all the way in the receptacle.Has anyone else had this problem ? Are there different assemblies for the '98 ?
-
I was reading a previous post in 2011 made by a member named Fermin who had the same problem with his '99 convertible top dash light staying on all the time even though his top was really working near perfectly, except for that darn red dash light staring at him all the time and the fact that he couldn't drive it in the top open position without having the windows all the way up. I recently replaced my frame and rebuilt my top too because the previous owner had broken the pot metal where the steel ball connects to the front push rod, rendering the frame useless. Fermin's problem was that his light stayed on all the time. He had properly synched his transmissions, adjusted his pushrods correctly, replaced his top latch microswitch, checked and adjusted his b-pillar switch and rear motor spring to lid gap and cleaned and adjusted his brake switch. Apparently the solution was to hold the button down longer at the end of the cycle to get the light to turn off.
Like Fermin, I am totally paranoid about the transmissions overrotating and shearing that pin off and breaking the pot-metal and starting all over on a very expensive project.
My question is: What determines the motor to stop before it might over-rotate? Is it the electrical load on the motor determined by the spring tension?, Or is it an after- run time on the rear microswitch that turns off the convertible dash light?
I replaced my top latch microswitch and looked and cleaned my brake switch, Still, my dash light stays on and when my top is in the open position (clamshell is completely down and level) the windows stay dropped about 2.5 inches. In the top-closed position the windows close completely, so I think the new top latch microswitch must be working, (again the clamshell is tight and level) but the light still stays on. If I pull the double relay off and put it back on, the light goes off until I open the top, which of course is normal. But when I proceed to completely open the top and the clamshell closes tightly the light continues to stay on. If I continue to push the control button for a brief (1 second) in the down (top down) direction it often reverses the direction of the clamshell and starts to open. Is my problem a bad rear microswitch or am I just being a wussy and should keep pushing the down button on my dash risking catastrophic destruction of my top that works pretty darn well right now?
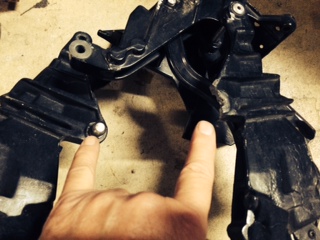
You can see in the photos the destruction of the ball joint on the frame. My pinky shows the normal right side with intact ball and pot-metal, my index finger shows a broken frame and no place to put that ball joint.
Close up shows why I am paranoid.
-
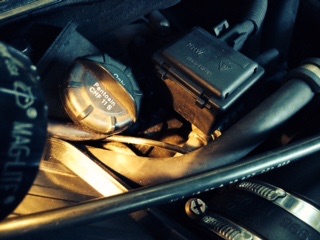
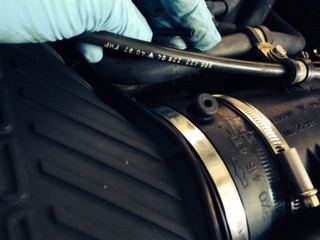
Opps this is the last picture of the hose connected to the rubber sleeve on the intake plenum. This view is from the cockpit, looking over the headrest of the driver's seat.
-
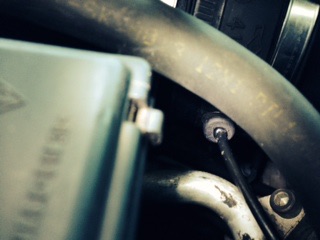
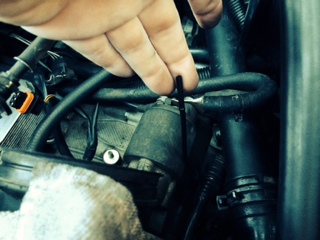
thanks Joost. I found the small vacuum hose on the left side. It was tucked down there out of sight. Once I reconnected it, it purred like a kitten at about 750 rpm... For a while. I noticed that the hose seemed a bit short so it might have pulled out of the rubber sleeve again. So I will look tomorrow to see if that is the case. In the mean time, I've posted some views in case some other buffoon makes the same mistake that I did. Even the diagrams from the Porsche dealership had very poor sketches for the left side. So I hopes this helps. First picture shows location of fuel pressure regulator.
This is connected to a short (2") curved section of approximately 5/16 hose that then connects to a small vacuum hard plastic vacuum line that routes to the front then underneath the left intake manifold.
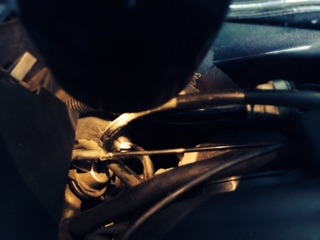
. These 1/8" hard plastic lines (Look at my fingertips on the blue gloves) have a shoulder that is supposed to sit flush against both ends. It's important to position the nipple on the rubber sleeve on the intake manifold in the right orientation. If you have it flipped 180, your vacuum hose will not seat well and cause a vacuum leak. The last photo shows the connection to the left ( driver's side) but viewed from the cockpit behind the driver's headrest. -
Thanks Mike. I did find it lower on Amazon, same part Bosch part # 0 280 140 572, porsche # 996.606.160.01 for about $161 free shipping.
-
Joost,
Thanks for actually spending your time to open your engine bay to verify my problem. Who does that anymore ? Mucho gracias!
I will take a look again and retrace the drivers side port. I certainly don't remember seeing any loose vacuum lines on that side. Perhaps my blind spot had enlarged that day causing me to miss it. I do have glaucoma so it's possible. I temporarily plugged that side with super sticky 3m tape this am before I went to work and it helped quite a bit. Still idles high 1020rpm and occasionally hunts up to 1200, but the Rpms don't fall quickly between slow ( lazy) shifts.
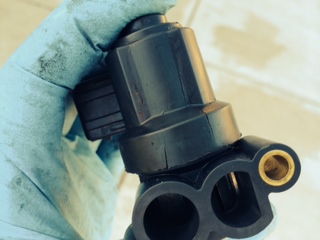
The hollow pin on the ICV... Did you drill it out ? Will I have to worry about damaging the electrical side of the ICV if I do that ?
I will try Q-bond or super glue to see if I can seal the cracks. Sunset Porsche quoted me $461 for a new Bosch ICV. Ridiculous !
You can purchase a Kia ICV in the same exact physical configuration but slightly different inductance values for about $35, not that I would substitute that. I'm not a Louie Viton type of guy, but I don't always shop at K-Mart either.
-
I am having the same problem after new top install. Did you ever figure out a solution ?
-
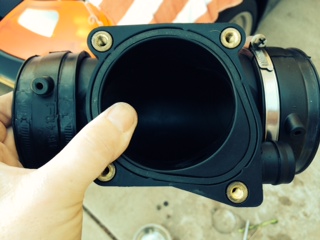
I decided to clean my '98 Throttle body and idle control valve following Advise on Pedro's Garage and Pelican Parts because of a intermittent idle problem, when the LOW idle would sometime cause a stall.
When I put things back together, the idle now has the opposite problem, hunting from 1100 to 2100rpm's. I replaced the ICV gasket, and the seal between the throttle body to the 'T" plenum. I'm 99.9% sure the rubber seals between the 'T" and the plenums are seated correctly...BUT I noticed two potential problems upon inspection and re-assembly. Number one is that both rubber connector seals has has a port that opens to the outside. the right side I believes goes to small black tube that goes to a check valve below the right intake plenum. The left side goes to ... no where... (creating a nice leak). Does anyone know where the left side port connects to ? Is that factory Porsche or do I have it installed wrong ?
Second problem is that I noticed some fine cracks on the ICV itself. When I was cleaning it with carberator fluid, these would actual weep a bit. Does that mean I need to replace the ICV ?
-
New battery Installed.
Need code for CR-210 Becker model #3297, Serial # V5007649.
Thanks in anticipation.
-
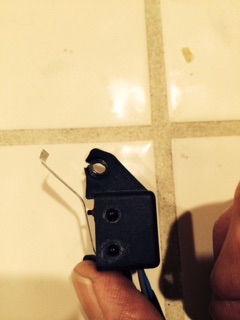
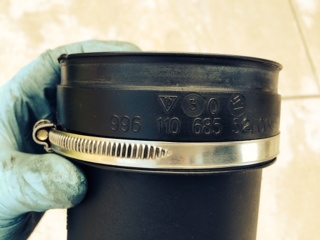
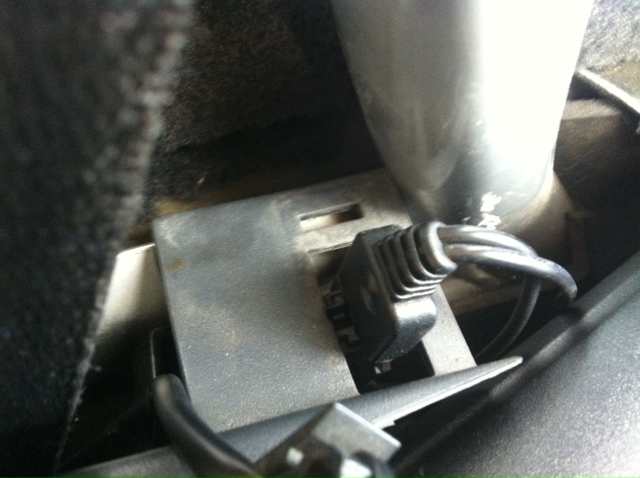
I recently had a Robbins top (with glass) installed on my '98 Boxster while also R/R'ing the convertible top transmissions and pushrods. The installation was not not quite as good as I thought it should be. The fabric is very tight and the front of the top rattles against the windshield frame with the least amount of road chatter.( is this normal?) Additionally the rear clam shell weatherstrip orientation is in question. I think it is upside down (see photo). The clam shell microswitch (photo) is not installed and I do not know where to attach it. There is also a small rectangular piece of plastic (photo) that mounts somewhere near the plug (photo) for the rear defroster. I'm hoping that when my microswitch is properly installed my dash convertible top warning light will reset itself. Any help/pictures would be beneficial.

'98 Exterior Rear Air vent removal
in 986 Series (Boxster, Boxster S)
Posted
What is the trick to remove my '98 Rear air vents? I want to repaint them. I see one screw topside. Can't figure out how to unclip it from the body.