Welcome to RennTech.org Community, Guest
There are many great features available to you once you register at RennTech.org
You are free to view posts here, but you must log in to reply to existing posts, or to start your own new topic. Like most online communities, there are costs involved to maintain a site like this - so we encourage our members to donate. All donations go to the costs operating and maintaining this site. We prefer that guests take part in our community and we offer a lot in return to those willing to join our corner of the Porsche world. This site is 99 percent member supported (less than 1 percent comes from advertising) - so please consider an annual donation to keep this site running.
Here are some of the features available - once you register at RennTech.org
- View Classified Ads
- DIY Tutorials
- Porsche TSB Listings (limited)
- VIN Decoder
- Special Offers
-
OBD II P-Codes - Paint Codes
- Registry
- Videos System
- View Reviews
- and get rid of this welcome message
It takes just a few minutes to register, and it's FREE
Contributing Members also get these additional benefits:
(you become a Contributing Member by donating money to the operation of this site)
- No ads - advertisements are removed
- Access the Contributors Only Forum
- Contributing Members Only Downloads
- Send attachments with PMs
- All image/file storage limits are substantially increased for all Contributing Members
- Option Codes Lookup
- VIN Option Lookups (limited)

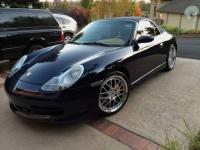
RD996
-
Posts
53 -
Joined
-
Last visited
Content Type
Profiles
Events
Forums
External Paint Colors
Downloads
Tutorials
Links Directory
Collections
Store
Posts posted by RD996
-
-
False alarm.
-
Thanks for the info. When I pulled everything apart I found I also had Textar pads with no shims. My brakes weren't noisy with that set up and after researching things more I found most people were saying the same as you, don't bother with shims on a car that's going to be tracked a lot. Things came apart easily, fronts are done, rears tomorrow AM.
-
I'm tackling my brakes for the first time today: new rotors, pads and brakelines. Car is a 99 C2 and I'm assuming may have the original rotors so I may be looking at some difficult caliper bolts as well although I think this has always been a Cali car that's been driven little in the rain/snow. I'm putting sebro sport rotors and PFC pads on since I am tracking the car a lot. My question is in regards to the shims and brake line replacement. In reading about doing this work, watching the DIY vids etc the shims seem to be a hit and miss deal. Do I need them? What about anti squeal paste do I need that?
As far as the brakelines go I've got the motive bleeder and I'm going to replace the existing fluid with Motul 600 when the job is done. Should I replace the lines before I change rotors/pads or after? Is there any benefit or detriment to do the lines first and obviously have some air in the system while changing the pads? I've got the flare nut wrench for that job, new caliper bolts etc. no shims or paste though.
-
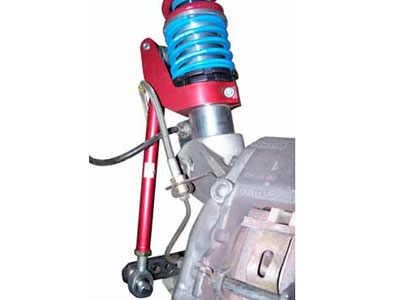
Talked to Tarrett the coil overs need disassembly with the collar going on from the top side.
-
I'm going to install a GT3 style front sway bar on my 99 C2 and have been looking at the Tarrett extended front drop link set which provides a collar for the upper mount point which either slips (or is screwed on-not sure) over the bottom of the front strut. I have PSS10 coil overs on the front/rear. Do I have to pull the entire shock assembly out of the car to slip these collars over the bottom of the strut or can I simply unbolt the wheel carrier, drop it away and get the collar over the end of the strut with out unbolting the top? Most of the DIYs show the top being unbolted, dropping the wheel carrier down and then pulling the strut out of the bottom.

-
If I had it to do over I would have changed the T-stat only and not bought the new housing as well. My car has headers and I couldn't move the coolant pipe completely out of the way during the housing install as the coolant pipe wouldn't slip thru the space between the headers and the T-stat housing. That made it hard to get to one of the new housing bolts. Would have been a lot quicker just to get the T-stat tool and use the stock housing.
-
I have a Tip so I have the 3rd radiator. I've got new coolant, a new water pump and have cleaned the radiators recently. I have pressure tested my cooling system and it's good. What I noticed after installing the LN low temp unit is the car settles at a lower temp when it first warms up and that temp is noticeably less. However on hot days driving slower speeds the temp will rise to the same max temp the system had before with the OE T-stat. I don't think the stock cooling system is effective enough to keep the car at the temperatures the LN unit (or the stock unit for that matter) open up at in all conditions. Yesterday I was in stop/go traffic in 90 degree weather and it was hot as I've seen the car get. I have a track day monday at Laguna Seca so I'm curious to see if my overall temp stays a little cooler at track speeds.
-
I installed an LN low temp T-stat and you're right about it. While my car generally runs cooler overall it still get's as hot as it did before the change. My car did run noticeably hotter overall when I got it due to the original coolant tank cap not holding pressure, not much different then having a leak in your system.
-
I just changed my coolant using this:
http://www.uview.com/index.cfm?PAGEPATH=Products/Cooling&DSP=ProductDetail&ID=45700&PRODUCTID=5120
It's ridiculously easy and it tests the integrity of your cooling system to a point as well.
-
Thanks John, I think I will just build a tool. Could have had it done already with all the time I've spent asking everyone on this thread! :blush:
Thanks for everyone's help!
-
JFP: is this safe or am I playing with fire? I can't see behind the stock pulley so I have no idea how much casting is there.
-
In doing a little more research the tool JFP suggested appears to be designed to hold the crankshaft during cam timing work. Has anyone used this to break the pulley bolt loose? Porsche 9593 special tool may be a flat bar with 2 pins like the ones that come bundled with some of the pulleys, I've got a call into the dealer to find out.
No need to get fancy or buy a special tool for this job. When I installed mine, I just used a bolt that fit through the pulley and into the hole in the block. The (relatively) difficult, time-consuming part is shaving off the timing boss...
I'm just worried about damaging the engine casting by doing that. My pulley bolt is original and I'm a bit worried about the potential force it may need to break it loose. How tight was yours?
-
I called RSS and they don't sell that tool separately but it wouldn't be too tough to make so I may go down that road. Is there any reason a chain clamp wouldn't work? My plumber buddy has those.
-
I'm thinking maybe a chain clamp and wrapping a pc of the old belt to protect the new and old pulley? That Porsche tool is $250 and takes a while to get, obviously makes sense for a shop but not a one time DIYer like me!
-
In doing a little more research the tool JFP suggested appears to be designed to hold the crankshaft during cam timing work. Has anyone used this to break the pulley bolt loose? Porsche 9593 special tool may be a flat bar with 2 pins like the ones that come bundled with some of the pulleys, I've got a call into the dealer to find out.
-
Thanks JFP! Is that tool in the picture threaded or just a rod that inserts? Is it safe to figure any rod type material that fits tightly would work? My bentley manual shows an illustration of a flat bar with 2 pins and mentions Porsche special tool #9593.
-
The harness coming in is not connected to anything other then the fan and trunk light. Can I just pull the bulb in the cluster or something like that?
-
I have an aftermarket wing on my car and have stripped the OE unit (which wasn't working when I got the car anyway)
-
Only the bundled tools with the pulley on Ebay.
-
Can one disable the rear spoiler warning light with either version of the durametric SW?
-
I bought an under drive pulley for my 99 C2 Tip and didn't really think it out. I know some of them come with a tool to lock up the pulley but mine didn't. Realizing now I can't lock up the motor with the tiptronic I'm looking for someone who sells a tool by itself and can't find one. I imagine the Porsche tool is pretty expensive. Does anyone have an alternative method that's safe? (or can recommend a supplier for the tool) I noticed I could shove a bolt thru and wedge it against the engine case but that seems pretty sketchy given the force required to break loose that original pulley bolt.
-
Always check your oil on a flat surface. I have found my electronic gauge to be quite accurate. I always fill 1/2 US quart low below spec. when changing oil and then keep the oil one segment below full on the electronic gauge which I believe the segments are 1/2 cup segments. Always easier to add a little oil than over filling it.
Curious about your comment above. The manual says the difference between the low and high mark on the dipstick is 1.5 liters which is a little over 6 cups. On my car there are 6 segments on the electronic level gauge which would translate to approx 1 cup per segment. Does the gauge represent the entire low to high range on the dipstick or half the range as you stated above?
-
I have a very similar sound coming from the passenger side of my motor - 99 C2 with 90K miles. Very loud upon cold start up after a week, not so loud starting up cold after a day. After about 15 seconds it mutes quite a bit and once the motor is warm I can barely hear it at idle. It goes away when I rev the motor as well. An Indy told me he thought it was a lifter but I got the impression he didn't put too much thought into it.
JFP: Is replacing all this cam chain stuff pretty labor/parts cost intensive to the point of tearing down the whole motor? I'm thinking about having a more thorugh inspection done to pin point the cause and determine the overall health of the motor with regards to cylinder wear etc. Do worn out timing chains and guides/tensioners etc cause catastrophic failures?
I did pull the original sump recently to replace with a deep sump and there was no plastic debris I could see.
Thanks
Rich
-
It's a one time deal AFAIC. The nut area on mine seemed no worse for wear with the minimal torque they recommend even using a slightly larger socket.
Doing my first filter change soon so hopefully the adapter won't break loose before the filter. Did the ½ turn+ JFP recommended on another thread on the first filter install so we'll see. If the adapter needs re-torqued during every filter change then I could definitely see the need for a tight fitting socket.
Lower control arm compatibility
in Cayman, Cayman S, Cayman R (987C2)
Posted
I've got a set of GT3 front lower control arms I pulled off my MY99 996C2. Will these work on a 2012 Cayman R?