Welcome to RennTech.org Community, Guest
There are many great features available to you once you register at RennTech.org
You are free to view posts here, but you must log in to reply to existing posts, or to start your own new topic. Like most online communities, there are costs involved to maintain a site like this - so we encourage our members to donate. All donations go to the costs operating and maintaining this site. We prefer that guests take part in our community and we offer a lot in return to those willing to join our corner of the Porsche world. This site is 99 percent member supported (less than 1 percent comes from advertising) - so please consider an annual donation to keep this site running.
Here are some of the features available - once you register at RennTech.org
- View Classified Ads
- DIY Tutorials
- Porsche TSB Listings (limited)
- VIN Decoder
- Special Offers
-
OBD II P-Codes - Paint Codes
- Registry
- Videos System
- View Reviews
- and get rid of this welcome message
It takes just a few minutes to register, and it's FREE
Contributing Members also get these additional benefits:
(you become a Contributing Member by donating money to the operation of this site)
- No ads - advertisements are removed
- Access the Contributors Only Forum
- Contributing Members Only Downloads
- Send attachments with PMs
- All image/file storage limits are substantially increased for all Contributing Members
- Option Codes Lookup
- VIN Option Lookups (limited)

Orient Express
-
Posts
680 -
Joined
-
Last visited
-
Days Won
3
Content Type
Profiles
Events
Forums
External Paint Colors
Downloads
Tutorials
Links Directory
Collections
Store
Posts posted by Orient Express
-
-
Having bought my 16 year old kids cars, may I suggest that you consider an older 4 door sedan like a volvo or a VW golf, and be prepared for the for the possibility of the car being wrecked within the year. I would also recommend that your child be required to pay their portion of the automobile insurance.
my 2¢ worth
-
In my shop, unless we know the history of the car, we only add distilled water, never coolant mix.
Yep, when in doubt, just use distilled or de-ionized water to top off the expansion tank.
-
The major issue with mixing coolants is the gelation issue.
This is only an issue with mixing different formulations of coolant, i.e. mixing G12 with non-G12 coolant. Mixing different brands of non-phosphate G12 coolant is not an issue.
-
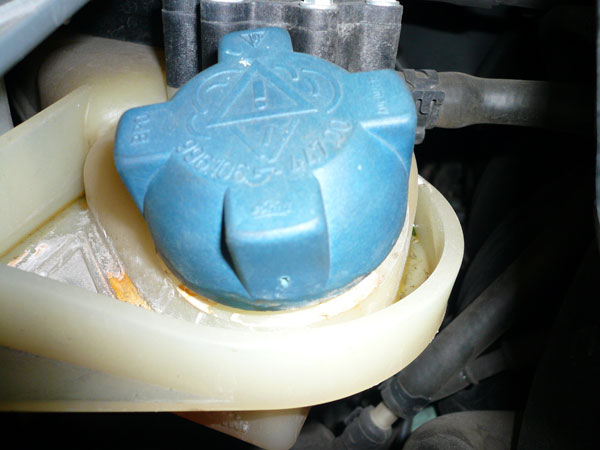
One other issue on the coolant tank cap.
1. make sure that it is not cross threaded on the tank.
2. make sure that it is fully seated. The cruciform top of the cap should be straight and level in relationship to the ground. There is a slight "click" feel to the cap when it is fully seated. Because of the compression of the cap gasket, it is sometimes difficult to get the cap fuly seated.
Here is a cap that is not fully seated:

And here is one correctly seated:
Your picture seems to indicate that your cap is not fully seated.
-
 1
1
-
-
The key term that needs to be satisfied with using any coolant in your Porsche (or audi or VW) is that is the coolant G12 type coolant. If it is, then mixing it is just fine.
I use G12 coolant that I buy at the VW parts department, and it works just fine. What is G12 coolant? It is essentially Phosphate-free coolant.
-
The Foam usually comes from the fresh air door that is under the cabin filter and accessable through the cowl on the passenger side. There is a thin foam on the door that will become delaminated over time and will be sucked into the HVAC system and out the vents. You can reach in through the cowl and remove the remainder or just let it blow through.
-
Darn it! So it sounds like I might have caused this problem. Next time of jack up rear of car, what should I do. LIft from body supports?
Delman
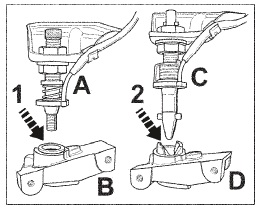
You did nothing wrong. These fluid filled motor mounts usually fail at 60 ~ 120K miles regardless of how you lifted your car. Good thing is that you were aware when it failed so you can replace them, rather than the mounts failing on the road and you not noticing until the NVH from the rear end starts getting annoying.
Make sure you replace both of them. It is a very easy job, 2 bolts and a nut on each side, just support the engine with your jack, remove the bottom bolts of the mount, then the two top bolts, remove the old mount from inside the engine compartment, then reverse the process and you are done. Total time 30 minutes ~ hour.
I have also seen a very dark purple coloured fluid leak from the mounts.Yes that is the color of the mount oil. They have failed, so time for a new pair.
-
Thanks to Loren for all of his hard work making RennTech what it is today!
-
I have been coating my wheels with Rejex for almost 10 years now, and it works great. I highly recommend it not only for the wheels, but for the glass and for the car too.
I recently installed EBC Red Stuff brakes on my 996, and have essentially eliminated brake dust on the wheels.
Red Stuff Brake pads + Rejex = clean wheels.
-
The elliptical opening was for a microphone component of the OEM phone system, rarely seen on these cars.
Not to be too anal, but....
The microphone for telephony as well as ambient cabin noise measurement (for GALA volume adjustment of the radio) is in the instrument cluster. The little plug that is on both air vents (for LHD/RHD cars) is for the manual headlight leveling adjustment control that is used on many ROW 996 and 986 cars.
As many have said, in this case, the button was probably installed by the previous owners for a garage door opener or alarm or some other owner installed equipment.
-
The pin numbers are on the connector shell, but are very small, you may need a magnifying glass to read them.
The grommet to pass the wire from the engine compartment to the cabin in under the carpet and sound absorbing material in the rear package tray under (if installed) the Bose subwoofer. It is a solid grommet that you need to cut an "X" in to pass the wires.
The 997 PSE is essentially identical to the 996 PSE, except the the muffler baffle switching signals. On the 997 the stock setup has the switching 12V+ coming from the DME which puts it in quiet mode from 25-45 MPH (or around those speeds). Some cars have a manual override switch, but most do not.
But the actual vacuum solenoid that controls the muffler baffles is just a 12V switch. Some folks have simply wired the muffler baffle vacuum solenoid to an on/off switch and to a 12V+ switched circuit so that they can quiet the exhaust on demand instead of the DME deciding. This is similar to the 996 PSE switching logic. Of course if you leave the Vacuum switch disconnected, then the PSE is in "Loud" mode all the time.
-
These cables are not OEM cables. They are probably either an aftermarket audio setup or a anti-theft tracking system that was removed. See if you can find out where they go in the cabin. I would suspect that the other end is in the center upper console. Since your car uses the MOST Bus for the stereo, the 2 small cables are probably fiber optic cables used for the CD changer or other audio device.
-
Orient - I see the electrical wiring for the defroster on the old. Is this transferred to the new mounts or is the defroster wired differently on the new?
The new mount will have essentially the same electrical connectors on it. remove the old mount, disconnect the wiring pigtail, install the new mount, plug in its pigtail.
-
Your hardtop is an 2003 or later hardtop if it has the newer threaded fasteners.
Here is a picture of the old vs new connectors.
-
On average, I get 150, 200K miles out of a clutch assembly.
-
Zimmerman cross-drilled replacements are a good choice both from value and performance. I highly recommend them.
-
The blue/black reverse wire is in the bundle that goes to the module under the drivers seat, but you have to peel away the cable bundle wrapping to find it. It is about an inch from the connector.
-
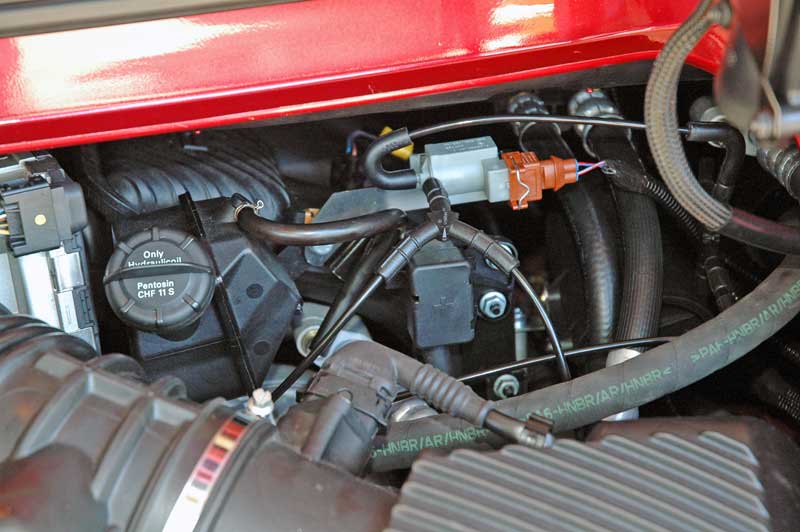
If you want the PSE to stay loud (default) all the time, then just unplug the electrical connector to the vacuum switch in the engine compartment.
The connector is the brown one in this picture. Yours may be black instead. This method is better than removing vacuum lines which can introduce leaks into the intake system.
-
There are a number of possible sources. If it if on the turbo, it could be from the oil feeder line on the turbo. If it is coming down the block, it could be a leaky valve cover gasket, or a leak in the head from an improperly plugged machining hole.
Take the plastic top covers off of the engine and see if you can pinpoint it from the top.
-
I had a similar situation last year with my 2002 996 with 65K miles on it. Depending on what state you live in, the cat may be covered by a 7/70Km emissions warranty. I would talk it over with your dealer and ask them to get Porsche to cover the replacement. Porsche replaced my faulty Cat at no charge.
-
The routing and attachment of the vacuum lines for a 997 PSE is identical to that of a 996. Here is a link to the description of my 996 PSE install and the vacuum line routing.
-
1
-
-
May I recommend that regardless of what rotor you pick, (I prefer Brembo or Zimmerman), that you use EBC Red Stuff pads for Boxster. These pads use ceramic material, and have great bite, no noise, and best of all no dust. They are competitively priced, and you can even buy them on Amazon. They are about $100 for each axle. I have them on my street 996, and they are perfect. Great stopping power, and no brake dust.
-
2
-
-
DIY: Dent repair with Dry Ice
I had heard this urban legend that you can repair door dings and dents by rubbing dry ice over the dent and then heating it with a hair dryer or heat gun. It seemed simple enough, so I decided to try it on the wife's urban assault vehicle which has its fair share of door dings. I went over to our neighborhood grocery store and got 2 pounds of dry ice for $3. Here is the what the test door looked like before the test. Essentially the process is to take some dry ice (while wearing gloves, as i
-
Author
-
Category
-
Submitted06/27/2010 01:56 PM
-
Updated12/17/2012 10:53 AM
-
1
-
-
What a life, for me yesterday, got my domain flagged as a Phising site because somehow someone stuck some phishing files on the server. Took me 3 hours to get it cleaned up.


Coolant Colour
in 996 TT, 996 TT S, 996 GT2
Posted
Get the Audi/VW G12 Coolant which is about $15 a gallon at your local VW dealer, and you will be fine.