Welcome to RennTech.org Community, Guest
There are many great features available to you once you register at RennTech.org
You are free to view posts here, but you must log in to reply to existing posts, or to start your own new topic. Like most online communities, there are costs involved to maintain a site like this - so we encourage our members to donate. All donations go to the costs operating and maintaining this site. We prefer that guests take part in our community and we offer a lot in return to those willing to join our corner of the Porsche world. This site is 99 percent member supported (less than 1 percent comes from advertising) - so please consider an annual donation to keep this site running.
Here are some of the features available - once you register at RennTech.org
- View Classified Ads
- DIY Tutorials
- Porsche TSB Listings (limited)
- VIN Decoder
- Special Offers
-
OBD II P-Codes - Paint Codes
- Registry
- Videos System
- View Reviews
- and get rid of this welcome message
It takes just a few minutes to register, and it's FREE
Contributing Members also get these additional benefits:
(you become a Contributing Member by donating money to the operation of this site)
- No ads - advertisements are removed
- Access the Contributors Only Forum
- Contributing Members Only Downloads
- Send attachments with PMs
- All image/file storage limits are substantially increased for all Contributing Members
- Option Codes Lookup
- VIN Option Lookups (limited)


yeeha68
-
Posts
71 -
Joined
-
Last visited
Content Type
Profiles
Events
Forums
External Paint Colors
Downloads
Tutorials
Links Directory
Collections
Store
Posts posted by yeeha68
-
-
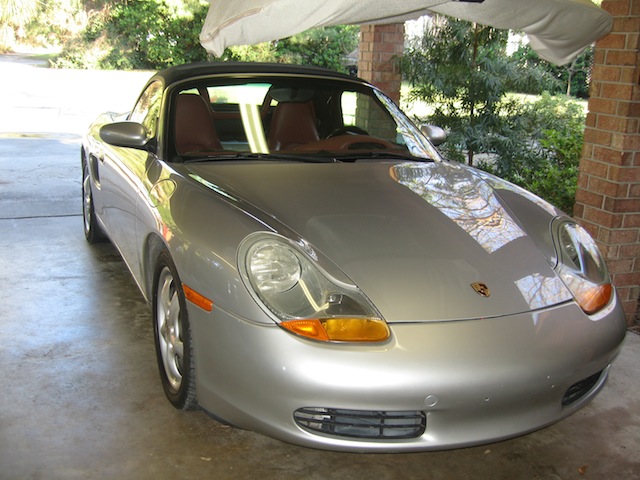
Updates...Its ALIVE!
I finally found the time to complete the build last week. This car has never performed as well as it does now.
More pictures and notes for all who are interested. As soon as I get the chance I will summarize everything that was done. The site will continue to grow as I gather my thoughts, but for now its packed full of plenty of info.
Enjoy;

-
wvicary-thanks for the info.
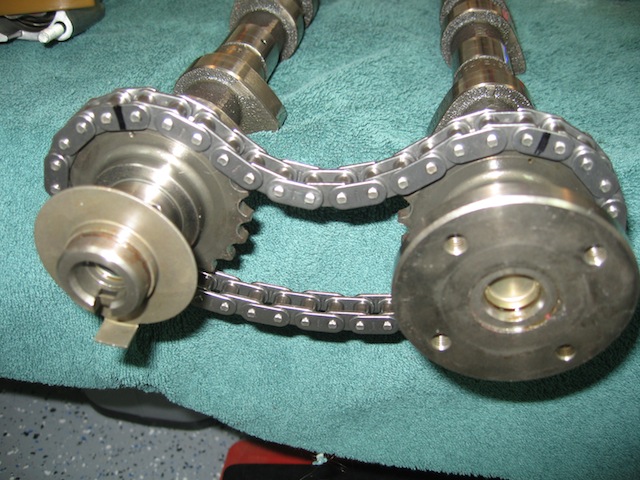
seafeye-No, I didnt make that tool. It looks fairly easy to fabricate, but I'm not sure yet if I really need it. As long the notches in the cam line up correctly you should be able to set the timing correctly. I guess I'll find out. I will continue to document the process and share it at www.nutrod.com.
-
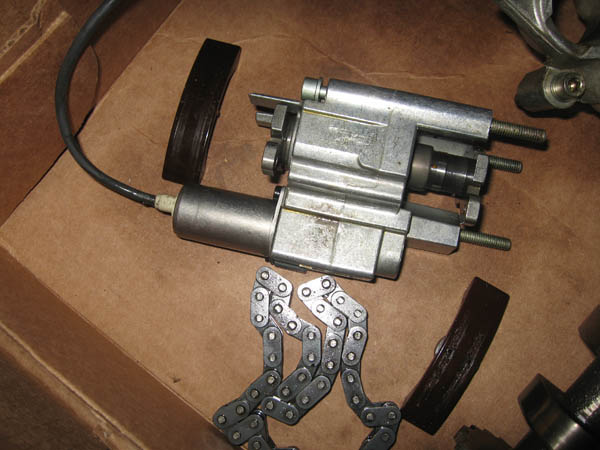
A question for anyone who has replaced the VarioCam...Does the actuator need to be primed before reinstalled? I know oil fills the cylinder to adjust the chain, I just dont know if I need to prime/fill it before the install.
-
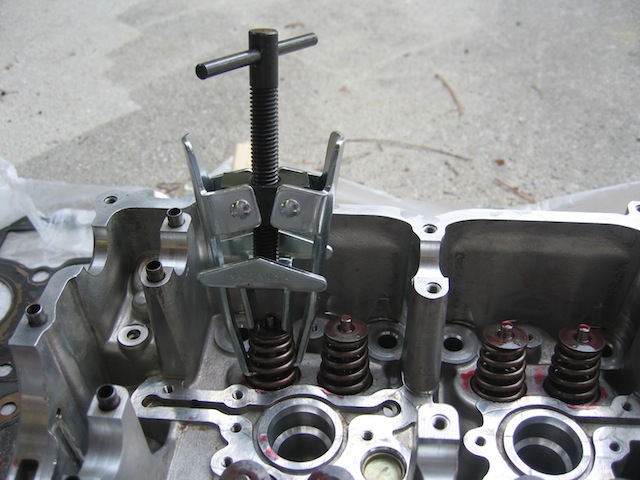
I keep going back and forth with this, so I'll ask for other opinions. I'm replacing a broken spring and seal for one valve. These are fairly inexpensive and I could go ahead and replace all of them while I'm in there for preventative maintenance. Should I do it, or take the "if its not broken, don't fix it" approach?
-
For all interested...Warm weather appeared and I tackled the secondary air system this week. Nasty little system. Pictures and narrative as well as a blog added: www.nutrod.com
-
Very, very nice -- what was your original symptoms and how was it diagnosed?
thx,
Mike
Loss of power, error codes on bank 2 (mis fires cyl 4,5,6). I spent too much time trouble shooting plugs, coils, and other entities. I forgot the most basic of all golden rules...CHECK THE COMPRESSION FIRST. I found no compression in cyl. #4. I figured it had to be a bad valve issue. On my soap box for a line or two..To all reading, Go out and get a compression gauge. They are cheap and will save you hours of trouble shooting. Use them first.
-
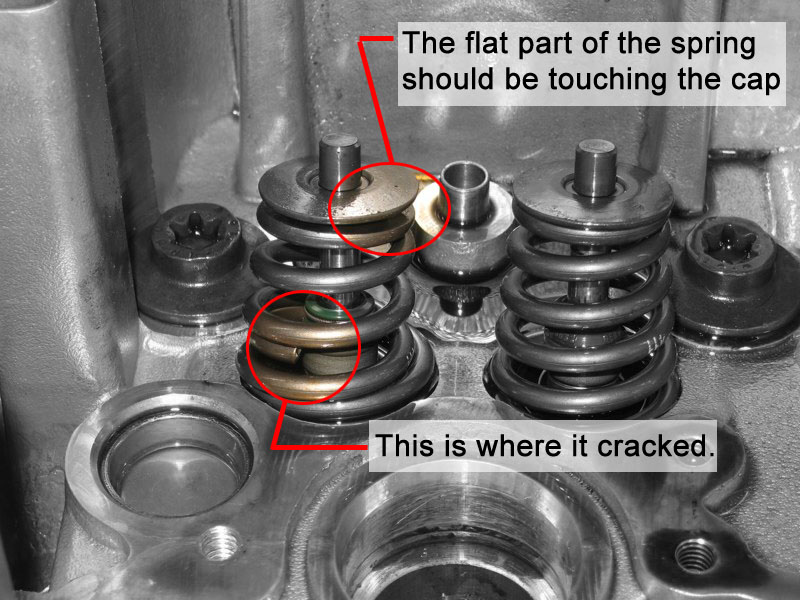
I went on your website. How did you know the spring was broken? I can't tell from the pictures.
You can tell right away just by touch. It is very loose. In this picture you can see the visual signs. Over time springs can become weak and break. Right now, as I wait out this cold weather, I'm trying to decide if I should go ahead and replace all of them, so there is an equal amount of presure across the board.
-k
-
Phillipj,
I spent a good month reading and researching. There really wasn’t anything technically difficult, all the fittings came off without resistance and the whole removal was fairly smooth. But no matter how much homework you do, you still have to do some creative problem solving on the fly, like building wood blocks to help secure the transmission, and the occasional surprise Porsche bolt you didn’t expect to find. For instance, as you are removing all the standard bolts for the transmission to engine you’ll come across ONE bolt that is a 10mm triple square and you can’t get a socket in there. Like a small key lock. Evil Germans.
Maurice,
I did in fact have the TREX board for the tool, but at the last second used another composite board used for lattice. About $6 at your local Home Depot. It was a smoother finish so I wouldn’t run the risk of scratching the Cams.
-k
-
The best oil change EVER!
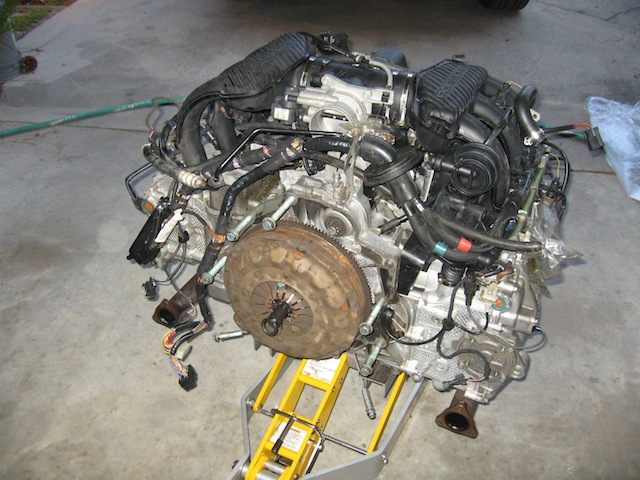
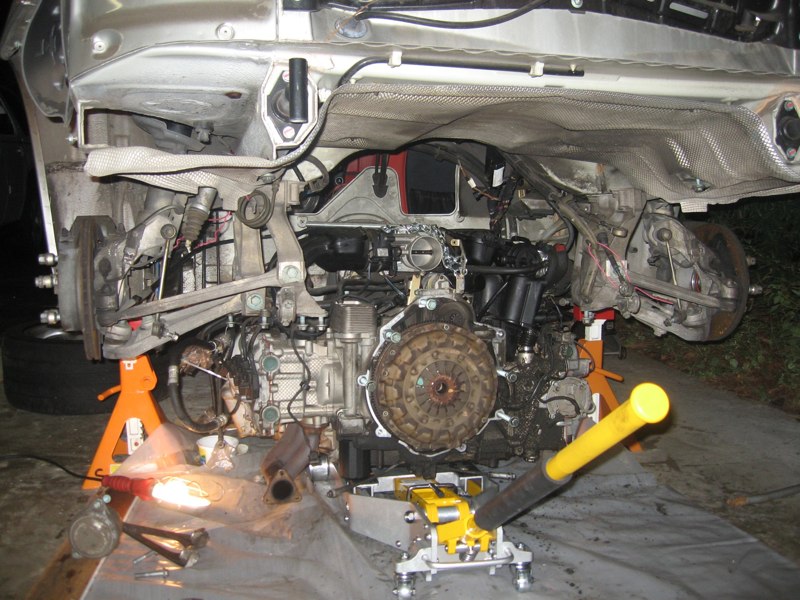
I didn’t like the $3,000 price tag the shop gave me to repair my valve issue, so I decided to tackle it myself. I figured if the engine has to come out, you might as well do some overall maintenance tasks too. And you know the old saying...If you want it done right, you have to do it yourself.
It took some time to get my nerve up, and I had to read a lot of posts, and ask a lot of questions (thanks to everyone who participants in these forums) and I'm sure I still have more to learn before I get it back in the car, but for all of you who have ever considered tackling this job, I'll share my opinion that yes, it is possible, and not as challenging as you may think. That being said, if you are shy about changing your oil or brake pads, don’t come down this road yet.
I assembled a documentation page www.nutrod.com for all who are interested, and I hope sharing this helps others in their quest for information. As I update it, I will let everyone know here.
-
I have a broken spring on an exhaust valve on cylinder #4. Is it possible to replace the springs yourself without special Porsche tools? Has anyone done this? The engine is out of the car and the head is off. I was planning on taking it to a shop but I come this far, so maybe I can do this too.
-
Thanks for the replies. Thats nice and lightweight compared to the 900+ lb. chevy V6 in my boat.
-
How much does a boxster 2.5 M96 engine weigh? Will a 750 lb. engine stand hold it? will an 800 lb. hoist move it? If I had to guess, its in the 700lb. area, maybe less...
-
How do plan on setting the timing during reassembly? The manual calls for tool 9612 to attach to the cam, but from what I can tell, it only helps line up the notch in the cam. Something that appears to be completely possible without the tool.
I am also struggling to understand the need for tool 9599; the 3 auxiliary chain tensioners. Do the regular tensioner bolts not preform the necessary task? One of the tool sites I saw them on refers to them as "optional" tools rather then "required"
Are you using both of these tools?
-
Does anyone have experience with setting the timing? Manual calls for tool 9612 to attach to the cam, but from what I can tell, it only helps line up the notch in the cam. Something that appears to be completely possible without the tool.
I am also struggling to understand the need for tool 9599; the 3 auxiliary chain tensioners. Do the regular tensioner bolts not preform the necessary task? One of the tool sites I saw them on refers to them as "optional" tools rather then "required"
-
I've been to the 986fix.com site several times. Excelent source for info. Take a look at this site also;
http://www.pelicanparts.com/techarticles/B...terTech-162.htm
Great documentation of engine teardown. He is publishing a book, you can find it on Amazon, but it wont be released until late 2010.
-
I have a Bentley Manual but it really lacks in the details. Where do you suggest getting a factory workshop manual that is of higher quality? I see several of them in PDF electronic formats for $10-$40. Are these really any good? Has anyone used them?
-
How did you handle the AC? Did you pull the compressor first so the lines are still connected, or did you disconnect AC lines to recharge later? I thought you could leave the compressor in the frame, but it appears that the lines weave in and out of the manifold.
-
suburban99- Your my new best friend!
I discovered my misfire issue was due to 0 compression in #4 cylinder today. I'm guessing I have a bad valve problem and I need to remove the head. So, I too will be dropping my 986 engine this week for Thanksgiving. I also plan to use jack stands in the rear. Too bad, I just replaced the cam solenoid on the other side last month with engine in the car. Would have been much easier now.
Did you use 2 jack stands on the rear of the car?
How high did you need the clearance to be?
Did you remove the bumper and muffler or was the car high enough.
I plan to document the process and post for all, but I'm sure I may be asking for some tips and tricks along the way
-
I swapped the coils and the plugs from one side to the other today. No change. Still get misfires on bank 2. It starts with cylinder 4, then 5, then eventually 6. Could this be a bad O2 sensor or burnt cat? Wouldn't I get an error code for these if it was?
My only other guess would be the timing. How would I set that or trouble shoot the issue? I have the durametric software but Im not sure what data to look for. Can anyone give me some pointers?
-
1998 986 2.5.
Greetings to all.
Out of nowhere while driving last week, bank 2, cyl 4,5,6 started misfiring badly. As in really bad. My first instinct was that I was out of gas, but had a half tank, and found the codes to be only for bank2.
Some additional background which may be important to know is that the cam solenoid for bank 1 had been failing earlier and also needed to be replaced. I successfully replaced the solenoid this weekend (a job that sounds much worse then it is and will post a documented step by step shortly with tool creation details...but that’s another story) Anyway, after completion, bank1 seems happy, but I still have misfires in bank2.
Here are the current error codes via durametric software.
Fault Number:P0300
Fault Number:P0304
Fault Number:P0305
Fault Number:P1319
Fault Number:P1316
Fault Number:P1317
I understand what they mean, but have yet to solve the problem. I would suggest the solenoid in this bank also, but I im not getting the cam error as I did for bank 1 (P1340) and this idle is much, much rougher.
Here is what has been checked based on other posts I have found here:
Coils- tested within range between .3 and .7 ohms
Plugs- look good
MAF- recently replaced, but I dont think it would effect only one bank anyway.
Checked for air leaks
Fuel cap-checked
Oil cap-removes easily during operation and causes even rougher running off
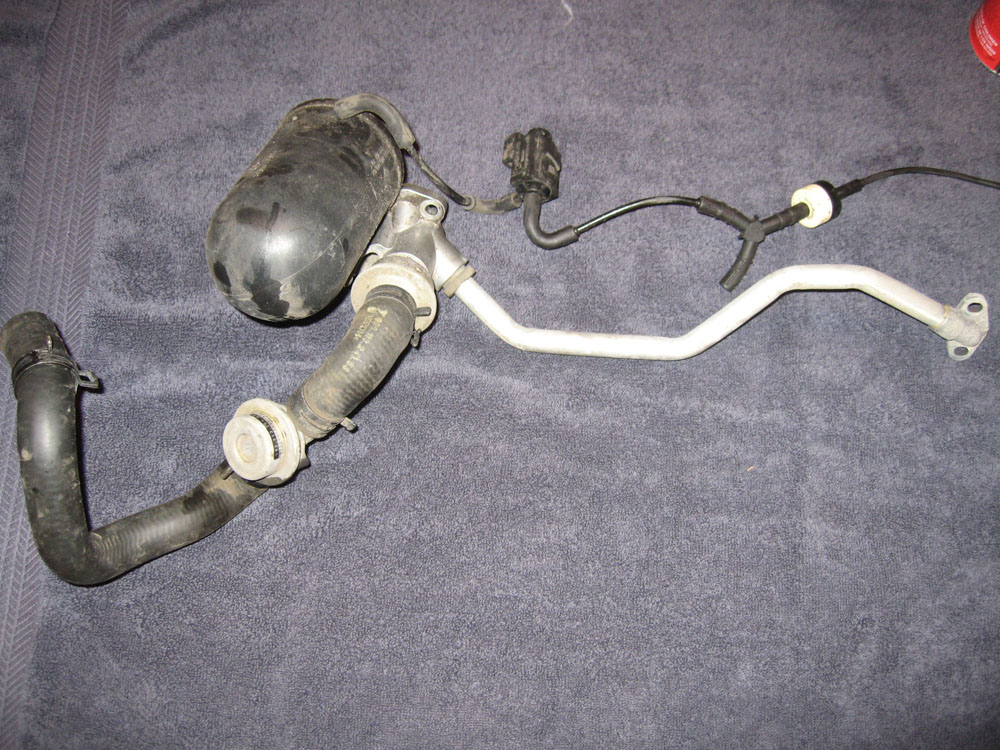
AOS-clean, no cracks, no oil in throttle
J-tube-replaced O-rings, no cracks
No burning oil, no milkshake oil, coolant good.
Yep...Im out of ideas....here is some realtime data from durametric. I not sure if it makes any sense to me. I dont know what to look for but maybe someone else does. Should I be looking at a different set of data? It seems to me, one of the many selections in the software would pinpoint a red flag. Anyone with an idea?? Long shots are greatly appreciated at this point.
Thanks. :cheers:
A-Time
B-Rpm
C-Air mass
D-Hot film MAF
E-Ignition timing
F-Exhaust temperature after cat. converter
G-Oxygen sensing cylinders 1-3
H-Oxygen sensing cylinders 4-6
I-O2 sensor voltage ahead of cat. conv.
J-O2 sensor voltage ahead of cat. c. bank 2
AAAAAAAAAAA__BBBB__CCCCC_DDDD_EEE____FF___G___H__IIIII___JJJJ
19:15:04.3593750__1440___49.5___1.96___20.3___52___1___1__-0.01___0.23
19:15:05.9062500__1560___51_____2.02___23.____52___1___1__-0.01___0.22
19:15:07.3906250__1400___42.5___1.9____23.3___52___1___1__-0.01___0.21
19:15:08.8906250__1200___39.5___1.82___18.8___52___1___1__-0.01___0.2
19:15:10.3437500__1560___59.75__2.08___19.5___52___1___1__-0.01___0.19
19:15:11.8593750__2120___62.25__2.08___27.8___52___1___1___0______0.18
19:15:13.3593750__2080___62.5___2.09___27.8___52___1___1___0______0.17
19:15:14.8281250__2120___59.75__2.17___27.8___52___1___1___0______0.17
19:15:16.3125000__2480___56.75__2______27.8___52___1___1___0______0.16
19:15:17.8281250__2600___76_____2.39___27_____52___1___1___0.01___0.15
19:15:19.3281250__2720___106.75_2.6____22.5___52___1___1___0______0.14
19:15:20.8281250__3840___58.5___1.9____21_____52___1___1___0______0.14
19:15:22.3281250__2000___50.75__2.04___29.3___52___1___1___-0.02__0.13
19:15:23.8125000__1640___52_____2______23.3___52___1___1___-0.01__0.13
19:15:25.2812500__1560___48.25__2.02___24.8___52___1___1___0______0.11
19:15:26.8125000__1520___47_____1.96___24.8___52___1___1___0______0.11
19:15:28.3125000__1360___43.5___1.92___20.3___52___1___1___0______0.11
19:15:29.8125000__1160___40_____1.86___18.8___52___1___1___0______0.1
19:15:31.2968750__1040___33_____1.68___16.5___52___1___1___0______0.09
19:15:32.7812500___800___29_____1.66___15.8___52___1___1___0______0.09
19:15:37.5156250_____0___29_____1.66___15.8___52___1___1___0______0.09
-
Bad idle and oil cap suction usually point to a bad AOS (Air Oil Seperator) A common problem for those of us with older cars. Do a search for the topic and you will find a ton of info. It is 1-2 hr fix/replacement.
-
They are standard size tires. 255/40/17. about 10" deep. They are Michelin Pilot Sport tires.
-
Well, I tried swapping tires around (I dont have additional tires available) and the plot thickens. It would seem that when the spare is on the rear passenger side the noise goes away. This is odd because the buzz is not present when either of the existing tires is used on the drivers side. However, when you put the front tire on the passenger rear side (wider then the spare, narrower then the rear) the buzz is present at about half the volume. The Conclusion: the wider the tire on the passenger side the louder the buzz.
Im at a loss...I can only come to two resolutions: 1. the tires have worn to create a resonance buzz, or 2. The toe is placing a torque on the bearings and they do need to be replaced.
Any suggestions before I breakdown and drive to the dealer?
-
Tires are stock size, and dont look like they have a cup. Ill try swapping them out next.


Misfires on bank 2 cyl 4,5,6
in 986 Series (Boxster, Boxster S)
Posted
in the end it was a broken spring on valve #3
Details and pictures at www.nutrod.com