Welcome to RennTech.org Community, Guest
There are many great features available to you once you register at RennTech.org
You are free to view posts here, but you must log in to reply to existing posts, or to start your own new topic. Like most online communities, there are costs involved to maintain a site like this - so we encourage our members to donate. All donations go to the costs operating and maintaining this site. We prefer that guests take part in our community and we offer a lot in return to those willing to join our corner of the Porsche world. This site is 99 percent member supported (less than 1 percent comes from advertising) - so please consider an annual donation to keep this site running.
Here are some of the features available - once you register at RennTech.org
- View Classified Ads
- DIY Tutorials
- Porsche TSB Listings (limited)
- VIN Decoder
- Special Offers
-
OBD II P-Codes - Paint Codes
- Registry
- Videos System
- View Reviews
- and get rid of this welcome message
It takes just a few minutes to register, and it's FREE
Contributing Members also get these additional benefits:
(you become a Contributing Member by donating money to the operation of this site)
- No ads - advertisements are removed
- Access the Contributors Only Forum
- Contributing Members Only Downloads
- Send attachments with PMs
- All image/file storage limits are substantially increased for all Contributing Members
- Option Codes Lookup
- VIN Option Lookups (limited)


Bay Arean
-
Posts
32 -
Joined
-
Last visited
Bay Arean's Achievements
Member (1/1)
0
Reputation
-
As far as I know! I sold the car to a nice guy in San Francisco. He had worked on older cars before and seemed to really appreciate its character, so I think it's gone to a good home. In the end I put around 3k miles on the Porsche. How's the Baum tool treating you?
-
3.6 engine tear down
Bay Arean replied to AWDGuy's topic in 996 Series (Carrera, Carrera 4, Carrera 4S, Targa)
Hey AWDGuy, Any update? Glad your tool made it safely. Can't wait to hear if your installation goes as smoothly as mine did. -
The new brake light switch arrived from Pelican today. I tested the contacts and they behaved as would be expected from the wiring diagram. Got on the highway, and sure enough -- no PSM/ABS fault lights and the cruise control worked again! So the conclusion was: in December 2014 the switch was replaced with a similar one but with different internal wiring. One of the two contacts worked correctly, causing the lights to activate but the computer to know something was wrong. I also tried the "OBD Drive Cycle" again, this time beginning with a cold engine. Followed the instructions to a T, and it was successful. My buddy's scanner showed all systems ready. I'll smog it this weekend. Looks like this project is just about wrapped up!
-
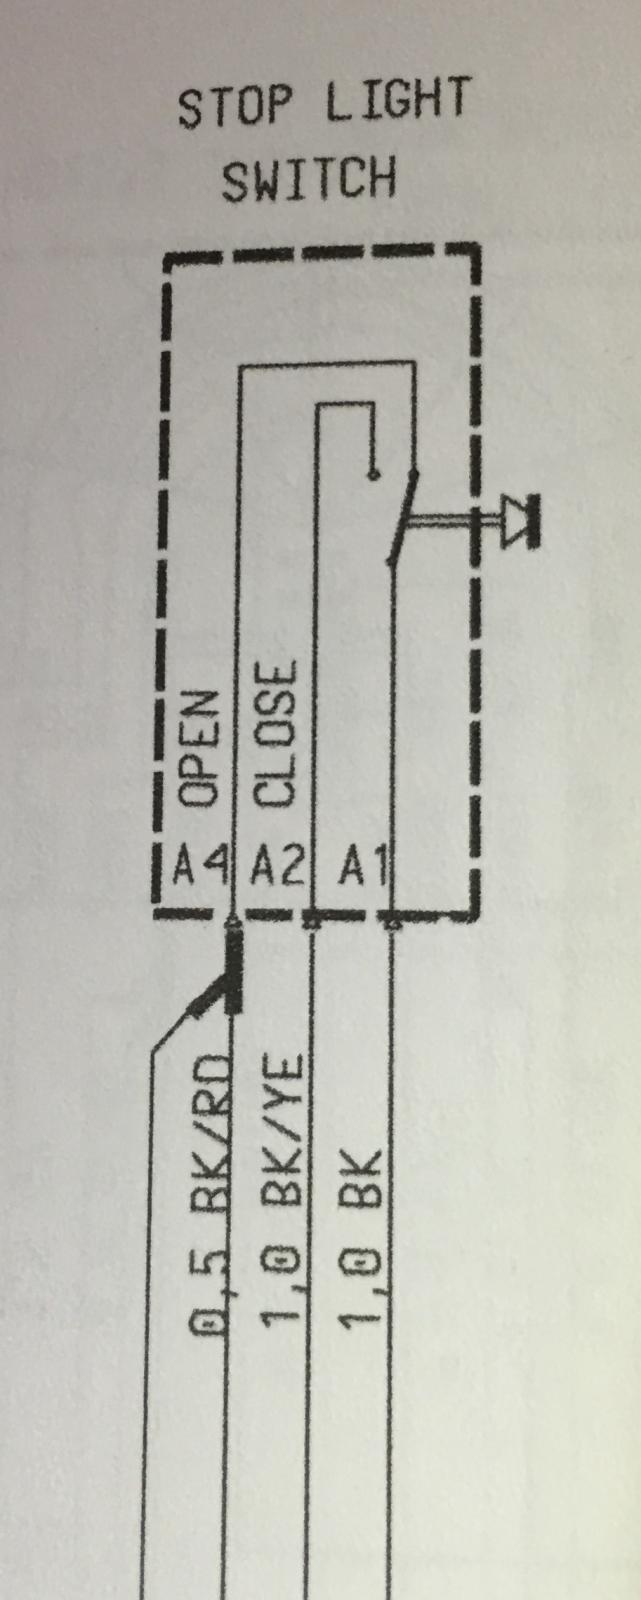
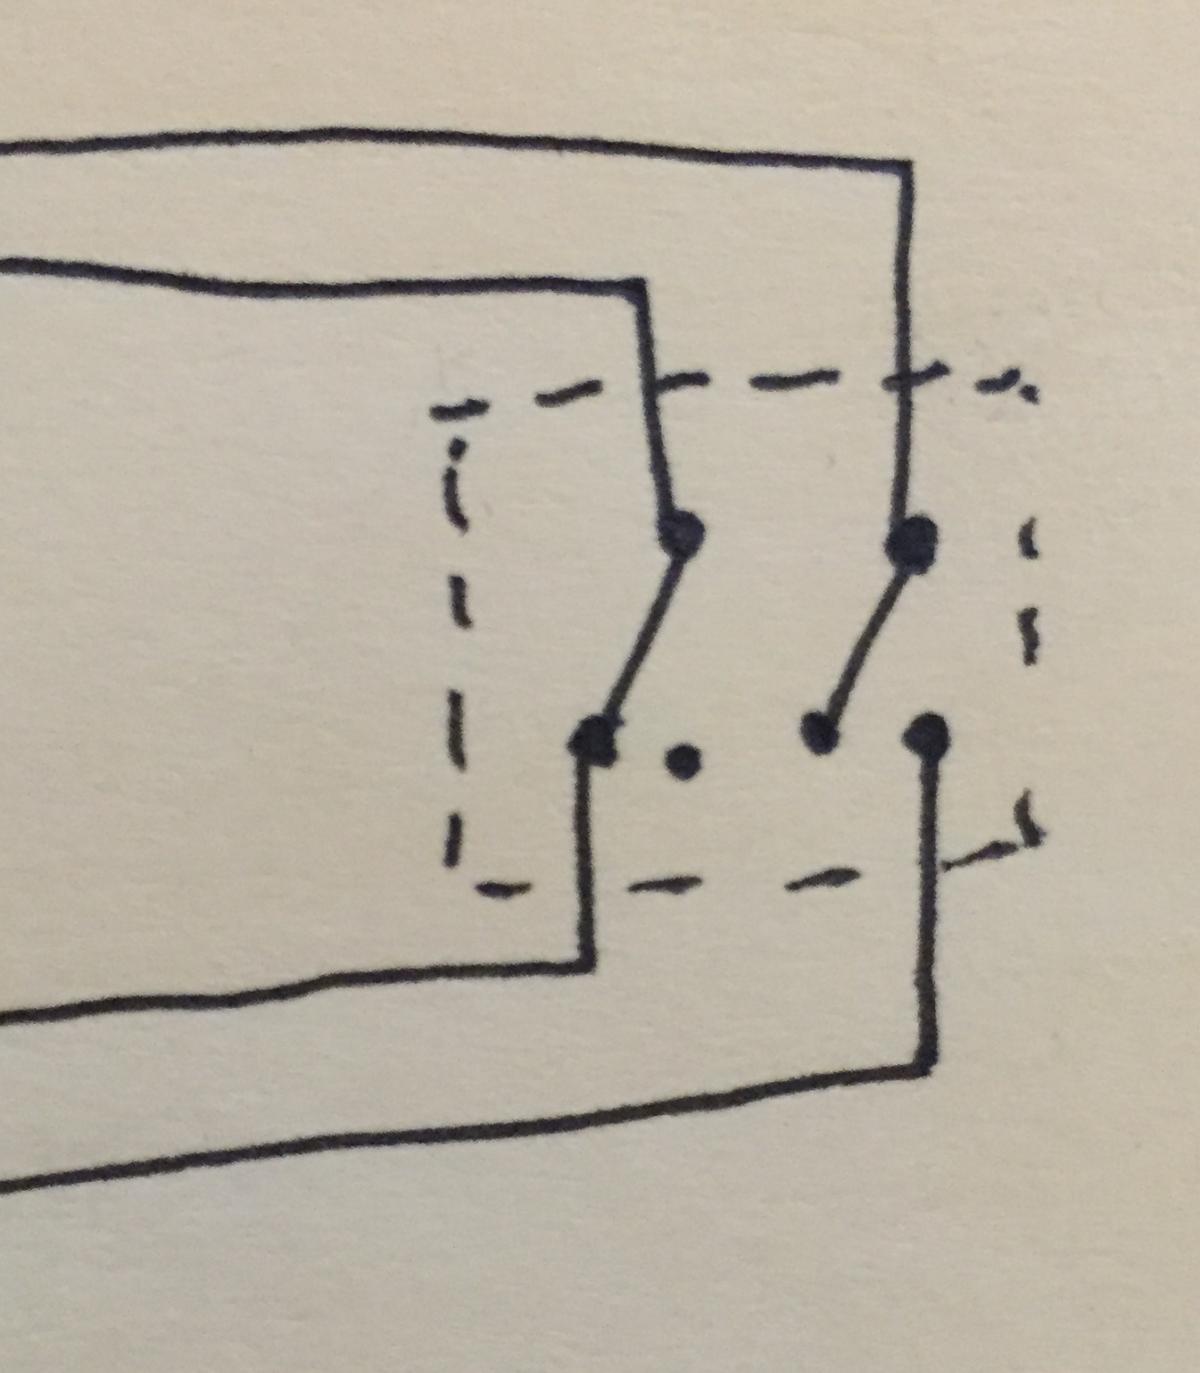
Interesting update on the ABS/PSM issue. I dug into the electronics around the various brake/clutch switches. In a manual, I looked up the details on the Brake Light Switch and found that there are three wires: a signal going in (blk), one NO contact (blk/ye) and one NC contact (blk/rd) going out. These should oppose continuity at all times. Using a multimeter, I found that my switch didn't do that correctly. Instead, my switch had four contacts, with two pair being opposing NO/NC. See hand-drawn sketch below. The part number on the switch was 96312343, which seems to be some generic p/n; certainly not the correct Porsche p/n. My research says 996-613-113-02-M100 is the right one. Correct one is on order from Pelican. The PO had it switched in December; the shop must have used the wrong part but since the brake lights still worked (one pair of contacts was correct) they left it. Hacks.

-
The first diagnostic was at the smog center; the technician told me 3 systems weren't ready. "Go drive around, at least 100 miles," he said. 200 miles later, here I am. Next I used my buddy's USB "PCM Scan" tool. It allows you to see the readiness flags for each module, as well as pull trouble codes. It doesn't show any faults. But I used a real Durametric to get the ABS/PSM fault code earlier today.
-
This seemingly simple task has also been difficult. (This car never ceases to confuse me). I've driven probably 200 miles so far and the readiness flags still are not ready. After googling, I discovered I need to carefully follow the "OBD Drive Cycle" which looks like this: Porsche 993 cycle Remember: The diagnostic checks above will be discontinued if: 1) Engine speeds exceed 3000 RPM 2) Large fluctuations in throttle position 3) Road speeds exceed 60 MPH 1) Start cold engine and idle for approximately 2 minutes, 10 seconds. This checks secondary air injection and evaporative leak detection systems. 2) Accelerate to 20-30 MPH and maintain steady speed for 3 minutes, 15 seconds. This establishes closed loop oxy-sensor operations, response times & switching times. 3) Accelerate to 40-60 MPH and maintain steady speed for 15-20 minutes. This evaluates catalytic converters while oxy-sensor response and switching times are checked. 4) De-accelerate and come to a stop. Idle for 5-6 minutes. This checks evaporative leak detection system. I tried this today and successfully readied 1 of the 3 not-ready systems. Will try again tomorrow to see if I can knock out the last 2...
-
I just got the code read thanks to a fellow member with a Durametric Pro. Code was 4340 - stop light switch. A very common issue on the forums. Next I'll research and see what other issues could cause this code to be thrown. In the PO's paperwork is shows a brake light switch having been replaced in Dec 2014 -- only two months before the engine blew up. Makes me wary that a new switch won't fix anything. To test this theory I kept the speed under 75 on the way home so the spoiler never went up. Still threw the failures, so I think this rules out that theory?
-
In an effort to improve the braking situation, first I manually bled the system the old fashioned way (without the Durametric tool). I also sanded the brake pads to roughen them up. The car had sat for ~6mo before I bought it, so the rotors were very rusty. I was concerned rust particles may have clogged up the pads and reduced their stopping power. Test drive showed huge improvement -- that problem is solved. Still have some rotor pulsing, so I will need to decide whether to invest in new rotors. Mine are too narrow to machine. ABS/PSM failure still exists after cleaning all four ABS sensors and MAF sensor. I think there's not much alternative besides using the Durametric tool at this point.
-
Hey JFP,, The failure lights show up at highway speeds and not during braking, which led me to believe the problem is probably not inside the braking system. That's why I was thinking MAF or speed sensors. Does that make sense?
-
The engine is doing great! I've driven about 100 miles so far. Need to pile on the mileage to reset the OBD's readiness flags so I can get it California smogged in order to complete DMV registration. In driving it I realize I have the following bugs to sort out: I get the ABS/PSM failure at highway speeds. From reading I may be able to fix this by cleaning the MAF, but more likely need to get a Durametric cable to pull the code. Ugh. Brakes feel terrible. They don't have much strength. I suspect they may need to be either resurfaced or bled. The vehicle sat for ~6mo before I bought it, if that helps the diagnosis at all.
-
I think I'll let this video speak for itself... The grinding noise we were hearing turned out to be from the power steering pump. It needed quite a bit more fluid than I had originally added as the lines filled.
-
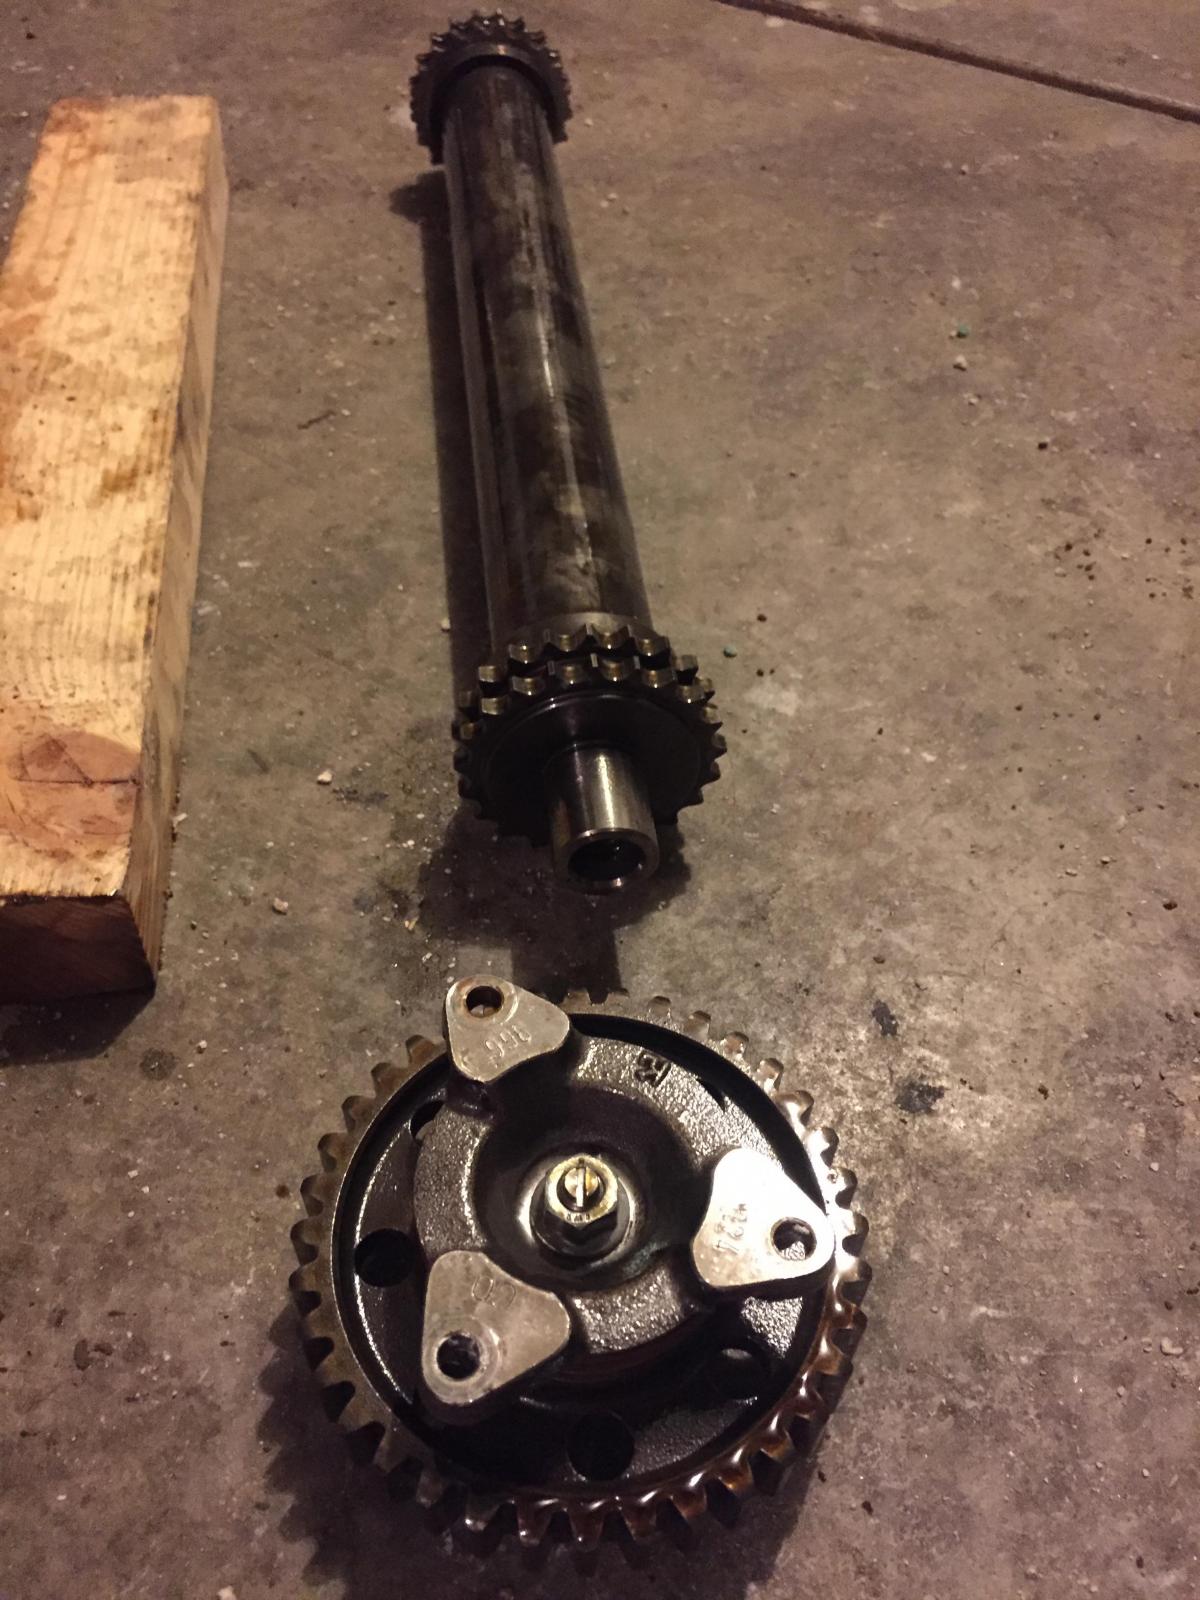
Hi all, Apologies for not keeping this thread updated with photos. I've done a poor job of photo-documenting. The engine is 95% buttoned up; I still haven't timed the cyl 1-3 side because I accidentally ordered the wrong exhaust camshaft sprocket. :oops: After splitting the cases, I cleaned out a bit more shredded aluminum carnage from the timing chain's path. I also found a couple pieces of chain link wedged in the oil pan's plastic. Reassembly of the engine was surprisingly easy -- I expected the wrist pin installation to be much more difficult than it was. I used the Baum tool to install the three wrist pins and three circlips. All pins and clips went in easily with no mishaps, and I was able to verify correct installation using a simple mirror. No endoscope required, so that will be going back to Amazon. Loctite 5900 created a nice seal between the engine cases, and valve covers. During timing, I could not manually loosen the intake camshaft adjuster bolt and had to use an electric Dewalt impact gun. I was not pleased with the fit of the camshaft alignment tool; it seems like the center region is too thick and it would not slip into place unless the camshaft journals were loose. Getting the intake manifold back together wasn't bad either. I had labeled wires to help remember where things went. I used an engine hoist to slowly lower the entire intake manifold down to the engine to work with enough time and space. In the end, this is the list of what I replaced: 7 valves and valve seals Timing chain Exhaust camshaft sprocket Intermediate Shaft (replaced with LN Engineering upgraded shaft) Misc seals and gaskets Connecting rod bolts 1x Scavenge oil pump If anyone needs the Baum tool, shoot me an email or PM. It's for sale or rent. (After this weekend when I fire up the engine, of course :thumbup: )
-
I found the information on this site: Link removed by moderator Connecting rod bolts: 20Nm then 90 degrees Couldn't find the piston ring alignment instructions. Please do not post links to copyrighted materials, it is against forum rules.
-
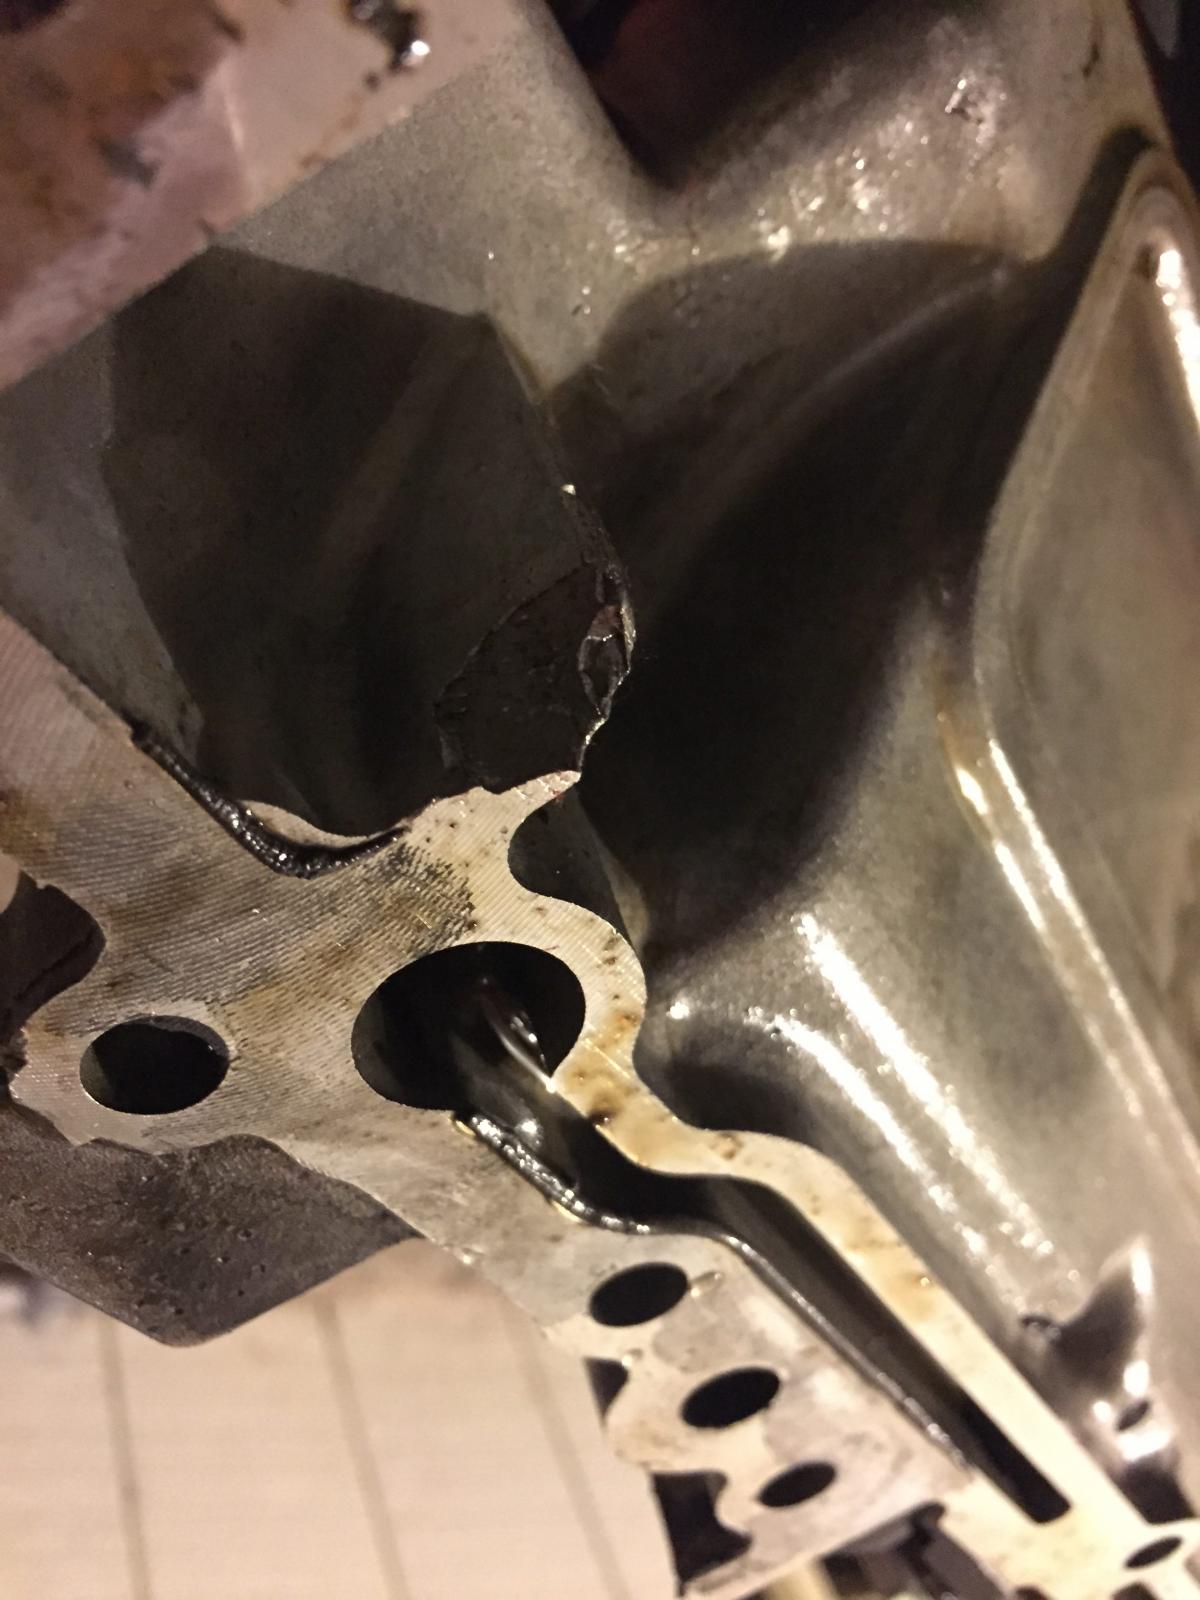
Thanks, Domiac! Amazon has a ton of them so it's nice to have a recommendation that stands out. At this point the engine is fully disassembled. The IMS shaft completely separated on mine -- the interference fit between shaft and crank sprocket became so loose, they don't hold together whatsoever. This weekend I'll get to cleaning: cylinder head and pistons, primarily. Also need to replace the bent valves with fresh ones. Currently the repair bill is around $3200. Honestly I'm shocked it's possible to spend this much in parts. The majority of that cost was to LN Engineering for a new shaft with bearing. The photos show the failed IMS, a chunk of aluminum missing from the case (no biggie :eek: ) and the crankshaft bearing block. Reassembly questions for the experts: What torques are people typically using for connecting rod bolts? I've read Porsche doesn't share this information. What is the piston ring alignment? I read someone mention a 10-2 arrangement between the top two rings.
-
Dang. Well if I don't find any volunteers by tomorrow I'll go ahead and order the Baum kit: http://www.toolsource.com/porsche-piston-driver-p-114349.html (and an endoscope!)