Welcome to RennTech.org Community, Guest
There are many great features available to you once you register at RennTech.org
You are free to view posts here, but you must log in to reply to existing posts, or to start your own new topic. Like most online communities, there are costs involved to maintain a site like this - so we encourage our members to subscribe or donate. All subscriptions and donations go to the costs operating and maintaining this site. We prefer that guests take part in our community and we offer a lot in return to those willing to join our corner of the Porsche world. This site is 99 percent member supported (less than 1 percent comes from advertising) - so please consider an annual subscription or donation to keep this site running.
Here are some of the features available - once you subscribe RennTech.org
- View Classified Ads
- DIY Tutorials
- Porsche TSB Listings (limited)
- VIN Decoder
- Special Offers
- Paint Codes
- Registry
- Videos System
- View Reviews
- and get rid of this welcome message
It takes just a few minutes to register, and it's quality Porsche information at a low cost.
Contributing Members also get these additional benefits:
(you become a Contributing Member by subscribing or donating money to the operation of this site)
- No ads - advertisements are removed
- Access the Contributors Only Forum
- Contributing Members Only Downloads
- Send attachments with PMs
- All image/file storage limits are substantially increased for all Contributing Members
- Option Codes Lookup
- VIN Option Lookups (limited)

RJFabCab
-
Posts
106 -
Joined
-
Last visited
Content Type
Profiles
Events
Forums
External Paint Colors
Downloads
Tutorials
Links Directory
Collections
Classifieds
Store
Everything posted by RJFabCab
-
Oill filter installation
RJFabCab replied to RJFabCab's topic in 996 Series (Carrera, Carrera 4, Carrera 4S, Targa)
Jeff, thanks for the pics. I was tired and moving fast... :eek: djantlive, thanks for the reply. I installed the new element and then the filter housing over it. As I tightened the housing I felt the crunch that speed123 described. That made me wonder if I had pushed the new filter element up high enough into the engine. So, I took the filter housing off again, and this time the filter element came off with the housing, and the filter was sort of stuck in the bottom of the filter housing... like something was holding it in place (this must have been the spindle assembly mentioned in Loren's DIY). So, I took the filter out of the housing and reinstalled it to the motor after making sure that it couldn't be pushed up any further. The filter element just sort of hangs in mid air. Then, I reinstalled the filter housing cover, felt the slight crunch again, and continued to torque it down to spec. Apparently this is all part of the process and normal. Thanks to all. -
Oill filter installation
RJFabCab replied to RJFabCab's topic in 996 Series (Carrera, Carrera 4, Carrera 4S, Targa)
The filter sits inside the oil filter housing that you unscrew from the engine (black 'oil filter' looking bit of plastic that sits on the right hand side under the engine (looking from behind) behind the sump. Remove the filter housing - extract the paper filter (the bit in your photo),replace with the new one and screw it back. That's all there is to it. Richard. Thanks, Richard... I understand all that you say, but my question was regarding how the filter actually installs to the motor. What I came to realize is that once installed to the motor(without the filter housing), the filter element sort of hangs in mid air. Meaning, it doesn't get crammed up into the motor (out of sight). The filter housing then installs over it. The filter element "pops" onto the motor and then hangs, later to be covered by the housing. I was working quickly and never saw the "spindle/spring element" that supposedly latches onto the filter element. I suppose it was inside the filter housing, but I didn't notice it. -
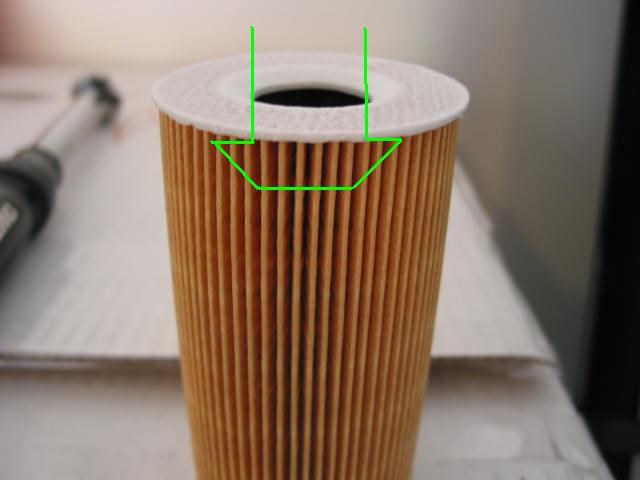
MY 2002 996 oil filter installation question: When the filter element is installed on the engine, does it slide all the way up into the motor, or does it sort of hang in the air after "popping" onto the engine portion noted in green in the pic below?

-
1. 10 mm hex. Got it. 2. Good advice on hanging the caliper to relieve tension. 3. I plan to if I actually see this project through! B) 4. Regarding the rear caliper, yes, the bracket will come off with the caliper, however, the bracket appears to house ABS (?) lines in addition to brake pad sensor lines and the ABS lines are fixed to the bracket with no slack. It looks like I'll have to remove the bracket to freely remove the rear caliper. They must be ABS lines... I can't think of anything else they would be. 5. I see. I was looking at the wrong part of the drum assembly. I was looking at part "7" rather than part "2" in your diagram. 6. Good. It shouldn't be a problem then once I learn how to adjust the rear drum brake. Thanks for the help
-
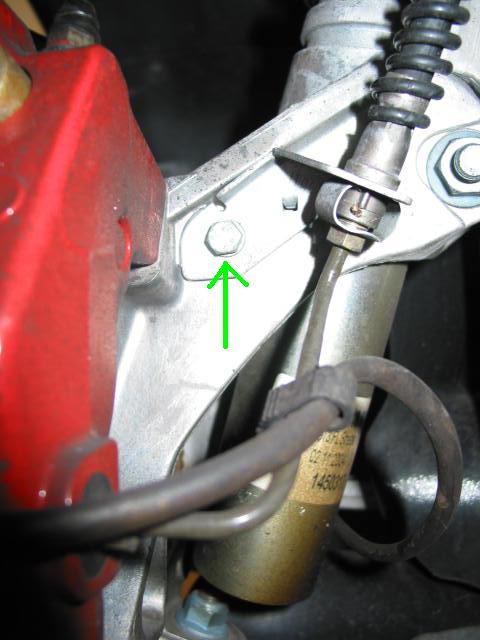
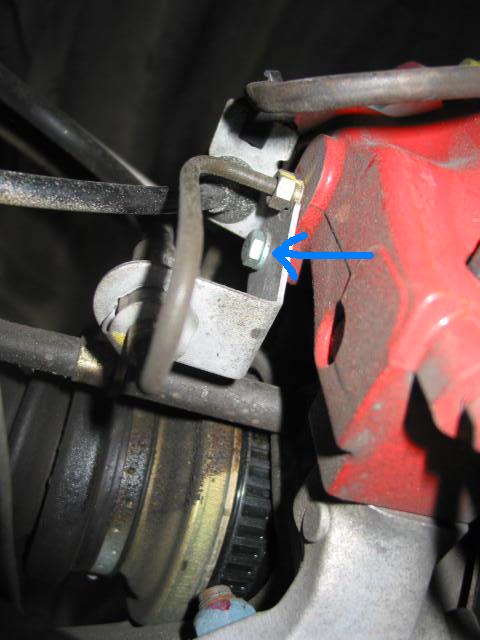
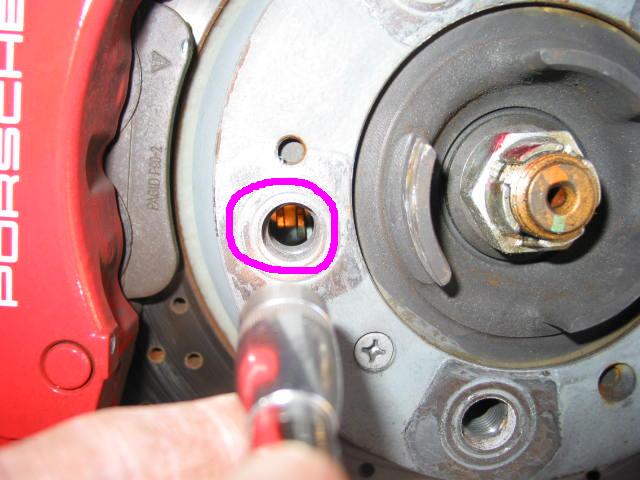
Loren, I took off the wheels and took a good look at the calipers/rotors. I have some more questions regarding changing the rotors. 1. The rotor caliper bolts appear to be allen head bolts. What size allen head wrench (metric) do these caliper bolts take? 2. Front rotors: after removing the 2 caliper bolts, will the caliper have enough room to swing off the rotor without removing anything else (such as brake lines)? It appears that the brake lines are rather fixed and that I would need to remove a 10 mm hex bolt (see green arrow) to be able to freely remove the caliper off of the rotor. 3. The bolt holding my retaining pin on the front calipers is 13 mm. 4. Rear rotors: After removing the 2 caliper bolts, should I be able to remove the caliper off the rotor without disconnecting anything else? Once again, it appears that I may need to remove a 10 mm hex bolt (see blue arrow) to be able to freely remove the caliper. 5. I'm still not clear on how to adjust the parking brake at the drum. I look through the threaded bolt hole and see 2 little brass looking pads/discs. How does this adjustment work at the rotor? 6. Regarding the parking brake, if the parking brake is released and the old left rear rotor turns freely, then there should not be a problem removing the old rotor and placing a new one, correct?
-
Loren, as usual... you ROCK! :beer: A couple of q's: 1. Is there a torque spec for the 2 philips screws holding the rotor? I know that the bulk of the support is done by the 5 wheel bolts. 2. I see that the torque spec for the caliper bolts is 63 ft/lbs. Can you verify that the torque spec for the bolt on the end of the retaining pin (the one that holds the caliper flat spring down) on the front calipers is 10 ft/lbs.? I recall mds using 10 ft/lbs. 3. I'm new to loctite. Should I use something like loctite 242 blue threadlocker on the philips screws, caliper bolts, or retaining pin bolt? 4. I haven't worked on a drum parking brake assembly. Can you elaborate? Is there a specific screw accessed through the threaded wheel bolt hole that allows adjustment of the parking brake? Does this screw have "notched" adjustments? Or, am I dealing with a screw to adjust cable slack regarding the parking brake lever? I did find this: Parking brake adjustment RJ
-
Can someone point me to a DIY for changing rotors on a MY2005 996 GT3? My searches are coming up empty. Thanks, RJ
-
Hey, Craig It's for PCA DE. Perhaps he's not so familiar with track stressed rotors. Who knows. I'm going in this afternoon to have a little chat with him. :huh:
-
Master Tech apparently wants to fail my GT3 on the tech inspection due to "bluish discoloration of the front rotors". Am I missing something here? Could this discoloration be indicative of a loss of rotor integrity due to significant heat stress? Sorry, no pics... as I thought the rotors looked just fine... no different than any other set with track miles on 'em. The rotors are not even close to meeting replacement criteria with respect to thickness, lateral runout, or cracks. Personally, I think they're A.O.K. but I'd thought I'd look for a litte input. Cheers
-
This usually has to do with emissions. My understanding is that cold (ambient temp) start is one of the most difficult hurdles in passing emissions requirements. Higher revs gets everything warmer, quicker...particularly the cats. --Brian Ditto that. It's my understanding that the temporary higher idle helps reduce emissions on cold startup. I'm not sure of the technical mechanism, but it's probably related to what Brian said. Cheers
-
Thanks, Loren. I've only been to the track twice in the GT3 and the front rotors are already showing signs of stress.
-
I searched the GT3 forum but couldn't find a definitive answer. Are there any caveats specific to the 996 GT3 vs. a regular 996 C2? It's my understanding that the procedure for the brake/clutch bleed is no different, and I plan on using the Motive Bleeder with ATE Super Blue/Typ 200 Gold. I'm simply looking for a little confirmation, especially on bleeding the clutch. You know how it is, wondering if the clutch pedal will "rebound" after you depress it! :unsure:
-
Abs/psm Faultabd
RJFabCab replied to villageidiot's topic in 996 Series (Carrera, Carrera 4, Carrera 4S, Targa)
I can state it no better than Joel Reiser at PCA. MAF sensors and ABS/PSM faults Also, check out this thread. More information Cheers -
OK, here's Joel Reiser's excellent explanation of the relationship between the air mass sensor and the ABS/PSM. Tech section pca.org
-
Karl, I've been tracking for some time now with the same setup and have never had ABS/PSM issues before. There was no consistency to when the faults showed up. Heck, the second PSM fault showed up while moving at good speed down a straight with no heavy braking immediately prior. It was strange. The first faults showed up under heavy load, so I thought I may have been confusing the electronics or overstressing the system. However, the other two alerts occurred during relatively stress free driving. NCBob apparently had a similar incident. The dealer told me that the faulty MAF somehow creates an electrical issue that affects the system. I don't understand the situation, and I have not had the time to review my tech manuals yet! The faulty MAF code definitely showed up on the PST2, though. I'll keep you all posted if I find out something interesting... Cheers
-
I am well aware of the issue concerning the cotton type filters. I was running the BMC filter (straight out of the box, not re-oiled) when my first MAF went out. The BMC may have had something to do with the first failure, but I know guys who have run the BMC's for years with no issues at all. So, I switched back to the stock element which has been in place ever since. And my reward? A second MAF failure! :P I just have to accept the fact that the MAF sensor is a unit prone to contamination/failure.
-
Update on my ABS/PSM problem. "Fault Code 5525". The dealer replaced the air mass sensor. This is the second time my MAF sensor has been replaced. The first time I was having rough idling and depressed throttle response. This time the engine response was perfect but I received the ABS/PSM failure warnings. Why does the MAF sensor affect the ABS/PSM systems? Perhaps I'll be able to dig the answer out of my technical manuals. NCbob, thankfully no modules needed replacement. There is no doubt that the ABS/PSM were "off" when I got the warnings! :drive: Cheers
-
Jeff, Thanks again for the help. I will review the PCA information. Cheers
-
wwest, I thought about the scenario you mention since I had no faults in the morning sessions except the fluid level alert. We have ample cool down time between runs and I had no alerts during parade laps during which I hardly used the brakes. Shortly thereafter within 2 laps of really moving, I had the alerts back. I was working the ABS out there, but it didn't seem like anything extreme compared to my usual track sessions. I had fresh ATE in the system and never lost pedal feel/response. Perhaps once the system "heated up", it never really had a proper chance to cool down enough under all the duress.
-
Jeff, thanks for the link. I had a little trouble searching Renntech due to the 3 character limit of ABS and PSM. Here's another Q. If I had a compromised brake pad wear sensor (it appears that the wear sensor is a continuous wire loop that eventually is broken by the worn pad), would this lead to the same "ABS failure" or "PSM failure" warnings on the display screen? I will keep you all posted. Thanks for the help!
-
During some "spirited" driving on the track I received a "brake fluid level low" warning. The brake fluid level in the reservoir was half way between the Min and Max lines. So, I topped it off with some ATE Gold (TYP 200) to just under the Max line. I have had this happen before and topping off the reservoir gets rid of the low level warning. I'm sure it's all the G's sloshing the sensors around. Anyhow, another trip out I received an "ABS failure" warning and then "Drive to workshop" message. Sure enough, the ABS was "out" :drive: , but I always had good pedal feel and braking performance. A restart on the car reset the ABS failure warning, however, on the next session the ABS failure warning returned and was followed by a new "PSM failure - Drive to workshop" message. It was like driving an 'ole 911! :thumbup: Another restart and everything was back to normal. Braking control and pedal feel never changed. The electronic aids including ABS just disappeared. No brake fluid overflow at the reservoir and no leaks in my system that I am aware of. Does this sound like a computer glitch or a faulty ABS/PSM module? Anyone have any ideas? Cheers
-
Ignition difficulty
RJFabCab replied to RJFabCab's topic in 996 Series (Carrera, Carrera 4, Carrera 4S, Targa)
Jeff, thanks for the link. I did a search but obviously missed that thread. The electrics work fine. Swapping keys was my next move while I contemplated a key fob battery replacement, which probably wouldn't help anyway. The dealer says I may need to simply have my key reprogrammed for my car. As for the clutch, it's always fully depressed on startup. Thanks to everyone! Cheers -
On occasion, I have trouble starting my car. Here's the scenario: 1. Unlock the doors with the remote. 2. Insert the key into the ignition. 3. Turn the key to start the car. 4. Absolutely nothing happens with respect to the engine turning over. 5. If I remove and then reinsert the key into the ignition a couple of times, then the car starts right up without difficulty. All of the electrics are working fine. It's as if the car is not recognizing the chip inside the key fob and therefore not allowing the ignition to startup. Could this be due to a weak key fob battery even though I never have trouble unlocking the doors? I know that the keys need to be programmed by the PST2. I'd like to try and change the key fob battery, but will removing the battery necessitate reprogamming of my key due to the temporary loss of power to the key fob? Thanks to all... :drive:
-
Another PSE rattle
RJFabCab replied to P.Viby's topic in 996 Series (Carrera, Carrera 4, Carrera 4S, Targa)
I had both of my PSE mufflers replaced under warranty. The internals were faulty. As Loren said, it was likely a loose weld or faulty valve assembly. I know of others who have had their PSE mufflers replaced due to internal rattling. -
I'm looking for some quality big round oval exhaust tips to fit my PSE. I went from stock to Fabspeed to PSE (newer version, not the 3.4L version). With the Fabspeed setup, I also ran the Fabspeed tips which were made for MY02 and later cars to accommodate the increase in overhang of the rear bumper. However, these Fabspeed tips don't fit my PSE. The inside edges of the tips rub against the outflow pipe of the PSE. So, what are my other choices for large oval tips for MY02 PSE? 1. I don't want the Tequipment twin pipe tips. 2. I may have to do a custom fabrication job TIA B)