Welcome to RennTech.org Community, Guest
There are many great features available to you once you register at RennTech.org
You are free to view posts here, but you must log in to reply to existing posts, or to start your own new topic. Like most online communities, there are costs involved to maintain a site like this - so we encourage our members to donate. All donations go to the costs operating and maintaining this site. We prefer that guests take part in our community and we offer a lot in return to those willing to join our corner of the Porsche world. This site is 99 percent member supported (less than 1 percent comes from advertising) - so please consider an annual donation to keep this site running.
Here are some of the features available - once you register at RennTech.org
- View Classified Ads
- DIY Tutorials
- Porsche TSB Listings (limited)
- VIN Decoder
- Special Offers
-
OBD II P-Codes - Paint Codes
- Registry
- Videos System
- View Reviews
- and get rid of this welcome message
It takes just a few minutes to register, and it's FREE
Contributing Members also get these additional benefits:
(you become a Contributing Member by donating money to the operation of this site)
- No ads - advertisements are removed
- Access the Contributors Only Forum
- Contributing Members Only Downloads
- Send attachments with PMs
- All image/file storage limits are substantially increased for all Contributing Members
- Option Codes Lookup
- VIN Option Lookups (limited)


sboost
-
Posts
17 -
Joined
-
Last visited
Content Type
Profiles
Events
Forums
External Paint Colors
Downloads
Tutorials
Links Directory
Collections
Store
Everything posted by sboost
-
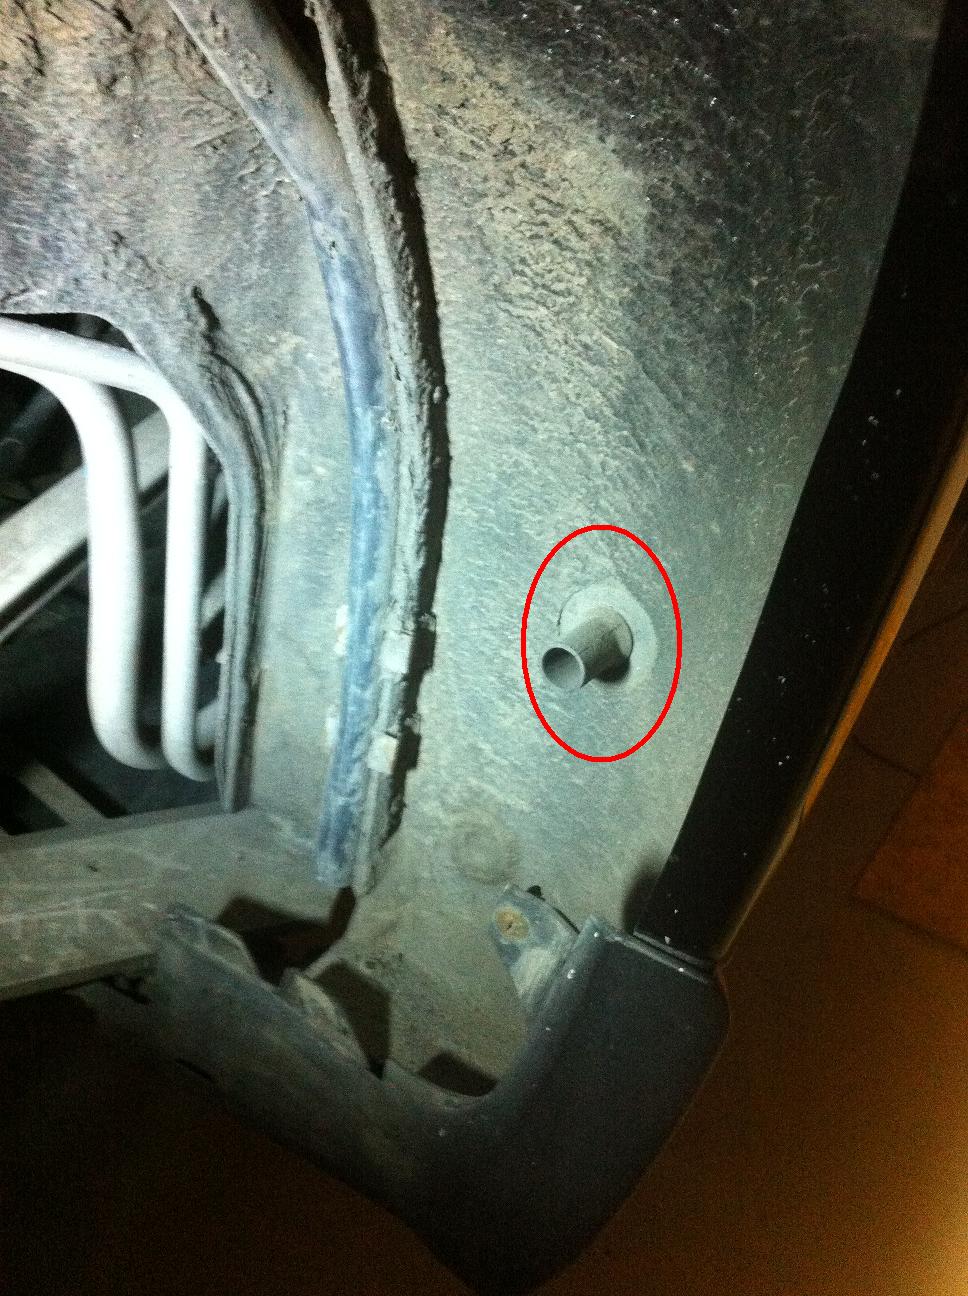
Thanks for the info. With a bit more snooping and by comparing both sides, I managed to figure out how the drain was supposed to be routed. It turns out that the tube was still there but just popped out of the hole in the wheel well and fell into the inner body. By removing the side engine air intake vent and pushing aside the rubber boot I managed to fish the drain hose back through the hole where it belongs. Tested the drain with water and works OK. My only concern now is that it was likely in this condition for years and actually draining water inside the inner body panel. Thanks again.
-
I changed the spark plugs on my 2000 Boxster last week and noticed something strange after removing the side access panels inside the rear wheel wells. On the forward side inside both rear wheel wells there is a hole about 1/2" diameter. There is a small rubber tube about 1 1/2" long inserted and sticking out of the hole. I presume the hole is there to vent the inner panel compartment and the tube is there to help prevent moisture /rainwater from splashing and seeping into the compartment. The problem is that mine was missing on the driver’s side. I’m guessing that this little seemingly insignificant tube plays an important role in preventing body panel corrosion. I would like to replace it but can’t identify the part number. I searched this forum and also have a copy of the Porsche parts catalogue but couldn’t find it. I included a photo from the passenger side of the rear wheel well on my car which shows the part I am talking about. Any help in identifying it would be appreciated. Thanks.

-
The clock display on my Boxster "spydered" on me (now has an ugly orange blotch). I removed and disassembled the instrument cluster just to scope out if replacing the clock alone was within my capabilities and decided not to go that route, A bit too much delicate soldering would be required. If it's possible this would be a great occasion to swap over to a Boxster S style cluster. I love the white gauge faces (and yes I know there are several aftermarket suppliers of gauge faces). Does anyone know or ever tried substituting a Boxster S instrument cluster for the standard Boxster? Would be fantastic if the same model year was plug and play, but if not is there a hack available? There are always plenty of instrument clusters available on ebay. My Boxster is a 2000 (5 Speed manual) with a Canadian model instrument cluster P/N 986 641 105 05 70C Thanks
-
Glass window top replacement
sboost replied to Tool Pants's topic in 986 Series (Boxster, Boxster S)
I posted this back in Dec 2007. I'm still holding on to the replacement top that Robbins sent me under warranty and haven't yet changed it because the old top is still holding up OK despite the minor separation. Steven Dec 2007: "It's been almost a year now since I replaced (myself) the top on my 2000 Boxster with a glass conversion from Robbins. I have to say that the fit, installation, and operation with the new top were all perfect -or at least as good as the OEM top. After a short time however, the top did begin to separate at one area where it is glued on the inside around the window and also at the back where it installs into the rear bow. It was clearly heat related, because it would disbond only in warm weather. The glue always remained tacky and if I pressed the fabric back together it would hold OK until the next time it was warm and parked in the sun (BTW I'm in Montreal Canada, summers can be warm here, but definitely not the hottest part of the planet). Let me add the fabric was not totally separating or opening, it was just a secondary fold that was becoming unglued. Concerned, I wrote Tops-on-line, (the e-Bay distributor I bought it from) about my problem asking if there was a procedure that they recommend to re-glue it and hopefully stop it from progressing. A couple of weeks later I received a brand new replacement top in the mail - no charge. My car is now in storage for the winter and I haven't yet had the chance to replace the top. For the time being it doesn't appear that the fabric will ever separate totally from the glass window so I'll probably wait and see how long it holds. The new top doesn't appear to be any different from the old one and my guess is that this is a problem with all the Robbins glass tops. I have to commend them for their excellent service in sending me a replacement, but I would feel a lot better with some acknowledgement of the problem from Robbins and confirmation that they have done something to address it." -
It's been almost a year now since I replaced (myself) the top on my 2000 Boxster with a glass conversion from Robbins. I have to say that the fit, installation, and operation with the new top were all perfect -or at least as good as the OEM top. After a short time however, the top did begin to separate at one area where it is glued on the inside around the window and also at the back where it installs into the rear bow. It was clearly heat related, because it would disbond only in warm weather. The glue always remained tacky and if I pressed the fabric back together it would hold OK until the next time it was warm and parked in the sun (BTW I'm in Montreal Canada, summers can be warm here, but definitely not the hottest part of the planet). Let me add the fabric was not totally separating or opening, it was just a secondary fold that was becoming unglued. Concerned, I wrote Tops-on-line, (the e-Bay distributor I bought it from) about my problem asking if there was a procedure that they recommend to re-glue it and hopefully stop it from progressing. A couple of weeks later I received a brand new replacement top in the mail - no charge. My car is now in storage for the winter and I haven't yet had the chance to replace the top. For the time being it doesn't appear that the fabric will ever separate totally from the glass window so I'll probably wait and see how long it holds. The new top doesn't appear to be any different from the old one and my guess is that this is a problem with all the Robbins glass tops. I have to commend them for their excellent service in sending me a replacement, but I would feel a lot better with some acknowledgement of the problem from Robbins and confirmation that they have done something to address it. Steven
-
Something seems to be Draining my Battery
sboost replied to sboost's topic in 986 Series (Boxster, Boxster S)
Success !!!! I disconnected the alternator terminal exactly where Tool Pants mentioned and the drain dropped from 2.5 Amps to about 20 mA. So now I'm focused on replacing the alternator. I sized up the job and don't expect it to be a problem for me. From what I've read in this forum, it's very likely that the problem is not the alternator itself, but the voltage regulator. A couple of people mentioned that they replaced just the regulator. I did a check on ebay and couldn't find one. Does anyone know the Bosch P/N for the regulator or where to get one? My car is a 2000 986, 2.7l, 5 speed manual. I found this alternator on ebay but not sure if it matches mine. http://cgi.ebay.ca/Porsche-911-Boxster-Bos...1QQcmdZViewItem From the Porsche parts catalogue I can see that the manual cars had a different alternator then the Tiptronic models. The alternator for manual cars like mine are supposed to have "pulley with free wheel lock" whatever that is ? The Porsche catalogue shows 2 different part number units for manual cars: 996 603 012 02 and 996 603 012 01 Does anyone know which one would be correct for my car and the equivalent Bosch part number ? Thanks a lot Tool Pants, Loren, Glyn, and vizcarra44 for all the help. I think it's about time for another forum contribution. Steven -
Something seems to be Draining my Battery
sboost replied to sboost's topic in 986 Series (Boxster, Boxster S)
My saga continues. Yesterday I did some additional checks. First let me confirm that the current drain I'm reading is 2.5 Amps. I'm measuring it with a multimeter across the negative battery post. I removed each and every fuse (not one at a time but all together just to be sure) from the main fuse block and the reading dropped to about 2.3 Amps. So what next? From what I can gather from searching this forum the next logical step would be to try disconnecting the alternator. Does anyone know if the alternator is fused or exactly where the simplest location would be to disconnect it? The only other idea I had was that it might be a Boomerang alarm system draining the battery. I know that the previous owner of the car originally had a Boomerang installed that he later cancelled. I'm assuming that he probably just cancelled the service with Boomerang but never disconnected or removed the unit from the car. Does anyone know where these alarms are typically installed on the car or where they typically draw power from? Myself I have no idea where to look for it or what it even looks like. I should also add that I replaced the ignition switch a couple of months ago. I had the typical symptom where the radio would sometimes stay on after the key was removed. All is fine since I replaced the switch, and in either event I don't think it could be my problem because I assume all of the switch connections are fused. Let me say that this car is my first Porsche and the help that this forum has provided me on several occasions has been invaluable. I love the car and this forum has helped make the whole Porsche experience so far very enjoyable. Without this forum, I would have probably ended up bringing my car to the dealer for every little problem that I've had. I can say with absolute certainty that if that would have been the case this would have been my first and last Porsche. -
On 2 subsequent occasions now I've gone to start my 2000 Boxster about 24 hours after last driving it, and found the battery to be completely drained. I thought the problem might be the battery itself but after fully charging it and leaving it disconnected for 2 days it held the charge and started the car OK as soon as it was reconnected. The battery is only 2 years old and when I store the car I've always used the Porsche trickle charger. With the car and all the lights and accessories off, I measured a current drain of about 2.5 Amps at the battery post. Does anyone know if this is normal? It seems high to me but I'm curious to know if it could be just an initial current for some system that remains active for a short period before going to "sleep". I tried pulling fuses one at a time for any and every system with an electronic controller (central alarm etc.), but the reading stays at 2.5 Amps. Funny thing is, absolutely everything on the car works fine (central lock, remote, windows, radio, lights, everything!) Does anyone know if the 2.5 Amp reading is normal, or experienced a similar problem? Without some advice my options are now: 1) Replacing the battery (which could be for no reason if it's a problem with the car's electrics), or even worse I could end up damaging the new battery from deep cycling it one two many times! 2) Bring the car to the stealership (please God No). Anybody have any ideas?
-
I did take a couple of before and after pics but nothing that would help with explaining any part of the job. With respect to the slide and clamping rail, I found that the best (and only) way to remove them was together as an assembly and still fastened to the top. First remove the 2 torx head screws holding the clamping rail to the tension bow (one on the forward side that also holds the side tension cable, and the other at the back). Once this is done remove the clamping rail together with the slide and top from the main bow by removing the plastic pins and then squeezing the 4 fingers that hold the clamping rail together, and push the whole thing out of the main bow. In my case, despite being extra careful some of the fingers on the lower mount were just too brittle and broke. Probably pretty common because I read about the exact same thing happening to another forum member. No big deal because the clamping rail from Porsche was suprisingly cheap (about $11 each side). I would recommend buying them even before you start and replacing them anyway. Not being concerned with damaging them during removal will make the whole thing a lot easier. Steven
-
I just completed installing a Robbins glass window top myself on my 2000 Boxster and wanted to share some of my experience. I purchased mine from Topsonline off of eBay in original A5 canvas for $695. It arrived promptly and came complete with the harness for the window defroster and installation instructions. I also had the original Porsche instructions and Service Bulletin in addition to reading everything I could find about the job on this forum. I have to say that the instructions from Robbins were pretty good and included lots of photos. The only part I struggled with a bit was removing the plastic slide and clamping rail arrangement out of the main bow on each side. In this respect the instructions were vague and the procedure from the Porsche manual was just plain not possible. Once it was apart and I was able to see exactly how it fits together it made the assembly a lot easier. I will say though, that Porsche didn't leave a lot of room to squeeze these parts in and out of place from the main bow. This was the first time I've ever replaced a top so I took my time working very methodically and slowly. If I had to do another my guess is that it would take me about 8 hours. In my opinion it is well within the capabilities of most DIYers, just requires a lot of patients and attention to detail. The fit is excellent. As good or better then the original with no wrinkles. If anything I'm concerned that it is too tight. I also played around trying to get the best access to the engine with the top in the service position. Access is best when putting the top in the service position with it opened as little as possible at the front. In this way the window can pass just over the top of the roll bar which helps a lot. I would consider engine access greatly compromised in comparison with the plastic window top, but in the end still sufficient for probably any engine work. I now understand why Porsche advises that the tension straps (the seat belt like straps on both sides) be replaced together with the top. At first this made no sense to me. Now I understand. Presumably, over time the straps and top stretch naturally in tandem, allowing the tension load to be partially carried by the straps. My new top is so tight that it took quite an effort just to close it. I did not replace the old tension straps and they now hang slack and don't carry any of the tension. I'm a bit concerned that all the tension is now carried solely by the top. The amount of force needed to close it makes me worry that the seams or fabric connection to the window might eventually give out. From what I've read in this forum, it is apparently normal for a new top to be very tight and after a few days it should stretch and require no more then normal force to close. Mine has been in the closed position for 5 days now (albeit parked in the garage) and it is still as tight as ever. I still have to manually force it forward to get the hook to catch and then use a lot of force on the lever to close it. I would be very interested in hearing about any experiences (good or bad) that other members have had with glass top conversions. I've read about some of the problems with the earlier GAHH tops detaching from the window, but assume that has long since been resolved and no longer occurs. Right ??
-
I've got a 2000 Boxster with halogen headlamps. It's a Canadian model type with daytime running lights. I recently replaced the headlight assemblies because both main beam lenses had yellowish burn marks. I see this regularly on typically half the Boxsters I look at and have neve been able to get a good explaination as to why this occurs from either my dealer or other Porsche forums. My car has never used anything but the standard 55W H7 bulbs from day one. I'm convinced that it is probably related to having daytime running lights, because I don't see it mentioned very much on this forum, presumably because the majority of members have model types without daytime running lamps. I can't help but feel that running with the headlights on in addition to the hot midday sun reflecting into the lenses must at least be a contributor. So now I'm determined to not have the same thing happen with my new headlights, and I want to loose the daytime running light feature. I've read the threads on the subject and removed the daytime headlight relay. As expected, it was as simple as that and the lights only came on when I turned the switch. All of them worked perfectly with the exception of the license plate light which never comes on without the relay installed. Does anyone know of a simple hack to bring the license plate light on along with the rest of the lights when the daytime relay is removed??
-
I have a 2000 Boxster (USA model) with regular halogens. The face of both headlights are somewhat yellowed and burned, the same as I have seen on so many other Boxsters. I got a great price on a good used pair from a 1999 model off of Ebay from someone in the UK. I was a bit unsure if there would be any difference between the assemblies from LH versus RH drive vehicles, but the price was right so I took a chance. I received and installed them this weekend. The rubber edge seals were a bit different, as was the glass pattern on the face of the main beam, but I suspect this was because they were from different years (1999 versus 2000). Beyond that there was no distinguishable difference, all the bulbs were per spec and the headlights fit and work perfectly. I removed P/N 986 631 032 04, 986 631 031 04 and installed 986 631 032 11, 986 631 031 11. The European parts catalogue has option code M492 "for left hand traffic" listed against the replacements I installed. I was unable to note any difference between them. Does anyone know if and what the actual difference may be between the assemblies for LH versus RH vehicles?
-
I have a 2000 Boxter right now sleeping the winter off. Just got done painting the brake calipers. They came out pretty good and the paint seems to adhere OK. Does anyone have any experience with those Porsche caliper decals available Ebay? Do they really adhere well and will they last?
-
Was at the the local dealer this morning and pointed out the stain. All the mechanic did was tighten the clamps. OK, but WHY is there oil there?? He couldn't give me an answer and when I mentioned the oil seperator he just shrugged me off. BTW, they also found another RMS or intermetiate seal leak (wont know which until splitting the engine and tranny). This will be the second RMS leak on the car. Also found oil leaking from the filler neck and the right side cam cover (which they claim is only the bolt seal)
-
I've got a 2000 Boxster 2.7 (65,000 km) which I purchased only about 6 weeks ago. When I looked at the engine for the first time I noticed exactly the same thing, although my stain appears a little smaller. I have no idea either where it might come from (appears to be oil?) Seems to be ecsaping from a joint in the intake crossover. I have an appointment at the dealer next week for some other items but will be sure to ask about it.
-
I'm considering an original Tequipment exhaust that has popped up on Ebay. It is P/N 996 111 987 00 and was removed from a 2000 Boxster S. I own a 2000 Boxster (not an S). Does anyone know if this unit it will fit the 2.7 engine as well or if there will be any modifications required? I've read previous discussions on exhaust systems that mention required switches and harnesses. Any comments on what the unit will sound like on the 2.7 engine would also be appreciated.
-
I just purchased a 2000 Boxster and am new to Porsches. I consider myself a competent weekend mechanic and picked up a CD of the Boxster service manual. All of the recommended maintenance procedures and inspections appear well within my capabilities with one exception - the requirement to read out the fault memory. I obviously don't have the "Porsche system tester" nor an OBD scan tool and have never worked with one. Anyone have any thoughts on whether or not it's worth while paying the dealer just to read out the fault memory if the car seems to be running fine without any problems? I would have thought that if there were any faults the check engine or another warning light would illuminate. Can anyone confirm? I also have a question regarding headlights. My car is not equipped with Litronics, and the face of both headlights appears slightly burned with some yellow-brown areas. In my search for a used Boxster I noticed others with exactly the same problem. Does anyone know why?