Welcome to RennTech.org Community, Guest
There are many great features available to you once you register at RennTech.org
You are free to view posts here, but you must log in to reply to existing posts, or to start your own new topic. Like most online communities, there are costs involved to maintain a site like this - so we encourage our members to subscribe or donate. All subscriptions and donations go to the costs operating and maintaining this site. We prefer that guests take part in our community and we offer a lot in return to those willing to join our corner of the Porsche world. This site is 99 percent member supported (less than 1 percent comes from advertising) - so please consider an annual subscription or donation to keep this site running.
Here are some of the features available - once you subscribe RennTech.org
- View Classified Ads
- DIY Tutorials
- Porsche TSB Listings (limited)
- VIN Decoder
- Special Offers
- Paint Codes
- Registry
- Videos System
- View Reviews
- and get rid of this welcome message
It takes just a few minutes to register, and it's quality Porsche information at a low cost.
Contributing Members also get these additional benefits:
(you become a Contributing Member by subscribing or donating money to the operation of this site)
- No ads - advertisements are removed
- Access the Contributors Only Forum
- Contributing Members Only Downloads
- Send attachments with PMs
- All image/file storage limits are substantially increased for all Contributing Members
- Option Codes Lookup
- VIN Option Lookups (limited)


hi8ha
-
Posts
470 -
Joined
-
Last visited
Content Type
Profiles
Events
Forums
External Paint Colors
Downloads
Tutorials
Links Directory
Collections
Classifieds
Store
Everything posted by hi8ha
-
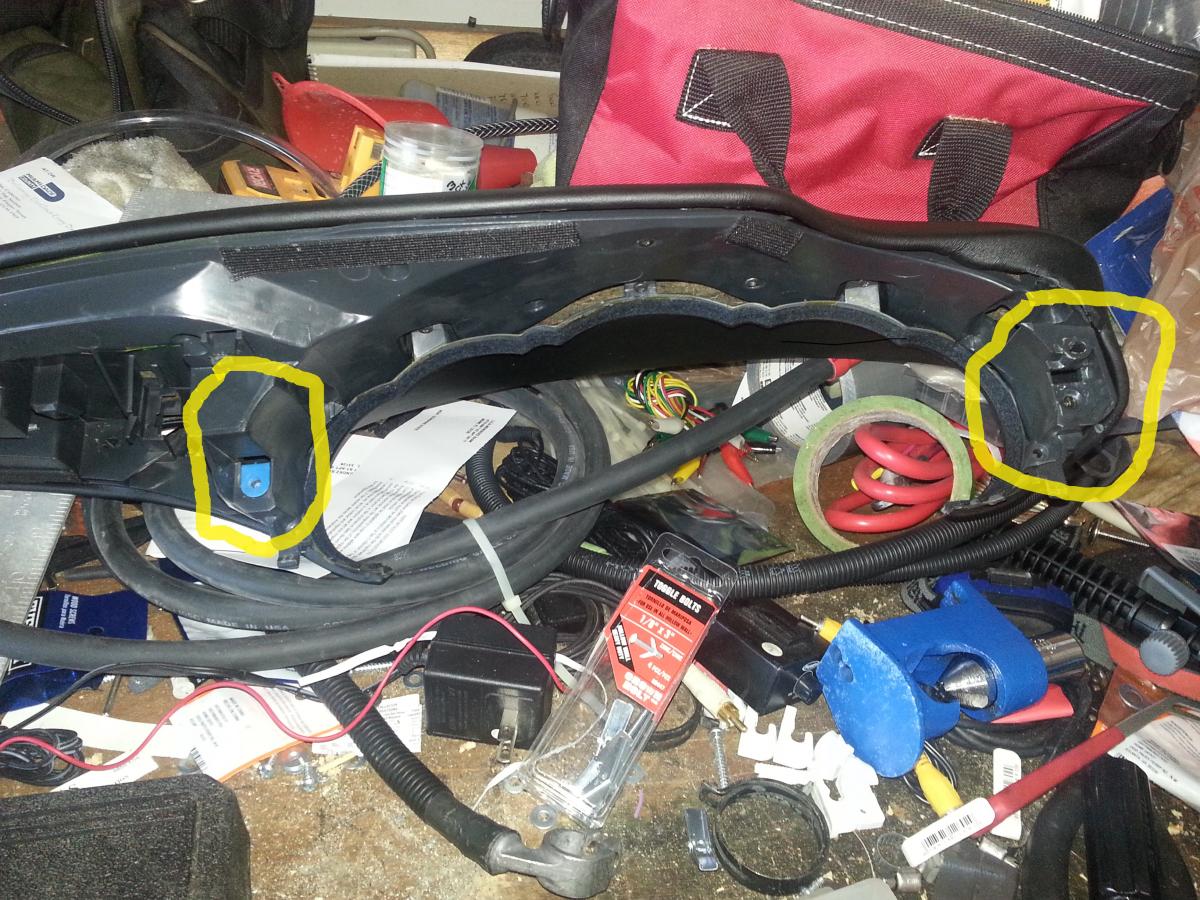
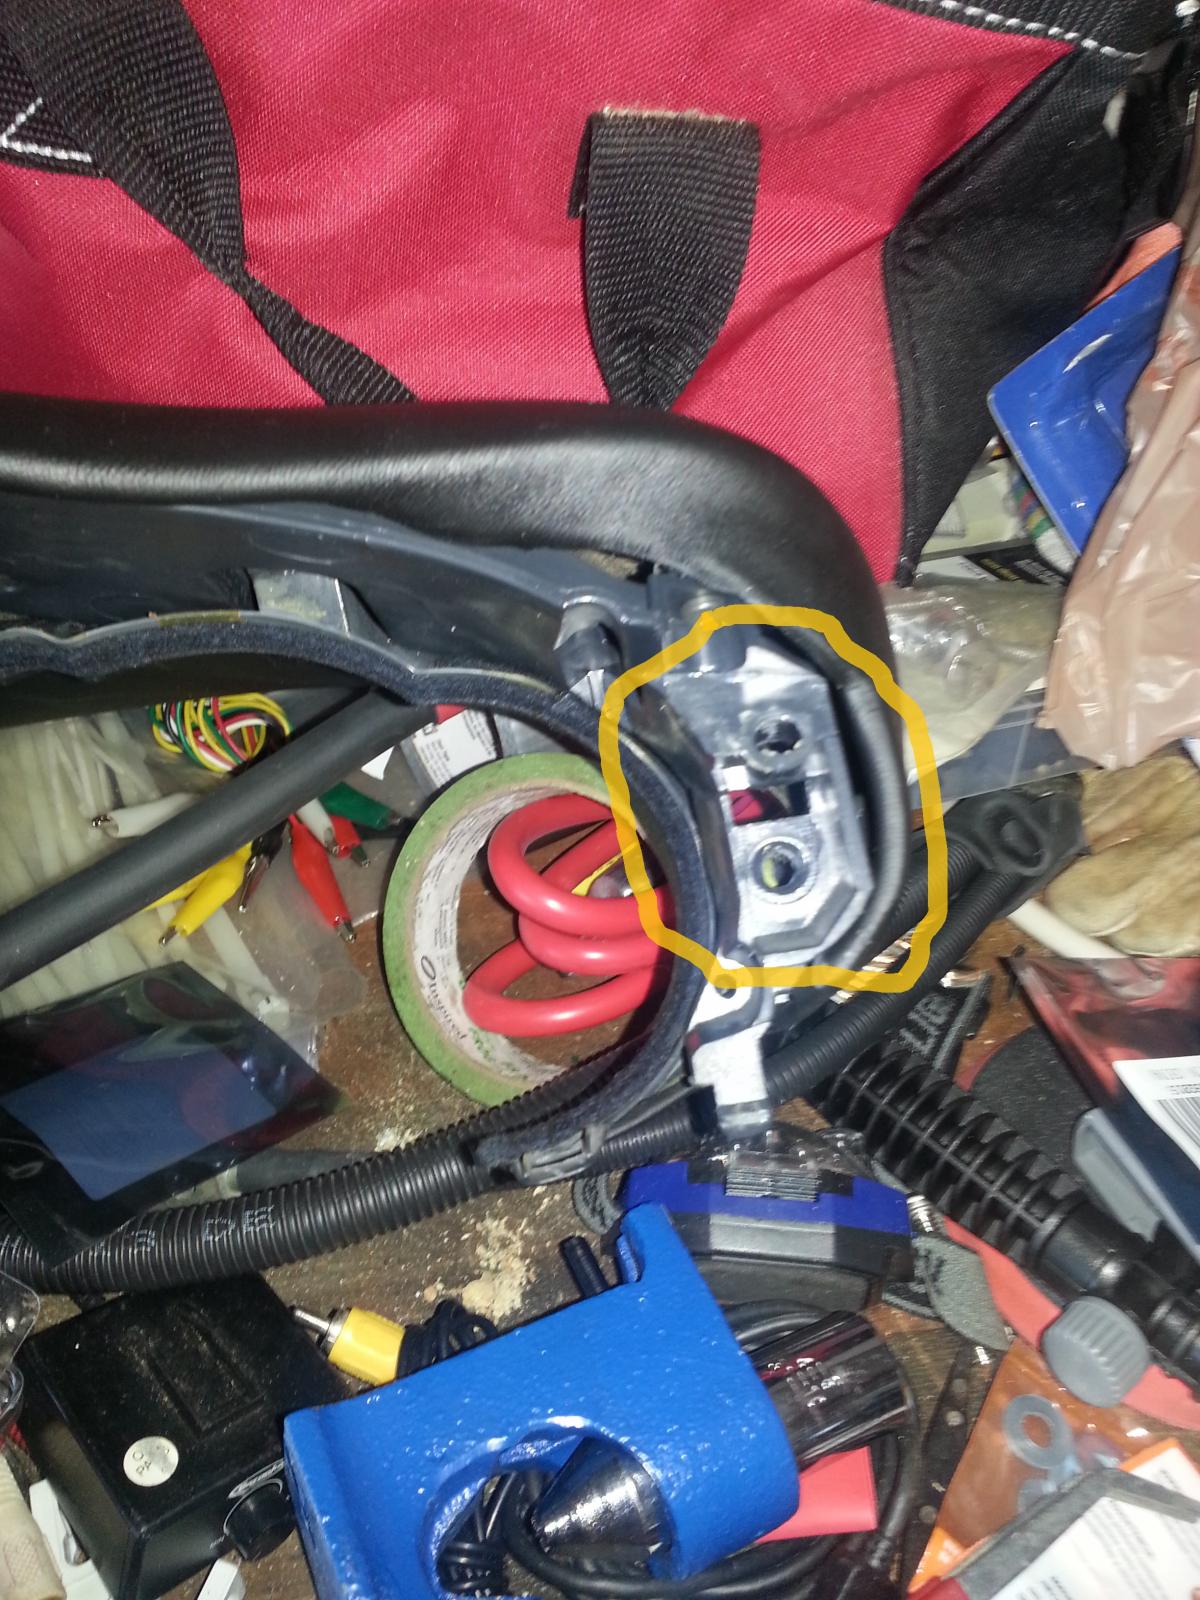
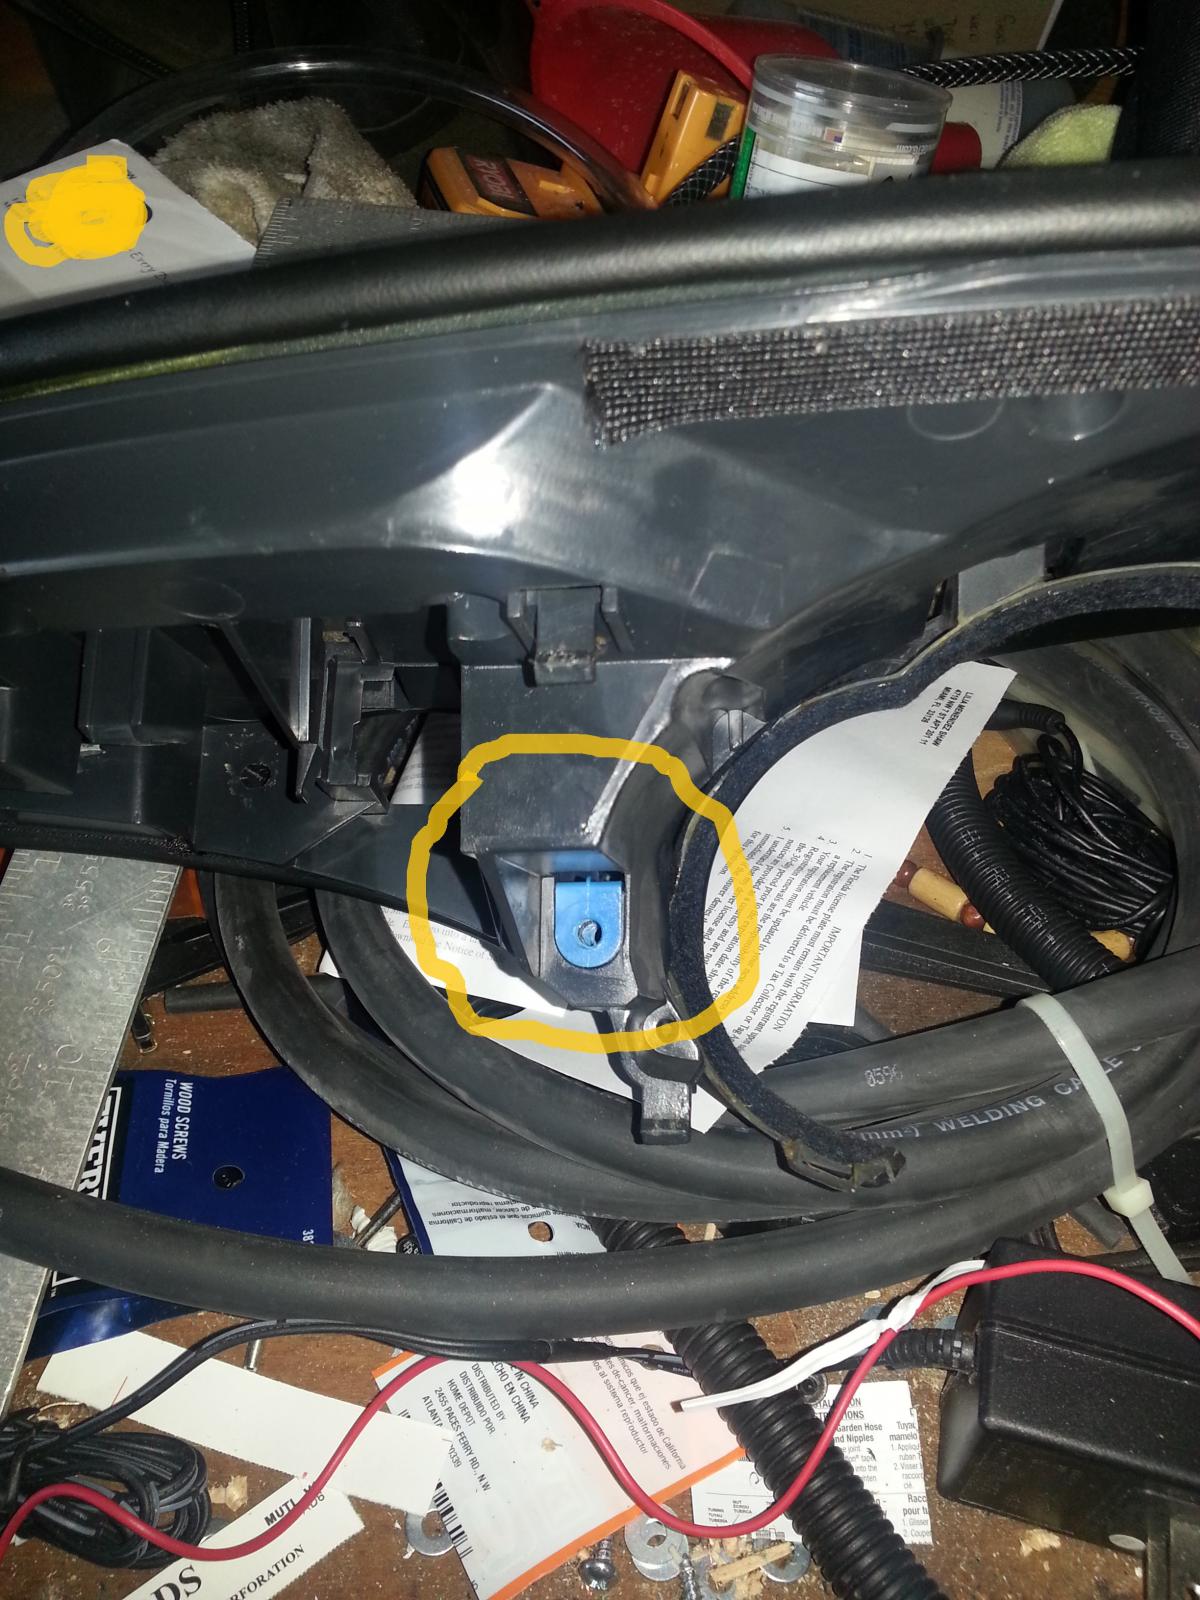
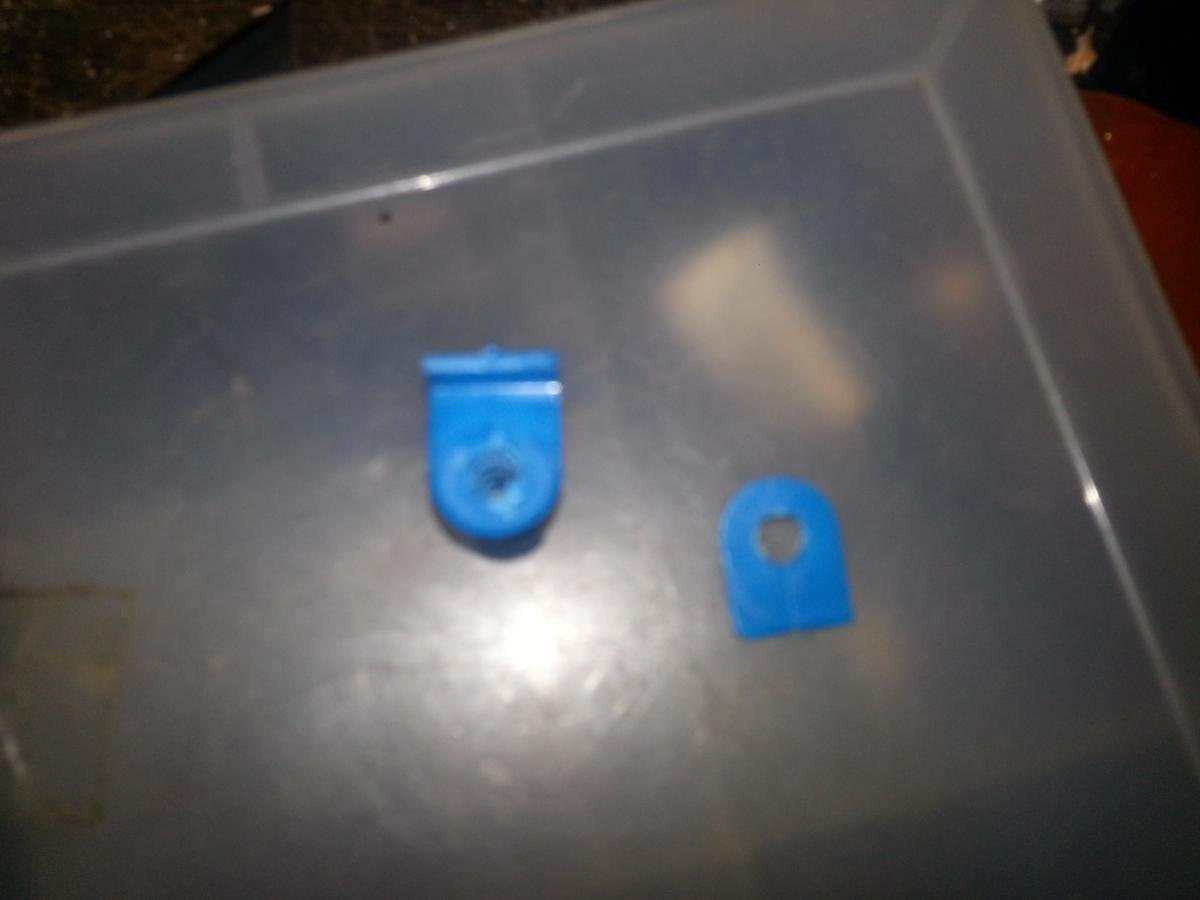
Replacing the bulbs for the cluster analog dials, found this part broken, see pics. Where can I get this part and if possible the part number? The pics show the whole cluster cover with a yellow circle on the missing pat, right, and how it looks, left.

-
I just went with the ATE Brake Fluid - Gold.
-
Thanks
-
Can I mix ATE type 200 DOT 4 with ATE Gold type 200? Also, does shelf break fluid expires?
-
Backup Camera...
hi8ha replied to creekman's topic in 996 Series (Carrera, Carrera 4, Carrera 4S, Targa)
"Violet/white Of the two lead wires connected to the back lamp, connect the one in which the voltage changes when the gear shift is in the REVERSE ® position This connection enables the unit to sense whether the car is moving forwards or backwards." There is a reverse signal wire under the driver's seat, don't recall the color/s. There is where the violet(purple)/white wire from the radio harness is to be connected.That signal tells the head unit the reverse is engaged and it will send the video signal from the camera to the screen. -
Thanks. How did the doubledin/camera go?
-
How long is cable "17", "19"; where is connection point "18", any pics? Thanks
-
Backup Camera...
hi8ha replied to creekman's topic in 996 Series (Carrera, Carrera 4, Carrera 4S, Targa)
Planning to install a reverse camera on my MY99 996. Plz let me know the rout you used to run the camera cables from the license plate to the engine room. After checking have not figure out how to do that. Thanks. -
Backup Camera...
hi8ha replied to creekman's topic in 996 Series (Carrera, Carrera 4, Carrera 4S, Targa)
When you connect the + of the camera to the revers bulb wire ( -/gound can be connected anywhere on the chassis), the camera gets power when the reverse gear is engaged. When the camera is powered it will send video signal to the GPS and you should view the image from the camera. Presume the GPS must be on as well. I would not connect the GPS power to the reverse power wire because the GPS would only work when reverse is engaged. Would suggest to read the GPS instructions as to how to connect the camera. Does it makes sense? -
Out of curiosity
hi8ha replied to hi8ha's topic in 996 Series (Carrera, Carrera 4, Carrera 4S, Targa)
OK. Thanks -
This is not a Porsche related question but since there are so many knowledgeable persons here... Is there a device that tells you what gear is the car in, like a LCD display, or something? I know there are devices that warns you abut reaching RPM threshold.
-
Headlights removal
hi8ha replied to hi8ha's topic in 996 Series (Carrera, Carrera 4, Carrera 4S, Targa)
Thanks -
Headlights removal
hi8ha replied to hi8ha's topic in 996 Series (Carrera, Carrera 4, Carrera 4S, Targa)
Finally. Had to remove the front lock cover piece, plastic that goes from side to side. Lift the passenger headlight from the bottom left corner. It finally came out. However, noticed some parts of the headlight weather strip is going bad, king of gooey. Can that strip be purchased without the need to purchasing the whole headlight? -
Headlights removal
hi8ha replied to hi8ha's topic in 996 Series (Carrera, Carrera 4, Carrera 4S, Targa)
Ok. It worked on the driver's side but not on the passenger side. On the passenger side I put the tool horizontally towards the rear, when I try to turn it 180 it only turns 90, the headlight tries to go forward but it stops. I can also hear a "clunk". When I try to revers the action, the headlight goes back to the "locked" position but a "Clunk" is also heard. When the headlight tries to go forward/out, I try to pry the top of the headlight but it does not comes out. -
Headlights removal
hi8ha replied to hi8ha's topic in 996 Series (Carrera, Carrera 4, Carrera 4S, Targa)
But why is being so hard? It should just slide out. The headlight tool should only be turn half counterclockwise, I turned it till it can not be turn any more, I'm afraid of braking the taps on the plastic taps in the headlight. -
Trying to do the side blinkers mod. But unable to take headlights out. Did the counterclockwise 1/2 turn but unable to take out the headlights, almost broke the side corner. When I turn the headlight tool clockwise, the headlight goes back to lock position what makes me think the lock/unlock mechanism is working. Any suggestions?
-
Backup Camera...
hi8ha replied to creekman's topic in 996 Series (Carrera, Carrera 4, Carrera 4S, Targa)
These are from other posts: "I also powered the rear camera from the driver's side backup tail light spliced in with the purple/white wire that goes to the HU and located a grounding source nearby. You'll also need to change your power source to battery in the HU setup screen." "Backup camera = backup lights. Get power and ground there." http://www.renntech.org/forums/topic/26098-how-to-run-backup-camera-wiring/ -
Yes in regards to the audio cables but I did not move the battery drain. In actuality I have an Optima batter that does not have a drain tube. But it MAY have been the old battery drain but when I replaced the old battery don't recall where the drain tube went so, your logic makes sense.
-
OK. Thanks once again.
-
Thanks. Do you happen to know what is the tube for? I see no signs there has been water in the area.
-
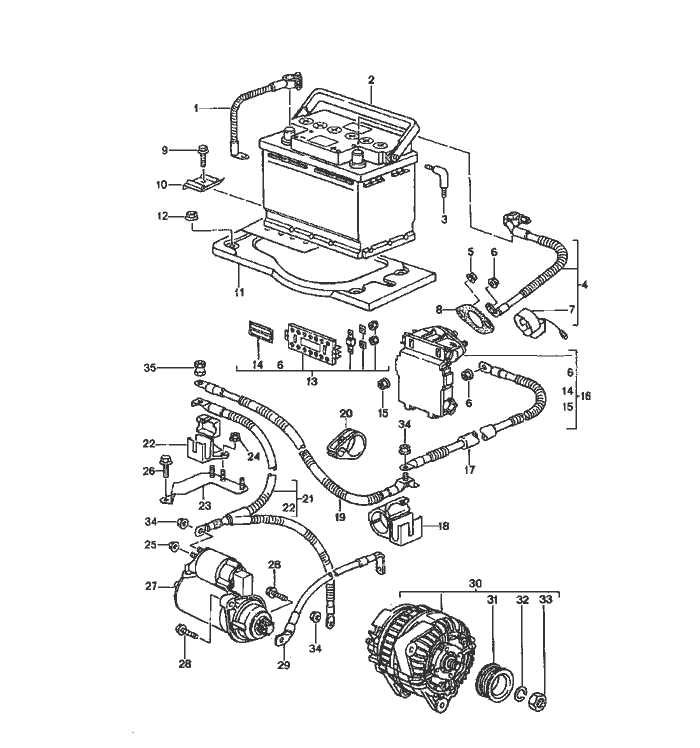
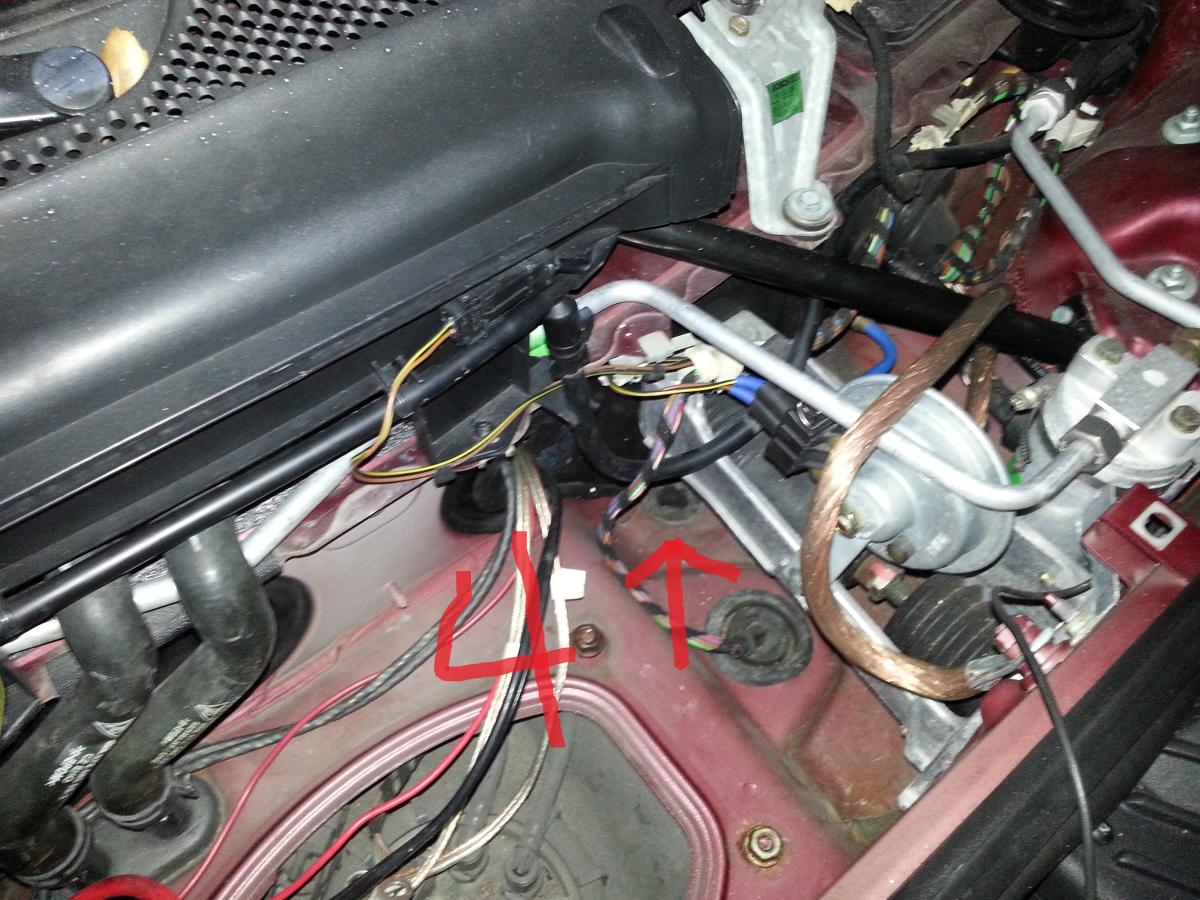
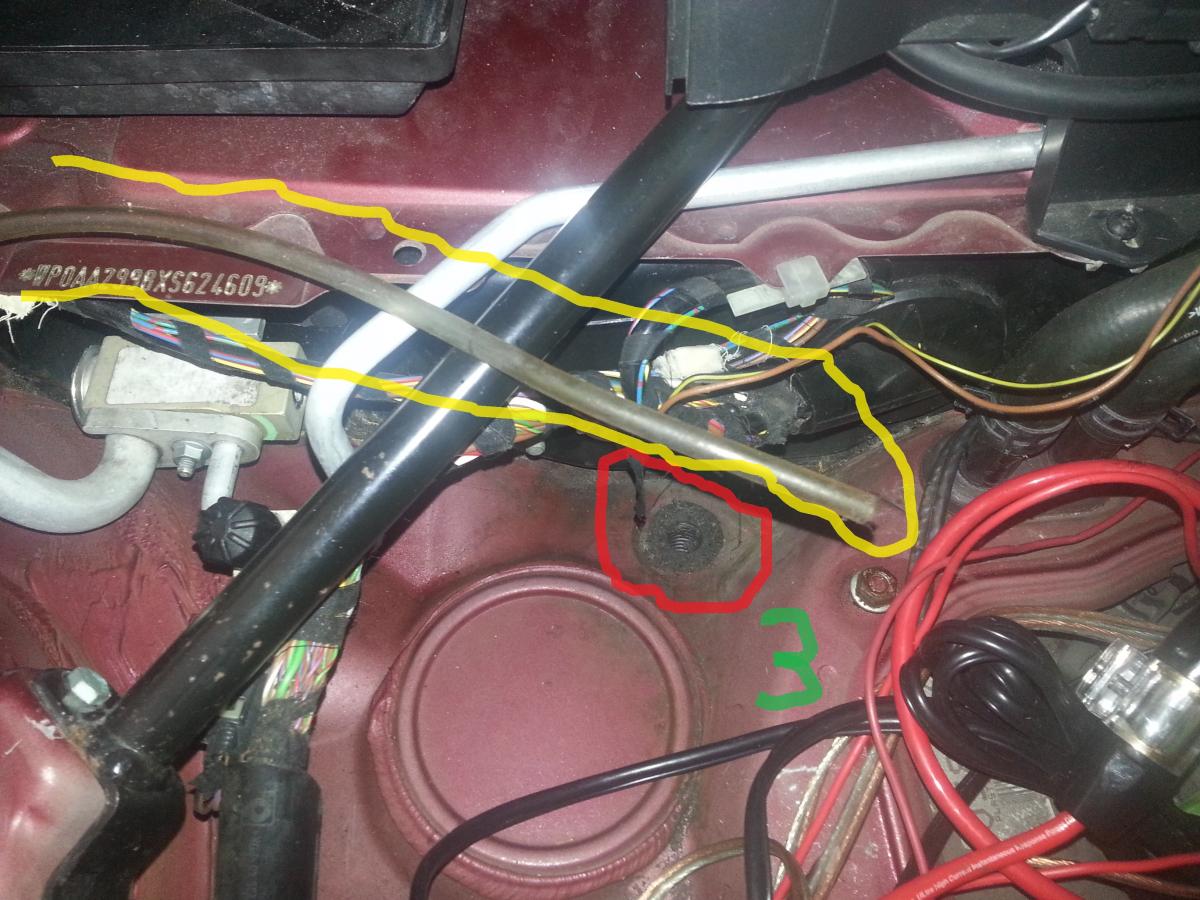
Pic #4, a broader view of where the driver side grommet/cap is located. Put my finger through the hole but it does no goes trough. Pic #5, a broader view of the passenger side. The red arrow shows where the tube either goes in or comes out. Th yellow arrow shows the grommet/cap. Put my finger inside and it goes all the way through.
-
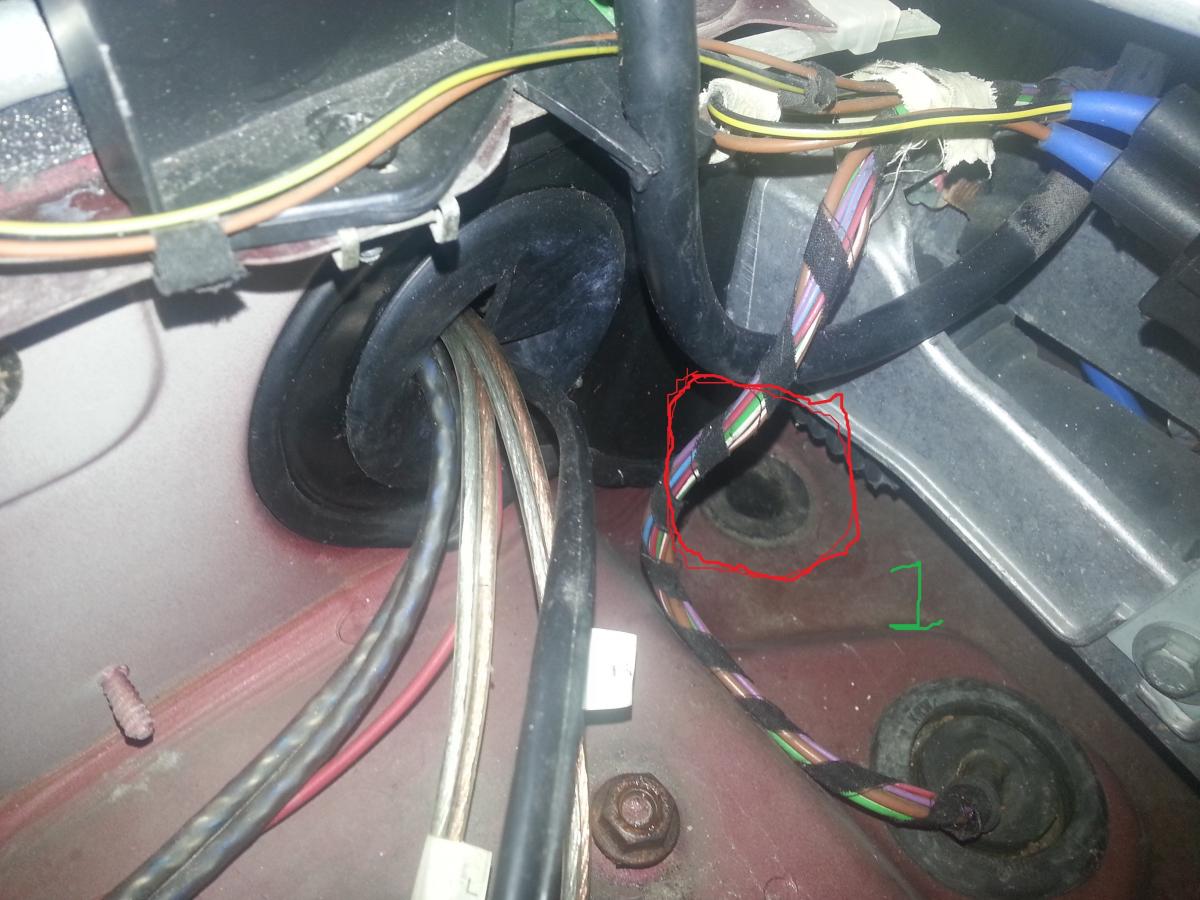
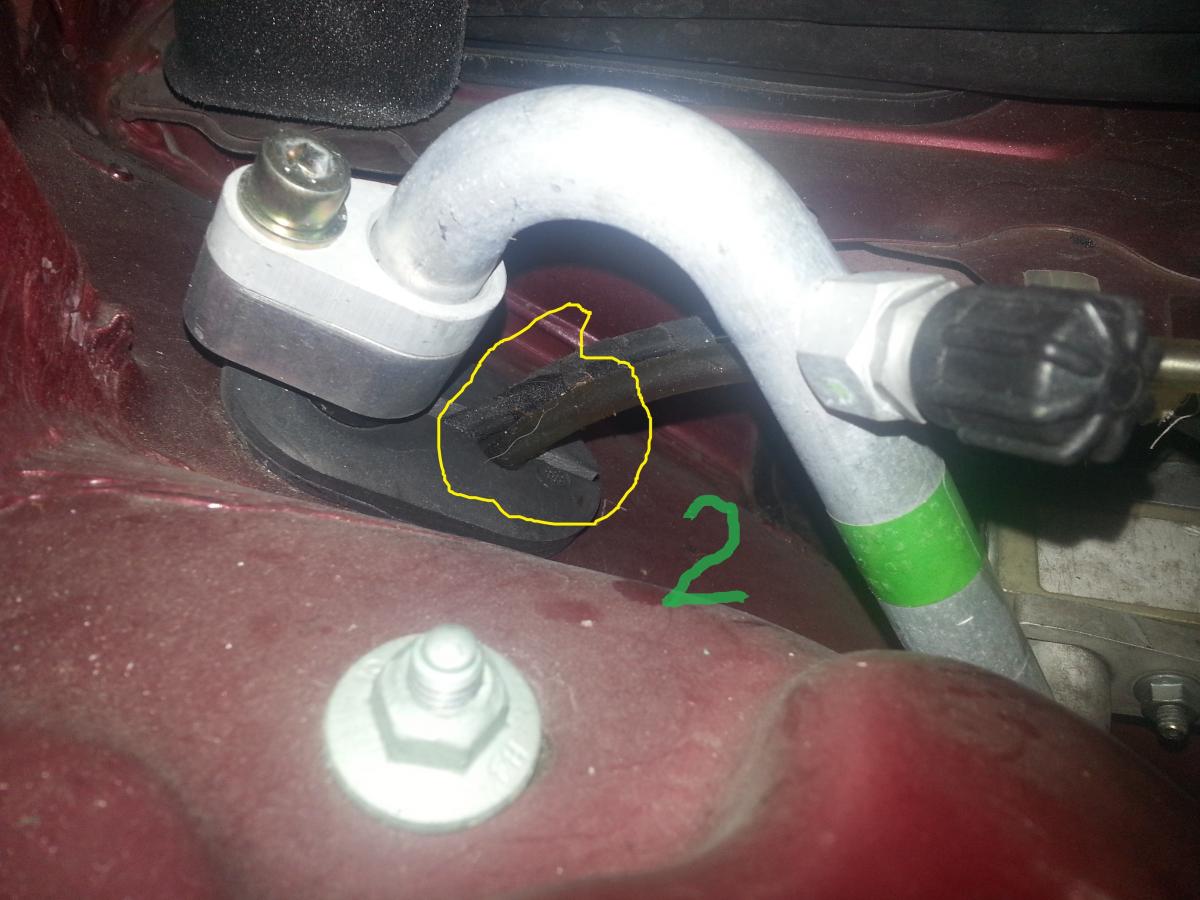
Pic #1, inside red circle, what is this grommet/cap ? Is on the driver's side, does not goes through. Is close to the brake master cylinder bracket. Pic #2, in yellow circle, what is this tube? Is on the passenger's side . I t was laying in the grommet/cap area in pic #3. Pic #3, inside red circle,what is this grommet/cap? It does goes through. The tube from pic#2 , surrounded in yellow was laying in the grommet/cap area.
-
Double Din Installation...
hi8ha replied to creekman's topic in 996 Series (Carrera, Carrera 4, Carrera 4S, Targa)
I Always try to check if there is a seller that ships from USA even if it is a bit more expensive. IF not.. I have no choice. -
Ground, battery, alternator cables
hi8ha replied to hi8ha's topic in 996 Series (Carrera, Carrera 4, Carrera 4S, Targa)
Thanks for the clarification. -
Want to replace the engine to chassis, transmission to chassis, positive/negative battery and alternator/starter power cables. Planning to make the cables myself using welders cable (more strands and better conduction), would a 2awg suffice? Already aware of the need to have a very good crimp connection.