Welcome to RennTech.org Community, Guest
There are many great features available to you once you register at RennTech.org
You are free to view posts here, but you must log in to reply to existing posts, or to start your own new topic. Like most online communities, there are costs involved to maintain a site like this - so we encourage our members to subscribe or donate. All subscriptions and donations go to the costs operating and maintaining this site. We prefer that guests take part in our community and we offer a lot in return to those willing to join our corner of the Porsche world. This site is 99 percent member supported (less than 1 percent comes from advertising) - so please consider an annual subscription or donation to keep this site running.
Here are some of the features available - once you subscribe RennTech.org
- View Classified Ads
- DIY Tutorials
- Porsche TSB Listings (limited)
- VIN Decoder
- Special Offers
- Paint Codes
- Registry
- Videos System
- View Reviews
- and get rid of this welcome message
It takes just a few minutes to register, and it's quality Porsche information at a low cost.
Contributing Members also get these additional benefits:
(you become a Contributing Member by subscribing or donating money to the operation of this site)
- No ads - advertisements are removed
- Access the Contributors Only Forum
- Contributing Members Only Downloads
- Send attachments with PMs
- All image/file storage limits are substantially increased for all Contributing Members
- Option Codes Lookup
- VIN Option Lookups (limited)


engdavis
-
Posts
8 -
Joined
-
Last visited
About engdavis

engdavis's Achievements
Member (1/1)
0
Reputation
-
99MY 996 C2 Cab. I recently had a broken rear convertible top cover cable activator on the convertible top drive mechanism. This caused me to have to close the top manually to get to the assembly. I have replaced the drive assembly and the rear cover now functions and closes properly with the top up in the closed position. The windows close and all is well until I try to open the top. The rear cover raises as it should and the top unlatches and moves like it is opening properly but, about half way through the cycle the top stops moving and I get the clicking sounds and blinking Top light. The top will not reverse back to the close position with the button but if I release the hydraulic pressure (part of the manual process) I can move the top a few inches towards the close position and then try the button and it will close completely including the rear cover and windows roll up. When I try to open it again, the same thing happens. I tried releasing the hydraulic pressure and letting the top go all the way back into the storage area. Then I operate the button but the rear cover won't close and if I try to raise it with the button it won't do anything except click and blink the red Top light. If the top is raised past half way manually, again the button works and closes the top normally. Everything is aligned perfectly so I feel it must be related to the manual operation somehow affecting the travel limits so the computer thinks the top is all the way down when it is, in fact, only half way. Hydraulic fluid level is good and all the micro-switches function correctly. The top just stops travel about half way instead of opening all the way. Is there any way to adjust the limits so the top will retract all the way? Is this something that the dealer can adjust with the PTS2? Any help or advice is appreciated.
-
Thanks for the advice Loren. The top has always opened and closed smoothly and seems like everything is aligned perfectly (all contact points merge perfectly). The top raises and lowers with no binding or distortion to either side and there are no water leaks when it is closed. No damaged components of any kind that I can find. All the micro switches work and sequence properly. I've tried to look between the headliner and the outer material with the top in the "maintenance" position but I don't see anything that looks out of place. I am hoping we have a top installer in the group that could help. I've thought about taking the headliner down to get a better look but haven't done that yet. Regards, Mike
-
I have a '99 C2 Cab. Top was replaced before I bought it and whoever installed the new top did not rig it properly. When putting the top down, I have to stop before the cover closes to get out and move the canvas material out of the way of the rear hatch hook. If I don't, the material will get pinched in the hook and cut a small hole in the top. It was there when I bought the car and I have since repaired the hole. Does anyone know how I can correct the folding of the top so it does not leave that fold vulnerable to the rear hatch hook? A drawing of how it should fold might help so I can see if something was not connected correctly when the new top was installed. Thanks in advance.
-
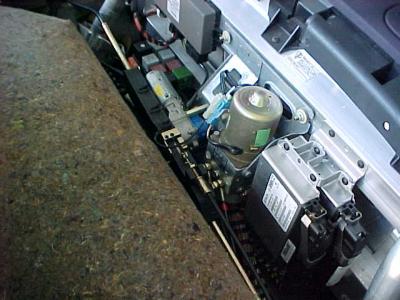
I finally found the reason my Convertible Top Light was on all the time. When I bought my car the Convertible Top had a very small hole where it had been pinched by the clamshell cover latch. I just discovered that that latch no longer moves when the top is cycled up or down. It can be moved by hand and when I manually latch it with the top up or down the cable end slider does not move far enough to contact the micro switch. When I activate the switch by hand the light goes out and all is fine until I release the switch; then the light is back on again. There seems to be no resistance to moving the latch by hand regardless of the position of the top and it can be moved from either end of the cable. The latch engages the clamshell cleanly. The plastic along side the track of the controller in front of the micro switch is broken so it was clearly distorted as some point to cause this, although there doesn't appear to be any permanent deformity to the controller and the micro switch still works. I suspect the strain of cutting the top material overstressed the controller mechanism and something has jumped the track or, obviously, broken an internal component in the black plastic controller. I want to take the controller cover off to see if the repair is possible. The controller also has what appear to be hydraulic lines coming out each side that go to the clamshell actuators on each side of the car. I really don't want to disconnect these if I can avoid it because I feel it will make a mess with hydraulic fluid around and under the controller. My questions are: Has anyone attempted to remove or repair the controller? Can the entire controller/reservoir pump assembly be removed as a single assembly far enough to allow access the the black controller mechanism? If so, what's the best (cleanest) approach to getting it out? Is there a way to remove it far enough to get the cover off without breaking into the hydraulic lines? What kind of drive mechanism activates the cable that goes to the clamshell latch? I will try to upload a picture of the area in question. Thanks in advance for any guidance or help. Best regards, Mike D.

-
Hello all. This is only my third post to this forum but after reading everything I could find on replacement of the Oil Separator Bellows, I decided it was worth a try at home in my garage. I had found about three drops of oil on my garage floor over the last two weeks since I bought the car and was throwing P codes 1124 and 1126 every few days (vacuum leak most likely). I already cleaned the new MAF that was in the car when I got it but since the codes persisted I had to accept the fact that I probably had a vacuum leak. Lots of reading on other posts eventually lead me to the Oil Separator Bellows tube as the most likely culprit since the car has 57K miles on it and no record of this item ever being changed. Yesterday I stopped by the dealership and picked up the Bellows tube ($12.84 including tax) and then Lowes for two 1 1/2” stainless steel hose clamps ($3.54). The dealer estimated a couple hundred dollars for labor to replace it and a call to a local independent shop resulted in the same estimate. Today I decided to tackle the job and see if I could do it. I have read many questions in this forum (including my own) asking where the Oil Separator is and how to find it. Armed with the great pictures provided by brucem on this forum, here's the URL to that post. (I don't know how to insert as a link, maybe Loren can help) I decided I was ready to give it a try. http://www.renntech.org/forums/index.php?showtopic=8834&hl=bellows What follows is the sequence of events I went through to get it done. I decided to time myself because the dealership and the independent both told me the book allowed 2 ½ hours for labor. So I allowed myself about five hours. 4:15 pm. Started by putting the back end of the car up on ramps. Crawled under the car and looked for over ten minutes before I actually saw the Oil Separator and bellows. Here’s the best description of how to see it. The Oil separator is above the left cylinders as you are looking at the car from the back. To see it you must position yourself on your back with your head forward of the left rear axle (LHD cars driver’s side) Then refer to brucem’s pictures and look up through the suspension members toward the rear with a light. You will eventually discover a small triangle of sight (about ½” in size) that you can look through with one eye to see the bottom of the separator and bellows about 18" away. I don’t know how brucem got the great pictures but I commend him. I didn’t see any way to get a view like he got with the engine in the car. 4:30pm. Almost gave up before I started. It looks impossible. You have to get your arm and hand to make two right angle bends through about a four inch opening (and I’m being generous here). I am right handed luckily and was finally able to touch the bellows after training my arm to bend in a whole new way. Now, how to get some kind of tool in there to compress the spring clamps. After trying several needle nose pliers and tiny angle slip joint pliers, I found the only tool I could get on the clamps was a plain old six inch straight pair of pliers. I could compress the clamps but couldn’t move them up or down off the bellows. No room. I finally succeeded in “walking” the top clamp down into the center of the bellows but then there was no room for the bottom clamp. There is absolutely no way to release the bottom clamp and slide it up. 4:45pm. I took my finger and worked the top of the bellows off the tube it fits onto. Now all I had to do was figure out how to get the top clamp out so I took an old fashioned wire coat hanger and formed a small hook at one end (about ½” diameter). I straightened the rest of the coat hangar and guided it up through the “sight” triangle and hooked it into the top (exposed end) of the old bellows and then hooked the bellows along with the old top clamp and pulled. The bellows were still pliable so I wasn’t too worried about pieces breaking off. I pulled and the old bellows tore neatly in half and the top half along with it’s clamp came out in one piece. I then had room for the bottom clamp to move up but still couldn’t get enough movement with the pliers so I took a long (about 24”) flat screwdriver and, again going up through the “sight triangle” pushed the bottom half of the bellows along with it’s clamp up off the tube it was connected to. 5:00pm Success, the old bellows and both clamps are out. Now, thanks to advice in another post from brucem I took the new bellows with no clamps on it and worked it into the gap between the two tubes. It popped in there like it knew where to go. Both sides immediately seated exactly where they were supposed to go. 5:05pm. The rest of the story is a test of one handed manual dexterity. Since there is absolutely no way to get two hands into where the clamps have to go, I had to open the clamps before I could get them around the bellows and then squeeze them together and turn the screw at the same time with only one hand to get them started. This is worth practicing a few times because it was almost the hardest part of the job. Eventually I got them both started and then it was just a matter of tightening the clamps with a short 5/16” nut driver and a small ¼” drive ratchet with a 5/16” socket. 5:20pm Mission accomplished. Total time; one hour and five minutes. It’s not a job I want to do again but it can be done. My biggest caution for anyone else that decides to try it is, make sure your old bellows isn’t crumbling in pieces as they would probably end up in the crank case. I hope I never have to change the Oil Separator itself. I really looks like a challenge. I hope this helps someone else who might be considering changing their own bellows.
-
I've been reading this forum for about two weeks and the information has been great. I just bought my first Porsche (1999 996 C2 Cab) and really enjoy it. Mostly commuter driving but the commute seems shorter now. I installed the K&N air filter element right after I bought the car and within a day had the infamous P1124 and P1126 codes with the CEL. After reading how many others have had this with K&N and other after market air filters, I took out the K&N and replaced it with a new OEM paper filter. Continued to throw CELs every couple days, and attributed that to residue from the K&N filter oil (came pre oiled in the bos) but after a can of CRC MAF cleaner I hope those are a thing of the past. It's been three days since the last cleaning of the MAF, the entire inside of the air box and the air intake bellows and so far no CEL. If the CEL returns my next steps will be a thorough inspection of the vacuum lines and there lies my question. Is there somewhere I can find a schematic of the entire vacuum hoses system? Looking in the engine bay it's hard to determine exactly where all the vacuum lines are and I don't want to remove or disassemble things that don't increase accessibliity to vacuum lines or connections. I would also like to know if there is a step by step instruction posted for the oil separater bellows replacement. I've heard that can also cause the CEL but I don't know where it is located. The car has 56000 miles and runs great. Even with the CEL on there is no noticable decrease in smoothness, fuel economy or throttle response. I've also noticed some oily film in some areas of the engine bay but it looks like just old dust and dirt accumulation, nothing major and no "wet" areas. No obvious oil or coolant leaks anywhere. This is a great forum, thanks for all the good info. Regards, Mike D.
-
Courtesy Lights
engdavis replied to engdavis's topic in 996 Series (Carrera, Carrera 4, Carrera 4S, Targa)
Thanks for the response viper501. The switches are in the correct positions, but with the key off, none of the switch positions turn on the lights. With the key on, all positions function as they are supposed to. RFM, I'm afraid I don't know what a PIWIS tester is. Is it a "dealer only" device? Thanks -
I have a 1999 996 that I just bought. The interior courtesy lights don't work with the door opening or the remote unlocking. With the key on the lights work as they should when the door is opened. The door panel lights also do not work unless the key is on. Can anyone tell me how to get the lights to work as the owners manual says they should? Thanks in advance for any assistance. Mike