Welcome to RennTech.org Community, Guest
There are many great features available to you once you register at RennTech.org
You are free to view posts here, but you must log in to reply to existing posts, or to start your own new topic. Like most online communities, there are costs involved to maintain a site like this - so we encourage our members to donate. All donations go to the costs operating and maintaining this site. We prefer that guests take part in our community and we offer a lot in return to those willing to join our corner of the Porsche world. This site is 99 percent member supported (less than 1 percent comes from advertising) - so please consider an annual donation to keep this site running.
Here are some of the features available - once you register at RennTech.org
- View Classified Ads
- DIY Tutorials
- Porsche TSB Listings (limited)
- VIN Decoder
- Special Offers
-
OBD II P-Codes - Paint Codes
- Registry
- Videos System
- View Reviews
- and get rid of this welcome message
It takes just a few minutes to register, and it's FREE
Contributing Members also get these additional benefits:
(you become a Contributing Member by donating money to the operation of this site)
- No ads - advertisements are removed
- Access the Contributors Only Forum
- Contributing Members Only Downloads
- Send attachments with PMs
- All image/file storage limits are substantially increased for all Contributing Members
- Option Codes Lookup
- VIN Option Lookups (limited)


kbrandsma
-
Posts
1,103 -
Joined
-
Last visited
-
Days Won
8
Content Type
Profiles
Events
Forums
External Paint Colors
Downloads
Tutorials
Links Directory
Collections
Store
Posts posted by kbrandsma
-
-
Thank you for your help. I will check the switch tomorrow.
I have a problem with the front trunk light! the switch has power to and from it but no feed to the light bulb is ok. thanks.
Here is a DIY HERE for front microswitch.
-
Hi - i just did my coils, plugs, tubes and o-rings on a 2000 996. Removing/replacing the tubes is a really simple job with the right tool. I purchase the factory recommended puller tool - from HAZEL p/n 788-30 - A$100 well spent. Instructions are in the repair manual at Group 15 46 19 - page 15-83. However instead of the two mounting bars, I used the nut on the puller to secure a ring spanner under a large washer and then levered the puller and tube out against a wood block against the engine. They all popped out with little to medium force. Prior to installation make sure you use the recommended lube on the o-rings. To install I used the handle end of a large screwdriver - that fitted snuggly on the end of the tube without getting stuck - to push them back in. Hope this helps.
Can you post a photo of the Hazel p/n 788-30. I used the transom plug and it worked slick.
-
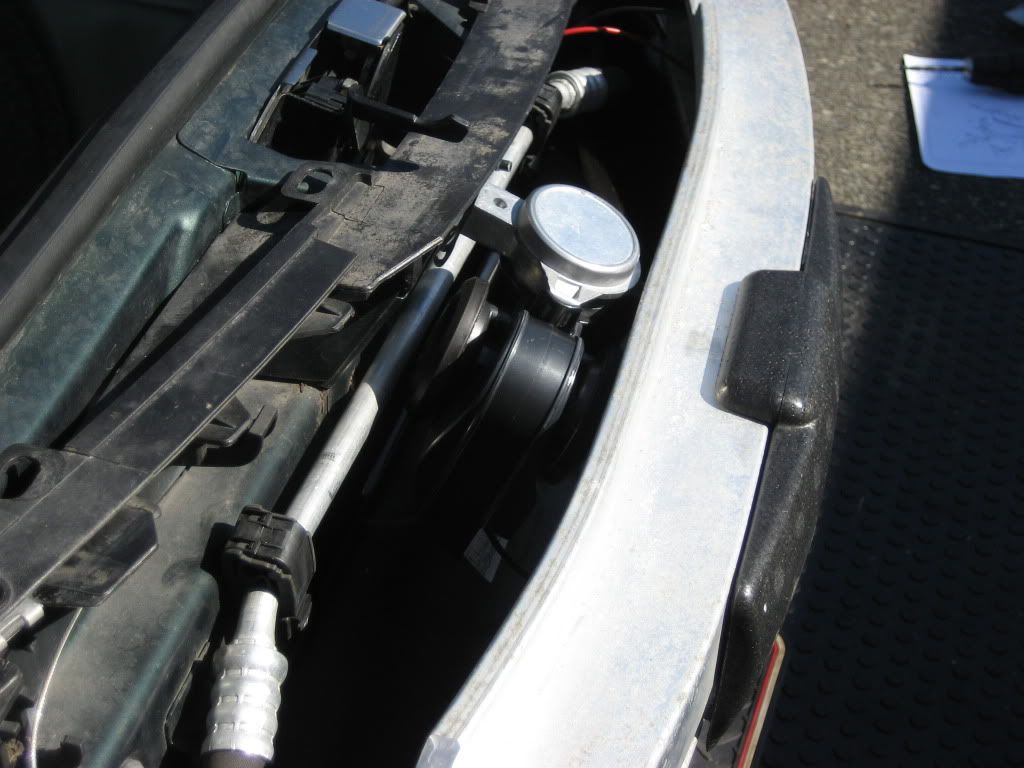
Some bumpers come with a center plug. This one did not. Which was ok with me because I wanted to add a third radiator.
-
+1 LN Plug. Make sure not to :wrench: over torque.
-
You can pull the passenger side wheel well back and find the emergency trunk cable immediately behind and on the under side of the light. It is a small metal cable with an eye hook at the end.
Or perhaps it has already been routed behind the pop out towing plug on the front bumper.
Here is a link for more info. PRESS HERE
-
Try Georgia Bumper.
Here is the LINK
-
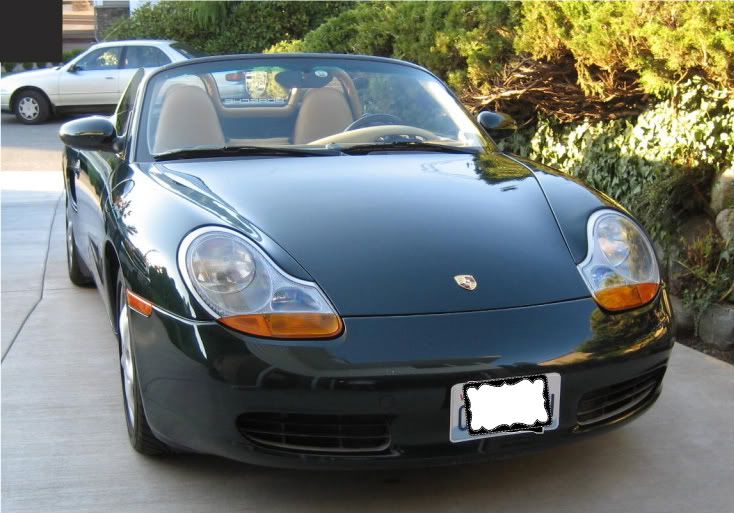
I see you went with a different bumper? Looks nice but I prefer the stock one actually. Do most places actually buy the correct paint from a Porsche warehouse or just try to match it? Cuz im going to be really really anal about the way it looks when its done. If it was my other car I could care less.
I was told that it is a 3M paint and not difficult to match. The shop did worn me on the difference from metal to a plastic bumper. However I was very pleased with result.
-
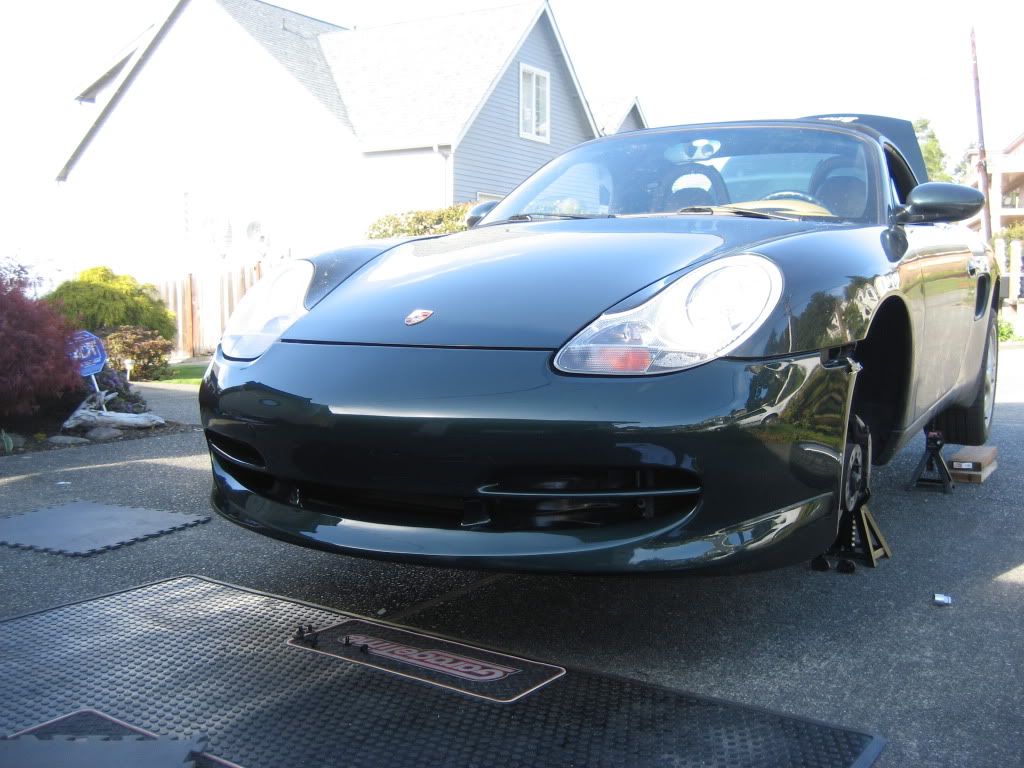
I found a 911 Bumper on eBay and kept communication with the company until they had one I was looking for. If I remember correctly they were located in Georgia. I'll go through my PayPal records and see if I can locate them.
Here it is before it was painted and installed.

-
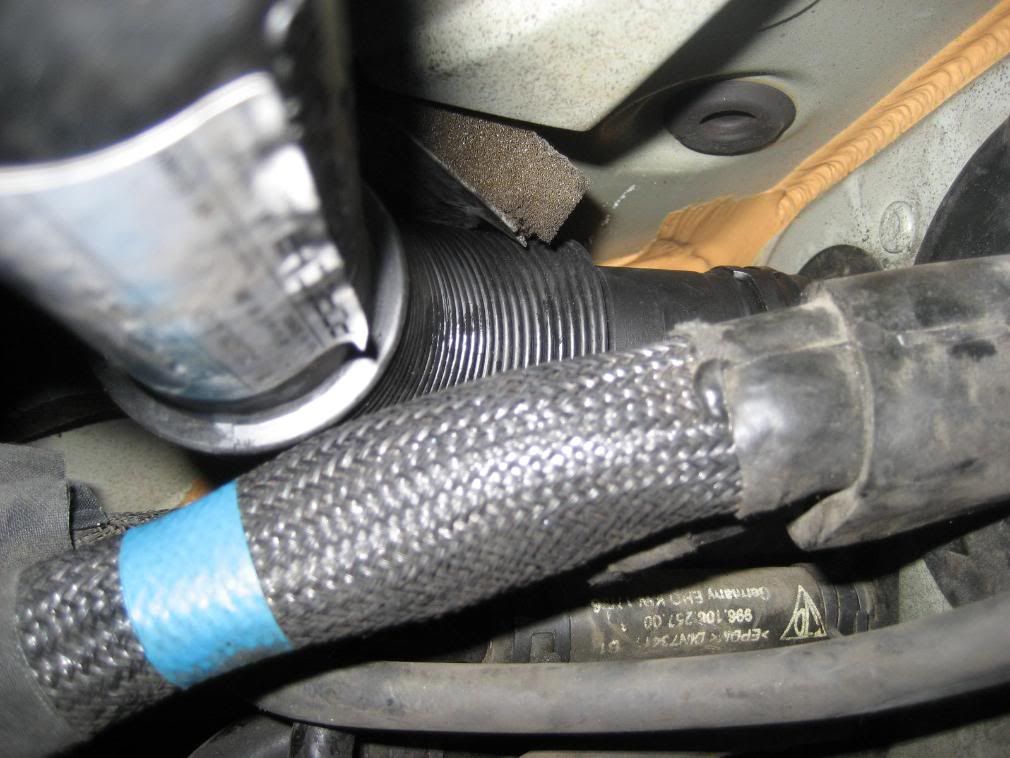
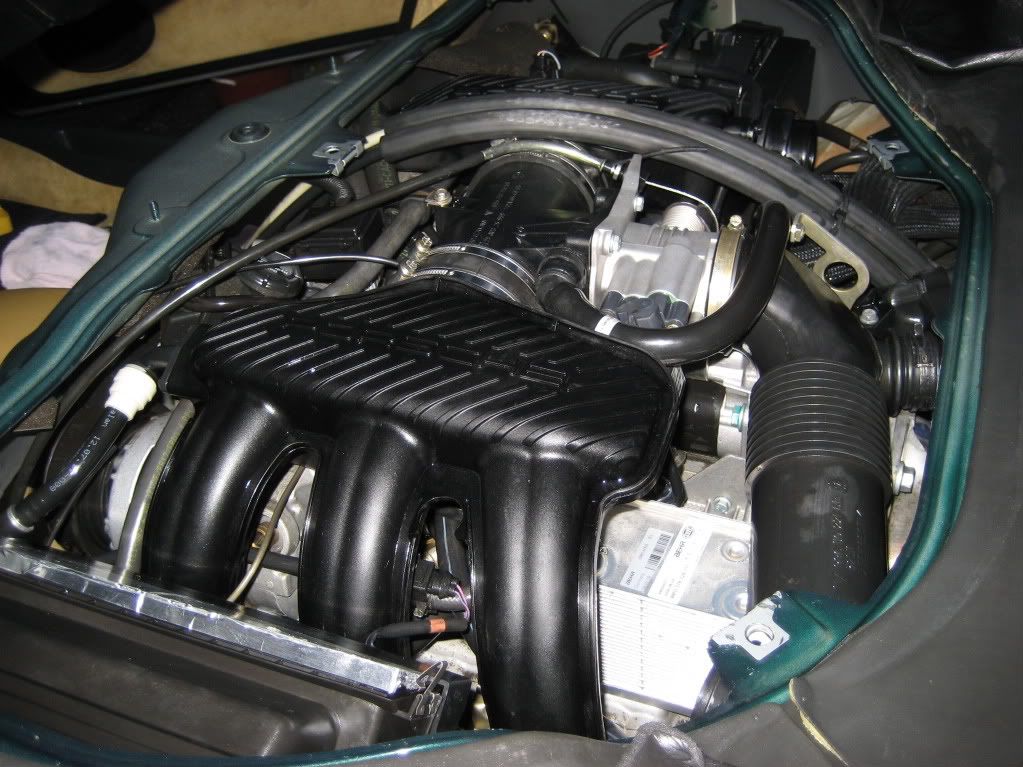
I replaced all three of my oil filler tubes. Even with the tranny removed (RMS Replacement) you can only get the first tube from the top. To get more room between the engine and the rear firewall, I removed the air tube that goes from the airbox near the MAF and the throttle body.
Here is a shot of the new tube leaving the rear trunk firewall. Noticed I reused the spring clip. I could not get a tool in there to use a worm clamp. The Sears clamp tool work great.
Here are a couple of photos taken from down below. The first photo is with the hose removed and the 2nd photo is with the new hose installed.
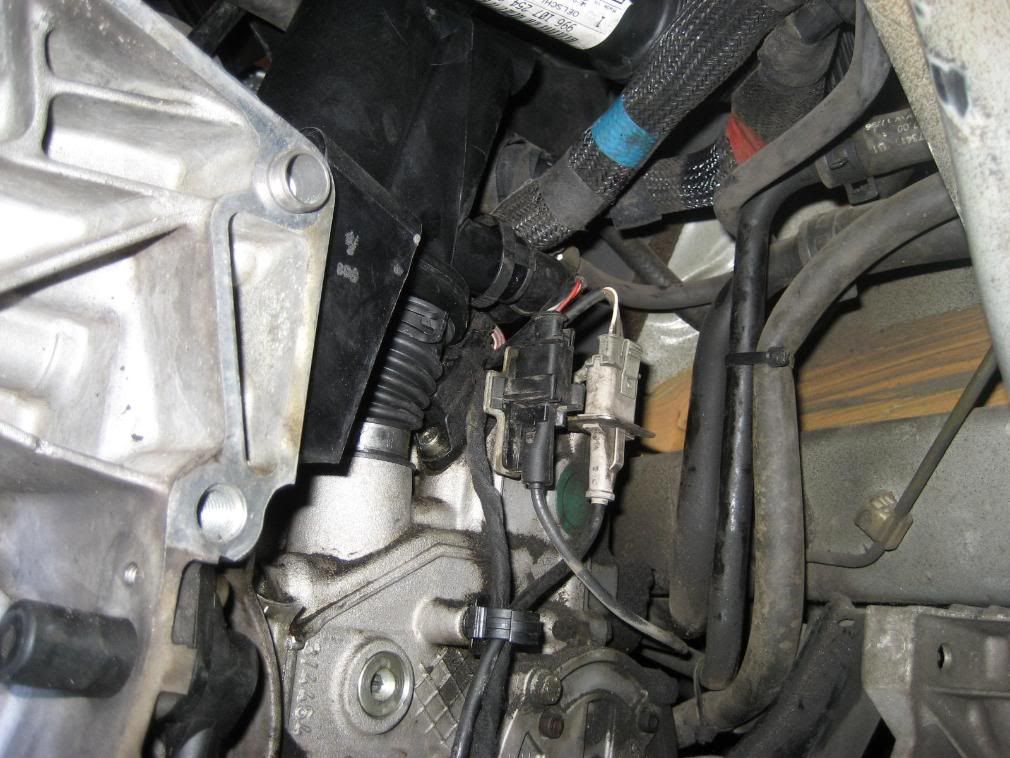
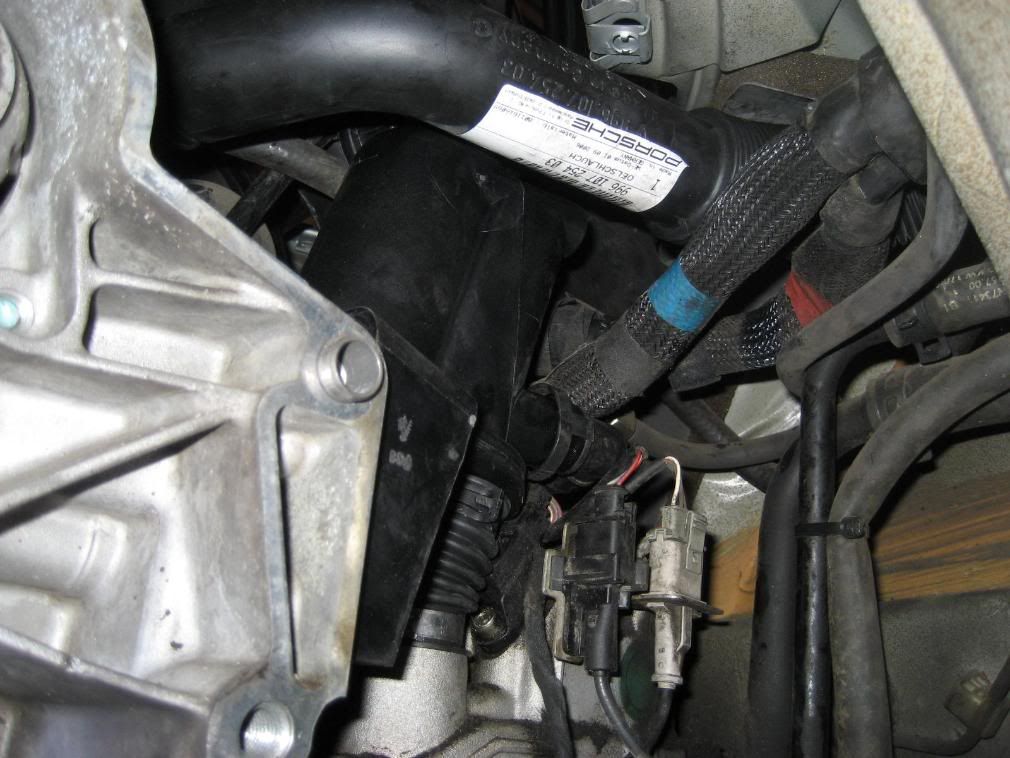
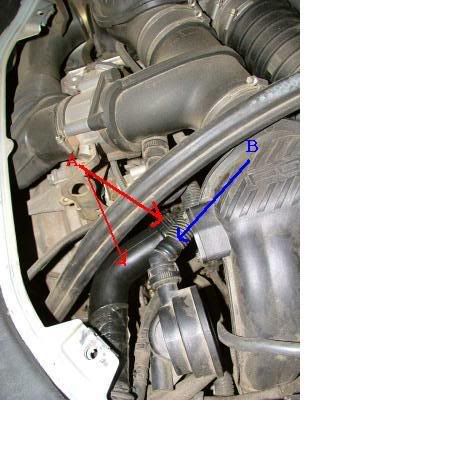
Here is a photo from the top side of a Boxster S. The RED A points toward the filler tube and the BLUE B marks the J tube. I would recommend replacing the J Tube at the same time replacing the AOS.
It is also a good idea to clean your air tubes and the throttle body itself while everything is removed. If you remove the harness from the idle control valve (ICV) and remove the valve from the throttle body be careful not to damage or lose the gasket. You will need that gasket on reinstallation.
BoxsterTaff is right about finding the vacuum hoses that are inserted in each side of rubber sleeves that connects the center tube to the intake manifolds. Also, his trick of starting the passenger side bolt on the third tube is ingenious and then nipping out a section of the ear so that it can slide under. That alone will save you a ton of time. I used a magnetic pickup tool to work the bolt in place and then using a free hand to get the bolt started and then finally a socket with a swivel extension. It's tough because you can't get a socket perfectly on top of it.
-
 1
1
-
-
I replaced all three of my oil filler tubes. Even with the tranny removed (RMS Replacement) you can only get the first tube from the top. I removed the air tube that goes from the airbox near the MAF and the throttle body
Here is a shot of the new tube leaving the rear trunk firewall. Noticed I reused the spring clip. I could not get a tool in there to use a worm clamp. The Sears clamp tool work great.
Here are a couple of photos taken from down below. The first photo is with the hose removed and the 2nd photo is with the new hose installed.
Here is a photo from the top side of a Boxster S. The RED A points toward the filler tube and the BLUE B marks the J tube. I would recommend replacing the J Tube at the same time replacing the AOS.
It is also a good idea to clean your air tubes and the throttle body itself while everything is removed. If you remove the harness from the idle control valve (ICV) and remove the valve from the throttle body be careful not to damage or lose the gasket. You will need that gasket on reinstallation.
BoxsterTaff is right about finding the vacuum hoses that are inserted in each side of rubber sleeves that connects the center tube to the intake manifolds. Also, his trick of starting the passenger side bolt on the third tube is ingenious and then nipping out a section of the ear so that it can slide under. That alone will save you a ton of time. I used a magnetic pickup tool to work the bolt in place and then using a free hand to get the bolt started and then finally a socket with a swivel extension. It's tough because you can't get a socket perfectly on top of it.
-
1
-
-
I replaced mine recently. Bumper cost $550 shipped and I had a local reputable shop prime and paint the bumper along with the hood, a pair of speed humps and the small rectangle on top of the spoiler for another $500. While the bumper was off I also cleaned theradiators and buffed/shined air scoops.
Before
AFTER
-
I added the Griot's Italian air horns last summer. Their is no problem what so ever. I left my OEM horns installed and really like it. If I touch the horn with a quick tap you get a quick response from the stock horns. If you lay on the horns a split second longer you get both. The sound is much better and people know you are there.
The photo below is the Italian Horn installed right above my 3rd radiator and below the latch.
-
You should also check your "J" tube for signs of oil entering the throttle body to determine AOS failure. You can also check for white smoke at start-up.
The oil filler tube leaks can also be a sign of the oil separator failure or maybe going out. When the AOS starts to fail it sucks the oil filler tube(s) almost flat. That closing/opening eventually can cause a hole in the filler tube. It did in my case.
Good luck!
-
OK, I admit that I am inept at searching this site. I was thinking that somewhere on here there was a DIY for throttle body cleaning on a 986S. My car is a 2001 Boxster S for US market with Tiptronic.
Could someone please send me a link to this DIY?
Thanks,
Bruce
Here is a link to a DIY on the 996. Should be the same in your case.
Link HERE
-
1
-
-
I looking at purchasing a 2006 Cayenne S with the following VIN #
WP1AB29PX6LA66345
Can anyone tell me the Option Codes that came with this vehicle?
Thanks in advance!
:thankyou:
-
Here is a shot. Not sure if it will help.
That is one clean engine if I may say so.
Hey, thanks!
I followed Orient Express's lead. Concentrate of SImple Green and water from garden hose worked well in my case!
Here is a link for more info: PRESS HERE
-
Sometimes when working in the battery area I have left a tool on the cowling under the hood. When I closed the front trunk it closed relunctantly and on re-opening was very difficult. Is one side of the front trunk lid (close to the windshield) higher than the other?
If so you might try placing a towel down on the lid and gently push down on the high spot and see if it doesn't open or assume your latch is working (open) and put a hard plastic upholstery tool near the latch and pry up.
Good luck.
-
Check the two (2) circled items in the photo below.
-
1
-
-
Here is a shot. Not sure if it will help.
-
I recently changed my change over valve and accessed it from inside the cabin. You have to remove keys from ignition, disconnect negative lead to the battery and remove the passenger seat, then rear carpet covering then the access aluminum panel. You then remove serpintine belt and then alternator. The change over valve is directly behind the alternator. To get the alternator out you also have to put the top in service position and open up main engine bay to gain access to the main electrical leads to disconnect from alternator. It wasn't difficult but a lot of work.
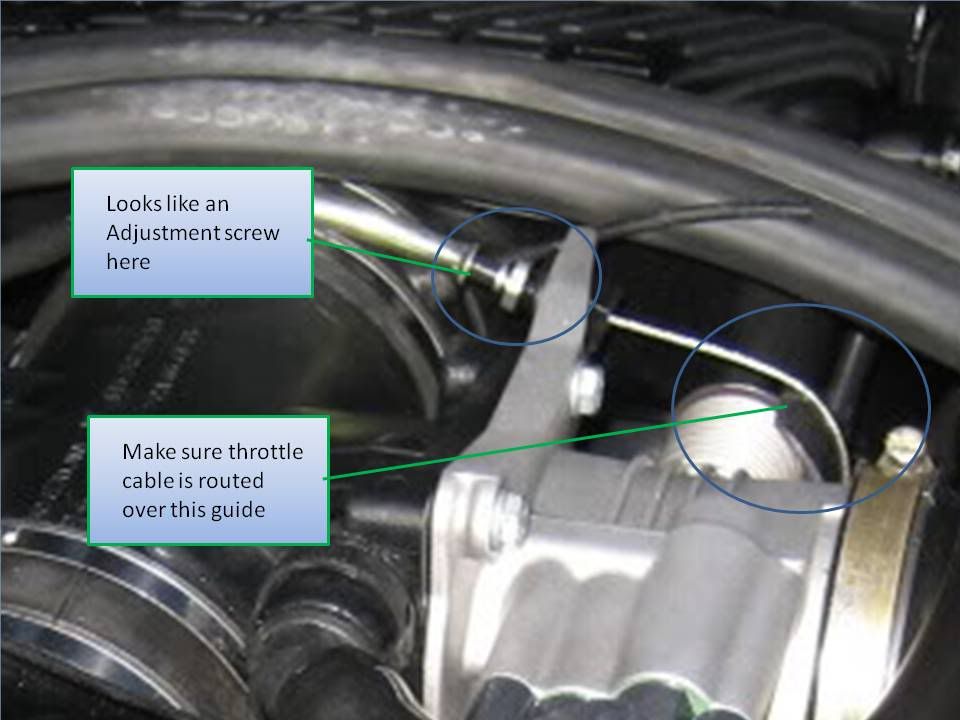
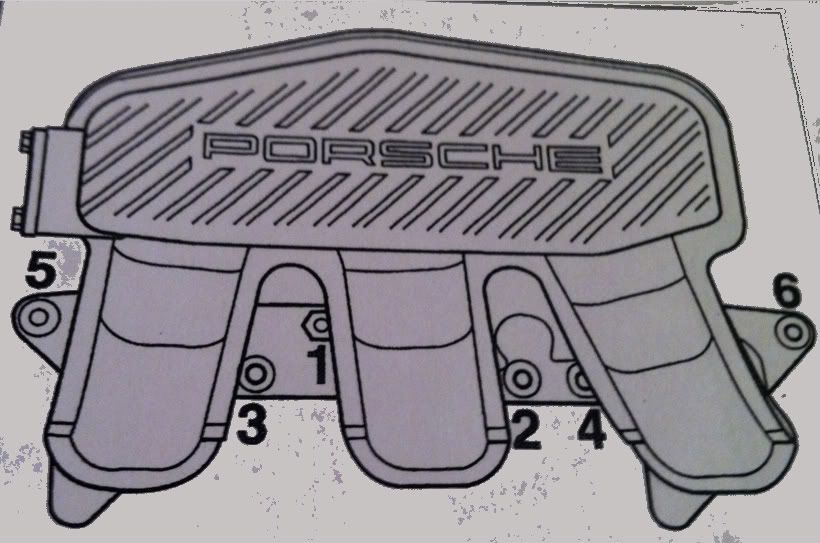
I would do all over again by removing the fuel intake manifold. You will need to remove the throttle assembly (tube bewteen manifolds that connects the throttle body). You can remove the six bolts (M6 x 16) to the intake manifold in any order, but on re-assembly you should reconnect the manifold and bolts in the sequence below to 7 ft.lbs torque.
The other reason I would approach this way as it allows to better inspect vacuum hoses. You can also give the throttle body a good cleaning. One reason why I went from behind the passenger seat was to also replace my serpentine belt.
Good luck! Keep us updated!
-
I have a check engine light on and checked the p-codes at autozone. P 1126 and p1133 came up... my car has been running like this for over a year (I know-- I should've checked into it earlier), but I'm finally getting down the the solution...hopefully. Does anyone having experience with the aforementioned problems... I would love some input :) Thx
Here is a good link! PRESS HERE
Welcome!
:welcome:
-
1
-
-
The relacement bulbs are the same for both. They are H7 (55 watt) bulb. You can pick them up at any auto parts store like AutoZone, NAPA etc.
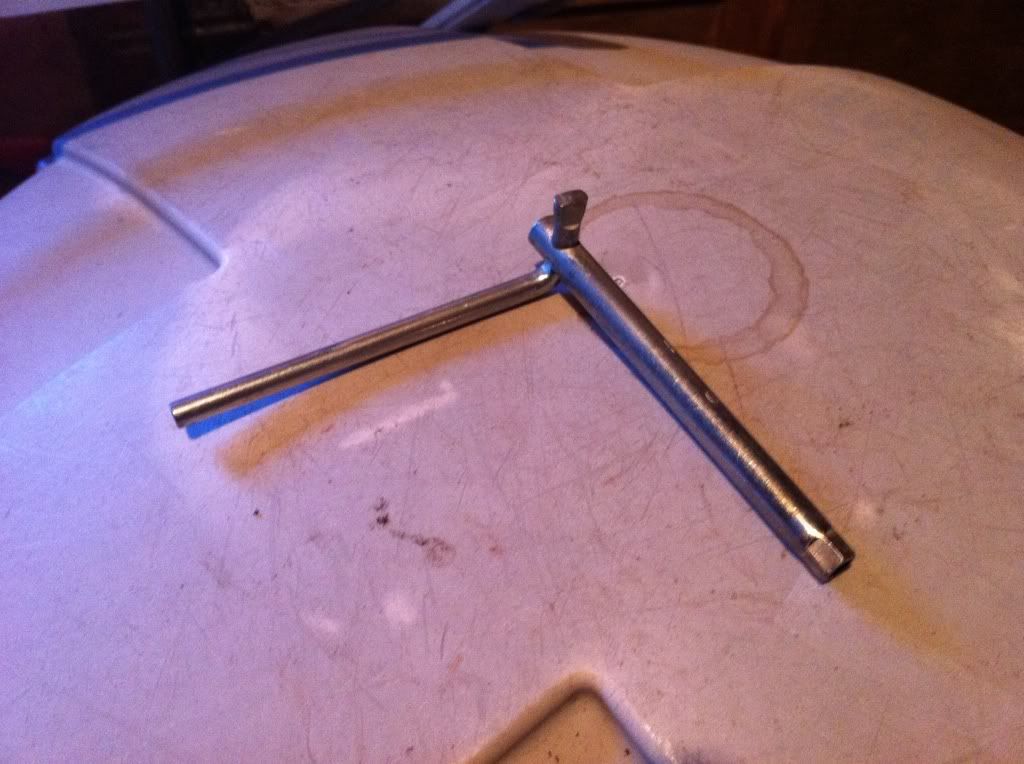
In the front trunk is usually a tool kit, actually a roll up pouch (somewhere around the spare tire or under cover for the spare) that contains the OEM wrench that came with the car that is used to pop the light out. If you don't have the wrench it is a 5mm size socket. The link that Loren gave you (page 218) above will explain how to pop the light out with the wrench.
Good to see a fellow Washingtonian on Renntech. Are you from Tacoma or from Snohomish County?
OEM wrench
-
1
-
-
My 99 Tiptronics makes a banging noise when it shifts, this happens when i accelerate the car from first to second gear, if i drive it slowly its fine, when happened i was thinking its the antifreeze bottle that is moving around in the trunk, Does transmission have a mount? or what should i check. Thanks in advance.
If the front mount has never been changed in your 99 Boxster, that's probably the best place to start. How many miles does it have? There is a DIY in the 986 DIY Tutorial Section that might be worth a look. It is not difficult.
Keep us posted!
-
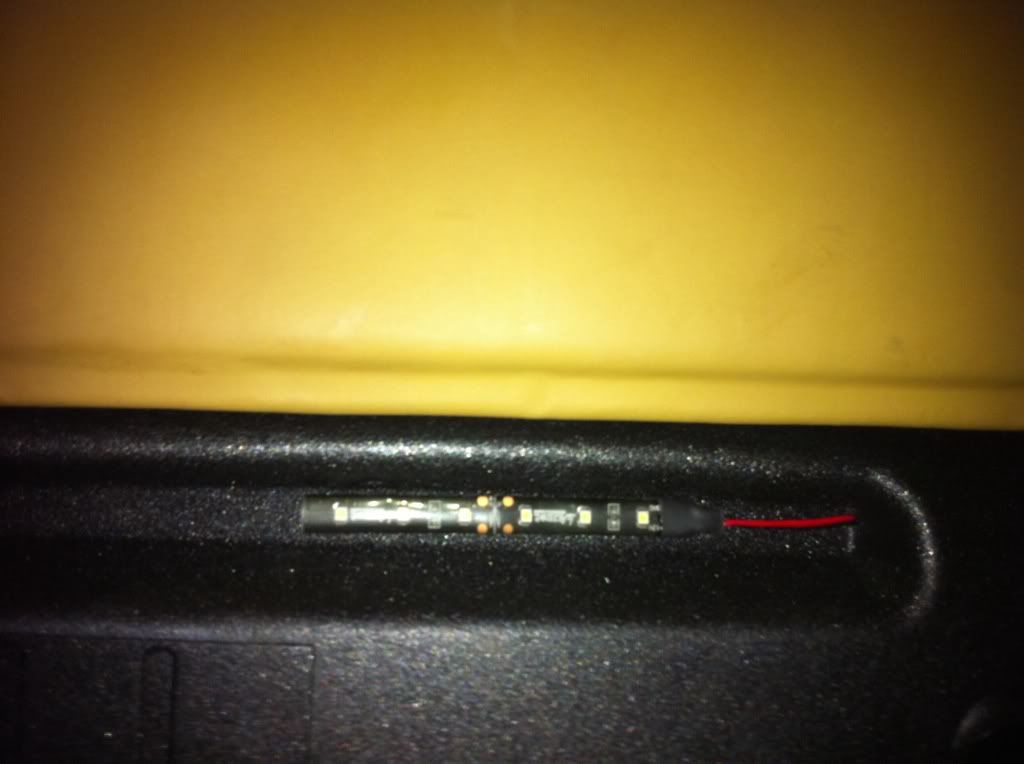
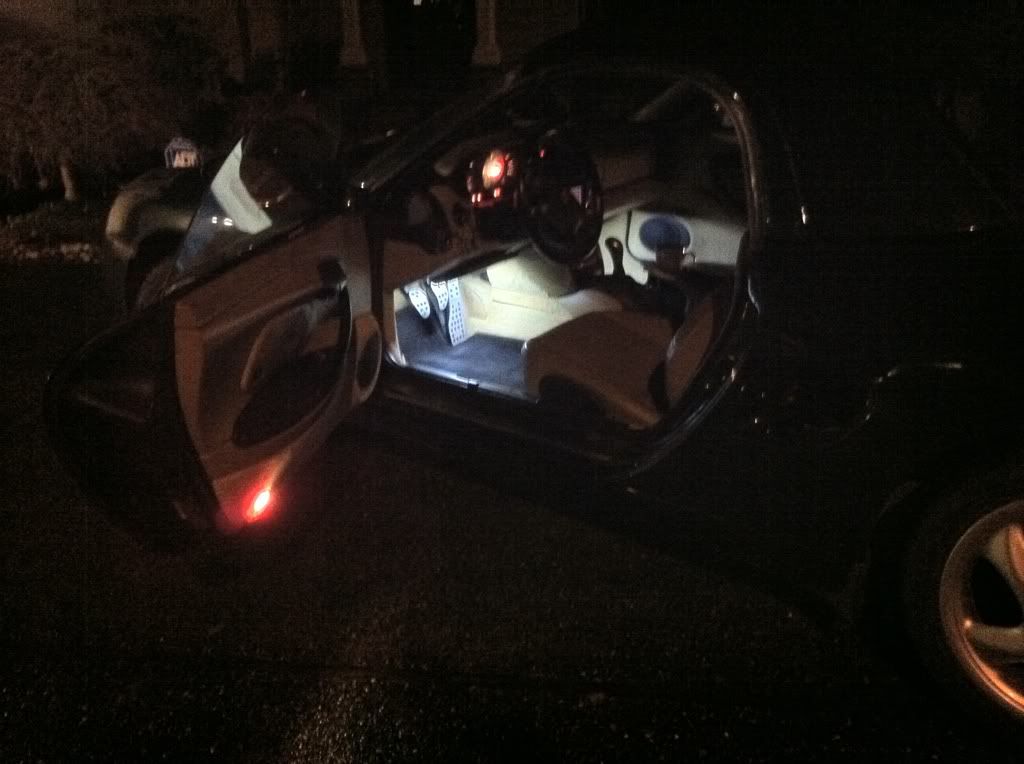
Here are a couple of shots of the installed LED lights. The first photo is from the driver's side taken from the floor matt looking straight up. The light is attached to the bottom of the horizontal vent tube. The wire leads continue along the vent tube and then go through the center console and above the foam cover on the passenger's side. The second picture is the exact same shot on the passenger's side. The red/black wire leads on the passenger's side go through an opening I made with a pencil through the foam cover. To make sure there was good adhesion I used my heat gun to warm up the 3M tape as well as the tube and foam pad. You can see on the passenger's side that there is a natural channel that the lights are attached in.
Driver's Side:
Passenger's SIde
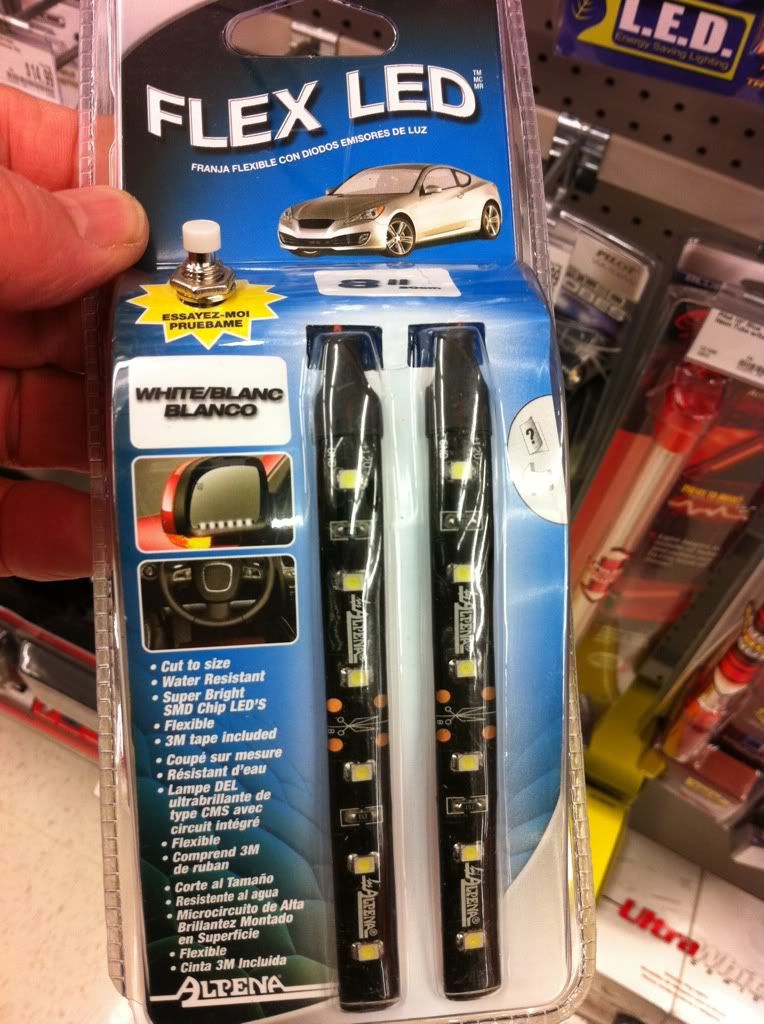
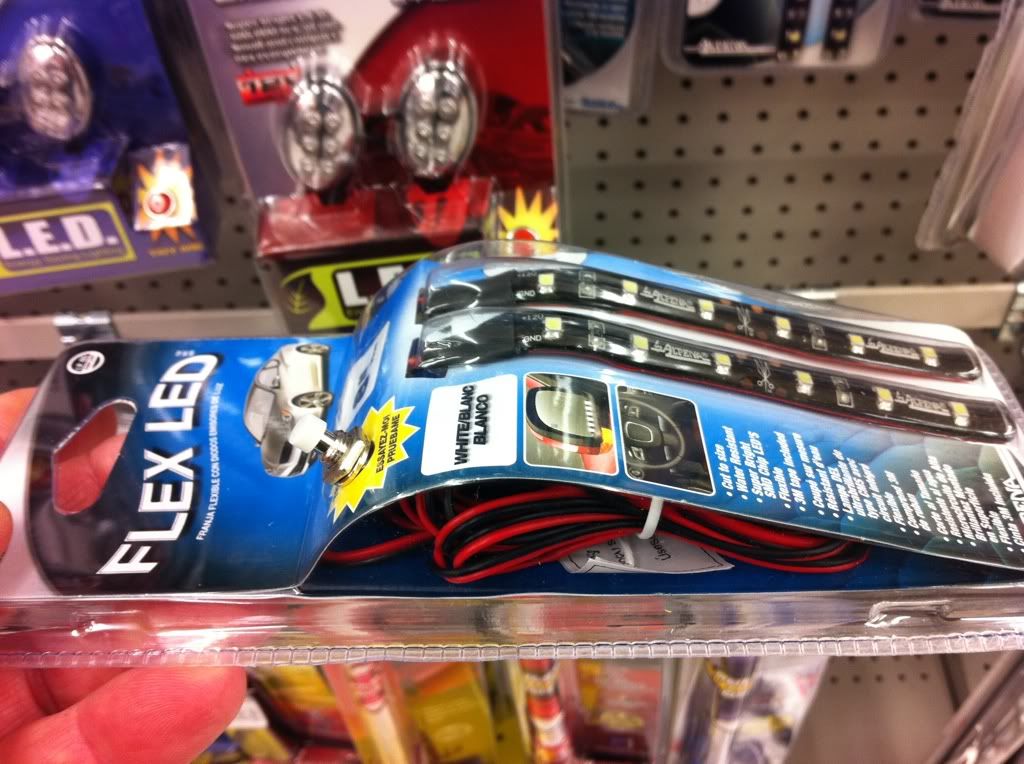
I stand corrected. The cost was $15.99 not $8.00 for the pair and they are 8" long. I knew there was an eight in there somewhere. Below is a shot of an unopened package at AutoZone. You can also see where you can cut them to make them shorter. The next photo shows the thickness and the last shot is taken at night from the driveway with the car's parking lights on. They give you a good idea on how bright the LED's are when compared with the door lights.
-
1
-


Did I buy a Boxster that has had a turbo installed?
in 986 Series (Boxster, Boxster S)
Posted
No factory Turbo installed. Do you have aftermarket exhaust?