Welcome to RennTech.org Community, Guest
There are many great features available to you once you register at RennTech.org
You are free to view posts here, but you must log in to reply to existing posts, or to start your own new topic. Like most online communities, there are costs involved to maintain a site like this - so we encourage our members to donate. All donations go to the costs operating and maintaining this site. We prefer that guests take part in our community and we offer a lot in return to those willing to join our corner of the Porsche world. This site is 99 percent member supported (less than 1 percent comes from advertising) - so please consider an annual donation to keep this site running.
Here are some of the features available - once you register at RennTech.org
- View Classified Ads
- DIY Tutorials
- Porsche TSB Listings (limited)
- VIN Decoder
- Special Offers
-
OBD II P-Codes - Paint Codes
- Registry
- Videos System
- View Reviews
- and get rid of this welcome message
It takes just a few minutes to register, and it's FREE
Contributing Members also get these additional benefits:
(you become a Contributing Member by donating money to the operation of this site)
- No ads - advertisements are removed
- Access the Contributors Only Forum
- Contributing Members Only Downloads
- Send attachments with PMs
- All image/file storage limits are substantially increased for all Contributing Members
- Option Codes Lookup
- VIN Option Lookups (limited)


juniinc
-
Posts
1,155 -
Joined
-
Last visited
Content Type
Profiles
Events
Forums
External Paint Colors
Downloads
Tutorials
Links Directory
Collections
Store
Posts posted by juniinc
-
-
There is a black clip above your lamp holder(green) for the ring.You will need to pop it out.
 Thanks again Chris, you have been very helpful.
Most pieces have been removed relatively trouble free so far thanks to everyones inputs in this thread. However I have run into one problem. Removal of the center dash trim, two "outer" trims (ones with 3 vertical buttons) off, climate control unit off, how do you remove the stereo unit (or din)?
-
Nice photo! Tool Pants .
I can sew on a button, if I can see the holes where the broken thread use to be. Sometimes I used dental floss as the thread. I once tried a stapler for buttons, but it did not work.This is an example of the top off vinyl repacement if you are in the business.
-
OK Maurice, I bet it is your seat buckle receptacle. According to my experience & research the most frequent cause is a fault in the relay in the seat belt. 986 has a relay that detects and records whether the seat belt was being worn if the airbag deploys. You would most likely have to replace your seat belt buckle receptacle(986 FAQ). Also I've seen some cases related to faulty reading, all it needed was computer to be reseted. Same thing that happened to my 350 Z last week.
Maurice,Got great answers but some info:
When I bought my 2.5L used I had similar issues and although I know I had the seatbelt fault I believe I saw the air bag (SRS) fault you mentioned. I'm trying to check my screenshots of the durametric to "back this up".
I bought the kit buckles and ground set too. I noted when I got everything apart that the ground wires appeared to have been done by the PO so I sent the kit back and installed the buckles. That problem never reared it's ugly head.
About the same time I replaced the horn issue with the bad bushings in the air bag frame. After that was fixed (which included disengaging the air bag lead) and putting it back on the "other error" never appeared again.
I don't have you answer but getting the air bag out is a 10 minute job. It may be worth checking the wires in that area for cuts/chafes. I don't recall how the circular spring wiring is in the Boxster but in my Saabs their failure has always triggers SRS lights. I've relplaced the twice in my Saab with 260K miles.
Shawn
Ohio
Shawn:
Thanks for the info. Will definitely check the wires for cuts/chafes as this most recent variety of airbag light only reared its ugly head about 3 months ago.
Regards, Maurice.
Anybody know how many ground wires exist between the air bag in the steering wheel and the car chassis and between the steering wheel and the car chassis? Locations?
Regards, Maurice.
-
LOL I might do that. Thanks Maurice
Hey....... yes I did it myself. You can purchase the material at any automotive upholstery supply store. It is a good weekend project but you will need some hands with it. Here are some tips I recommend. Before you start to detach your old thread, make sure you mark your center point on the top & bottom. Then you want to make a exactly matching template by transferring your old window ,make sure you mark your existing factory stitch marking too.That way your new window will fit tight.Hey.....cracked the back window in my 2000 'S' today and was thinking about getting a glass window replacement top.You are saying you replaced your plastic window for less than $30?? That's crazy! Did you sew the window in yourself? Where did you buy the plastic replacement window and how did you fit it?
Any help would be greatly appreciated!
Ashley
Calgary, Canada
Juniinc:
Great job, with good photos!
If you could compile a avery detailed DIY with additional photos and list of materials, it could be revolutionary.
Regards, Maurice.
-
Emiata sells their stuff for around $100. I've seen their vinyl,wasn't really impressed with it. Yes taking the top off would be easier to sew it in but putting your top back on is the hard part. I've seen some guys took more than a week to trying to figure it out. Even though I've done my fair share of converting tops I just had some bad experience with it.
Hand sewing this stuff only needs a good needle, pliers and patience. I've practiced on my boat canvas and it's really easy to do by hand. Now running and industrial sewing machine is an art form. Remember taking the frame off and benching it will make it easier to get to the underside too!Obviously anything is better then the yellowed one it's replacing but keep in mind for the boating world there are many different plastics with different pros/cons. Some flex, some don't...at different thickness (mils). We need to fold in half!
I would tell anyone to try it themselves if they can sew a pair a (tool)pants and have good canvas. Patience will get you a professional look and I agree for less then $50.
FYI that Joanne Fabrics (we have them in the midwest) carries middle grade stuff that will last 3-5 years, I used it to repair side windows on my boat when the guy in the shop by the lake told me $400, I did it for $40. Learned lots too!
Shawn
-
Hey....... yes I did it myself. You can purchase the material at any automotive upholstery supply store or from me. It is a good weekend project but you will need some hands with it. Here are some tips I recommend. Before you start to detach your old thread, make sure you mark your center point on the top & bottom. Then you want to make a exactly matching template by transferring your old window ,make sure you mark your existing factory stitch marking too.That way your new window will fit tight.
Hey.....cracked the back window in my 2000 'S' today and was thinking about getting a glass window replacement top.You are saying you replaced your plastic window for less than $30?? That's crazy! Did you sew the window in yourself? Where did you buy the plastic replacement window and how did you fit it?
Any help would be greatly appreciated!
Ashley
Calgary, Canada
-
Thanks Shawn. we have a pre-cut(28"x58") vinyl strictly designed for this purpose. a guy also told me that it is used on military gas mask. Stitches look better than ever,my old existing thread color was Grey but now its completed w/ black. it is almost invisible.
(
Nice. What was the product used, something like strato-glass used on boats? Was it a bear getting the needle and tread through both?Many have seen my posts as we took the top/frame off my car this summer to fix a "bent" part in the top. It took about 10 minutes to get the top/frame off and on the bench. I saw this as a far easier way to get the needle/thread at the rear window for such a fix as yours.
I would love to know what product you used and how you feel the stitches look.
Shawn
-
Hello everyone. This is Juniinc.
It seems to me many of us are having a issue w/ damaged rear window. I would like to contribute some of my recent work.
This week's project was tackling my torn out ,yellow stained rear window . So I finally brought her to my shop .
First I almost ordered a kit but after a few phone calls were made I realize that I can actually get the better stuff from locally.
So I decided to make my own window kit. and it is much more flexible, thicker than the factory one.
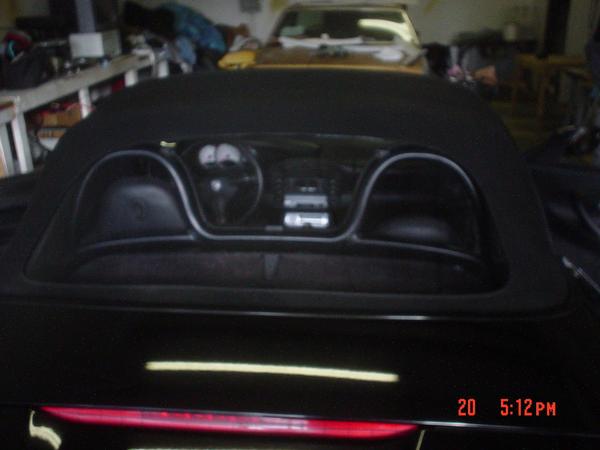
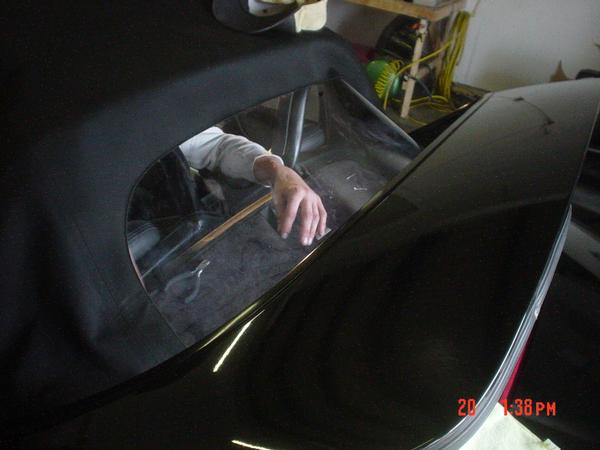
Estimated installation time is about 6-8 hours with the top on. If you haven't done this process with the top being on before, I recommend you to do it with the top off!
Keep in mind it is really tight behind the roll bar, especially when you try to stitch the bottom.
With the top off you should be able to accomplish the job in a few hours
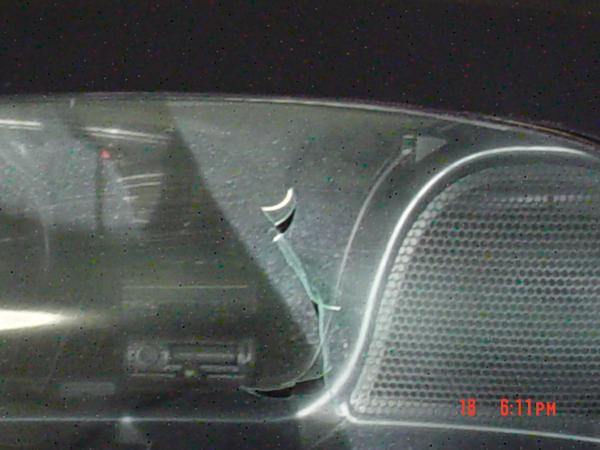
Hood with old broken windowPerfect Canvas with old windowroof latch wasn't even closed,tight! Shows the tightness of the stitchingshe is finally done -
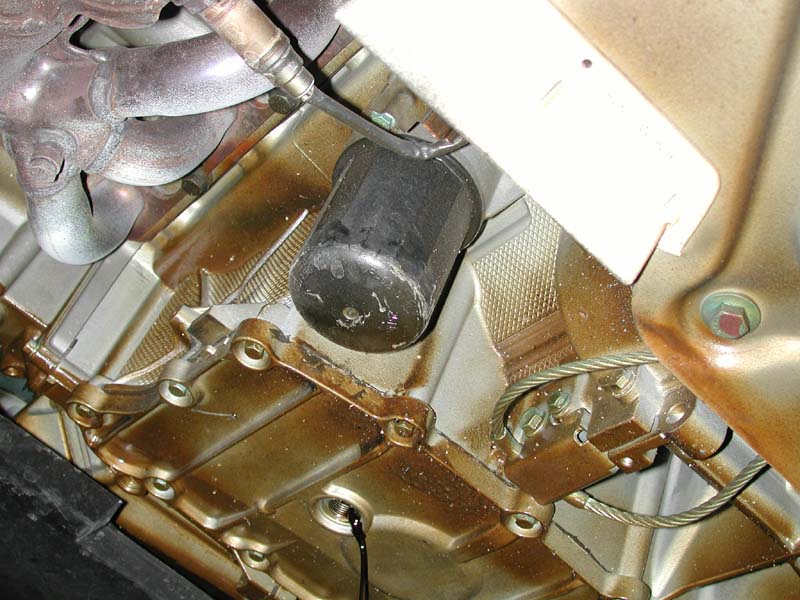
If you havn't done it yet this might help you. I just jack up my left side of the car then if you want to level the car just lower your jack. Much more quicker & easier.You guys are right, it's not a big deal to change the oil and oil filter on my 97 Boxster. I watched the mechanic do it. There is no splash shield to remove, the oil filter and drain plug are right there once the car is lifted. My mechanic did not have the exact oil filter wrench (74mm w/14 flats). He used one of those clamps and got filter casing off after a little strugle. The rest is pretty much straight forward.
I think I will do the next oil change myself. Is it better to jack the car up and put 4 jack stands or build some ramps out of two 2x10's? If I use ramps, I should use 4 ramps for all 4 wheels, right? To keep the car level for better draining of the oil, right? Any suggestions?
I feel much better now knowing the oil is clean. The baby really running smooth.
Thanks agin for the help.
Mustang66
-
Now, this makes me happy! Thanks for that shop proven dyno Jim. This is the most cost effective way to gain your HP I have seen lately. it is better than a poor man's true air flow kit or EVO cold air intake. WOW
And enjoy your dyno proven 5hp and 3ft/lbs or torque gain. Bisi did back to back on his Dynapack, view this thread:http://www.6speedonline.com/forums/f16/fin...ked-986s-75281/
-
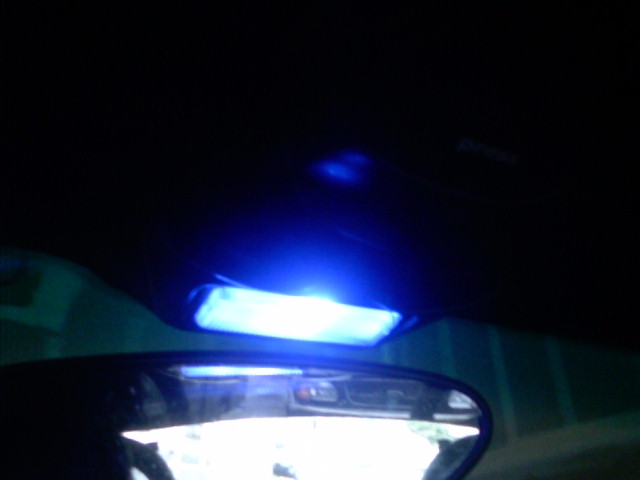
Clear side marker w/ xenon bulb Dome was replaced w/ blue LEDGreat write up!
Question:
Why didn't you go for the higher/10,000k ones?
Whiter/bluer light, right?
-
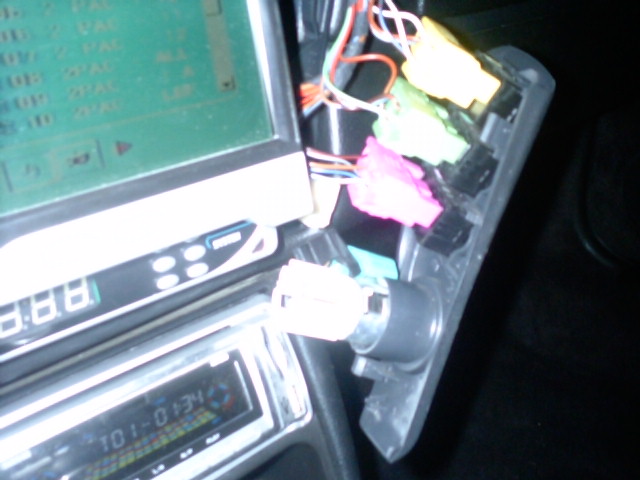
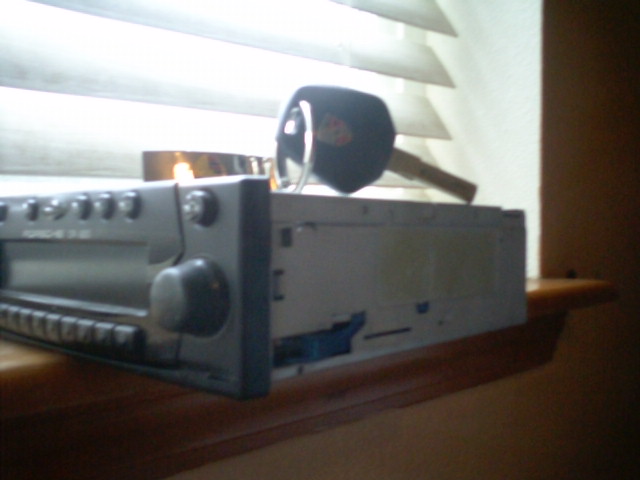
Hey Gustavo, I've removed many of em. I just use a long knife blade,skinny enough to fit the side slot. All you have to is trigger that blue tab on both sideHi guys,
I am adding the rear speaker kit this weekend and I just realized the Becker office in NJ are closed for the entire weekend starting today at 4PM.
Can I remove the Becker radio using a regular removal tool or does it have to be the Becker specific one?
Thank you so much,
Gustavo
:renntech:
-
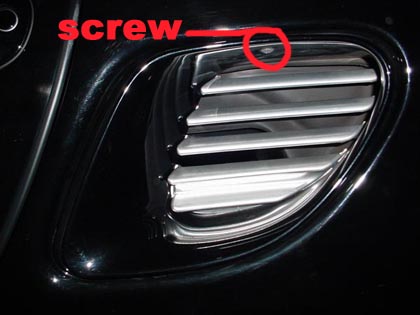
Thanks! Maurice. It is all 1 piece.
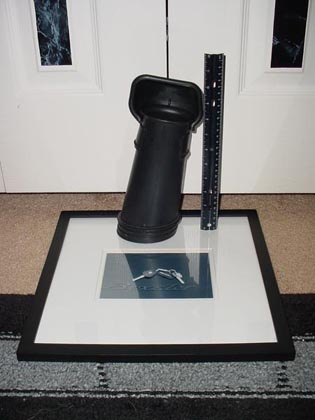
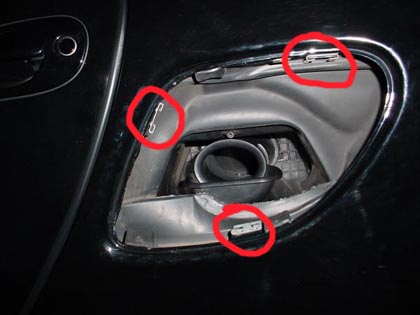
1.) Un-screw the one phillips head screw at top center of side air intake...2.) The molded air duct and the intake grill are still attached by three delicate plastic tabs at the three points... The best way to remove this is gently insert your fingers through the grills into the intake at the points circled in red and gently try to free the tabs... All three points come forward towards you, but if one is stuck or gets caught it will break...
3.) Inside the drivers side air duct you will find a snorkle... The snorkle is added to most US cars for noise restrictions. Now this piece is attached by no screws or tabs, but it most likely will give you some troubles removing... The best way is to remove this, just grab a hold of the long snorkle (not the small dish on the end)... Now wiggle it from left to right and vice versa while pulling out towards you. This works, but might take a little effort.
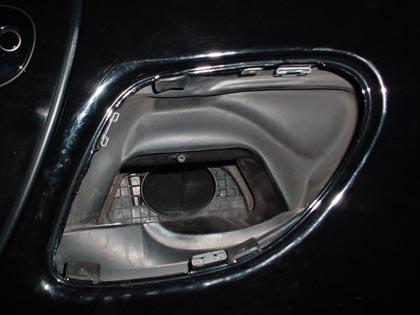
4.) This is what the intake is going to look like after the snorkel is removed... Just carefully insert the three tabs back into their points... Make sure that all three are tightly in by pushing the airduct cover (not the grill)... Insert your 1 screw into top center of cover and you are done.
Juniinc:
Excellent DIY!
Your second and third photo show the litlle "dish" below and at the front of the snorkle... The fourth photo is not as clear. What happens to the "dish"?
Regards, Maurice.
-
Desnorkle Your 986
1.) Un-screw the one phillips head screw at top center of side air intake... 2.) The molded air duct and the intake grill are still attached by three delicate plastic tabs at the three points... The best way to remove this is gently insert your fingers through the grills into the intake at the points circled in red and gently try to free the tabs... All three points come forward towards you, but if one is stuck or gets caught it will break... 3.) Inside the drivers side air duct you will f
-
Author
-
Category
-
Submitted10/05/2007 09:33 PM
-
-
Blue LED
The original orange colored instrument backlighting in my 2003S seems pretty dim even when turned full bright. Doesn't appear to be a burned out bulb, as the lighting is even across the cluster. I haven't been able to locate a hack that identifies a specific fix for this issue, although changing the color might be a solution. If any of you have any "bright" ideas, input would be appreciated.Thx, Lyn
-
This is interesting. Did not know there was a test for the instrument cluster illumination sensor.
2003 cluster has LEDs, not bulbs.
-
I think it's your ECU DME unit. Only if the DME will allow a re-program - then it is likely still not a long term solution.
The problem is usually not software - but hardware.
In this case I will call a few places and find out if its possible to get a second hand unit of the same kind...2.5 and tip whilst I await the result form the garage.
-
Cant see how you could have damaged anything with what you have explained, try disconnecting power to the radio unit, reconnect and see if the re-set has put everything right again.
Are you sure you have not disconnected the dash speakers at the radio unit when you attached the new ones?
The speaker wires that goes to the dash speaker are distributed from your amplifier located in the front
-
Is it my imagination or are the defogger strips in that window big and ugly? The 2003 glass rear window and the hard top (all years) have nice thin unobtrusive defogger strips.
I agree.
-
2001 boxster S - stock. - USA
What is the easiest way to add horsepower off of the get go? I see chips and such, but always read about how they are overpriced and not always provide what they offer.
Can someone help a complete mechanical beginner on ways to add power starting from least expensive and simple to major overhauls/conversions?
Thanks in advance!
Do you want more HP?
Check these out guys,your super charger will cost you around $7,700.00 if you know how to put it on... LOL of course "desnorkling" would be my first option.
ImagineAuto__Porsche_Boxster_Stage_1.htm
-
I've read a few threads about this problem but my symptoms are a little different so here goes.........
When I open the Driver door the window will drop the 13mm (per Bentley) and then IMMEDIATELY go back up. The Bentley manual is woefully inadequate on helping with this.
First let me stop anyone who will say "you need to replace the regulator", don't think so. Why? Well the windows drop the appropriate amount when disengaging the top, they both also go up and down just fine. The regulator is doing what it's being "told" to do, when it's told to do it.
In the Bentley this 13mm drop is referred to as "comfort open" & "comfort close"
Here's what I'm thinking.........
The computer is being told the door is opening so it drops the window. Then the computer is being told the door is closed so it raises the window immediately. What I can't figure out (yet) is what tells the computer this. Are there tiny switches in the latch mechanism and one of them is sticking?
I will solve this, but who knows how much time it will take. Anyone with a little more knowledge in this area who can help?
Thanks, Tim
FWIW: 97 Boxster
There are 2 micro switches in your driver's side door for your inner & outter handle.
attatched to your door handle(back side)
-
I just picked up a 98 thats in great shape, except that there's a tear in the rear window. When I purchased it, the "dealer" said he had a guy who would replace the rear window at his cost. When I picked up the car, I was told that the shop had lost it's convertible top guy, so I was out of luck. I've made several calls locally, and have been told that the rear window isn't replacable, and the whole top needs to be replaced. This seems kind of odd to me! Can anyone help me? :help:
yes


Door "comfort open" question
in 986 Series (Boxster, Boxster S)
Posted
this thing?