Welcome to RennTech.org Community, Guest
There are many great features available to you once you register at RennTech.org
You are free to view posts here, but you must log in to reply to existing posts, or to start your own new topic. Like most online communities, there are costs involved to maintain a site like this - so we encourage our members to donate. All donations go to the costs operating and maintaining this site. We prefer that guests take part in our community and we offer a lot in return to those willing to join our corner of the Porsche world. This site is 99 percent member supported (less than 1 percent comes from advertising) - so please consider an annual donation to keep this site running.
Here are some of the features available - once you register at RennTech.org
- View Classified Ads
- DIY Tutorials
- Porsche TSB Listings (limited)
- VIN Decoder
- Special Offers
-
OBD II P-Codes - Paint Codes
- Registry
- Videos System
- View Reviews
- and get rid of this welcome message
It takes just a few minutes to register, and it's FREE
Contributing Members also get these additional benefits:
(you become a Contributing Member by donating money to the operation of this site)
- No ads - advertisements are removed
- Access the Contributors Only Forum
- Contributing Members Only Downloads
- Send attachments with PMs
- All image/file storage limits are substantially increased for all Contributing Members
- Option Codes Lookup
- VIN Option Lookups (limited)
.jpg.e8e9c9fbf537e47f829229384041b3ad.jpg)

kpl
-
Posts
36 -
Joined
-
Last visited
Content Type
Profiles
Events
Forums
External Paint Colors
Downloads
Tutorials
Links Directory
Collections
Store
Posts posted by kpl
-
-
Driving for more than 10 mi. didn't do it. I was hoping for more "tech" in an answer, but anyway it's fixed. After reading various forums I came up with a list of things to check and did the following: Disconnected the battery and put it on a charger. While the car was starting up fine, I had been working on the drivers side window mechanism the day before, running it up and down a lot. I also pulled out the front ABS wheel sensors and sprayed them down with brake cleaner, and did the same with the ABS rings. I also wiped off the electrical plugs and really made sure they were plugged in tight.
-
digging up this old thread as after changing the inner and outer tie rods and strut bearing on my C4S, and getting it aligned (not at the dealer) I now have the PSM and ABS lights on. Why would only the AWD cars possibly need the angle sensor realigned? I'm just trying to understand how this system works, thanks. I've never had any issues with alignments previously.
-
Thanks! Which cat is considered "bank 1"? I got a check engine light P0420, swapped the O2's side to side, and the same code came back, so it's got to be the cat.
-
Great how to. I took off the instrument cluster to better get to the 10mm bolt. It's held on with 2 screws, one behind the hazard switch, and one behind the small circular screen on the far left of the cluster. I had a lot of trouble getting the key cylinder back in. I had to use a bit of force pressing it in, for it to finally lock back in (it'll make a small click sound). Sunset has the assembly (lock and switch) for $138 now, part #996-347-017-07.
-
Seems like I get a different results on different parts house websites. What are the part numbers for the 02 sensors? I might as well get the numbers for the cats too in case they are shot.
Thanks for your help,
-
-
The plastic side curtains look good. I found that by disconnecting the battery and recoonnecting would temporilary fix it. It'll work fine for a bit, but it's memory won't last very long. It seems to lift up too far at times, make a clunck, and jump forward and 1/8" or so. Other times it works ok, but won't respond when pressing any buttons, then it'll work again.
-
I was getting ready to test the switch with a volt meter to see if that was the problem, got distracted for a few hours with something else, and left the ignition on and drained the battery. To my surprise after charging the battery back up the sunroof works just fine after a reset. So if the reset does not work for you, try disconnecting the battery to reboot the whole car before digging into it further.
-
I can use those instructions also. Mine was acting funky for a few weeks, having to press buttons repeatedly to get it to do what I wanted, until while closing the sunroof it made a pop sound and now will no longer slide back and forth, but will still tilt. I reset it according to the instructions but that didn't help.
PM sent.
8 pages in the service manual - without motor removal.And if there is a frame problem - a lot more.
Not for the faint of heart...
Do you know where I can get my hands on these pages so that I can see what I'm up against. I'm willing to try the repair myself, as long as the information is clear, and no special tools or tricks are needed.
-
what's the procedure for draining, refilling, and bleeding the power steering fluid? I searched and couldn't find one.
thanks,
-
nope, not the same sound, besides the sound of the air pump doesn't change with RPM does itIf you hear the same sound when you first start car -
it's never, ever, been that loud before...I know what that normally sounds like and this isn't it, unless it's changed it's tune very significantly and gotten 50x louder. What do they sound like when they die?
-
I only noticed this sound recently, kinda like a gear drive or blower. I've never heard this before, or since. It occurred a handfull of times, when we had short breaks between autocross runs, and was coming from the engine compartment. It didn't do it earlier in the day, when it was perhaps cooler and we had longer breaks between runs. You can hear it in this video.
It only started at the end of a run and was dependend upon engine RPM, and not dependent upon the car moving. It went away after about a minute or two. It didn't last long enough for me to park and pop the hood and maybe get a better idea of where it was coming from. When I got home I took the accessory belt off to check the idler pulleys, alternator, etc. and they all felt fine. I replaced an idler pulley quite some time ago, which sounded a lot different (loud screeching, bearing self destructing sound) when it needed replacing. Any ideas?
-
For those do it yourselfers try this: remove the electrical connectors to the oil pressure sending unit, clean the connections, reinstall after adding a glob of dielectric grease to each contact on the sender. Wipe a little of that same grease on the connectors after you snap them back together. Worked for me. I take it as an oversight on Porsche's part that these connectors are not sealed from the elements.
-
can I get a clarification as to the part number for the lower passenger side radiator hose for my '03 4S w/manual. I'm confused as to if it's the regular 996 part or the turbo. The hose has a metal collar on one end. I've got a slight leak at that side of the connection and figured I'd replace the hose as I can't tell if it's leaking from the O ring or from where the metal collar is sqedged onto the hose.

-
4. Remove the screws from the bottom side of the bumper. Remove the sheetmetal screws 6 and spacer sleeve 7 from the retaining strips on the left and right.
before these screws can be removed, it is necessary to remove the plastic rivets from the fender liner and push the liner out of the way.
I had the same issue and had to remove 3 torx screws from the inner fenderwell to get enough give to be able to get behind it to remove that #6 screw. Only removing the plastic rivit doesn't do it....at least on my car. Best to remove the front tires to get those three torx screws, though I managed without doing so
-
Does anyone know where to get a magnatic drain plug?
-
mine doesn't make those sounds anymore since I installed a Dension MP3/iPod adapter....perhaps because I don't keep CD's in the unit anymore since I only listen to my iPhone.
-
pull the electrical connector off, use a small piece of sandpaper to clean the two contacts on the sending unit, put a dab of dielectric grease on each contact, reattach the plug.
-
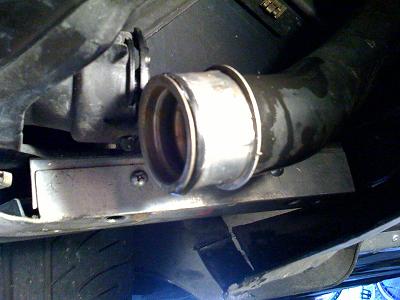
see attached pic
the outside of this hose is looking a bit crusty, what is it? water or oil?
anyone have a diagram of the oil and water flows through the motor so I can refer to it in the future?
Thanks,
-
That simple huh, no need to push the tabs on the ends in or anything?...I tried prying it but with only a little force as I was worried about breaking something, I'll try again.
I attached a photo, for other people that may wonder what I'm talking about.
-
Remove underside panels to access the front wheel drive.
What do you use to undo the rectangular metal clips on the panel? Or do you just carefully pull down on the panel after the four corner bolts are removed and they pop off?
-
mine (CDR-23) has been doing the same thing. Wondering if it is worth pulling and sending to Becker, who wouldn't give me a price to fix eventhought this sounds like a common problem, or just going with something else. Anyone send their's in to get fixed, and what did it cost?
-
mine does that too sometimes. I've only had the car a few months so I do not know how long it's been going on.
edit: more searching and I found this old thread: http://www.renntech.org/forums/index.php?s...hl=radio++noise
996 C4S front dif part number
in 996 Series Part Number Requests
Posted
is it 99634901003?
and is the same part used on the turbo?
Thanks,