Welcome to RennTech.org Community, Guest
There are many great features available to you once you register at RennTech.org
You are free to view posts here, but you must log in to reply to existing posts, or to start your own new topic. Like most online communities, there are costs involved to maintain a site like this - so we encourage our members to subscribe or donate. All subscriptions and donations go to the costs operating and maintaining this site. We prefer that guests take part in our community and we offer a lot in return to those willing to join our corner of the Porsche world. This site is 99 percent member supported (less than 1 percent comes from advertising) - so please consider an annual subscription or donation to keep this site running.
Here are some of the features available - once you subscribe RennTech.org
- View Classified Ads
- DIY Tutorials
- Porsche TSB Listings (limited)
- VIN Decoder
- Special Offers
- Paint Codes
- Registry
- Videos System
- View Reviews
- and get rid of this welcome message
It takes just a few minutes to register, and it's quality Porsche information at a low cost.
Contributing Members also get these additional benefits:
(you become a Contributing Member by subscribing or donating money to the operation of this site)
- No ads - advertisements are removed
- Access the Contributors Only Forum
- Contributing Members Only Downloads
- Send attachments with PMs
- All image/file storage limits are substantially increased for all Contributing Members
- Option Codes Lookup
- VIN Option Lookups (limited)

logray
-
Posts
2,121 -
Joined
-
Last visited
-
Days Won
1
Content Type
Profiles
Events
Forums
Exterior Paint Colors
Downloads
Tutorials
Links Directory
Collections
Classifieds
Store
Everything posted by logray
-
 The assembly went much faster since I knew how everything goes together. However it still took about 2 hours. I made one mistake and forgot to secure a clamp on one of the coolant lines, lost a gallon or so of fluid and had to deal with that after the repair. Note the AOS needs the coolant running through it otherwise it will not function. Now when I remove the oil cap there is a small amount of negative pressure and the engine idles a little rougher. After the coolant issues sorted out and a few drive cycles I inspected the TB and intake - NO MORE OIL. Oh and no more misfires, or CEL. Let's hope that did the trick. Thanks for everyones help!
 -
Oil Separator - diagnosis?
logray replied to Chauch's topic in 996 Series (Carrera, Carrera 4, Carrera 4S, Targa)
I think a lot of people on this board have it wrong, and this is the only post that is contrary to what most people believe. I believe you are right and the normal behaviour is a certain amount of negative pressure and somewhat rough idle when the cap is removed. Can you confirm this, that the rough idle is normal when removing the oil cap. If you remove the cap and nothing happens, the car dies, or you have extreme negative pressure or positive pressure from the cap then the AOS is bad. I'm pretty sure the easiest way to diagnose bad AOS is the presence of oil in the throttle body, y plenum, intake manifolds. -
If you've never done one before, it takes about 3 hours to get the old AOS out using the non-manual-trans drop method. This is using the method described in this post. The only other things I would point out in addition to the post above and you pretty much have a DIY for removal are: - A couple things go without saying but should be mentioned, disconnect battery FIRST, remove airbox. - To get my fat forearm into the rear inner left intake maniflold screw I had to disconnect the positive cable going to the starter - Two of the hoses on the AOS were held by single-use crimp on clamps - and I had to cut the hoses off - so buying the screw-on hose clamp is a requirement, not an option in my case (heading to auto parts store tomorrow). While you're there buy another screw hose clamp for the new rubber bellows at bottom of AOS. - Before removing any hoses on the AOS and the manifold screws on the inside behind the alternator, remove the screws holding the AOS onto the block, this is done under the car. This will free up the AOS just enough to get more play for a wrench in the tight space. Also helps when you go to remove the hoses off the old AOS. - I had a HELL of a time removing the large hose clamps on the adapter tube running between the manifolds behind the y-plenum (the hose not attached to the TB). The screws for the clamp were litterly BEHIND the hose (apparently installed before entire motor assembly installed in compartment. I had to reach underneath the hose and without seeing what I was doing somehow turn a stubby phillips just enough to jimmy it lose by wiggling the manifold. This was the LAST thing I did, after removing all of the intake manifold screws. If you can't see the screws to turn the clamps on the rear hose adapter, I might recommend not attempting this method of removal and just go with dropping the trans. The 986 DIY website was not useful for a C2 996 aside from just cutting the old rubber bellows instead of messing with the clamp. Basically get the AOS out of the way and then mess with the clamp. Otherwise the procedure is drastically different as far as how to get the old AOS out. Here is that link. NOTE: it should go without saying that this is NOT a simple DIY, it is for the mechanically inclined ONLY. Tomorrow goes the install! Should go much quicker as long as I don't forget any screws.
-
It's a manual. I've decided to try the procedure without dropping trans. Also everything I've been reading here about the AOS failure matches what is happening on my car. I'm not getting as much white smoke as some describe, but there is some - primarily on cold start. Will post my results, new unit supposed to arrive tomorrow. It will be a late night!
-
Yep, each time I've cleaned it there's been a little, and a little more yet inside the Y-plenum behind the TB. Edit: anything besides the AOS 996-107-023-55-M100 I might want to replace while I'm in there, boots, lines, clamps, etc?
-
About a quart every 3000 or 4000 miles. OH, I forgot to mention I was cleaning the intake and noticed a little oily residue insde the intake plenum area... more evidence I guess.
-
After clearing codes the first time here is what came up. 62 misfire emmisions-relavant 53 Cylinder 4 misfire emissions-relavant 54 Cylinder 5 misfire emissions-relavant 55 Cylinder 6 misfire emissions-relavant 75 misfire damaging to cat. converter 66 Cylinder 4 midsfire damaging to cat. converter 67 Cylinder 5 midsfire damaging to cat. converter 68 Cylinder 6 midsfire damaging to cat. converter This time nothing about cyls. 1-3, which leads again towards AOS? Did the filler cap suction test. Not having tested another Carerra I don't have anything to compare with, but I would rate the suction as moderate. With a VERY FIRM grip on a latex glove, it was very noticably being sucked into the filler tube. A slight to moderate amount of air noise wooshing in. Idle became even more sporradic, inclulding left bank of cylinders with cap removed. Cleared codes a third time. This time it idled for about 10 minutes and NO CEL codes came on, no rough idle (although the moderate suction was still evident).
-
99' C2 w/~60k miles. Car is burning about a quart every 3-4k. Added about a half quart today after about a 1 hour drive. Took it out to get some gas and the CEL came on. Some soot, a tiny amount of oil coming out of left exhaust tip below 4,5,6 for a while now. Has been running very smoothly but all of a sudden idling a little rough, fluctuating. Cleared first occurance of CEL with PST2 then they all came back on except for the 8 misfire with empty tank and maybe a couple more but I would double check. Codes: 68 Cylinder 6 midsfire damaging to cat. converter 67 Cylinder 5 midsfire damaging to cat. converter 66 Cylinder 4 midsfire damaging to cat. converter 10 O2 sensor ahead of cat. conv. Cylinder (1-3) 18 O2 sensor ahead of cat. conv. Cylinder (4-6) 75 Misfire damaging to cat converter. 8 Misfire with empty tank Going to do the oil filler cap suction test. Hoping it is just another AOS. BTW, when it rains it pours, the govenator sent me a smog renewal letter today. Advice welcome! :-(
-
IIRC you just fold it over and tie wrap it somewhere where won't flap into a moving part, i.e. belt. Here are the instructions... http://www.evoms.com/WebSiteUsers/evoadmin...nstructions.pdf
-
All this oil theory... A little soot on one bank is probably not the end of the world. All of the tests show no problems, aside from pulling your plugs which might show which cylinder is suspect. How much do you abuse your throttle? Someone mentioned a stuck fuel injector. Perhaps it is "unstuck" now? Is soot still accumulating? My 99 C2 w/56k burns about 1 qt every 4k miles and is guilty of a little bit of soot and burn off over a long period. I've always thought that buring a little oil is a good thing - keeps the oil more fresh? ;-) A little soot is like more wrinkles on your face, or more lines on your hands. Have you read the owners manual??!!!???? It does say the engine consumes oil.... Especially considering the compression.
-
IPASS Codes Impossible to Obtain?
logray replied to logray's topic in 996 Series (Carrera, Carrera 4, Carrera 4S, Targa)
Thanks Loren, dice are rolling... -
IPASS Codes Impossible to Obtain?
logray replied to logray's topic in 996 Series (Carrera, Carrera 4, Carrera 4S, Targa)
SoCal near LA. I provided the title. A dealer in Irvine and another in Norwalk. I may try Roseville/Rocklin up in NorCal in a few weeks when I drive up there. They were kind enough to enable my OBC for free (after a fair amount of haggling and "accepting all liabilty"). Perhaps they would be more open? Perhaps I am just using the wrong tactic. -
I've tried two nearby dealers and they aren't willing to give me codes for a vehicle I own due to "security reasons". Despite the fact that the vehicle is not under warranty and I own it free and clear they aren't willing to divulge any IPASS codes in person or electonically. I have a new key remote I want to program and don't want to pay a dealer since I have a PST2. I also have a spare DME and want to play with some software for it, but don't want to mess up the good one I've got - so I have a spare. Has anyone had success with any specific dealers (pm me?), or if that is not kosher on this board due to "security reasons" - then perhaps someone would be willing to share their "tactics" on how they have successfully obtained this information? I can't imagine any reason why they wouldn't be willing to give me codes for a 10 year old MY 99' 996 C2 - unless they are afraid I might reverse engineer their security system or something and start stealing Porsche's left and right or re-write the sofware on DME's and immobilizers - and even then it would take a whole lot more than DME codes/etc. to do these things. TIA!
-
Anyone know how/if it is possible to enable the speed gong warning and set the speed of the warning using a PST2?
-
PST2 Manual of Features/Functions
logray replied to slant911's topic in Diagnostics, Tips and Diagnostic Tools
I searched high and low for the other thread and could not find it. Do you still have it bookmarked? Thanks. -
MY99 996. I pulled up my drivers seat and found two black/blue wires going into the abs module. I could not find a "free" black/blue wire with a cap on it. Am I missing something? The pics in this post are gone... TIA! Edit: ok, my eyes were tired last night, one of the wires was blue/black. I located and connected to the black/blue and the rear camera doesn't engage when I go in reverse. Wait, neither does the side mirror tilt or rear lights... fuse is fine... ****! Reverse gear switch here I come! http://www.renntech.org/forums/index.php?showtopic=7162
-
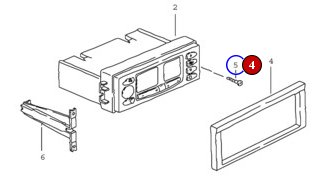
Does anyone know how the a/c surround trim fastens/clips into the lower/center console? Mine is attached by gravity today. Tried double sided tape but there are not enough flat surfaces there. I did an aftermarket HU install in my 99 996 and relocated my A/C controls to above the batwing. The trim I bought was 996 552 339 0001 (looks like #4 in the attached diagram) but I can't for the life of me find the clips that this puppy snaps into. On the back side of the trim there are two small plastic ferrules on either side, then in the console frame there are two small holes where it looks like some sort of small round clip would go into. Maybe a rubber grommet. Is it OEM-191853615A Grommet, for, POS.4 ? Anyone???

-
CDR23-iPod Integration quest
logray replied to plima's topic in 996 Series (Carrera, Carrera 4, Carrera 4S, Targa)
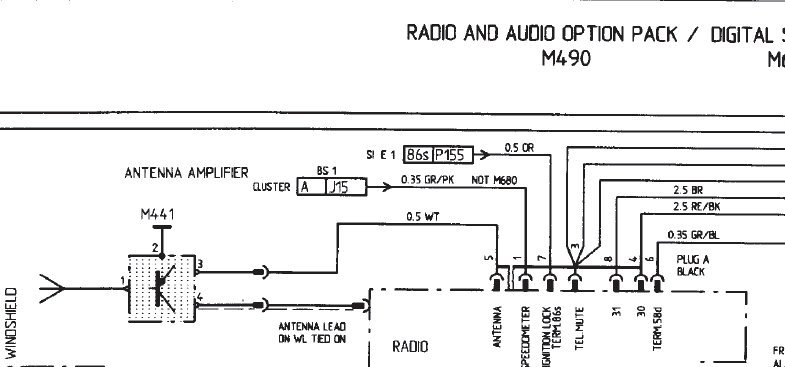
Your car is a MY99 - different radio. Here is your schematic for the antenna. Actualy I have the "enhanced audio m490 package" so the schematic looks more like the attached - my earlier post was actually referencing the schematic - let me know how you read it. To me it looks like position 5, white wire (which I did not have connected previously). It's in the same harness\connector with the speed wire, ACC, BAT, etc. Regardless I've completely gutted the entire terrible stock "enhanced" system with a Pioneer AVIC-Z2. The only thing I've kept are the stock speaker wires, which were sufficient guage for the cockpit volume\speaker size selection. I've connected the white white - position 5 to my stereos blue\white "power antenna" lead, which is used to either power an antenna retraction motor or diversified "windshield" antenna. Reception has improved dramatically, and this might have solved a ground loop problem I was having. Thanks for the reply.
-
CDR23-iPod Integration quest
logray replied to plima's topic in 996 Series (Carrera, Carrera 4, Carrera 4S, Targa)
As in, I need to supply 12volts for the antenna amplifier <or> this lead\wire supplies 12v? I think this might be why my radio reception is so poor. I don't have anything connected to A5 (white). -
1999 996 Idle Problem
logray replied to ChilPhil's topic in 996 Series (Carrera, Carrera 4, Carrera 4S, Targa)
Clean your TB. DO IT NOW. It's about a 1 hour job max (if you're really anal). If this is your car's first time and it is several years old it will improve your idle and throttle response. What you'll need: -Chem mask (or do it outdoors on a windy day with a dust mask) -Carb cleaner (aresol/compressed canister) -Microfiber cloths (don't want bits of cheap cloth getting in your engine with a regular rag) -m10 and m13 sockets w/extension or deep and wrench to remove throttle body -mechanics gloves or disposable latex gloves -flathead screwdriver to remove air intake hose -phillipshead to remove idle control from throttle body I cleaned my 99 C2 996 a few days ago. It had never been done before. With car in sunlight. Removed airbox (1 bolt, ingenious) a few clips, MAF cable, clamp and it's off in a jiff. Next 4 main throttleb bolts, 1 nut, a few clips, a few wires. Push in on the butterfly and the wire comes right out. After this the entire throttle body comes right off - pain free. Away from the car outside on a clean piece of newspaper, liberal application of carb cleaner onto all inner surfaces of body (use mask and gloves), microfiber cloth will remove all deposits after a little soak time and a little rubbing. Wipe dry with clean cloth. Remove idle control with phillips head, spray inside. Wipe clean. Removed a ton of old deposits, metal will be shiny, reinstall all parts. Enjoy smooth idle and much improved throttle response. Before I did this idle would fluctuate between 600-800. Throttle was dead until half way down or at high rpms. Afterwards I had a new car. Stable idle around 690ish. Throttle was much snappier through the entire range. This has been covered many times before. BTW I've seen DMEs on ebay for less than $1g, but programming will cost you more. This procedure will cost you $30 tops if you buy all of the tools and cleaning supplies. -
Group 48 Costco Roseville, CA was $53 plug $5 core plus tax. Had about 6 in stock.