Welcome to RennTech.org Community, Guest
There are many great features available to you once you register at RennTech.org
You are free to view posts here, but you must log in to reply to existing posts, or to start your own new topic. Like most online communities, there are costs involved to maintain a site like this - so we encourage our members to subscribe or donate. All subscriptions and donations go to the costs operating and maintaining this site. We prefer that guests take part in our community and we offer a lot in return to those willing to join our corner of the Porsche world. This site is 99 percent member supported (less than 1 percent comes from advertising) - so please consider an annual subscription or donation to keep this site running.
Here are some of the features available - once you subscribe RennTech.org
- View Classified Ads
- DIY Tutorials
- Porsche TSB Listings (limited)
- VIN Decoder
- Special Offers
- Paint Codes
- Registry
- Videos System
- View Reviews
- and get rid of this welcome message
It takes just a few minutes to register, and it's quality Porsche information at a low cost.
Contributing Members also get these additional benefits:
(you become a Contributing Member by subscribing or donating money to the operation of this site)
- No ads - advertisements are removed
- Access the Contributors Only Forum
- Contributing Members Only Downloads
- Send attachments with PMs
- All image/file storage limits are substantially increased for all Contributing Members
- Option Codes Lookup
- VIN Option Lookups (limited)


M A $ E
-
Posts
41 -
Joined
-
Last visited
About M A $ E

- Birthday 09/23/1976
Recent Profile Visitors
M A $ E's Achievements
Member (1/1)
0
Reputation
-
hey Jinijazz, in my opinion, they are still a little yellowish, but def better than the stock ones. you can really notice the difference when you are about 10 feet away form the car. The old ones make your xenons look pretty yellow. with the philips bulbs, not so noticible. let me know if want this extra set to save time and shipping from the UK. $25 shipped to you.
-
I'm pretty sure they use the same xenon bulb. the city light in question is the same H6W check this link. http://www.6speedonline.com/forums/showthr...t=philips+xenon
-
here you go...

-
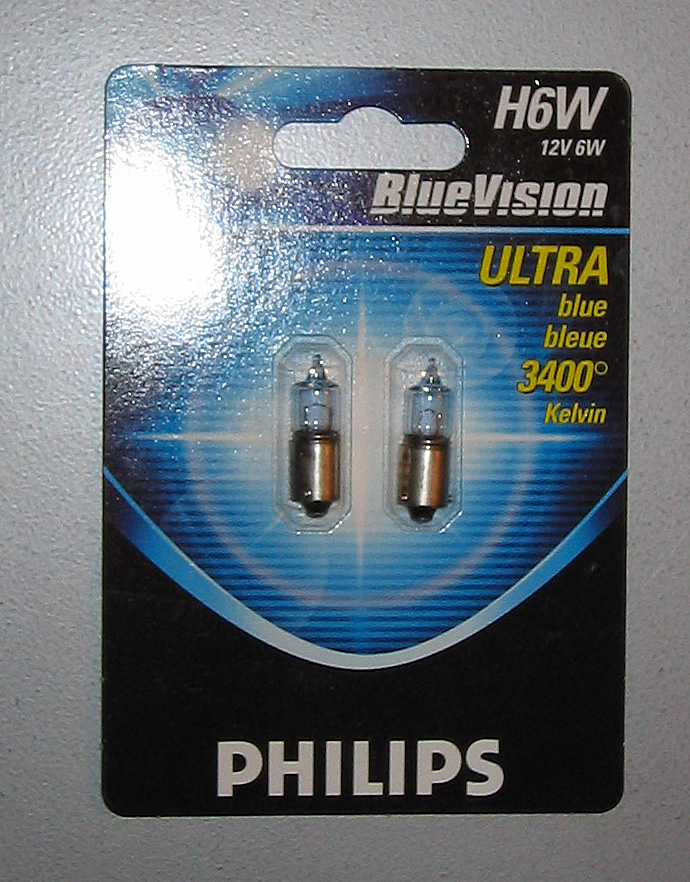
jinijazz, you're right. the city light is yellowish. You need to buy the Philips Blue Vision H6W bulbs. they match up really well and reduce the yellowish tint that it casts on your litronics. you can't get them in the US as they come from the Europe. They don't make your headlight look bluish either as they are pretty small. If you're interested, I have a extra pair in the package still. otherwise you'll have to order them from the UK.
-
Fabspeed V6 cat back
M A $ E replied to kodafalvo's topic in 9PA, 9PA1 (Cayenne, Cayenne S, Cayenne Turbo, Cayenne Turbo S)
nope. just one set... -
Joining the P-car family
M A $ E replied to Thanatos69's topic in 996 Series (Carrera, Carrera 4, Carrera 4S, Targa)
welcome! wow, 5AM and 3AM? you sure have some sleep issues... then again, I remember I could't sleep either when I got mine! -
Fabspeed V6 cat back
M A $ E replied to kodafalvo's topic in 9PA, 9PA1 (Cayenne, Cayenne S, Cayenne Turbo, Cayenne Turbo S)
no, I was just wondering if you had a clip of how it sounds? -
Fabspeed V6 cat back
M A $ E replied to kodafalvo's topic in 9PA, 9PA1 (Cayenne, Cayenne S, Cayenne Turbo, Cayenne Turbo S)
sound clip... -
So I gave the dealer a call. fairly basic... 1. remove all pastic trim pieces around the engine bay via 1/4 turn screws (watch out the pop out sometimes), you'll notice the air filter housings on both sides. 2. start with the driver's side and look for the 2 plastic torx screws (T27) on the lids of the housing. 3. Look closely and you'll notice the head of the torx screw is not round. it was a small extension protruding form the circumference of it. 4. look even closer and you'll nitice a black dot debossed from the housing around the head of the torx screw. 5. line those 2 up and give it a pull and the whole pin will come up. 6. undo the 2 metal spring clips and you'll be able to pull the lid completely off. 7. replace the filter and repeat steps for the otherside. 8. However, there is 1 extra step on the passenger side that needs to be taken. you'll notice a vacum tube in the rear bottom of the lid that needs to be removed first. It's a *****, but it does come out. don't forget to out it back in when you are done changing filters. 9. all done. :thumbup:
-
ah, man. I surely will post a diy one I figured it out. wish me luck! time to make a couple of phone calls...
-
does anyone know how to install the aftermarket air filters for a cayenne turbo? I see the spring clips on the top but something is holding the rest of the housing on the bottom. I found a DIY here at renntech, but it's for the Cayenne S. The piping on the turbo is different since the S' intake goes directly to the throttle body. I can't seem to be able to get the housing lid to come up and off. Loren, do you have a TSB for replacing stock filters?
-
Thanks fellas! I'll brave it this weekend and see where it gets me. So the lightweight bumper is a must it sounds like. mudman2, I'll hit you up if I want to trade. thanks for the offer!
-
Does anyone have a step-by-step procedure to removing the rear apron? My CT came with the facorty option tow hitch and I want to remove it for some weight savings and since I never plan on towing anything with it anyways. thanks in advance!
-
I recently installed my new aluminum face gauges. During the installation, I didn't rest the floating dash on a towel, so now my full leather dash has these mars in between the instrument cluster and the steering column -- from the mounting points. they are not creases in the leather, they almost like indents in the semi-soft leather dash. does anyone know how to get the leather to rebound back to it's smooth original state? I've tried wiping leather cleaner into it to condition and hopefully soften it up, and I've tried to heat it up with a hair dryer. nada. It seem to rebound a bit itself overnight, but not quite well enough. any suggestions? P.S. if you are going to do this, be extra careful. During the whole install, I not only marred up the dash, a couple of the needles on the gauges didn't work (which I later fixed), and had a very hard time removing the trim from the hazard light switch which I basically had to rip out. The dealer wants $87 to replace that small piece of abs around the hazard switch!
-
Well I finished the bypass pipes saturday morning and I'm very HAPPY with them!!! They sound great and help the car move a little quicker on the highway. Did I mention they sound great? you can finally hear the V8 and a bit of turbo whine. I def reccommend this mod to any 955TT out there! OK, so I gotten alot of info on this board, so it's time for me to give some back. You can totally install these yourself in a couple of hours, as long as you know what you have ahead of you. 1. with some WD40 on the nuts ;) , you should be easily able to loosen the metal sleeves that join the 2ndry cats to the pipes that lead to the muffler. there are 2 nuts on each sleeve. NO need to remove them, just slide them over to disconnect the 2 pipes. 2. each flange that connects the 2ndry cat to the primary cats, is held by 3 bolts --6 in total. On inspection, you'll notice that 4 of the six (2 on each side) are no- brainers as far as removal. remove them. and move onto the one at the top of the flange on the driver's side. It takes a little bit of work, but with persistence, you'll get it off in no time. 3. The nightmare bolt at the top of the flange on the passenger side: is actually really easy as long as you have the right tools. after hearing back from itzkirb, who suggested that I either remove the wheel (as he did it) or to go through the engine bay, I opted for the latter. I went to Autozone and bought two 24" socket extensions and a U joint extension to connect the two 24" exts (this help give the extention contraption some side-to-side mobility) . My wife then held the extension steady at the engine bay as I went under the car to guide it into the nut. Came back up and easy wrenched it off. VOILA! 4. went back in reverse order (didn't need the extention trick to get the top bolt back on, since without the cats you have more room and the fact that there is steel flex mesh to provide some give), checked for leaks and did a test run! It's def a DIY project. why waste $150 for installation? you could use that money for the BMC filters! GOOD LUCK!