Welcome to RennTech.org Community, Guest
There are many great features available to you once you register at RennTech.org
You are free to view posts here, but you must log in to reply to existing posts, or to start your own new topic. Like most online communities, there are costs involved to maintain a site like this - so we encourage our members to donate. All donations go to the costs operating and maintaining this site. We prefer that guests take part in our community and we offer a lot in return to those willing to join our corner of the Porsche world. This site is 99 percent member supported (less than 1 percent comes from advertising) - so please consider an annual donation to keep this site running.
Here are some of the features available - once you register at RennTech.org
- View Classified Ads
- DIY Tutorials
- Porsche TSB Listings (limited)
- VIN Decoder
- Special Offers
-
OBD II P-Codes - Paint Codes
- Registry
- Videos System
- View Reviews
- and get rid of this welcome message
It takes just a few minutes to register, and it's FREE
Contributing Members also get these additional benefits:
(you become a Contributing Member by donating money to the operation of this site)
- No ads - advertisements are removed
- Access the Contributors Only Forum
- Contributing Members Only Downloads
- Send attachments with PMs
- All image/file storage limits are substantially increased for all Contributing Members
- Option Codes Lookup
- VIN Option Lookups (limited)


JeTexas
-
Posts
533 -
Joined
-
Last visited
-
Days Won
1
Content Type
Profiles
Events
Forums
External Paint Colors
Downloads
Tutorials
Links Directory
Collections
Store
Posts posted by JeTexas
-
-
I'd guess a week if you're lucky.
-
It turned out to be something not so bad. The airbag / horn pad had vibrated loose enough that it was making noise. I cinched it back down and no more weird clattering noise from the steering wheel when I turn. I guess I didn't get it on tight enough when I took the steering wheel apart last summer to fix the non-stop horn honking.
-
I've got a 99 996 Cab C2 6-speed with 125,000 miles. Over the past month or so, I've developed a vibration in the steering wheel when I'm turning. It's quite a judder and will even make noise if I'm turning into a driveway or anything uphill or on uneven pavement. It originally was only when I turned left, but now it's starting to vibrate when I turn in either direction.
It feels like there's some bushing in the steering column that's gone missing and it's letting the move up/down and in/out a little bit. However, I'm not sure if there's anything like that in the column. I don't know if I should start opening open the steering column and dash to look in there or if this is indicative of something gone awry in the suspension. Perhaps I should be looking at the bushings on the control arms or replacing my shock absorbers. I don't know. I'm kind of lost when it comes to suspension.
The ride quality seems to be normal aside from this new steering wheel vibration.
Anyone have any ideas? What should I check first?
-
I have a 1999 996 with 125,000 miles on it that is still purring like a kitten. I have every expectation of seeing over 250,000 miles out of this engine and transmission. However, I'm probably going to have to do some suspension bushings and shocks soon.
-
Porsche's announcement of a Lithium Ion Starter Battery is all over the news and gadget blogs this morning. It's 22 pounds lighter than your standard lead-acid battery. However, nobody seems to think the $1700 price tag is worth the weight savings and increased battery lifespan, especially since you still need a lead-acid battery for cold weather.
Here's a couple links:
http://www.motorauthority.com/blog/1039902...-spyder-911-gt3
http://jalopnik.com/5422745/porsche-chargi...****ing-battery
-
I think the only thing I can think of that could be causing this (aside from sitting on the remote as already mentioned) would be a bad top controller unit. I had one go haywire on me, and it was rolling all of my windows down sporadically. The unit is a brown rectangular box mounted to the back side of the rear seat assembly. You can access it by putting the top in service position, then removing the liner carpet. You'll have to test it with a Durametric or PST-2 to see if it's working correctly, but in the short term you can just unplug it to stop the top from randomly going down.
Note, when you unplug it with the top in the service position, you'll have to manually close the top and recalibrate it with a Durametric or PST-2 when you plug it back in.
You might be able to unhook that carpet liner with the top in the service position, then close the top, then reach through and unplug it, but I've never attempted this.
-
That's a standard configuration. They also came with the climate control on top, then radio, then cd holder, then cubby. There's also a different configuration for the ones with premium sound and the ones with navigation.
I think there's a thread called cupholderectomy that has the details for moving climate control to the top.
-
I have the exact same problem in my 99. It seems to be related to the temperature of the seat. If it's cold, it turns on, but if the seat is already warm, it won't. If it's really hot in the car, I get the flashing light.
I've never bothered checking the relay or replacing anything because it always works when it's actually cold.
-
If I was of the mind to leave the sideskirts black, I'd put a black chin spoiler on the car and maybe do some black trim around the lower edge of the rear valence - but personally, I'd paint them silver. It reminds me of high school when we'd buy body kits for our Mustangs but couldn't afford to paint them for a year, so we'd drive around with mismatched primer parts.
-
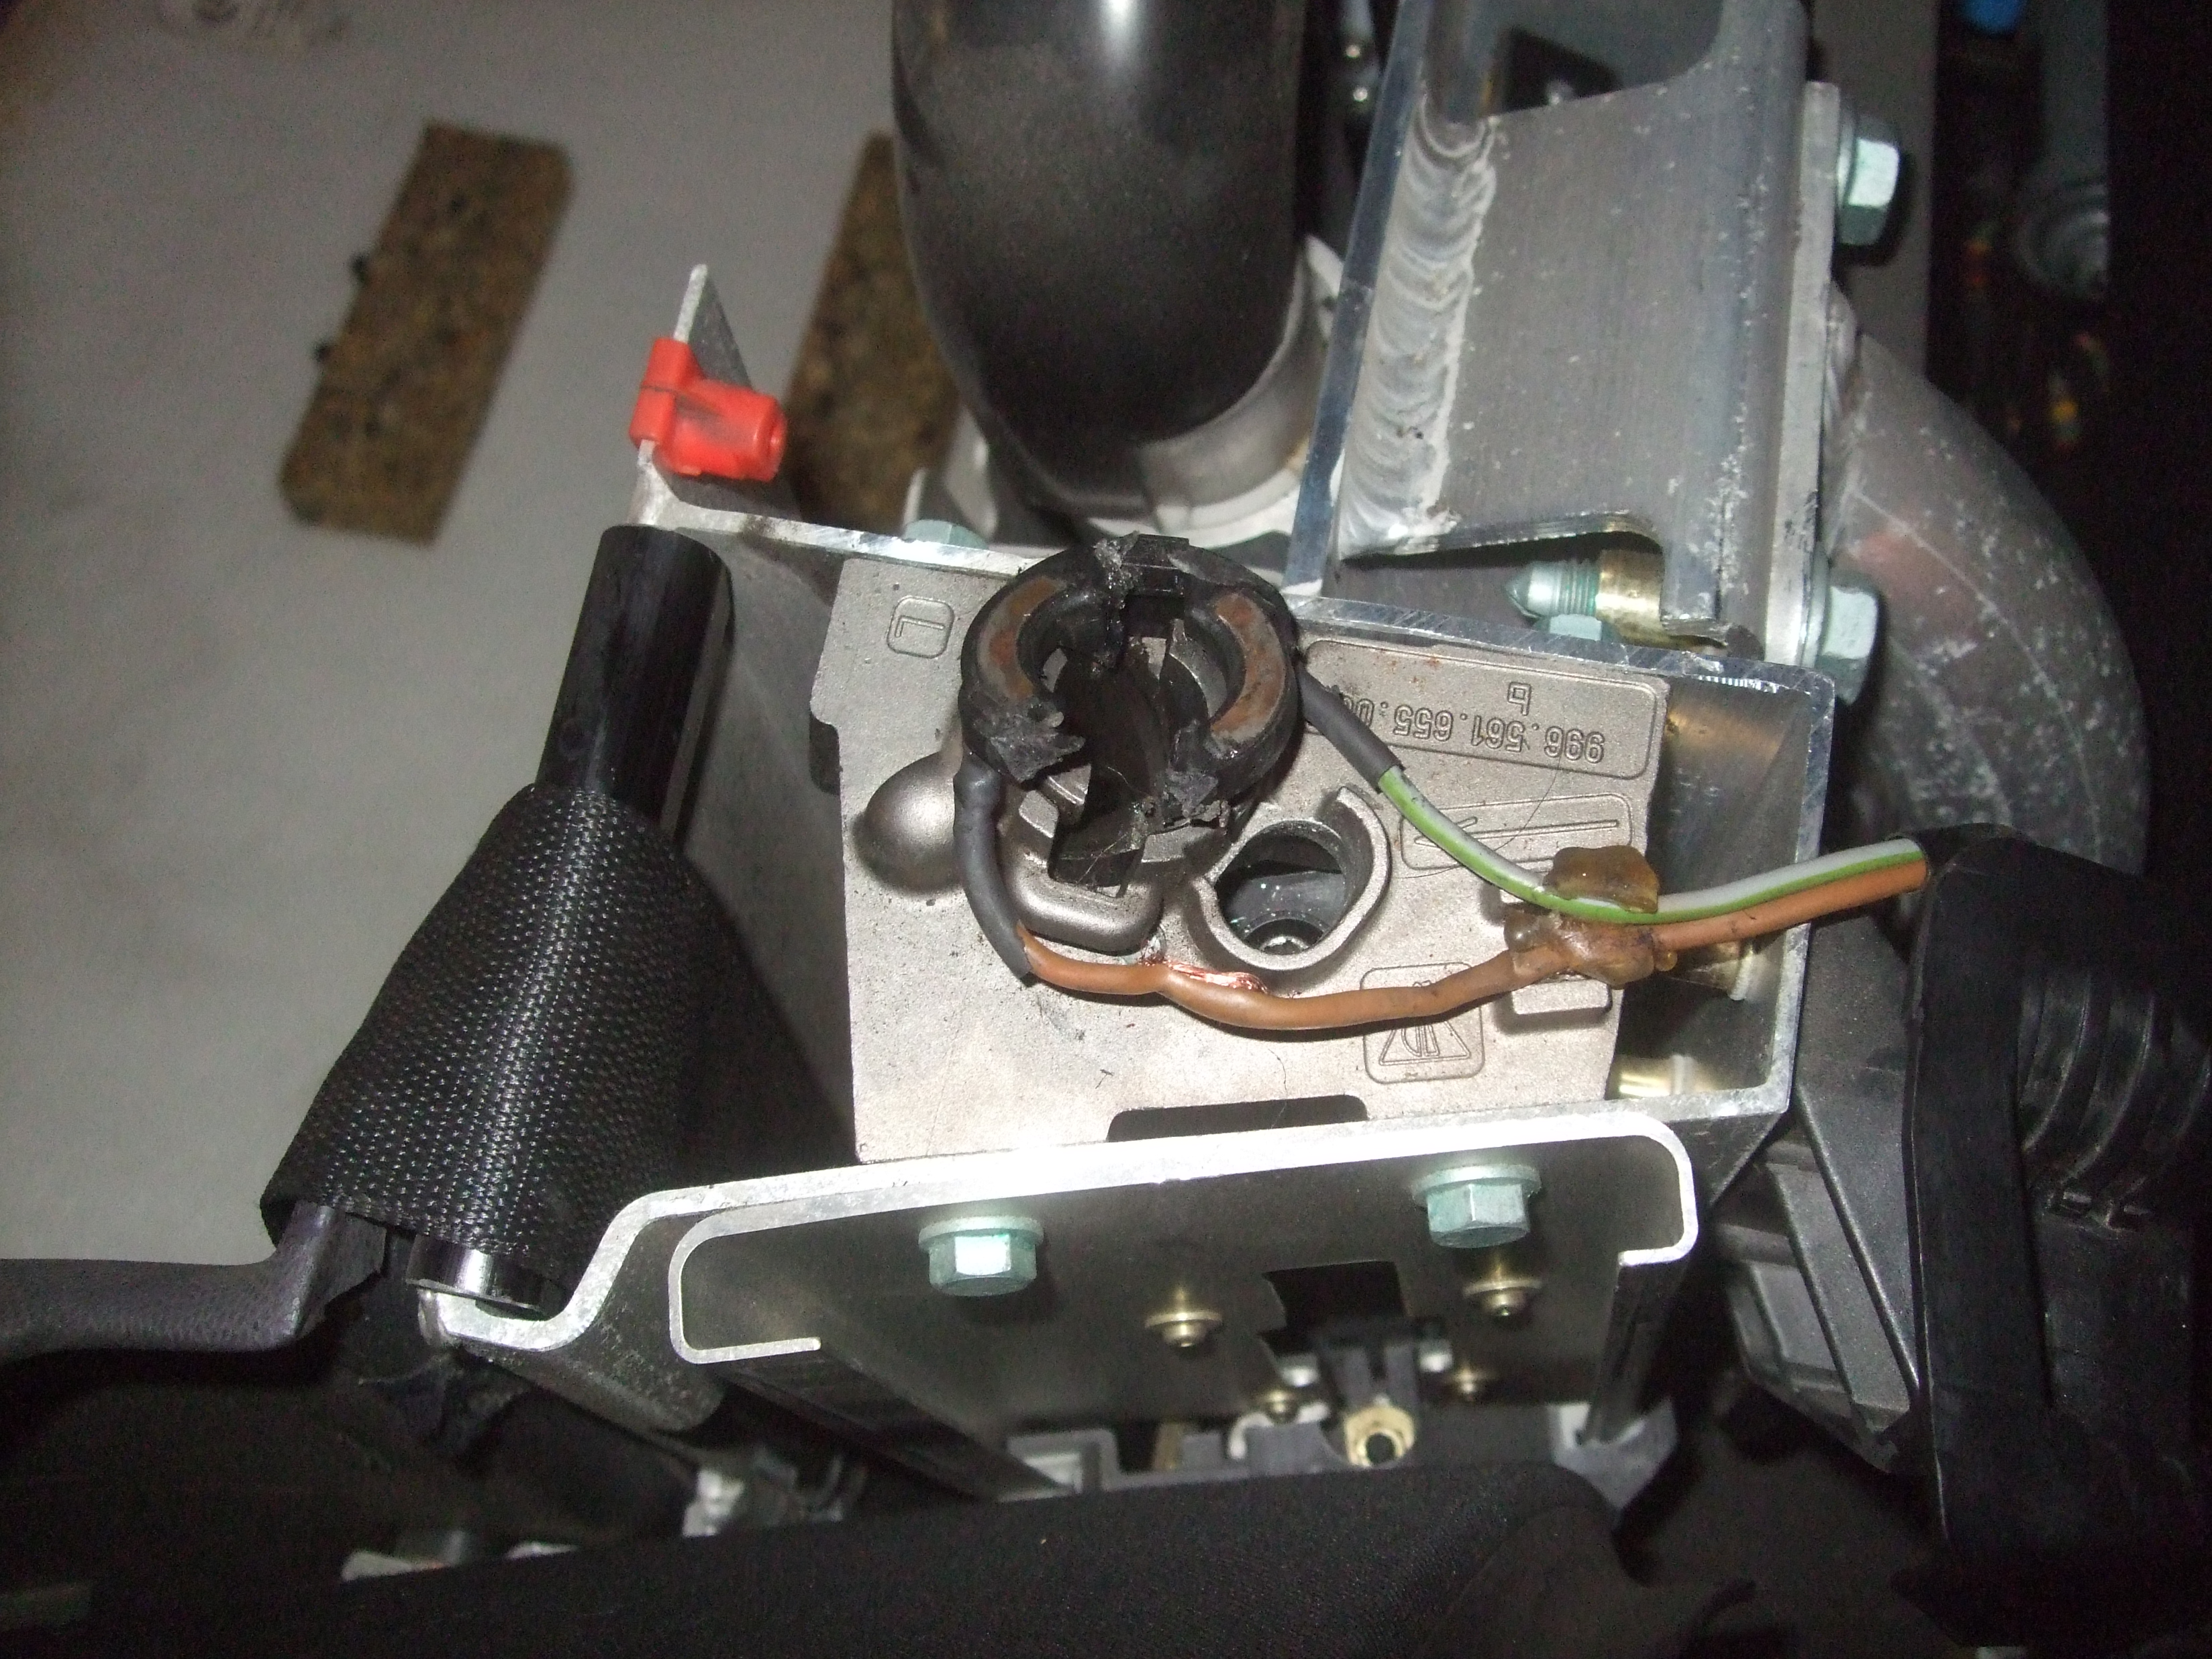
Is there a part number for this little plastic ring that has the metal contacts for the electrical contacts to the hard top? All I can find is the mount itself.

-
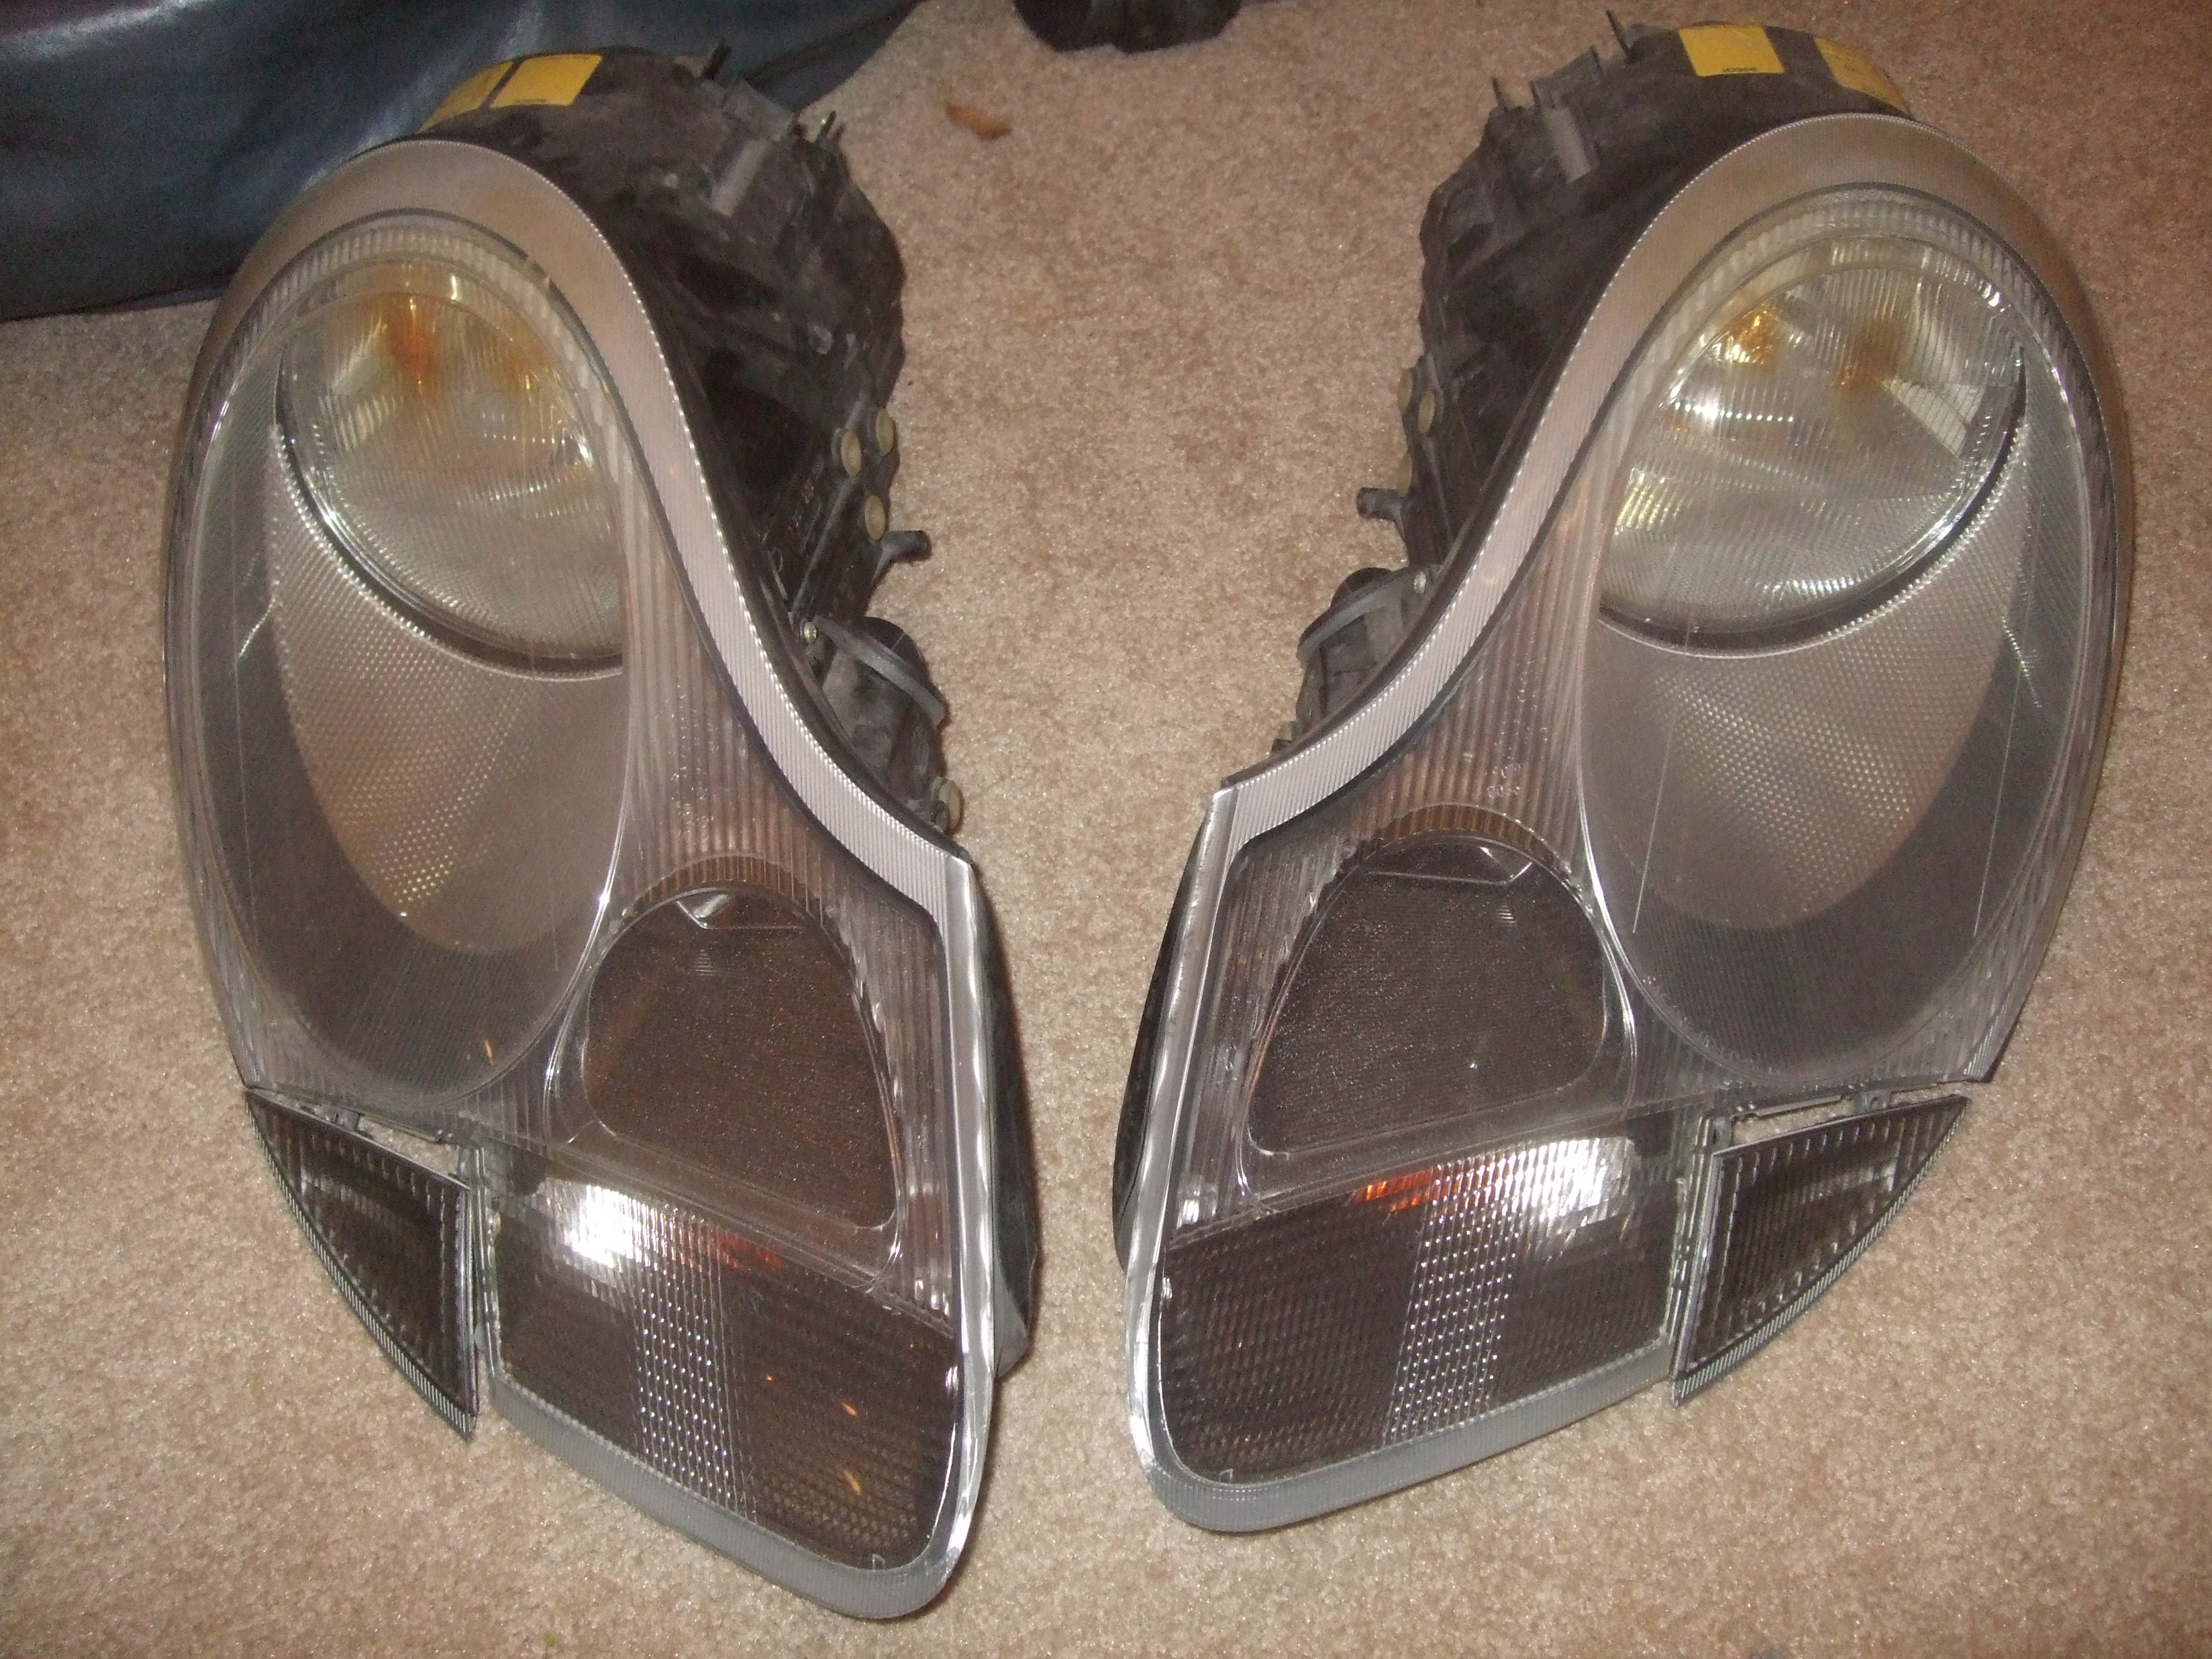
I'm about to attempt the same on an old set of my lights. I had heard set them on a block of wood for 3 minutes in the oven at 300 degrees. I'll try 250 first. What did you use to pry them apart?
-
You can usually tell if it's the window seal or the regulator as you can see the seal pulling on the window and the bad seal noise is like fingers on a balloon type thing. Silicone grease will recondition the seals somewhat and get them to stop sticking. There's a DIY for the regulators.
-
Good luck, guys. I'm jealous. Hopefully I'll get one of these organized in Houston someday.
-
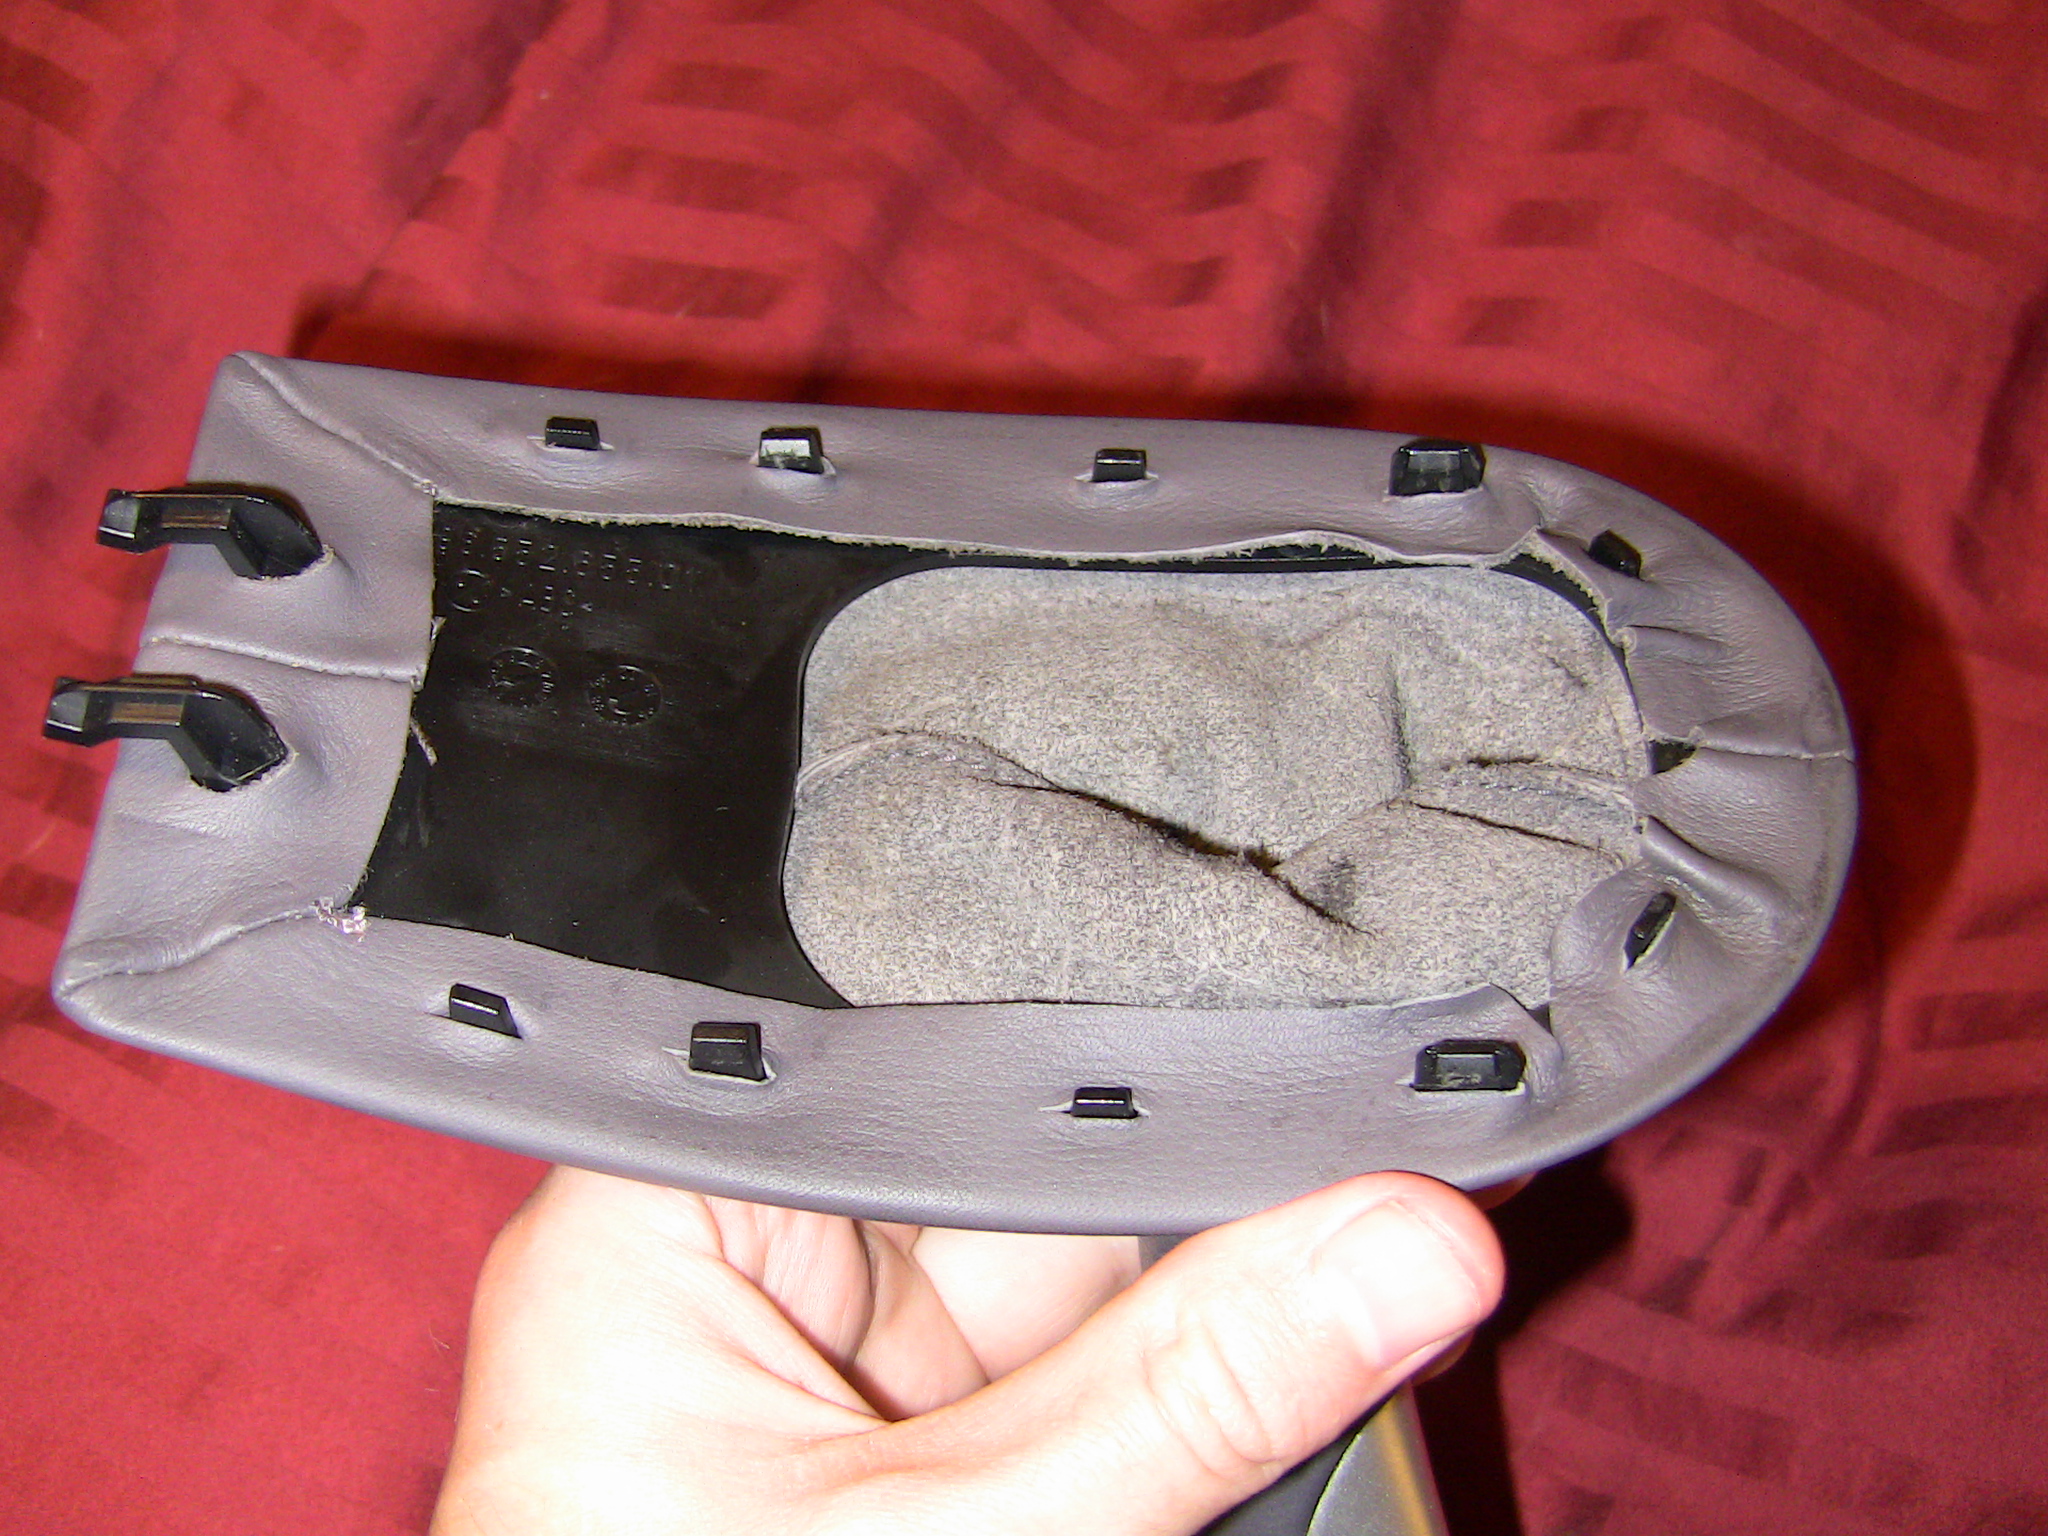
Do you mean this plastic piece that's inside the boot?
It says part number 996.552.655.01
Unfortunately, I think you have to order the entire shift knob and leather boot to get it. Mine was 996.424.075.02 but that's for a 99 C2 in grey leather.
If that black plastic piece with the clips is what you need, and it's not available by itself, I can sell you the one pictured. I just swapped my shifter because there was a big hole worn in the leather on the shift knob.
-
On the 996 the knob, plastic trim that shows the gear pattern and the leather are all one piece. I think it runs about $200. The knob just slides over the flat shifter and then the skirt has plastic clips that hold it onto the console.
-
Can someone post photos of what the connections look like? If they're standard-size optical connections, I'm pretty sure that convertor I posted above will work.
-
You can put a cheater bar on the brake arm if you need more leverage to pull it up further. Otherwise you can probably release the tension by unscrewing the adjuster nut at the turnbuckle of the cables.
Not sure what it looks like on Boxster, but here's a link to the 996 DIY for parking brake adjustment.
http://www.renntech.org/forums/index.php?showtopic=10733
Releasing the tension on that cable should allow you to unlock you lever. Then you can readjust it to where it won't get stuck again.
-
Can you have someone gently rock the car while you try to disengage the brake?
-
I found a Reach toothbrush that bends backwards and spent some time scrubbing through the bulb openings with toothpaste and another polishing compound. No luck. There are projectors from broken Litronics on eBay maybe if I can open the lens I could swap those in.
-
You'd want to seal them up to keep moisture from getting inside them, but other than that they should be ok. The question is, how were they damaged? I hope not from being forcibly pried from the Carrera in a dark alley.
-
I would use a good bolt to mark the length on my drill bit and keep drilling them out with larger and larger bits then rethread the holes. Sometimes the bolt your drilling out will just crumble and come out halfway through the process if you're lucky.
-
This is a project I've been wanting to tackle for a while, but I just recently was able to afford a new set of headlights, so I could pull these out to experiment on them. My 996 headlights have yellowing on the inner lenses from the heat of the bulbs.
My first question is, has anyone succesfully done this before? I'm hoping that if I can get to the inside of the lenses, I can scrub them with toothpaste or headlight polish and remove the yellowing.
The second question is how do I get to the inside of the lens? If I can devise some sort of long skinny scrubber to reach in through the bulb hole that would save a lot of work, but I have doubts that I can make that happen.
The other option is to bake the headlight in the oven sitting on a big block of wood at 300 degrees F for 3 minutes then attempt to pry the outer lens off. Then I could unscrew and remove the reflector and repeat the process to remove that inner lens. At that point I could finally attempt to clean the lens or install HID projectors.
Any advice or words of experience before I start these experiments?
-
The very first thing I would do is pop out and re-seat both lights and make sure you have them locked down. As the manual states, when you lock them in using the 5mm socket tool, you should hear a definite click. If they're not locked down, vibrations will cause them to lose connection and flicker.
If that doesn't solve the problem, I'd then start spending money on switches.
-
Have you tried calling the car fat and taking every chance possible to tear down its self-esteem in hopes it will perform better in an effort to please you?
Coolant Hose leak...
in 996 Series (Carrera, Carrera 4, Carrera 4S, Targa)
Posted
Changing all the hoses out was one of the very first things I did when I bought my 99 a couple years ago. Here's my thread on that.
http://www.renntech.org/forums/index.php?s...l=radiator+hose
Be wary of the NAPA rebuilt water pumps. I bought one last spring and it lasted exactly 6 months before it died. I think I'm at 3 or 4 months with the second one, which was replaced under warranty, but it still cost me a Saturday to swap it out.