Welcome to RennTech.org Community, Guest
There are many great features available to you once you register at RennTech.org
You are free to view posts here, but you must log in to reply to existing posts, or to start your own new topic. Like most online communities, there are costs involved to maintain a site like this - so we encourage our members to donate. All donations go to the costs operating and maintaining this site. We prefer that guests take part in our community and we offer a lot in return to those willing to join our corner of the Porsche world. This site is 99 percent member supported (less than 1 percent comes from advertising) - so please consider an annual donation to keep this site running.
Here are some of the features available - once you register at RennTech.org
- View Classified Ads
- DIY Tutorials
- Porsche TSB Listings (limited)
- VIN Decoder
- Special Offers
-
OBD II P-Codes - Paint Codes
- Registry
- Videos System
- View Reviews
- and get rid of this welcome message
It takes just a few minutes to register, and it's FREE
Contributing Members also get these additional benefits:
(you become a Contributing Member by donating money to the operation of this site)
- No ads - advertisements are removed
- Access the Contributors Only Forum
- Contributing Members Only Downloads
- Send attachments with PMs
- All image/file storage limits are substantially increased for all Contributing Members
- Option Codes Lookup
- VIN Option Lookups (limited)


insite
-
Posts
341 -
Joined
-
Last visited
Content Type
Profiles
Events
Forums
External Paint Colors
Downloads
Tutorials
Links Directory
Collections
Store
Posts posted by insite
-
-
I could probably get -2.0 if I wanted more negative. I want less negative camber in the back (or ... "most positive"). Increases in rear camber only make the car unpredictable at the limit, especially in transitions, and make the car more "pushy" in low-speed corners. I also do ProSolos in this car, and it maximizes the launch if the camber is minimum. I run 245/35/18 fronts and 285/30/18 rears so there is some understeer built-in as a result of that, but removing all the rear camber and toe makes the car very well balanced.
interesting. i've never run more positive than -1.5 in back. i've got staggered tires, too, but i bought them from a 996, so they're 225/265. how do your tires wear with that little neg in back? the track i go to most often has few transitional turns compared to many steady state sweepers / carousels, so maximizing lateral grip is a must to be fast there. where do you usually drive?
-
wow; good to know. maybe i just got lucky; 5/32 is a lot. why are you toed all the way out in back? is the car lowered a lot? tarrett arms? out of curiosity, when you string your car, do you just do parallels on each side of the car, or do you use a center line for thrust angle?
The car is set up for minimum rear camber and zero rear toe. To acheive zero toe you set the toe adjusters to as low as they go and then dial in negative camber until the toe actually reaches zero. If you were to set the camber adjusters to "max positive" rear camber (about -1.0 to -1.2 degrees) and then set the toe you would not be able to get out all of the toe-in. Make sense? :)
To string the car we set the strings to be parallel to one another, then measure how much the car is misaligned between the parallel strings and adjust the strings (equally on each side obviously) to compensate. That leaves you with parallel strings and a car which is parallel to them.
i usually use two plumb bobs at the midpoints of the sway bars (as measured from the control arm mounts). i then use a laser straight to strike a centerline. i measure to the centerline from the toe plates to get toe. as for camber, it seems odd that you're only able to get -1.0 to -1.2. maybe i'm misunderstanding. isn't the factory setting between -1.6 and -1.8? why are you running minimum rear camber? acceleration (auto-X)? just curious as to why people do what they do.
i was running about -2.0 in back and -1.6 up front most recently. this proved to be too much neg for street tires; they actually wore on the insides at the track. this time i'm going to run -1.2 up front and -1.9 in back. i'm going for 1/16" total toe (slow track, < 110mph). i'm going to try toe out (1/16") for the irst time up front.
-
I just verified that this is not true (at least for my car). I strung up the car last night to verify the toe prior to the ProSolo this weekend. The right rear was off because when I did the last suspension swap I removed the camber eccentric. Even though it was marked and put back to the same location, it caused the toe to be off. 5/32" in on the right rear.
I should add that my toe eccentrics are set to as much toe-out as possible - so there is no more range of adjustment there - hence why I had to make the adjustment at the camber eccentric.
I put the car on the slip plates and loosened the camber eccentric. I verified that there is about 1/16 of a turn of "slop" in the camber eccentric which makes sense - the camber eccentric is "captive" but it can still move laterally a bit once loose. Depending how the bolt is loaded (which is basically saying depending on which way it was last turned) you can get +/- changes in toe and camber. I tweaked it out and tightened it once the toe reached the right location.
Camber change was minimal - I gained a slight bit of negative camber but really the goal was to get rid of the toe-in.
wow; good to know. maybe i just got lucky; 5/32 is a lot. why are you toed all the way out in back? is the car lowered a lot? tarrett arms? out of curiosity, when you string your car, do you just do parallels on each side of the car, or do you use a center line for thrust angle?
-
what tools do i need to replace the seals of my calipers? does anyone have a diy on this? would appreciate it.
1. remove calipers from your car. don't push pistons back in.
2. open bleed screws and pour out excess fluid
3. use two screwdrivers to pry each piston out of its cylinder.
4. remove inner seals w/ plastic covered paperclip to avoid scratching cylinders.
5. clean all parts w/ 99% rubbing alcohol. this will dissolve the brake fluid.
6. powder coat calipers at this point if desired.
7. soak new inner seals in brake fluid for 30 min.
8. install new inner seals into calipers.
9. coat inner ring of each outer seal with silicone grease.
10. slide an outer seal onto each piston.
11. lubricate each brake cylinder with a light coat of brake fluid.
12. begin pressing the piston into its cylinder by hand until you hit the seal.
13. twist the piston slightly as it passes the seal
14. once past the seal, seat the outer dust boot in its groove
15. press cylinder all the way in. use a long piece of wood if you need some leverage.
16. repeat for all pistons.
17. install calipers and bleed system.
to do this job you will need inner seals AND outer dust boots. the outer dust boots are about $10 a pair from Sunset Imports. the inner seals are about $13 each from HRP World. don't do this unless you're sure you need to. you likely have no problem with your calipers unless you track the car.
-
I've got a buddy that broke his timing chain on his low mileage MY99. No mechanical overruns or other abuse.
What do we know about the likely causes of this?
Is the timing chain and supporting hardware a known weakness of MY99?
that is VERY strange. i wouldn't think it would break unless something else in the engine siezed first. which chain was it, IMS side or oil pump side? my first guess would be maybe some debris in the oil pump locked up the pump and the resulting stress snapped the chain.
-
I am considering only adding the M030 sport suspension sway bars but not the springs to my '02 2.7 Tip. Wife and I both like the current ride but I could use a little less lean. Has anyone tried this setup and if so what are the pros & cons if any? Which dealer has the best prices on these items? I notice that Eibach has 24mm frt. & 19mm rear and H&R has 26mm frt. & 22mm rear. How much stiffer than the M030 Porsche bars and would they be worth the extra money?
I have also decided to keep my 17" wheels rather than switch to 18", at least at this point. Thanks for any insight and suggestions.
the M030 sways are great with the stock springs. they are also quite comfy (they passed the woman test). the H&R will be way too stiff if you like the current ride; they're more geared toward motorsports. eibach is similar to the M030. i recommend the 'S' M030 front bar (24mm) and the base M030 rear bar (19.6mm). they are cheapest from Sunset Imports (around $215 for BOTH sways and BOTH sets of bushings).
-
Awesome, thank you. I was waitlisted for the last PCA. NASA HPD3 is not W2W, if you are ever inclined to try it. HPDE4 is combined with Time Trials so it gets hairy on turns 10A-B and 12. Can't wait to do the new asphalt. Thanks again
Izzy
yeah, PCA DE is tough to get into at RA. there is a DE coming up in September at Roebling Road that's a lot easier to get into. i'll be going. I may also do RA in october. i've never done a NASA event. probably next year. i'm getting to the point where i want to / am able to do a lot more driving...
-
Insite,
Having a hard time determining which seal I need from HRPWorld. Do you remember for front 996 which one it is?
I am partial to Pagid Oranges for track days, have had great luck with them. Also, going to Road Atlanta in August, try out the new surface. You drive it with PCA or NASA?
you want to do both front calipers. you will need four 40mm seals and four 36mm seals. if you do the rears also, you'll need 4 x 30mm and 4 x 28mm seals. they're on this page: http://www.hrpworld.com/index.cfm?form_pro...;action=product
use 99% rubbing alcohol to clean out the calipers (it dissolves brake fluid & doesn't leave moisture or residue). soak the seals in brake fluid for 30min before installing. use high temp moly assembly lube on the pistons when you reassemble. put the outer dust boots on the pistons BEFORE you put the pistons in the calipers.
the new surface at RA is great. i primarily do PCA and private events; no W2W stuff until i have a larger budget.
-
also, if you get a chance, remove the dust shields behind the rotors. this is good to do when replacing wheel bearings. they'll cool better.
-
you can get the inner seals from HRP world. they're $13 each. usually it's those that go; they overheat. they're only designed to take 400 - 500F of heat at the seal. there's a thermal barrier coating on the pistons that helps prevent this, but on the track it can still happen. once the seal has been overheated, it won't retract the pistons properly. the result is that the pads drag slightly and overheat the pads / calipers, causing fade. replace the inner seals in your old calipers and they'll be fine.
if you haven't moved to a full race pad yet, do so. you will be suprised at the difference. it's more economical to keep a street set and a race set if you go to the track a lot. i like hawk HT-10, pagid orange, and carbotech.
-
We found it to be much quicker and easier to do the rear by disconnecting the rear camber eccentric bolt. If you do this, you don't need to remove the lower ball joint, you don't have to pry the control arm, you don't have to remove the axle and you don't have to remove the brake calipers.
that's definitely the way to do it. i've done several of these and never removed the axles. it's actually possible to split the ball joint and still remove the strut assembly with the axles and lower control arm in place. it's FAR easier, though, to remove the entire lower control arm and leave the ball joint in tact. three hours must be some kind of record! the best i can do is four, but that's just one man.
Yeah, after doing it this way I can't imagine why anyone would remove the axles, calipers, etc.
I did the front without cracking the ball joints or control arm or caliper as well - but it's kind of a wash as to whether that method is easier or not.
i think the fronts are much easier to remove without splitting the ball joints. no risk of ripping a boot, either.
-
We found it to be much quicker and easier to do the rear by disconnecting the rear camber eccentric bolt. If you do this, you don't need to remove the lower ball joint, you don't have to pry the control arm, you don't have to remove the axle and you don't have to remove the brake calipers.
that's definitely the way to do it. i've done several of these and never removed the axles. it's actually possible to split the ball joint and still remove the strut assembly with the axles and lower control arm in place. it's FAR easier, though, to remove the entire lower control arm and leave the ball joint in tact. three hours must be some kind of record! the best i can do is four, but that's just one man.
-
Unfortunately because those eccentrics have so much slop in them, this in no way guarantees that you're at the same alignment as when you started. If you've ever aligned one of these cars you know that if you turn the eccentric, often no change in alignment will occur for the first 1/16 of a turn!
this is partially true for the toe eccentrics, but not the camber eccentrics on the lower control arms. i have a SmartCamber guage that i use to verify camber after this type of work. i've had the rear control arms removed four or five times. if i set the eccentric to its previous position, the camber doesn't change at all.
-
Some people have all the fun! I'm already scraping some driveways and bump stops as it is 02 S, so I'm outta luck :(
you'll still get a lot of benefit just from doing the sways. optionally, you can do the complete U.W. M030; it doesn't change the ride height.
-
OK...its been a whole week now. I L-O-V-E this suspension.
I may need to move someplace that has lots of super curve laden roads now. :D
It's insane how much more speed I can carry through a tight corner now and the car still doesn't even feel remotely close to the edge. It's obvious that I'm going to have to get it on a track to get any idea of it's full potential, and then I think it's going to scare me a little at first.
awesome, isn't it? the compromise in ride quality is almost unnoticable. i really think it should have come standard like this.
-
So if I change the car setup to max neg camber (three bolts all the way in) what toe value would I have??? I just want to know if I would be ok by just changing the camber to max neg for autocross and then when I get back home I switch it back to street setup.
it would depend on your toe value before you moved the camber. if you have a toe setting that's within spec, max neg camber up front will decrease your front toe-in. this is generally desirable for auto-x. it MAY even push you to toe out up front, which many people also consider desirable for auto-x. just try it and go for a drive to see how it feels. you'll know immediately if you've gone too far.
-
Insite,
What device are you using to measure camber?? Can you let me know where did you get it from? thanks,
Also, is it hard to change the toe on the front by yourself???
it's a friend's guage. you can get them from smart racing products. you can also make one with a level from home depot, but it's kind of a pain. as for toe, i do have toe plates that i use from time to time, but my alignment guy only charges me $60 for a four-wheel, so i mostly just take it to him. changing the toe up front is easy. measuring it in accurate relationship to everything else is tougher.
BTW, everyone says that changing the camber on these cars also changes the toe, and it does. i've found, though, that the front toe is particularly insensitive to camber changes, so i can change my front camber a lot without changing front toe much. for me, i have it set up so that when i set the camber to my track setting, front toe goes to zero. when i set it to street, toe goes in slightly, which is desirable for street driving.
-
getting ready to redo my motor mount,
i like the idea repairing the factory mount by removing all of the stock rubber and replacing with the flexane 80
is the 1lb kit enough to complete the job?
thanks, ked
the 1lb kit was enough for me to do my motor mount, all four control arms and two strut top mounts. also, you don't remove the factory rubber. you clean it with alcohol and cast the flexane around it.
-
It's possible you may need a Hazet 16mm triple-square tamper-proof (hole in the center) socket to remove the trans drain bolt. If that's the case, you might try http://www.zdmak.com or http://www.samstagsales.com.
I've also seen the socket on Ebay.
correct. ebay has tons of them; do a search for volkswagen transmission drain tool.
-
So in other words... I can simply purchase "S" Calipers and use them on my base with your simple modification? or do I still need "S" Rotors.
JFP IN PA --> Do you have the part for the rotors that you use?
why would you do that? my point is that the base calipers ARE the S calipers. the only difference between the two is how the pins are set (as above). so, you can use either caliper on either car with either rotor depending on how you set the pin depth. the only benefit the rear brakes on the S have over the base is that the rotors are thicker. if you wanted to use these thicker rotors on your base boxster, you would need to buy the rotors described by JFP in PA in this thread. you would then need to set the pin depth on your calipers to accept the thicker rotors. that's it. no need to buy new calipers.
also, one more time for clarity: this only works on the rears. the front calipers are different in several more ways.
-
Actually, the rear rotors are not "base thickness" (20 mm), they are "s" thickness (24 mm), I just checked....................
fantastic news. i am really glad to hear that. thanks again for your help!
-
Sweet!!!
Do you know if it is possible to change those pins? I was looking at the diagram and I couldn't find those pins. Looks like it's one piece with caliper.
or you just thinking about cutting them off, I mean making shorter?
BTW awesome job!!!
they're not on any diagrams. they're supposed to be part of the caliper. you can remove them and re-insert them to a different depth.
-
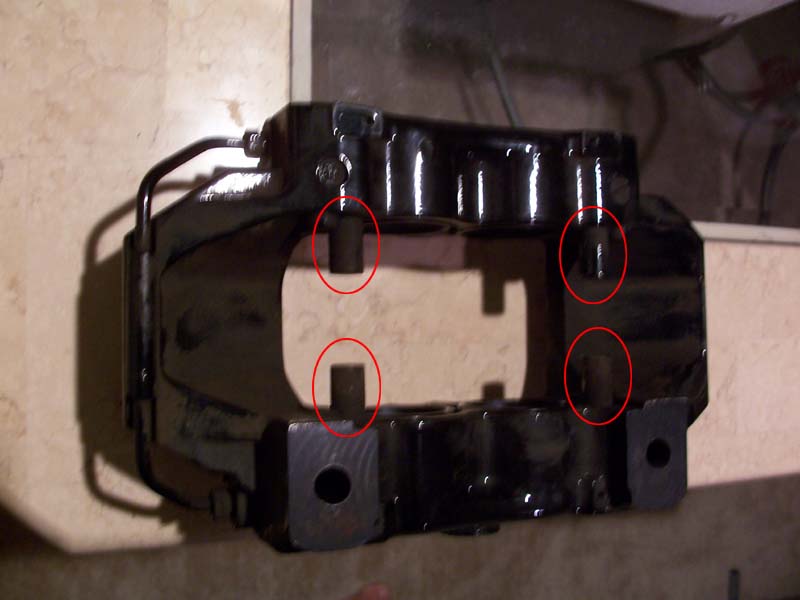
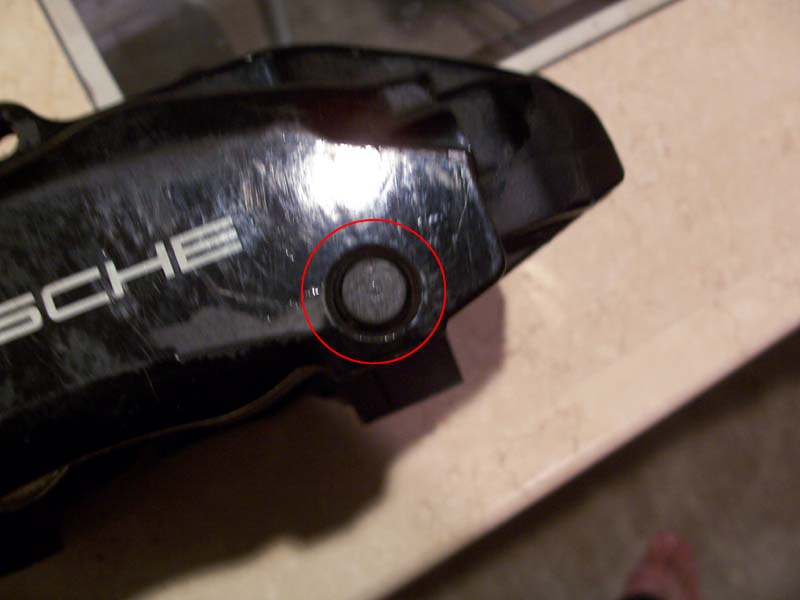
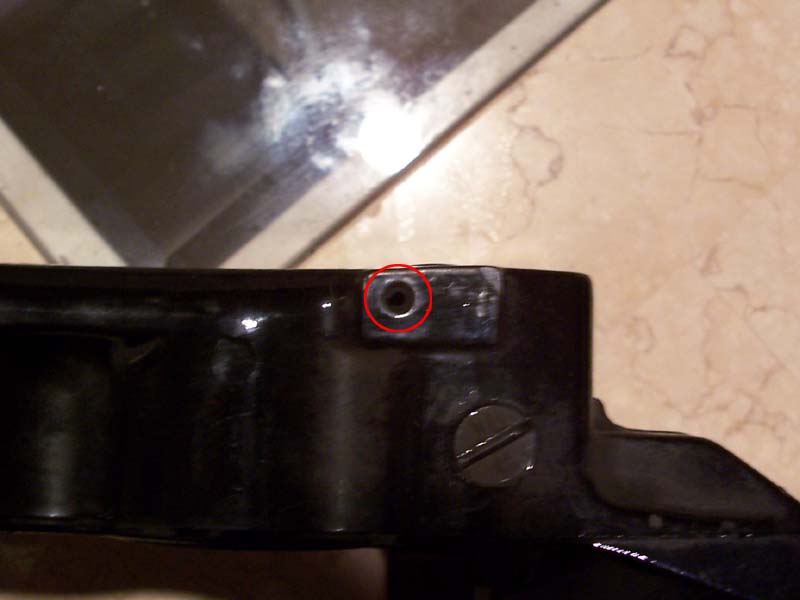
i'll try to explain. the caliper mounting distance from the hub for the S and base rear calipers are the same. the caliper offset (distance from mounting point to the center of the pad clamping area) are also the same. as are the cylinders, pistons, etc. the ONLY difference is the mounting position of the pad retainer pins. the first photo shows the pins i'm talking about. The second photo shows an S caliper pin from the outside. notice the pin is flush with the caliper surface. The third picture shows a red base caliper's pin mounting depth. it's mounted deeper than the S caliper's! the final picture shows the roll pins that retain the caliper pins in place.
now for the cool part: the caliper retaining pins for both calipers are the same! that is, they can be mounted at either depth. one can simply remove the roll pins, slide the caliper retaining pins in or out, install new roll pins, and convert the caliper! that is all. the base caliper's pad retaining pins are installed in the narrow position so that they won't fit around an S rotor, which is thicker. the base rotor is identical in diameter and offset, but is 2mm thinner. so, an S caliper can be installed on a base rotor, but a base caliper can't be installed on an S rotor without the above mentioned modifications.
i took all measurements of an S caliper and a base caliper to prove this; all dimensions are identical except for the pins! crafty, eh?

-
Anytime. I've done three of these conversions, all using the Brembo parts from the above sources, and all were a snap to do. I still have one set on an 02, and they have been great to drive, and have not caused any problems........ the last "full" kit I purchased (everything for all four corners) was $2795 (delivered) from Suncoast.................
stay tuned for pictures on how to turn an S rear caliper into a base rear caliper and vice versa. BTW, the base rotors will work with the S rear calipers. i will post pics on how / why this is the case. i'm thinking maybe brembo sends you cross drilled base rears. next time you buy a set, measure the thickness. i bet they're standard thickness. i'll post the pics / measurements / explanation a bit later; still messy from working earlier.

Boxster Suspension R&R
in 986 Boxster Suspension, Brakes, and Wheels
Posted
john -
do you have aftermarket toe links? i was aligning my car yesterday and am unable to run less than -2.2 deg camber in back and still meet my toe requirements. at -1.8 in back, i can't get less than 13/16 toe in (the left side is at max out). i do run RoW ride height, but i didn't think that would matter so much....