Welcome to RennTech.org Community, Guest
There are many great features available to you once you register at RennTech.org
You are free to view posts here, but you must log in to reply to existing posts, or to start your own new topic. Like most online communities, there are costs involved to maintain a site like this - so we encourage our members to donate. All donations go to the costs operating and maintaining this site. We prefer that guests take part in our community and we offer a lot in return to those willing to join our corner of the Porsche world. This site is 99 percent member supported (less than 1 percent comes from advertising) - so please consider an annual donation to keep this site running.
Here are some of the features available - once you register at RennTech.org
- View Classified Ads
- DIY Tutorials
- Porsche TSB Listings (limited)
- VIN Decoder
- Special Offers
-
OBD II P-Codes - Paint Codes
- Registry
- Videos System
- View Reviews
- and get rid of this welcome message
It takes just a few minutes to register, and it's FREE
Contributing Members also get these additional benefits:
(you become a Contributing Member by donating money to the operation of this site)
- No ads - advertisements are removed
- Access the Contributors Only Forum
- Contributing Members Only Downloads
- Send attachments with PMs
- All image/file storage limits are substantially increased for all Contributing Members
- Option Codes Lookup
- VIN Option Lookups (limited)


LVDell
-
Posts
1,146 -
Joined
-
Last visited
-
Days Won
1
Content Type
Profiles
Events
Forums
External Paint Colors
Downloads
Tutorials
Links Directory
Collections
Classifieds
Store
Everything posted by LVDell
-
Depends on what radio you have. Pre-MOST systems can use that plug, MOST systems cannot. Here is the plug that some of the guys have talked about over on Rennlist. Same as what you posted but cheaper: http://www.discountcarstereo.com/detail.aspx?ID=993
-
Help locating drain and fill plugs on 99 Boxster tranny
LVDell replied to LVDell's topic in 986 Series (Boxster, Boxster S)
Steve, the good news is I don't have that plate on mine :) -
Help locating drain and fill plugs on 99 Boxster tranny
LVDell replied to LVDell's topic in 986 Series (Boxster, Boxster S)
After reading the workshop manual it states that you add 2.25L of tranny oil which will leave it 11mm below the opening. So.....wouldn't common sense dictate to just add 2.5L?????? What cracks me up is that it states...."use a bent wire hook (shop-made) to check the level". You mean there is no special tool for this or TSB how to make this tool??? :) -
Help locating drain and fill plugs on 99 Boxster tranny
LVDell replied to LVDell's topic in 986 Series (Boxster, Boxster S)
Thanks for the reply. What amazes me is that the drain and fill plugs on my 996CAB and GT3 were very easy to do with no "special" tools required. Wonder why Porsche decided that the Boxster needed a special hard to find tool??? And this 11mm stuff? I have read that doing a search today and just don't get it either. Again, on the other cars, you fill until it starts to come out of the fill location. -
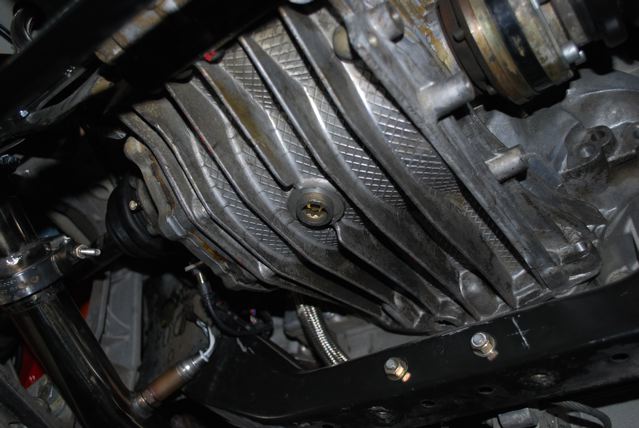
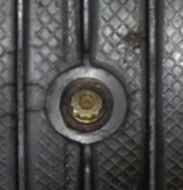
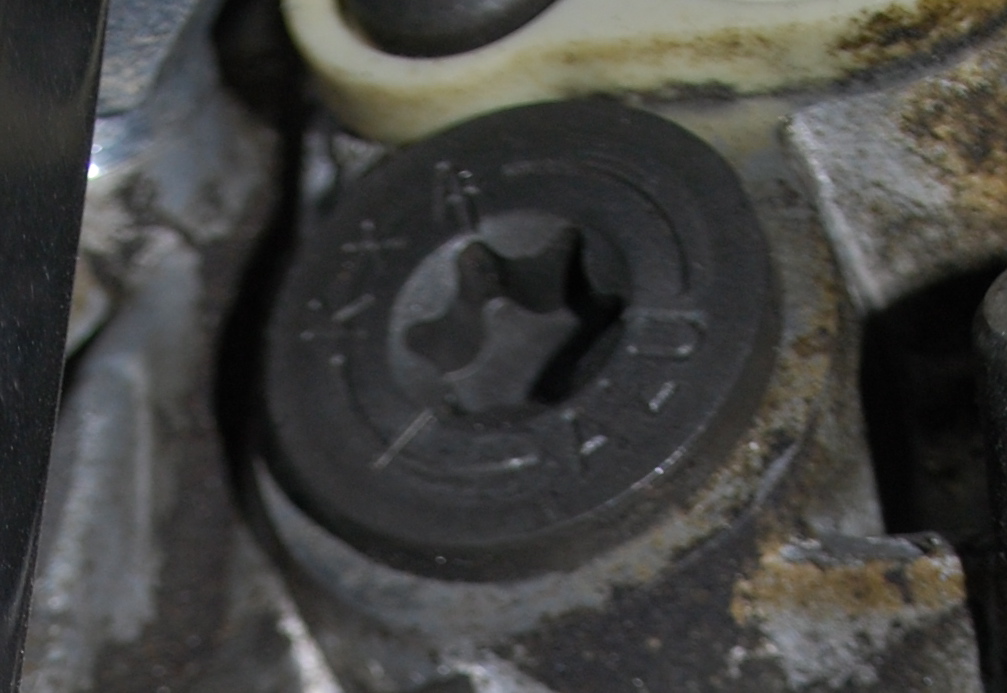
New to the 986 world and while it looks straightforward I want to make sure I have them located properly before I go to task. I have been changing the tranny fluid in my GT3 and 996CAB (as well as many friends 996's) for years and it is very easy but the Boxster tranny looks just a touch different. Can somebody please point out in the pictures where the two (drain in fill) are as well as type and size? The drain looks like a security bit (not sure why) and the other looks standard. TIA! **I assume that these two pictures I just took illustrate the drain and fill plugs but I'd like to be sure before I start going to town on the box :) **

-
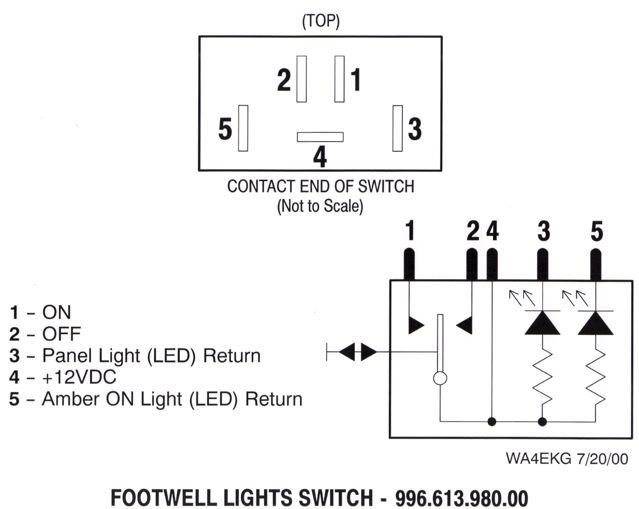
So I've looked at every thread imaginable about adding the footwell lights to the car but I haven't seen anybody just add the FWL switch and connect it to a set of lights you can turn on and off at will. Most all the installs tied into the doors and dome lights. Or they are tied to the dome light with no switch. I just want to install two lights ( 1 driver and 1 passenger side) that are wired to the switch. Here is a diagram of the switch. Since i don't know anything about electricity I'd appreciate any input from those of y'all that understand it. Trying to figure out what Porsche did to wiring up those lights. The goal of this project is to wire those two lights to the switch and have the switch act like it was factory to begin with (lights up with the rest of the switches) TIA!
-
2.5L (MY97-99) Order Guide Anywhere?
LVDell replied to LVDell's topic in 986 Series (Boxster, Boxster S)
Mike, we very may have already met! I was there from day 1 when it was at the "Bean and Bagel" on 55. When they shut down we moved to a new location just down the road on Davis and Old Jenks in Apex. (about 10 min from my place in Cary). In the Bean and Bagel days I drove my yellow GT3. We still do them every Saturday and routinely get 10-15 guys. Come join us anytime, we'd love to have y'all. Here's the link the location WAKE ZONE LINK I'll update my bookmarks for your page url. -
2.5L (MY97-99) Order Guide Anywhere?
LVDell replied to LVDell's topic in 986 Series (Boxster, Boxster S)
eBay? Not looking to purchase the actual hard copy guide. I was looking for the same thing that Loren has here posted for the 03+ cars in pdf. Thanks Mike for the reply! By the way, you're just up the down road from me. I'm in Cary. By the way, is "Porsche Boxster Web Pages Index" your website? That is a fantastic repository! -
I have the order guides for my other cars and was hoping there was something available for the 2.5L 97-99 986. TIA!
-
Is the CF Shifter shift pattern a replaceable insert?
LVDell replied to LVDell's topic in 986 Series (Boxster, Boxster S)
Great info Halo, thanks again! -
Is the CF Shifter shift pattern a replaceable insert?
LVDell replied to LVDell's topic in 986 Series (Boxster, Boxster S)
Thanks Halo! You'd think Porsche would have been a bit smarter and allowed us to replace the insert. But then again they make more money by selling us a whole new unit! :censored: -
Is the little round shift pattern on the CF shifter a replacement piece? Can you change from a 5-sp to 6-sp pattern or vice versa? It doesn't appear to be as I have tried to remove it with no success. TIA!
-
What? First I've heard of that. It states that it the manual. If you do a lot of around town driving, you can dillute the oil down with fuel. It does not state in the manual that you should change the oil at 5K based on inadequate lubrication levels due to fuel intrusion.
-
What? First I've heard of that.
-
Air Filter Replacement (V6)
LVDell replied to LVDell's topic in DIY Articles - Cayenne - Maintenance
Very welcome :cheers: -
Body kit creating downforce issues?
LVDell replied to Fish8's topic in 996 Series (Carrera, Carrera 4, Carrera 4S, Targa)
Very welcome. By the way, I can speak from experience as I have a GT3 as well that is a track whore :) -
Body kit creating downforce issues?
LVDell replied to Fish8's topic in 996 Series (Carrera, Carrera 4, Carrera 4S, Targa)
You already have a rear spoiler that raises at speed. You can add the front with changing the rear but you should not add increased downforce to the rear without increasing the front. What you are doing is exactly what my CAB has and it feels great (and looks great).....GT3 front and sides. -
It's more than just pressures. You haven't said what situation you are looking to get more grip. Is this daily driving? Road course racing? etc? There are way too many variables but the easy ones are tire pressures, tire size, and sway bar adjustments. Have you thought about talking to a race shop to get your car "dialed in"?
-
Here is the thread with all the pictures: http://forums.rennlist.com/rennforums/show...d.php?p=4976072 Cheers, Dell
-
Air Filter Replacement (V6)
LVDell replied to LVDell's topic in DIY Articles - Cayenne - Maintenance
Very welcome. Glad I could help :) -
Neither are which are needed on the track :) I have pics now of the entire install so I will post up a DIY in case somebody else does this. :cheers:
-
Figured it out. I decided to go further into the dash and see where this wiring assembly ends. It actually splits into to wiring harnesses just under the dash which you can reach by just removing the top half plastic steering column cover. Here is a picture of what the 2 connectors look like. Thanks Maurice for you reply....just thought I would post back the end result in case anybody else does this in the future.
-
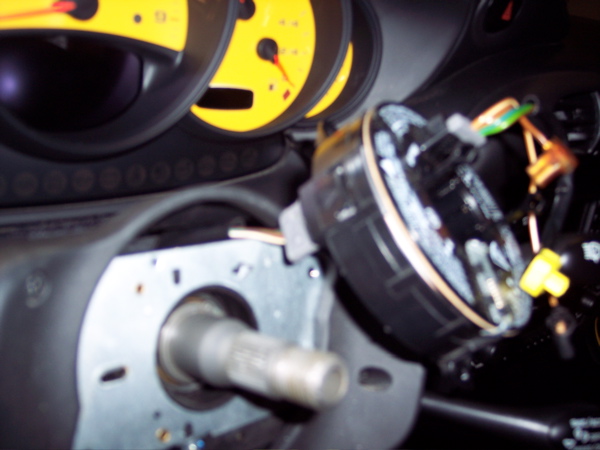
Maurice, while I appreciate the reply, have you actually read those instructions? The grey plug is NOT removed from the plastic ring during the entire OBC hack install. Rather it is just hanging out of the way. Thanks for the reply, but I need to know how to remove the grey plug as pictured. I have added a zoomed in picture illustrating what needs to be removed. The grey plug that attaches to the plastic ring assembly appears to be latched on or something but I can't figure out how to slide it out.
-
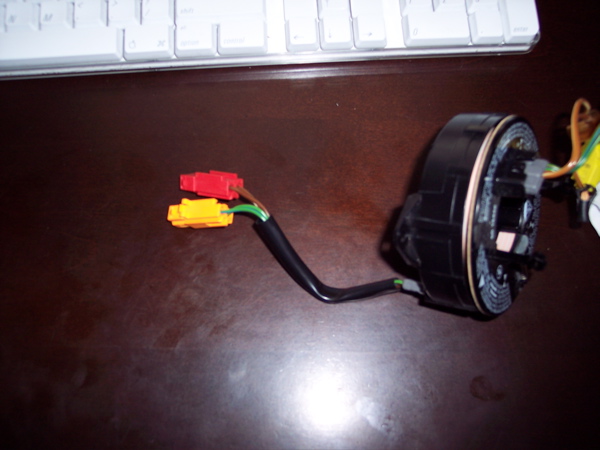
Here is a picture. I am trying to figure out how to get this ring removed and it is connected by the grey plug. I am installing a cup wheel and quick release so this needs to go! Thanks for any help in advance!!!!! :cheers: Cheers, Dell
-
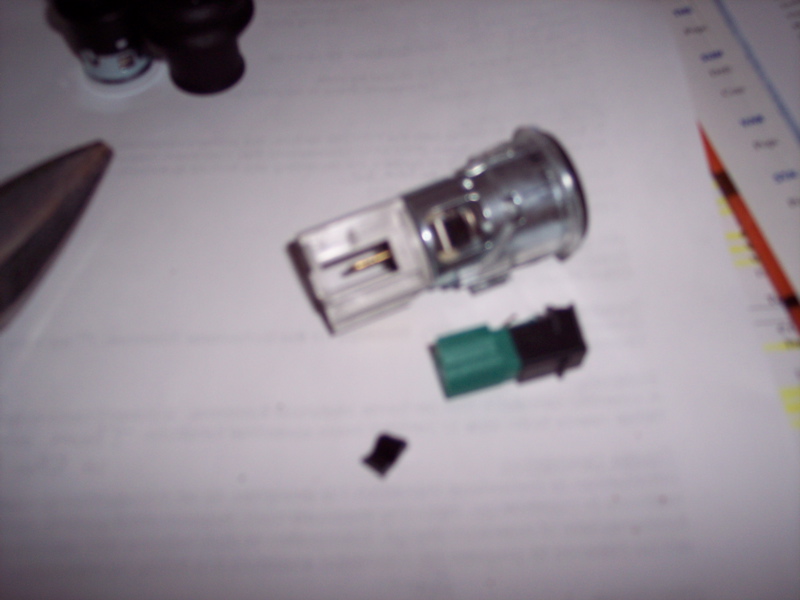
Got it replaced and everything works perfect! I can't believe I didn't do this years ago. The parts that need to be purchased are: 99665210210 (list $18.18) 99665210110A05 (list $10.20) I couldn't get the old one out easily without frustration and since I wasn't going to use it again I decided to just break off the offending piece (pic attached of black and green piece removed with wire cutters) so the old assembly would just slide out :)