Welcome to RennTech.org Community, Guest
There are many great features available to you once you register at RennTech.org
You are free to view posts here, but you must log in to reply to existing posts, or to start your own new topic. Like most online communities, there are costs involved to maintain a site like this - so we encourage our members to donate. All donations go to the costs operating and maintaining this site. We prefer that guests take part in our community and we offer a lot in return to those willing to join our corner of the Porsche world. This site is 99 percent member supported (less than 1 percent comes from advertising) - so please consider an annual donation to keep this site running.
Here are some of the features available - once you register at RennTech.org
- View Classified Ads
- DIY Tutorials
- Porsche TSB Listings (limited)
- VIN Decoder
- Special Offers
-
OBD II P-Codes - Paint Codes
- Registry
- Videos System
- View Reviews
- and get rid of this welcome message
It takes just a few minutes to register, and it's FREE
Contributing Members also get these additional benefits:
(you become a Contributing Member by donating money to the operation of this site)
- No ads - advertisements are removed
- Access the Contributors Only Forum
- Contributing Members Only Downloads
- Send attachments with PMs
- All image/file storage limits are substantially increased for all Contributing Members
- Option Codes Lookup
- VIN Option Lookups (limited)


zappbranigan
-
Posts
37 -
Joined
-
Last visited
Content Type
Profiles
Events
Forums
External Paint Colors
Downloads
Tutorials
Links Directory
Collections
Store
Everything posted by zappbranigan
-
DIY for Inner Tie Rods
zappbranigan replied to zappbranigan's topic in 986 Series (Boxster, Boxster S)
I wound up renting an Inner Tie Rod Removal tool from Advanced Auto. Autozone also had one. Probably the tool WVICARY is speaking of. I found the problem with these tools are that the wrench itself comes mainly in 1 3/16" and 1 5/16". Guess which size you need for Porsche? Of course, the exact size the tool skips...1 1/4"! My solution was to file down the new tie rod nut to fit the smaller wrench. The snug fit helped me torque to correct specs. A few minutes of filing with a metal file and I was in business. Removing the old tie rod was a bit more challenging. I used the larger wrench size and took an old metal hose clamp, bent it in half, and forced it into the space created by the larger fit. After I got it snuggled in there nice and tight, I gave it a quick turn with the rachet and all was well. The loaner tool program from Advanced Auto, combined with a little ingenuity, and I saved a couple hundred bucks in stealership fees by changing the inner tie rod myself. -
DIY for Inner Tie Rods
zappbranigan replied to zappbranigan's topic in 986 Series (Boxster, Boxster S)
Looks like Harbor Freight makes a "special tool" for this project. Took me some searching to come up with what looks like a great DIY on this link: http://www.ifitjams.com/tie_rod.htm It's not a porsche vehicle the technician is demonstrating on, but all the major parts are there and similar. Guess I solved this one on my own, but hopefully someone with inner tie rod replacement on their list of weekend projects will find this helpful. -
DIY for Inner Tie Rods
zappbranigan replied to zappbranigan's topic in 986 Series (Boxster, Boxster S)
Apparently, it's also called a 'JOINT' (part number 996 347 322 03) and labeled number 6 in the diagram. After separating the ball joint(8) from the wheel carrier, the manual says to pull the sleeve back (2) and remove tie rod (6) with the appropriate wrench. A 30 mm wrench of some sort is needed, or at least that's the size of the nut that's holding the tie rod to the steering assembly. The problem is, there is no room to get a wrench that big into the recessed area. I can barely get my hand in there. I'm coming across various things called "tie rod removers", but of course they won't be specific to a porsche. Surely somebody out there has replaced one of these. BTW, I'm calling this a "tie rod" because that's what 2 technicians called it when they wrote up the repair log for my 01 Boxster. Haven't seen it called a "joint" until I looked at the above diagram.
-
It's been asked several times on renntech, but never answered. So I'll throw it out there one more time... Anybody got any ideas on how to change the inner tie rod on a 01 Boxster? I'm down to the tie rod itself, but looks like the wrench needed to get in there and release the ball joint side of the tie rod is going to be tough. Probable a special tool, I'm guessing. Bentley manual just says to use the "appropriate wrench". I could've figured that one out. Can Sears tool dept. help me? What tool or method should be used to get this bugger out?
-
Wheel size mystery....
zappbranigan replied to zappbranigan's topic in 986 Series (Boxster, Boxster S)
'preciate everyone's input. Since owning this car, and discovering all the hidden problems not mentioned by the dealer, I suspect everything wrong with car is a product of ductaping or a paint-over. This forum has been an unbelievable help for people like me with these nagging issues and a limit on my bank account. So thanks again to everyone!!! Grover: I keep putting off buying the durametric software and manual cuz I'm always thinking the money needs to go to the next project. After being embarrased again by not having it and being told I need it...I'm going to make it my next "project". Thanks for calling me out on that one. PK2: No signs of rub marks or polished spots...thank God. First time I think I haven't discovered a new problem while fixing an old one. To put the issue to rest, I'm going to do the history search and see what comes up. Based on everyone's ideas, I think the tires are there by design, and they are stock. -
Wheel size mystery....
zappbranigan replied to zappbranigan's topic in 986 Series (Boxster, Boxster S)
Shawn, I am a little cautious with this car because of ALL the problems that I've had to fix to bring it back to road worthiness. This thing must've been in a flood or something. Rust everywhere on the undercarriage and wheel carrier. I had some "rubbing" coming from the rear of the vehicle that was identified as wheel bearings. I'm almost done completing that DIY, and the larger wheels got me wondering if that may also be causing the roaring sound I heard. Didn't know if the larger wheels were an improper size for the vehicle. Thanks again for your input! -
Another mystery involving a 2001 boxster I bought with no maintenance history. Among many other issues I've solved/working on thanks to the help from everyone here on Renntech :renntech: I've got another anomaly. The back wheels are much wider than the front wheels. I don't know anything (yet :)) about wheels or wheel sizes, but there are some numbers imprinted on the wheel around the valve stem hole. I assume it's the wheel size numbers... The back wheel reads 8.5 and 48 The front wheels read 7 and 55. The recess for the lugnuts are also quite different as the lugnuts on the front wheel are flush with the holes (almost sticking out). The back lugnuts are pretty recessed and out of sight. I don't care for the difference aesthetically. Can anybody advise if this is a problem? What's the stock size wheel for a 2001 Boxster (non S)?
-
Removing Wheel Hub w/out SIRS tool
zappbranigan replied to zappbranigan's topic in 986 Series (Boxster, Boxster S)
Sorry for the absence after starting this post. I was out of town and quite busy. And to all those looking to rent the puller, jjanari is right. I called weeks ago and had to settle for a puller that is designed for a VW I believe. So it was a gamble...and they did not have it on sight. I was put on a waiting list and I'm still waiting! jjanari: No I did not find a "solution" that allowed me to complete the wheel bearing job MYSELF. After speaking with some real gear-heads I know, I decided to follow up on another posting's suggestion that a machine shop might do the whole job for pennies on the dollar. After calling numerous local machine shops (just Yahoo'd my zip code with the keywords "machine shop" under the Yellow Pages link on Yahoo) I got no where. Everyone was either not familiar with my request or just didn't handle that small of a job. SO HERE'S WHERE MY EFFORTS PAID OFF. More idle conversation at work about my problem and someone walked into the office and told me he had the same wheel bearing work done at an auto parts store down the road from where I live. I drove down the road that night and wallah! For $40, Jefferson County Auto Parts pulled the hub, and replaced the bearing in about 10 minutes. That was just one bearing, but well worth it. Hell, I'd already spent $30 in various screws, bolts, and couplings trying to build a DIY bearing puller. Don't waste your time. Just read below. My advice here is to call LOCAL auto parts stores near you. Ones that have more than just inventory in the back of the store like NAPA, or other chain stores. I haven't called, but would assume NAPA, Advanced Auto, etc won't have the tools necessary to do what this LOCAL auto parts store did. (And they probably have a policy about working on luxury cars like Porsche. I've ran into that issue several times.) This local auto parts store had a large shop in back of their inventory shelves and the guys working there were more knowledgeable than the typical teenager selling oil filters. My headache is over. I saved hundreds of bucks. And I'm on to painting my calipers before reassembling! Good luck to those who are in the same boat! -
I have a DIY tool for removing the wheel bearings from my 2001 Boxster, but seem to have ran into a bit of problem.... I need to remove the wheel hub. My DIY tool doesn't allow me to do that. Anybody got any ideas that will remove the hub without causing any damage?
-
Part should be in tomorrow. We'll know for sure then! Thanks again to all!! ************************UDPATE************************************ Got the thermostat installed today. What an easy process! Thanks again for everyone's guidance! Temperature rose to 180 and stayed with some pretty decent cabin heat. After a quick test run, however the engine temperature stayed at 180 with the engine temperature light flashing. I know there's a thread somewhere where Loren pointed out the 4 reasons the temperature light comes on. Seems like all arrows are pointing to the coolant sensor now. *************** FINAL UPDATE *********************** Added more coolant (to the max fill line) and all is well now. No more flashing light. No overheating either. Still not sure why the thermostat was totally gone, but I'm not complaining. Thanks again to everyone for their input!
-
This car really has been a mystery as so many things have needed repair when I bought it (motor mount, ignition switch, radio wiring, wheel bearing, control arm, new carpeting due to previous coolant leak, etc). The fact the thermostat was missing almost leads me to believe there is yet another issue awaiting me...like the overheating mentioned earlier. Would an educated guess into the reasoning behind removing the thermostat, lead one to believe there may be a water pump problem too as wvicary suggests? I'm guessing once I get the thermostat installed, coolant levels checked, etc, a first sign of a bad water pump would be overheating?
-
I can only wonder how much I would've paid the "stealer" for this problem. Just goes to show how this forum, and everyone with porsche "know how" who contributes, really helps out us little guys. Thanks again to 1schoir, rsfeller, Bill_SoCal, and Maurice, who walked me through this issue! You guys saved me a ton of cash! After I get her put back together, I'll report my results and bring this mystery to an end!
-
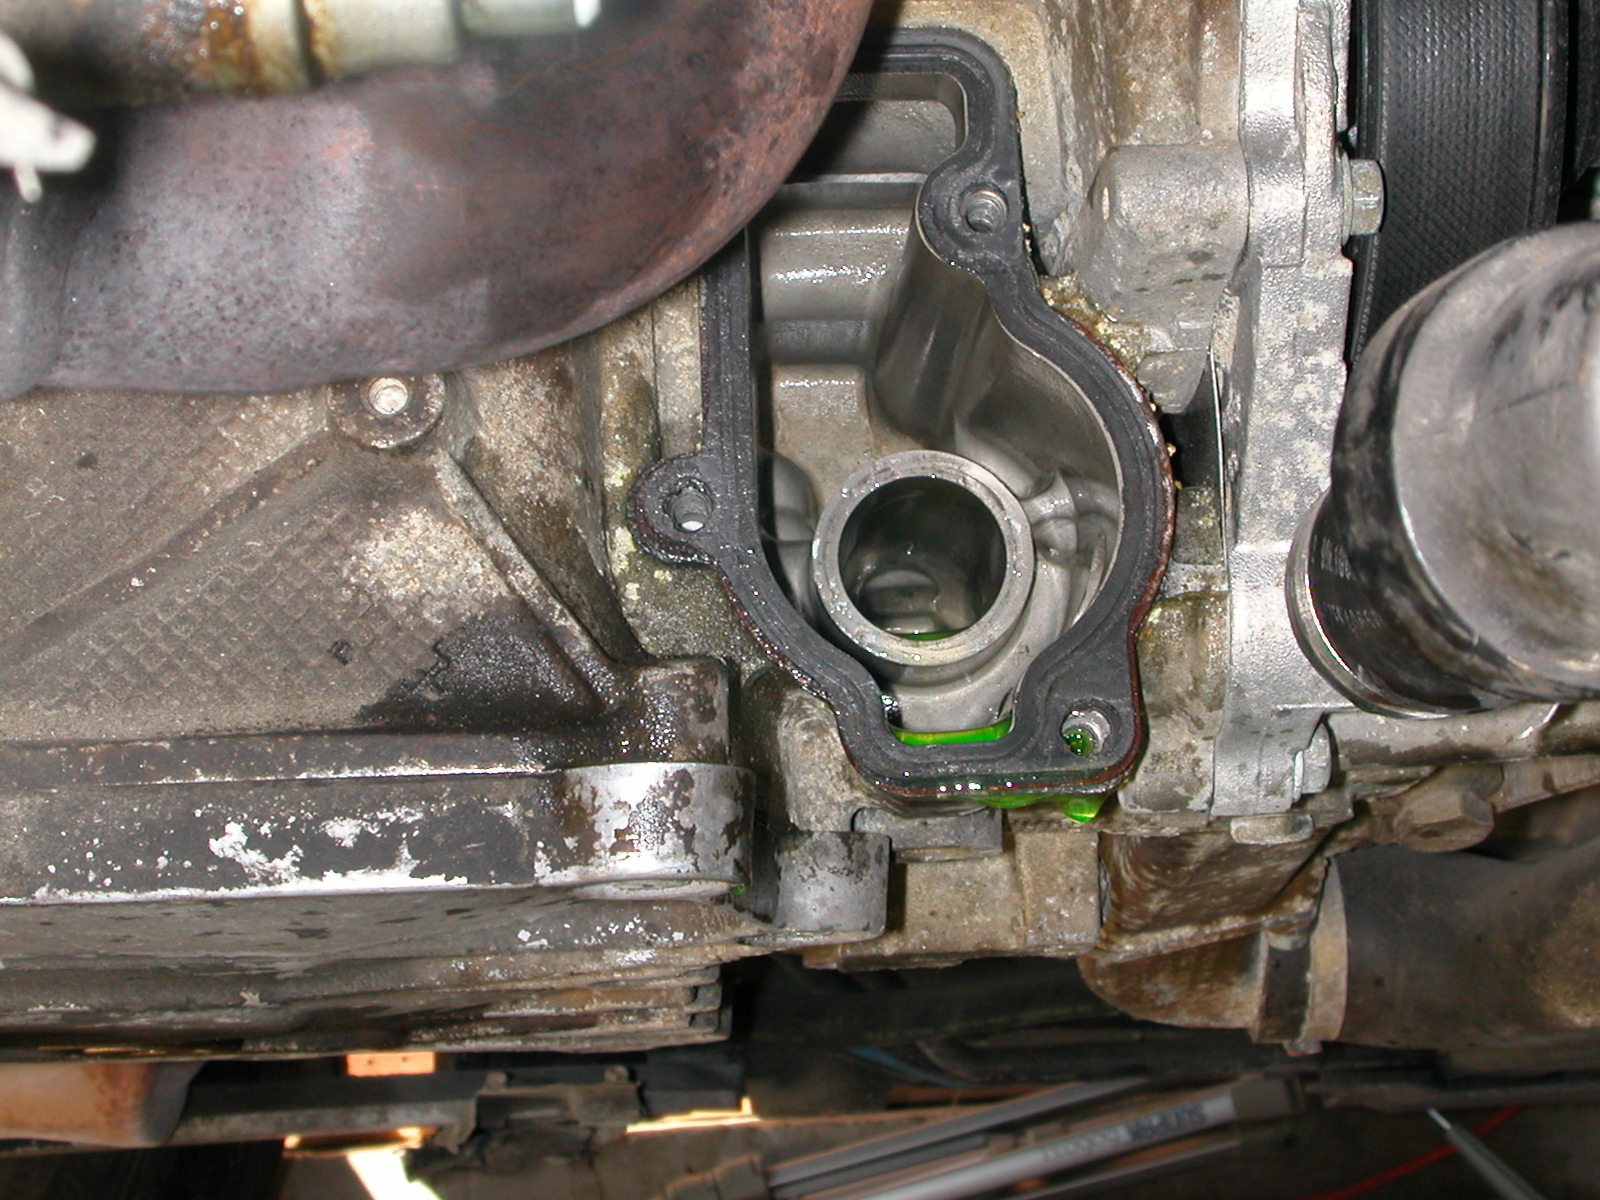
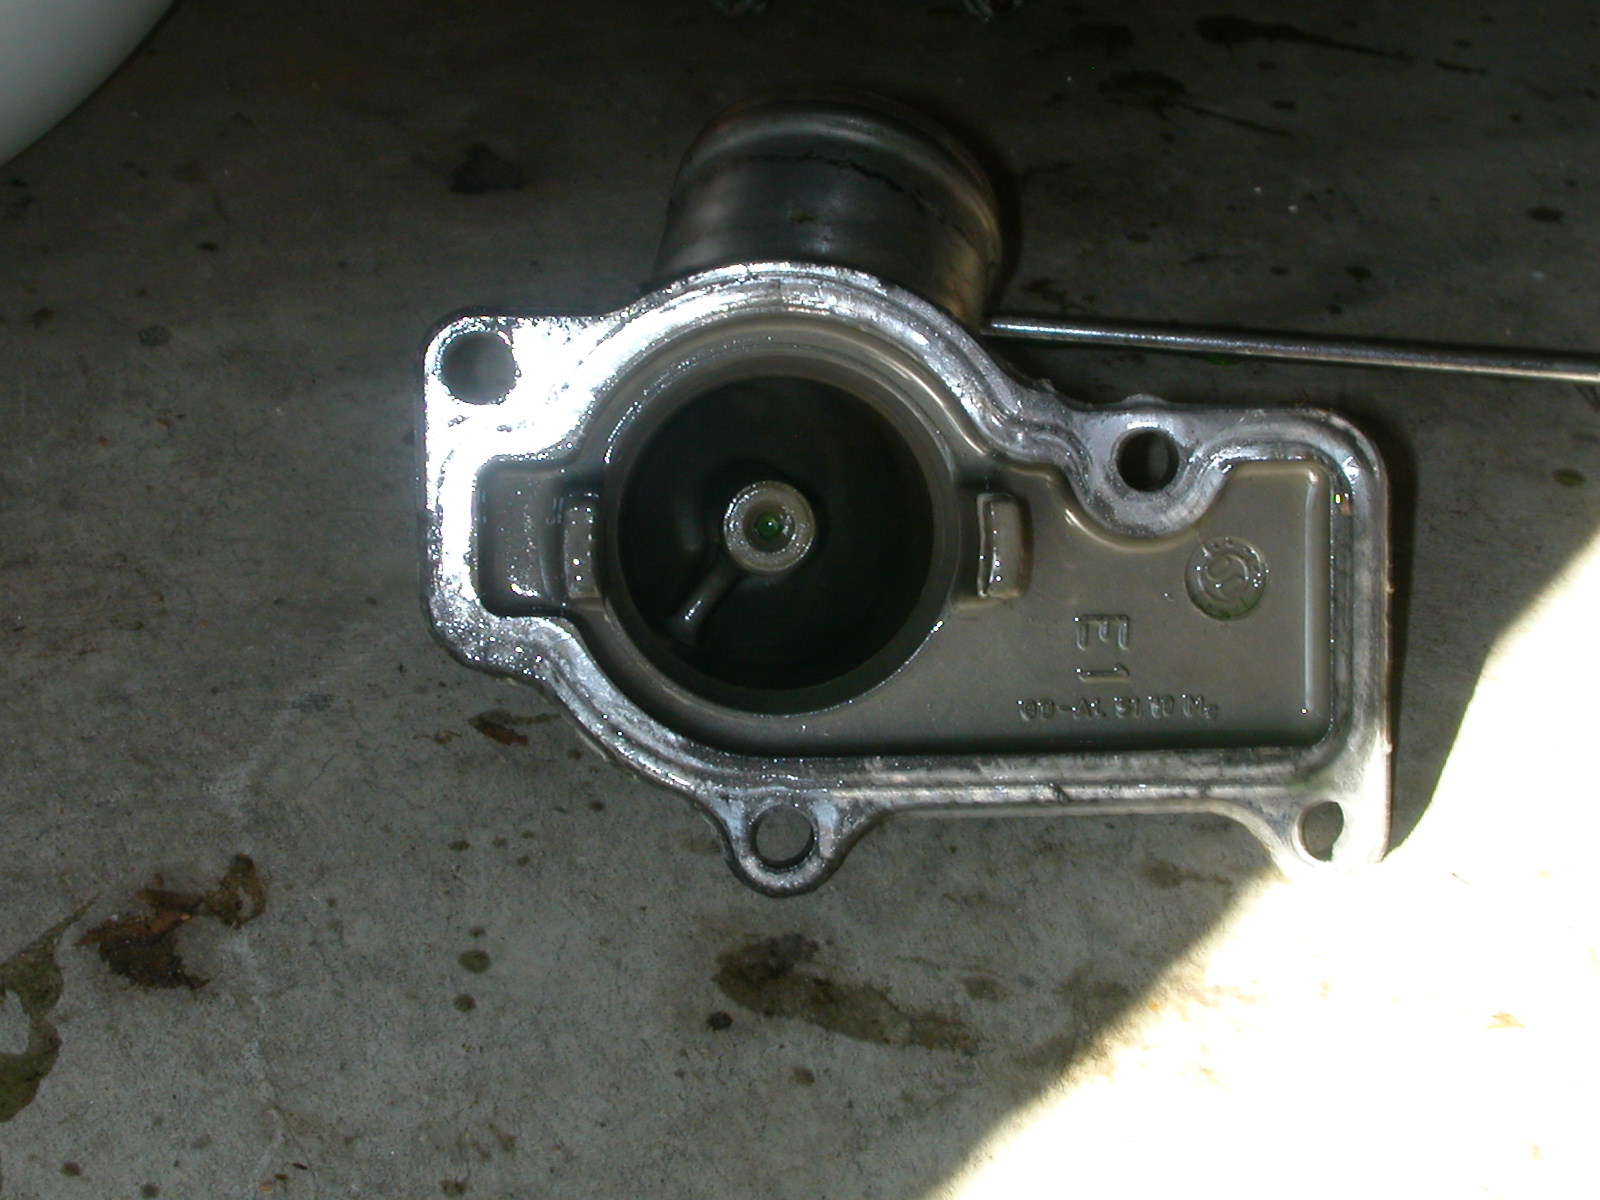
Uhhh...can someone please verify what I think I have..or haven't found once I removed the thermostat housing? After searching for a new thermostat and seeing several pictures of what they look like, I was very surprised when I removed the housing and found nothing inside...[pictured below] And nothing was inside the engine either. :huh: This is gonna sound a like a total Noob question, but based on the parts for order I've seen....shouldn't there be an actual thermostat somewhere in housing? Have I been driving without a thermostat? And if so, what kind of damage has been done in anyone's estimate?
-
rsfeller, done, done and done. I feel much better about this "project" now. I'll report back after getting the new thermostat in. And just FYI, I've kept the car garaged since the problem arose so I hope what little driving I've done hasn't caused yet more problems. Much appreciation to everyone who chimed in to help an up-and-coming DIY'er! Joe St. Louis, MO
-
Maurice, Great photo. Now I know what I'll be doing when I wake up tomorrow morning. I appreciate the help. I hate to go back to the well too many times here, but can you or anybody tell me if the thermostat is "stuck"....can I repair or do a quick-fix to it? Or does the whole flippin' thing need to be replaced? Very greatfully, Joe St. Louis, MO
-
It sounds like the root of my heat/temp gauge problem has gotten a little narrower.... Now, the thermostat that's possibly "stuck" open. Can someone point me to where I might find that? And what to look for? I know I need to buy a Bentley manual in the worst way. My next expenditure on this car (only owned it since last summer) may be the manual. Thanks for the help so far!
-
I've visited several threads and after eliminating almost all other solutions, I still have the same problem. When I turn on my 2001 Boxster, the temperature gauge is buried at 0 and will sometimes rise to 180 and back down after 20+ minutes of idling or driving. It never stays at 180 though. When the weather got down to the teens here recently, I never got the temp gauge to rise above 0. The heat inside the boxster never gets any hotter than "barely" warm. And that too is only after the above mentioned time lapse. I've ruled out the following so far: Air mix flap is working (under passenger footwell dash area) No coolant leak Recently investigated the door flap inside heater core for missing foam. All is good. There's no signs of leakage anywhere or obvious signs of hose damage. I'm really hating to take this to the stealership as I've read many people's experiences with taking their car in and getting everything including the kitchen sink completely replaced.....and still not getting the problem solved. Also, as long as I have the heater core pulled, any advice on how to tell if you have a bad heater core? Joe St. Louis
-
Justto close this discussion...I could not verify a leak from the coolant tank or the hydrolic fluid. (Another check of the hydrolic fluid showed it was full, just didn't realize the "full" level was so close the bottom of the dipstick). I did find the rainwater drain behind the driver's seat covered by a small piece of plastic. My final conclusion is that the previous owner must've had some kind of leak, fixed the leak but not the carpet. Since then, rainwater has been accumulating under the seats due to the rainwater drain not working. I took Seafeye's advice, ordered the floor carpet from the craigslist webpage, and installed new carpet. Now to move on to wheel bearings and tie rods! Thanks to all who responded to this forum. Joe St. Louis
-
Sorry, I'm learning. Can you give me a bit more specific suggestion on how to bypass the sensor. The vehicle has been driven several times now with no signs that the actual temperature is high. So I'm guessing it's a faulty read somewhere. In searching down a possible leak, I did wind up taking almost all the interior trim and disconnecting alot of wiring up the interior middle out. Beside that...the only thing I touched before this warning light began flashing was to fill the hydrolic fluid reservoir and the coolant tank. I think I overfilled both. I tried to remove some hydrolic fluid but didn't touch the coolant fluid level...which is why I'm thinking the coolant level sensor might be screwed up. Thanks again for everyone's help!
-
I overfilled the coolant tank the other day while I was searching for the infamous leak that caused puddles under the driver's seat. I narrowed it down to the drain spout being clogged. THE PROBLEM is, much like an earlier post on this issue, my wife drove the car to work at called me saying the temperature warning light was flashing and the needle was all the way to the left...at 0. I determined that there were no leaks regarding the coolant tank or hoses. And when I had her check the coolant tank, she said it looked full. QUESTION: Would overfilling and then not draining the overfill cause this to happen. I read about coolant level sensors on this forum, but don't really know what that is and where? I would appreciate some advice. Oh, and thanks to all who participate in this forum. I've pulled some serious DIY'ers off without much problem and saved mucho dinero thanks to everyone at renntech! Joe St. Louis
-
Rubbing noise coming from rear of an '01
zappbranigan replied to zappbranigan's topic in 986 Series (Boxster, Boxster S)
Just to close out this mystery: It was a bad rear wheel bearing. Changing it this weekend thanks to alot of DIY postings and advice. Thanks to all and renntech.org! -
Yeah. I read where a guy found standing water under his seats and the central alarm unit was soaked. I did find some liquid down in that little well area around the unit. I think it might be toast too, because I got a series of beeps from time to time when driving but couldn't figure out why it was going off. I need a new key so never bothered to worry about setting the alarm. I guess I should mention that when I bought this car last spring, I got it for around 6K, knowing it had 95000 miles and "issues". The engine worked and sounded okay, so all these little repairs are not getting me down. It's just that every time I attempt to tackle one problem, I discover two others. I did discover a plug covering the driver's side drain spout under the top and to side of the engine (Beelzy called that one). It had an actual 'stopper' of some sort like it was meant to be covered. Didn't have one on the passenger side. And even though it might explain the liquid, it doesn't explain why the liquid was green. No obvious signs of a melted or damaged hose behind the engine compartment lid either. I fired up the car and let it run for 30 minutes. Couldn't find any sing of any leak anywhere. My only other theory might be that these issues were fixed by the previous owner but the liquid under the seat was never discovered or at least fixed.
-
No. No fogginess since I bought the car this past spring. I did another posting here concerning the carpet behind the driver's seat. There is what appears to be melted carpet leading from the floor back up to the engine compartment lid. I described the green liquid under the carpet there too, and last night someone suggested it might be hydraulic fluid from the power steering lines. I do have earmarks of a leak from the coolant tank too. I'll check the power steering lines today as well as the coolant lines. Based on the number of things I've had to do get this car back on its feet...I'm guessing I've probably got both problems causing the pooled liquid under the seats. I can only imagine what kind of price tag I'd be looking at a dealership for these issues. My wallet and I thank everyone for helping me trouble shoot these issues! I'll post back with what I can find.....
-
I checked the Hydraulic fluid, and bam!...empty, or pretty close to it. I'll do a search today and see if that may be the root of the problem. Thanks for the revelation!
-
Can I start up the car, let it run for a bit, then be able to tell where it's coming (if it's a coolant hose) from with the engine compartment lid from behind the seats off?