Welcome to RennTech.org Community, Guest
There are many great features available to you once you register at RennTech.org
You are free to view posts here, but you must log in to reply to existing posts, or to start your own new topic. Like most online communities, there are costs involved to maintain a site like this - so we encourage our members to subscribe or donate. All subscriptions and donations go to the costs operating and maintaining this site. We prefer that guests take part in our community and we offer a lot in return to those willing to join our corner of the Porsche world. This site is 99 percent member supported (less than 1 percent comes from advertising) - so please consider an annual subscription or donation to keep this site running.
Here are some of the features available - once you subscribe RennTech.org
- View Classified Ads
- DIY Tutorials
- Porsche TSB Listings (limited)
- VIN Decoder
- Special Offers
- Paint Codes
- Registry
- Videos System
- View Reviews
- and get rid of this welcome message
It takes just a few minutes to register, and it's quality Porsche information at a low cost.
Contributing Members also get these additional benefits:
(you become a Contributing Member by subscribing or donating money to the operation of this site)
- No ads - advertisements are removed
- Access the Contributors Only Forum
- Contributing Members Only Downloads
- Send attachments with PMs
- All image/file storage limits are substantially increased for all Contributing Members
- Option Codes Lookup
- VIN Option Lookups (limited)

steve20186
-
Posts
68 -
Joined
-
Last visited
Content Type
Profiles
Events
Forums
External Paint Colors
Downloads
Tutorials
Links Directory
Collections
Classifieds
Store
Everything posted by steve20186
-
 If you've been running solvent or carb cleaner through the valve ports and cylinders and If it's as clean as you say, then maybe some light oil would be in order to get some lubrication back in there, but if not then I would leave it dry. I would think that from a "clearing out" standpoint, dry is better.
 -
If you still have it all apart, I would probably try one last blow in the intake and suck out exhaust while you rotate the motor through a complete cylinder cycle. There will be some overlap at some point where the air will pass through both, so maybe find that point and keep it there for a bit. All in all, I'm with JFP - I wouldn't use any chemicals either - especially if you are then running those fumes through a vacuum cleaner. Flammable chemicals and electric motor sparks can make for some good YouTube videos.
-
The rag, or all your prodding and poking may have loosened some carbon that's now stuck in the seat. If you are sure you got the crap out, I'd probably fire it up and see what happens.
-
Water pump - which one?
steve20186 replied to steve20186's topic in 996 Series (Carrera, Carrera 4, Carrera 4S, Targa)
Received the bearing fast. They were RBI brand, mfg in China. http://www.rbibearing.com/. Packaging was first quality, they came sealed in bags and the box material wasn't the toilet paper weight stuff the Chinese sometime use. The bearings themselves looked to be good quality and installed in the idlers with the expected effort. Next question. Use sealant on the metal gasket? If not, is the microscopic layer of black material on the gasket some sort of sealer? -
I'm currently waiting for parts to complete a water pump and oil filler tube replacement session. Just this afternoon - before I saw this thread - I was stuffing a blue shop rag in the plenum to keep bad things out, and I had a bad vision about forgetting it somehow. :eek: Wow. OK, so this thread so unnerved me that I had to find an alternative to the rag I had stuffed in mine....turns out that those plastic promo cups fit snugly enough to act like a big plug and not interfere in the work. It's also impossible to refit the t/b with it in place.
-
Water pump - which one?
steve20186 replied to steve20186's topic in 996 Series (Carrera, Carrera 4, Carrera 4S, Targa)
I found this place to have the best price on the bearings. Everything seemed to point to VXB but they only had an ABEC 1 rating. One other place with decent quality only had one in stock. I finally found this place: http://www.usabearingsandbelts.com/m7/5202--5202-2rs-5202-zz-premium-double-row-ball-bearings-15x35x15-9.html $12.49 each and $4.40 s&h USPS 1st class mail. I'll update this when they come in. -
Water pump - which one?
steve20186 replied to steve20186's topic in 996 Series (Carrera, Carrera 4, Carrera 4S, Targa)
Thanks for this tip. Not sure why it never occur to me to even free spin these while the belt is off - they were all very free rolling and while not noisy, they were well on their way to failure. -
Water pump - which one?
steve20186 replied to steve20186's topic in 996 Series (Carrera, Carrera 4, Carrera 4S, Targa)
Ordered OEM pump and a few other parts from Sunset - amazing prices and great service! -
Another flavor of IMS fix?
steve20186 replied to steve20186's topic in 996 Series (Carrera, Carrera 4, Carrera 4S, Targa)
I'm not considering this, I was just on the Vertex site researching water pumps (and now an oil fill tube too) and stumbled across this. I thought I'd been keeping up on the topic, but I guess not. I swear there are more "fixes" than there are cures for ED, baldness and sleep apnea combined. :blink: -
Water pump - which one?
steve20186 replied to steve20186's topic in 996 Series (Carrera, Carrera 4, Carrera 4S, Targa)
Did you mean Suncoast? -
FWIW - I did a search on this this and Rennlist and couldn't find anything? http://www.vertexauto.com/ShowItem/294268%20Porsche%20IMS%20Pressurized%20Oil%20Feed%20Kit.aspx From their site:(my highlighting and shocked smiley) IMS Pressurized Oil Feed Modification Kit This is a step by step procedure for pressure feeding the IMS bearing with engine oil. This is achieved by punching a small in the cover at the front of the IMS. :eek: The front cover is a very thin metal plug, only .25MM thick. Using a sharpened center punch and a hammer the hole can be opened with relative ease. The Oil Pump's factory 8MM Allen drive is then replaced with a slotted 8MM drive. The slot on the new 8MM drive will provide a governed oil passage from the oil Pump pressure side into and through the IMS. This pressurized oil will flow through the IMS and in to the the IMS bearing. This will maintain a constant, fresh oil flow to the IMS bearing. Is this for real? I assume you would do this after a replacement when you could remove the bearing side covers???
-
I'm finding pumps on PP: $257 for Pierburg OEM supplier or Genuine Porsche for $437. Local place has a Gates brand pump for $87 (generally trust Gates stuff...) eBay search yields $60 and up for brands like Airtex, GMP, Gates, Hamburg Technic, Laso and then Pierburg for more than PP Some have a composite and some have a metal impellers? I plan on keeping the car for a while. Any words of wisdom as to which I should get? Thanks
-
The car follows road imperfections sometimes, but overall it's unnoticeable. If I notice wear on that side I may try the hole elongation. Thanks
-
I just had my 'car aligned and they said the right front adjustment was maxed out and it's still at -0.6 deg. (36') ...forgot to add spec is -0.3 to +0.3 Left was adjustable to -0.2 deg. so it's w/in spec. Is this an issue and if so is there a recommended method of fixing it? Thanks It's a '99 Coupe
-
Hmmm. Interesting. Thanks.
-
It's a '99 996. I had just washed the car and pulled it into the garage. I washed the widows in and out then decide to run the oil level check. I turn the key to "on" while standing outside the car. The level is indicator is doing it normal rolling 2 segment routine, but it was taking longer than expected. When I look at the countdown timer it's something like 45:25 - with the seconds are counting down. :eek: Key off, wait a few, key on - still counting down. I figure I'll do it the old fashioned way so I go to pop the engine lid and I hear no click! At this point I'm preoccupied with what I'll need to do if my cable is busted so I come in and start looking for that answer online. I'm thinking that maybe the countdown is some sort of theft lockout or something...I bring my laptop out to read the codes with my Durametric - to see if I have anything funny going on with the alarm system and also look for the backup lid release cable. I decide to try the release lever once more. Still the same. When I turn the key, the timer is now down to around 7 minutes. I decide to let it run it's course. After it does, the level checks fine. So with my kid pulling the latch, I can get my fingers under it and lift it open. Looking at the cable where it enters and actuates the latch - it seems to be doing what it's supposed to. I'm thinking that the screw in rubber bumpers have collapsed to the extent where they don't provide enough upward tension on the latch though - not sure and now it's dark and cold. Before closing it again I check to make sure that the extra release cable is where it's supposed to be under the tail light. :thumbup: My main question though is any idea why the car was counting down from 45+ minutes?
-
Driver's seatbelt wet?
steve20186 replied to steve20186's topic in 996 Series (Carrera, Carrera 4, Carrera 4S, Targa)
Neglected to mention that the car is a coupe - do they have these drains too? -
When I drove to work it wasn't raining. It poured most of the morning but by lunch it was no longer raining. I get in my car, pull the seat belt over and it's soaked - not just damp. I felt the carpet near the bottom of the pillar and also the floor behind the seat and they are dry? When I got out I made sure that the seals were intact and they seemed to be. This has never happened before. Anybody else experience this? Thanks
-
1999 C2 6sp, 78k miles Mornings and if I leave the car for several hours, the engine starts by revving to exactly 2000 rpm then immediately comes back to rest at around 800. Other times when it's warmer, it will rev only to like 1000-1200 or so, Is this normal? All I can think of is that the immediate jaunt to 2k is hard on the bearings. :unsure:
-
Rear Fog lights 996
steve20186 replied to dporsche74's topic in 996 Series (Carrera, Carrera 4, Carrera 4S, Targa)
I suspect it's a directional thing. If you know the light is on the drivers side, then you know the rest of the car - even if you can't see it - is to the right of that red light. As was said. if both are on, it looks like brake lights. -
So is there anything under that shelf that I can hit if I put screws there - not very deep - but through it just the same.
-
I want to put 2 screws about here to hold down a box. I know the ECU is back there but I thought it was closer to the front.

-
Litronic retrofit question
steve20186 replied to steve20186's topic in 996 Series (Carrera, Carrera 4, Carrera 4S, Targa)
Thanks. I ended up trying the #2 wire and after playing with it a bit using a jewelers screwdriver again and it clicked in place so I went back to the first wire (pink) and tried a few different angles and it finally clicked. As far as where to route the harness o the LHS, I went ahead and routed it around the front since the connector that attaches to the new relay box faces toward the front. There were some other wires and I was able to follow those through/behind the hood latch mount and had plenty of harness to finish the job on the drivers side. Tested it and the low beams raise up a bit when the high beams are on. :thumbup: Now I just have to aim them. -
Litronic retrofit question
steve20186 replied to steve20186's topic in 996 Series (Carrera, Carrera 4, Carrera 4S, Targa)
I'm in the middle of the install and I have 2 questions: 1) At step 3.4 "Insert the 4 wires at each headlight into the supplied connectors..." Just pushing them in by hand doesn't seat them in the connector - is there a special tool for this? Is there a trick that can be used instead of the special tool? I've tried a jewelers screwdriver, a very small allen wrench and no go. Help! 2) Maybe I'm missing something, but it talks about the connectors and goes straight into reinstalling the headlights. Does the left side harness feed around the front of the trunk or at the back of the trunk? Thanks -
Litronic retrofit question
steve20186 replied to steve20186's topic in 996 Series (Carrera, Carrera 4, Carrera 4S, Targa)
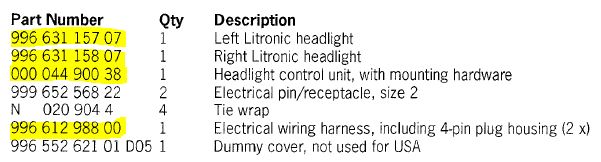
I have the these highlighted parts specified in the Porsche TSB for the retrofit kit. I won't have any DME troubles will I?