Welcome to RennTech.org Community, Guest
There are many great features available to you once you register at RennTech.org
You are free to view posts here, but you must log in to reply to existing posts, or to start your own new topic. Like most online communities, there are costs involved to maintain a site like this - so we encourage our members to subscribe or donate. All subscriptions and donations go to the costs operating and maintaining this site. We prefer that guests take part in our community and we offer a lot in return to those willing to join our corner of the Porsche world. This site is 99 percent member supported (less than 1 percent comes from advertising) - so please consider an annual subscription or donation to keep this site running.
Here are some of the features available - once you subscribe RennTech.org
- View Classified Ads
- DIY Tutorials
- Porsche TSB Listings (limited)
- VIN Decoder
- Special Offers
- Paint Codes
- Registry
- Videos System
- View Reviews
- and get rid of this welcome message
It takes just a few minutes to register, and it's quality Porsche information at a low cost.
Contributing Members also get these additional benefits:
(you become a Contributing Member by subscribing or donating money to the operation of this site)
- No ads - advertisements are removed
- Access the Contributors Only Forum
- Contributing Members Only Downloads
- Send attachments with PMs
- All image/file storage limits are substantially increased for all Contributing Members
- Option Codes Lookup
- VIN Option Lookups (limited)


PaulE
-
Posts
15 -
Joined
-
Last visited
About PaulE

PaulE's Achievements
Member (1/1)
1
Reputation
-
I'm resurrecting this thread as after 7 years of 2003 Boxster S ownership my CDR-23 radio finally gave me a Traffic Program! On my drive down to Raleigh, North Carolina 3 weeks ago, I was listening to my IPOD on the radio through an FM transmitter. While passing near Camden, NJ, an actual traffic and weather TP announcement came through the the radio. Well, it inspired me to once again see if I could find out how to turn off the TP function, and this time I found it here: 1. You need to be in CD mode when you turn the CDR-23 on. 2. Immediately after it powers on the display shows PORSCHE, and then the CD information is shown. For a few seconds, there is an additional symbol (actually a small arrow) on the display above the 0 button. 3. Press the 0 button (before the arrow dissappears) 4. If you now press TP it will cycle through TP ON, TP MUTE, TP OFF and you make your change. I did as instructed above and TP has successfully been disabled. As I said in my original post, I couldn't find this information in the owner's manual, radio manual or quick guide to the radio. The 2 times I asked my dealer about this they didn't have a clue. Just wanted to share.
-
That String Thing through the Headliner
PaulE replied to PaulE's topic in 986 Boxster Convertible Top Issues and Solutions
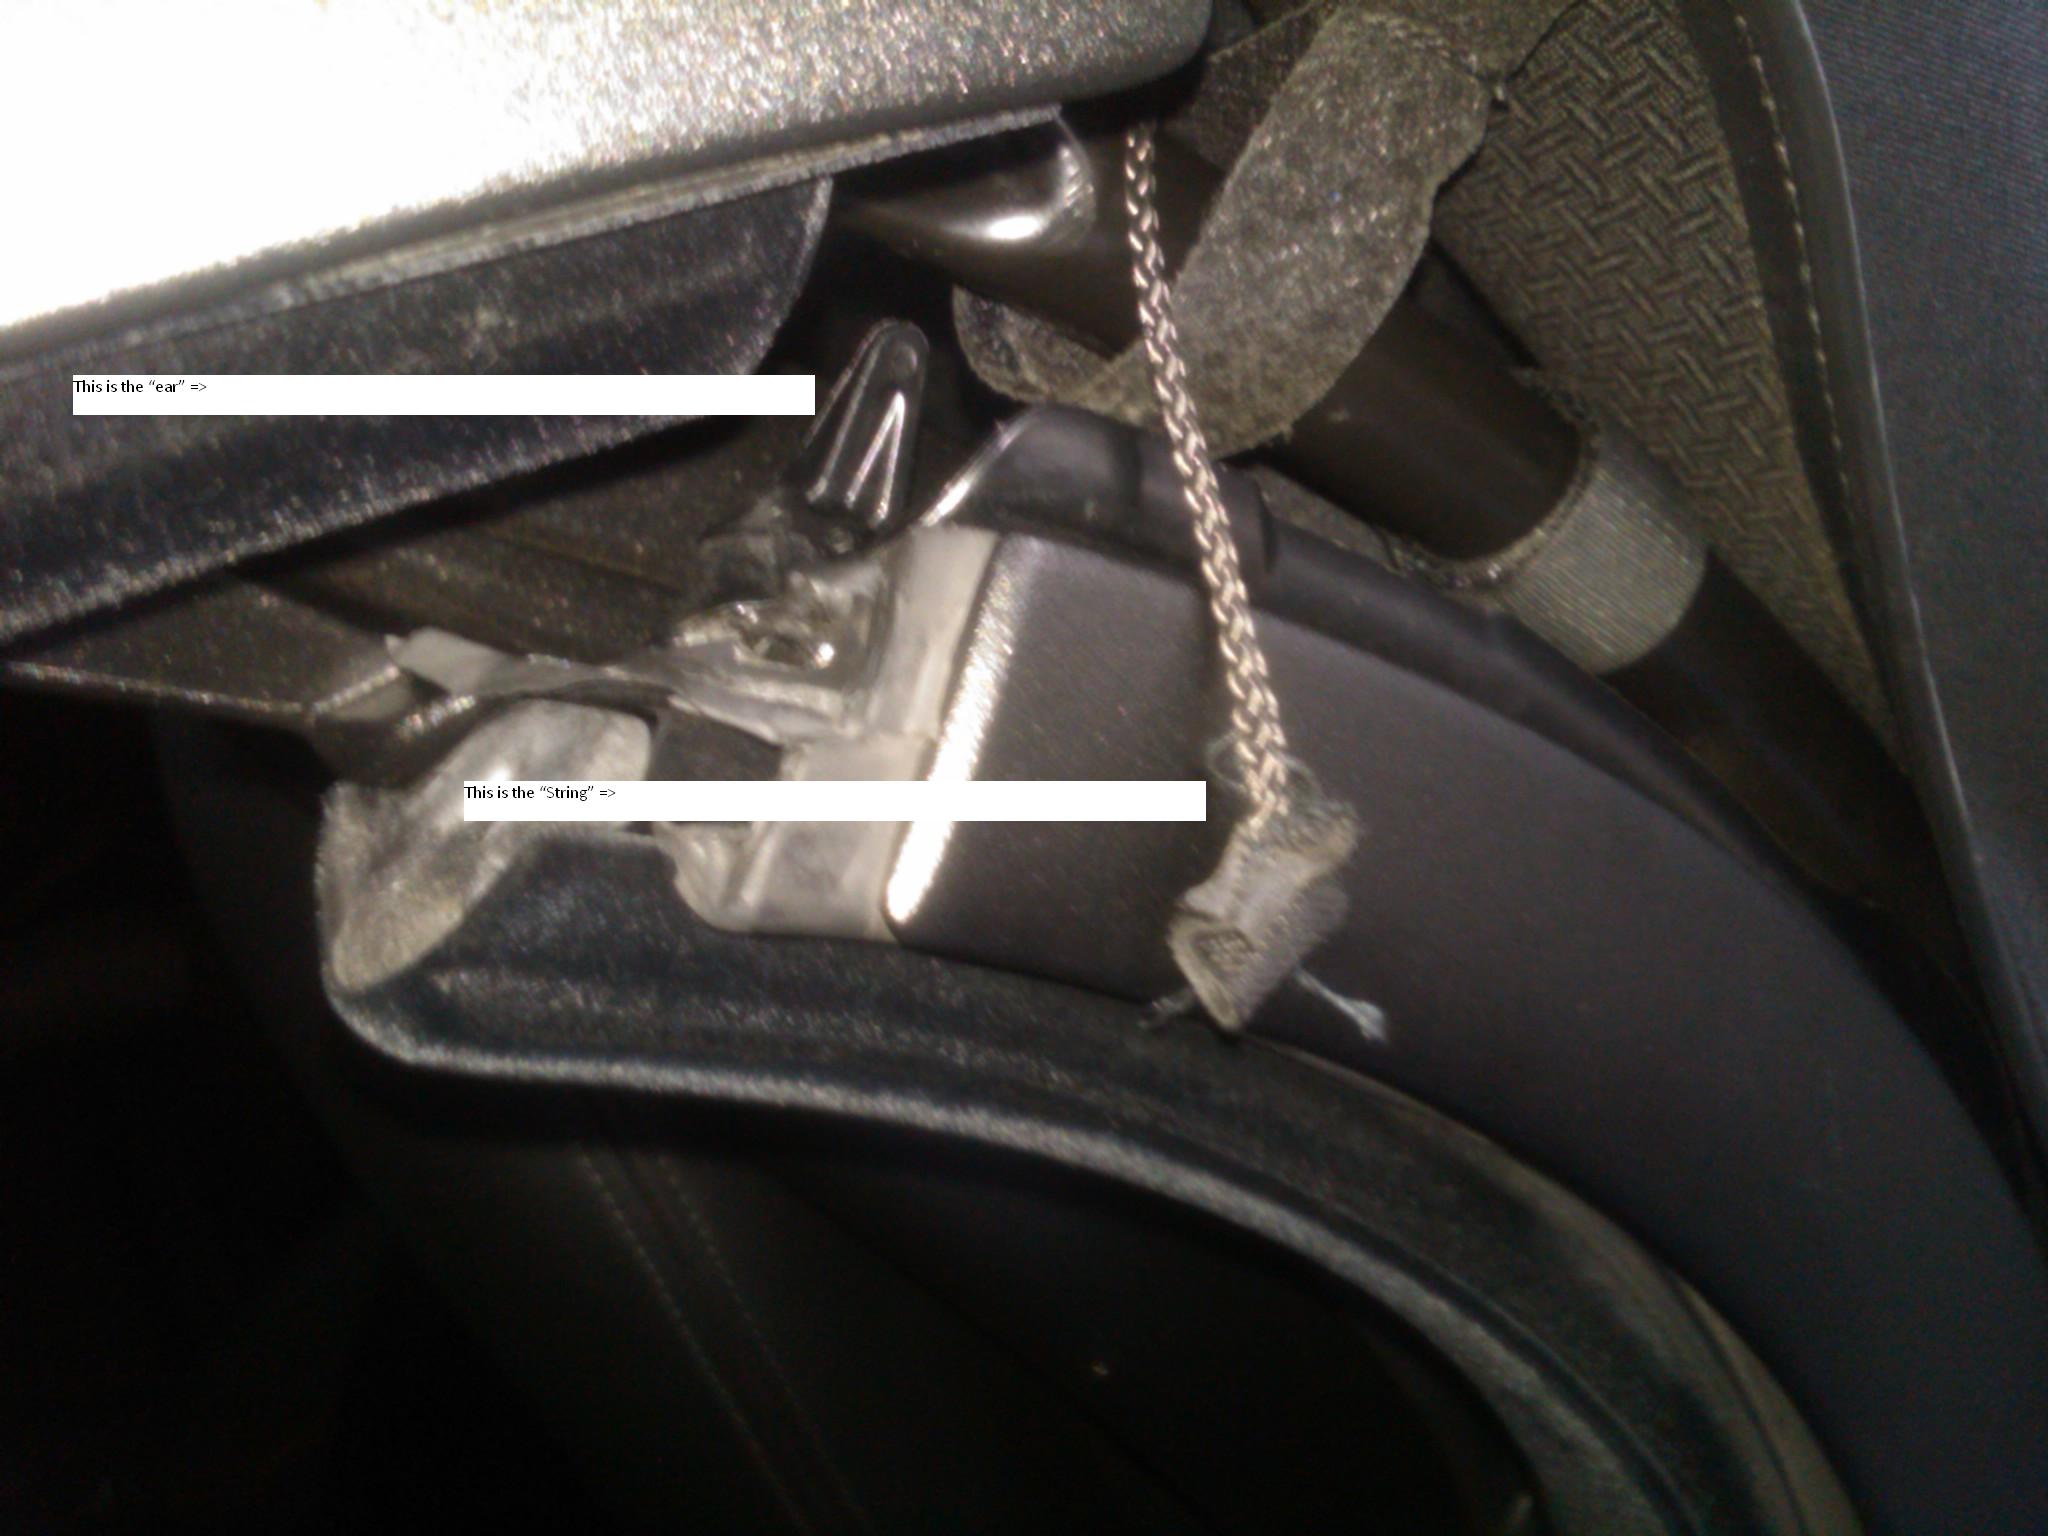
Paul: After attending the Porsche meet today, I can now definitively say that the looped string goes OVER the cylindrical push bar, below the velcro strap that is attached to the side piping of the canvas top and above the velcro strap that is attached to the top liner. The pointed part of the little ear faces towards the push bar (i.e, towards the rear or up, depending on the position of the top). Here are a few photos (some are courtesy of Boxtaboy) that show the correct routing and placement of the various parts. These are from an OEM '03 and an OEM '04 top. (Click on the photos to blow them up). Driver's side (left side) showing location of components. Passenger's side (right side) showing closer-up view with detail of routing of looped string coming in from the top and being retained by the underside of the ear. Also note the positioning of the little ear, pointing up and back. Close-up of routing of looped string end. Underside of little ear with looped string and sewn-in flap drawn in to show correct routing. Regards, Maurice. Thank you again Maurice. These pictures are especially helpful. Your first picture has shown me that I've incorrectly sewn the tab back on. I have it in the right place, between those 2 notches in the plastic, but I've sewn it to the exposed side of the plastic, not between the plastic and the canvas! Oh well, time to get out the scissors, needle, thread and thimble and do it once more. I have also decide to sew the ends of the fold placer string around the plastic ear with a few stitches. This past weekend I had the opportunity to take drive my Boxster S from Bergen County NJ to Raleigh, NC and back. Mostly top up but I had the top down a couple of times and the fold placer is holding nicely.:thankyou: -
That String Thing through the Headliner
PaulE replied to PaulE's topic in 986 Boxster Convertible Top Issues and Solutions
Paul: On my 03/04 top, the string ("fold placer") runs on top of the push bar, and it's routed in front of the velcro strap that holds the liner and below the velcro strap that hold the side of the top. IIRC the ear is pointed slightly towards the back, but I will have to look at my car tomorrow to see in which direction the little tab at the end of the string is oriented. On the 19th, I'm going to a meet where I know there will be at least one other '03 top. I will look at that one and take some photos and post them here as well for your reference. Are you sure that you sewed the velcro straps at the correct location along the tension cable piping? If not, that may be why your string keeps detaching when it binds. I will measure that as well and post it here. Also, are you sure that the fold placer string is the correct length? If it's too short (as in "if it has been repaired before by re-attaching it to the center section near the middle of the canvas") that may be causing it too be too tight as it runs over the push bar... Regards, Maurice. Thank you Maurice. I've been very busy the past few days and this is the first chance I had to check for a reply. I bought the car brand-new in 2003 and the fold placer has never been repaired or replaced, other than me attempting to re-attach it.. I believe I sewed the Velcro tabs back in the correct place, as there is a small notch in the tension cable piping sewn to the sides of the top and that is also where the stitching was undone from the piping. Right now I tried running the fold placer underneath the push bars. It is quite taut and from the outside it is creating two "dimples" in the convertible top at the points where the fold placer exit the sleeve through which it is threaded. Maybe my fold placer was too short from the factory? I am going to try running it over the push bars and ahead of the Velcro straps and see how it looks tonight. I would appreciate it if you can post some pictures. I will also see if I can find the part number, maybe if it's not very expensive, I'll order a new one and put it in. -
The Velcro tabs came unsewn from the convertible top of my 2003 Boxster S. Thanks to this very helpful link, I was able to sew them back on myself: http://memories.ppbb...es;read=1275020 While sewing the velcro tabs back on, I noticed I have the same detached string ("Fold Placer"?) referred to in this link: http://www.renntech....__1#entry118354 This string is theaded through the top of my headliner and attaches to little "ears" screwed into the inside of the convertible top exterior frame pieces on each side of the car above the window with one #15 Torx screw. When it is disconnected, the headliner flaps like a drumhead when you close the doors with the windows and top up. The headliner also flaps at highway speeds when the top is up and the windows are closed if this string is not connected to the push bars. My questions are as follows: Should this string be threaded over or under the push bar - the round metal tube that is part of the convertible top frame. If the string is supposed to be threaded over the push bar, should it be threaded in front of or behind the convertible top's velcro tab that is wrapped around the push bar when the string is attached to the ear? What is the correct orientation of the ear? I have it pointed straight up, but it can rotate as it is screwed on with only one screw. Should the little tab at the end of the string be pointing to the front or rear of the car when it is secured under the the ear? I have tried running the string over the top of the push bars, but it seems to bind against the top's velcro tabs and keeps detaching, even after sewing the string onto the ear with some thread. So I'm starting to think they need to be run underneath the push bars. Thanks in advance for any help/insight you can provide. Anyone out there have this problem? Anyone out there with an 03 986 who doesn't have the problem who can take a look and see how this string is routed and connected?

-
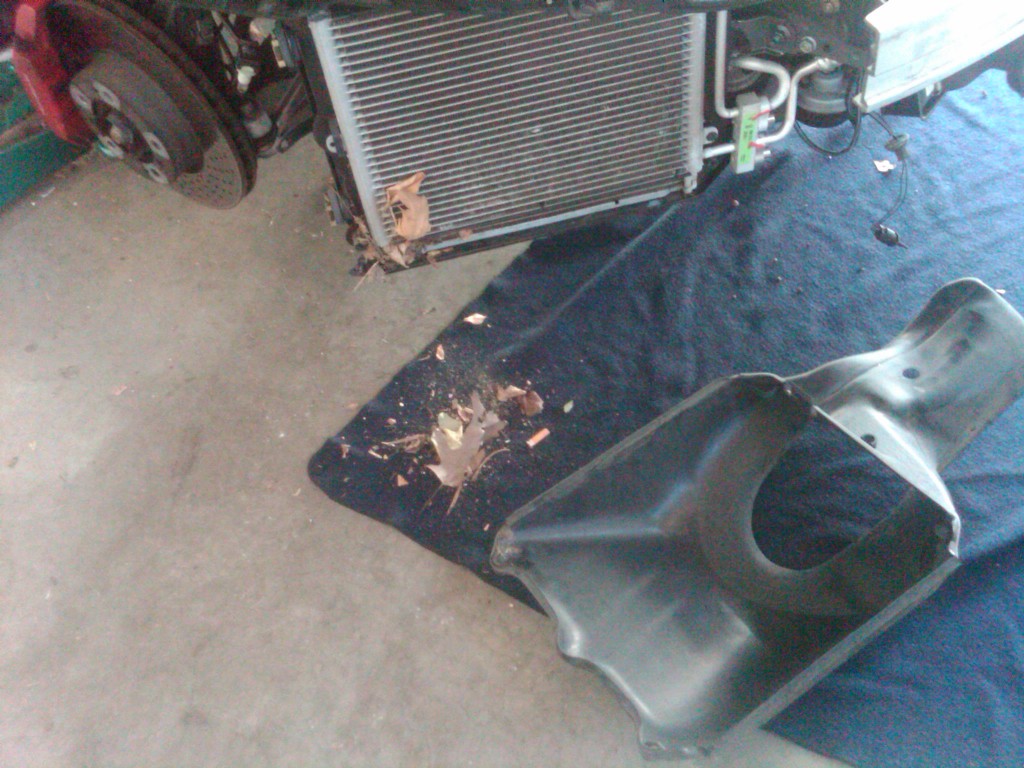
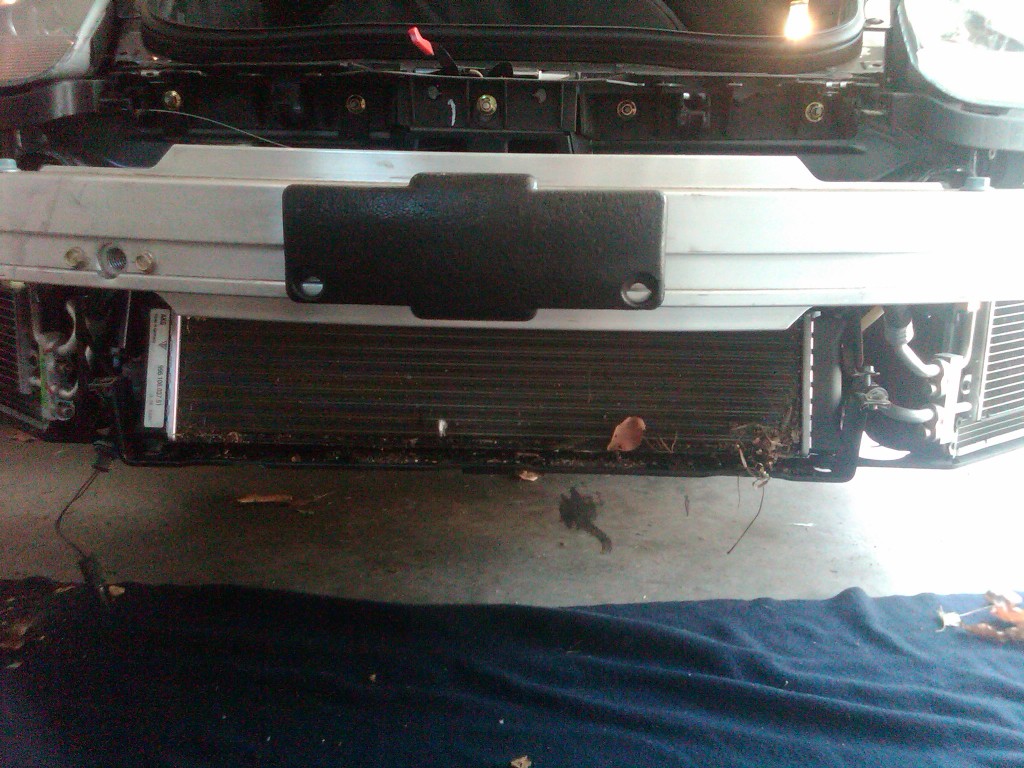
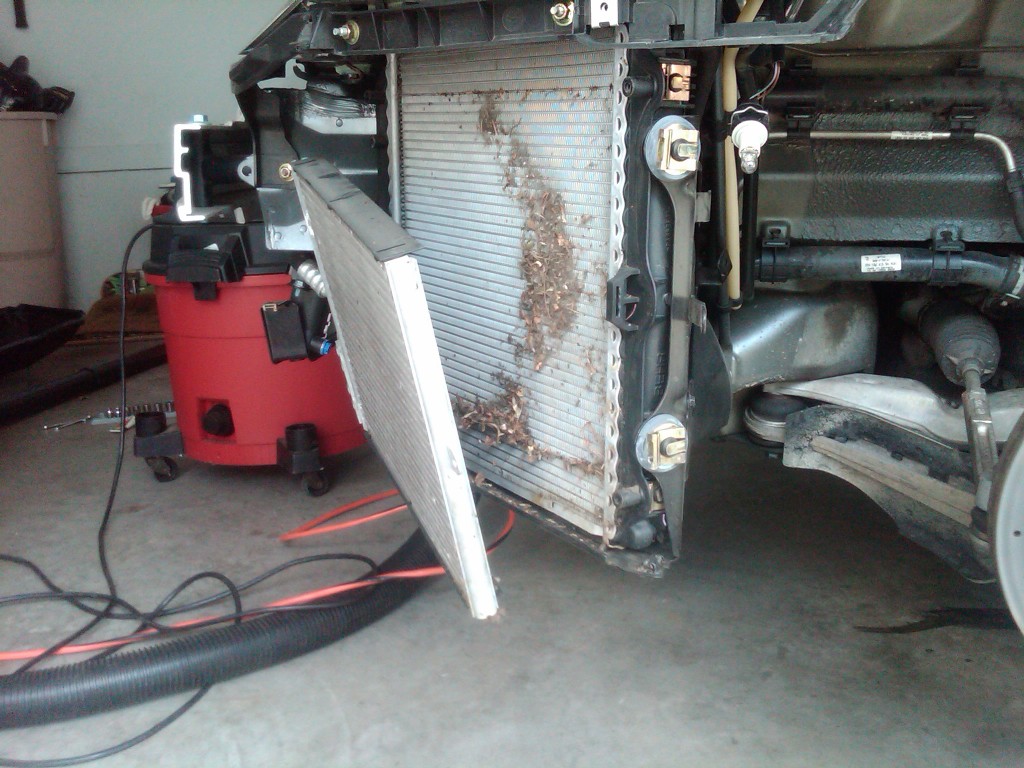
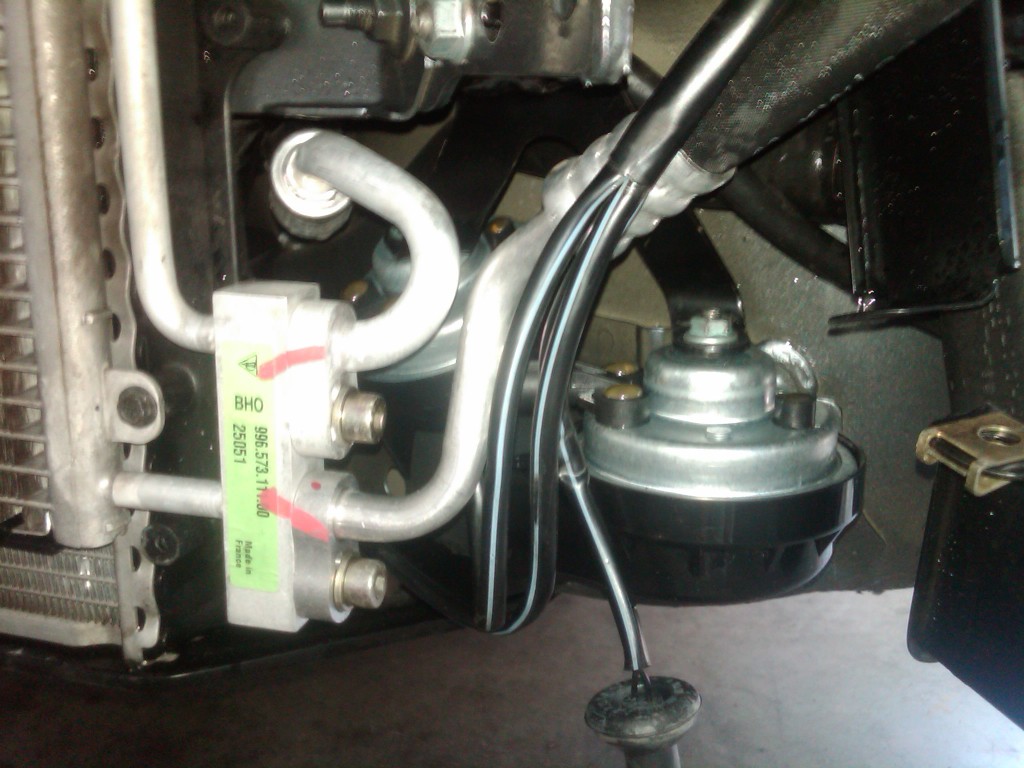
THAT'S CRAZY! I sell these horns for something like $8 each - he's ripping you off. They are the same as some VW or Audi part. Easy to replace, here's a tech article on taking the bumper off: http://www.pelicanpa...Wheel_Liner.htm Let me know if you have any questions... -Wayne Hey all, I finally did the horn replacement two weeks ago and cleaned out the radiators, ac condensors and oil cooler too. I bought the horns from Pelican Parts and followed Skyler's DIY blog and it really wasn't too hard. Got it done in about a 4 hours total. I also replaced both horns as long as I was in there and put the horns in with their trumpets facing backwards, in the hope that they won't fill up with water as easily and last a bit longer. The only thing I can add is that in removing the wheel well liners, there is an extra plastic rivet/button on the passenger side behind the MacPherson strut as the wheel well liner on that side has to cover the fuel tank inlet. In fairness to the dealer I rechecked their price quote. The $190 quote was for parts and labor. But I still did it myself as I wanted to clean out the radiators,etc. which I didn't think their price included and I put the new horns in facing backwards which I didn't think they would do for me. For a fair-weather car with less than 21,000 miles on it, there were quite a few leaves in there. My next project will be to sew back on the 2 convertible top velcro holding straps, part number 986 561 931 00, which have come unstitched from the top and are just hanging around the frame support tubes on both sides of the car. Thanks again for all the advice.
-
Thank you. It's been a while since I visited any Porsche forums, and had forgotten Skyler's great site. I now have a project. Removing the front bumper is a relatively quick and easy DIY. While you are in there, you might clean out the debris that accumulates behind the radiatiors. Here's a DIY with nice photos and instructions: http://www.skylersrants.com/ Once you get to the site, click on "Skyler's Boxster" in the menu at the top left of the page, and then choose "accessing the radiators" from the list. Regards, Maurice.
-
I noticed the horn in my 2003 Boxster S sounded a little funny lately. When I brought it in for an oil change and brake fluid flush, the dealer told me the high tone horn is out. He also told me a new horn was $190 plus tax and labor. My initial look for the horn found only the alarm horn near the battery, not the high and low tone horns. I've searched this forum and the internet and haven't found any how-to articles on where the horn is or how to replace it. I did see a couple of references to removing the front bumper cover to replace the horns. Does the front bumper cover really need to be removed to replace the horns? If so, is that a difficult job? Are there any how-to articles anyone can point me to on removing and replacing the front bumper cover and/or replacing the horns? Sorry if this has been covered already. I looked but couldn't find any detailed instructions. Thanks in advance.
-
Well of course there is NO TP if you're in San Jose and my car is in NJ! :) I have all the owner's manuals, including the radio manual. I just downloaded and re-read the radio owner's manual, and the only information in there on TP is that the TP button is for the Traffic Program on page 2 showing the radio face. I was hoping this one minor annoyance could be disposed of. Oh well.
-
Can anyone explain why the CDR23 radio in my 2003 Boxster S randomly beeps and displays "NO TP" when the radio is turned on and tuned to any FM station? When I first bought the car I looked through the owner's manuals asked the dealer but wasn't able to find an answer and since then I haven't pursued it. This is a US car in the US and as far as I know, there are no Traffic Programs available in the US. Pressing the TP button on the radio only mutes the volume of the radio. If there's a way to eliminate this minor annoyance, I would like to do it or have it done by my dealer when I get my oil changed if it involves some type of programming. Thanks in advance.
-
Help needed to fix rear speaker install
PaulE replied to PaulE's topic in 986 Series (Boxster, Boxster S)
Hi, I'm back finally. The rear speaker install is completed and everything works. Other than my screw up on the wiring everything was pretty straightforward and the how-to instructions on the Pelican Parts website are spot-on. Here are a couple fo things I found out along the way: The Porsche wiring instructions tell how to connect the red wire, green wire and two black ground wires, however the kit has a black wire with a yellow stripe and a black wire with a white stripe, plus two black ground wires. After I got my new pins, I installed the rear speaker wires in the radio's brown terminal socket in the positions that match the positions for these wires in the brown terminal socket for use with the amplifier. There is no radio code for the CDR23 radio in the 2003 Boxster S. After I finished the installation and reatttached the battery, I looked through all my paperwork and couldn't find a radio code. I turned the car on and the radio face said "PORSCHE", so I just turned on the radio and it worked. My radio presets were all still there too, even though the radio was disconnected for a couple of weeks. AMP/Tyco's cross-reference for the pin, Porsche part number N-903-352-04, is Junior Power Timer contact part # 927771-1. AMP/Tyco's part # for the extraction tool is 1-1579007-6. If you have a Porsche part number for an item made by AMP/Tyco, you can send an e-mail to Tyco at their website here and they will give you the corresponding AMP/Tyco part #: vZHM9JnBfY2F0cz0mcF9wdj0mcF9jdj0mcF9zZWFyY2hfdHlwZT1hbnN3ZXJzLnNlYXJjaF9ubCZwX3Bh Z2U9MQ** As I needed the tool also and I didn't want to order just 4 pins from a Porsche dealer, having the AMP/Tyco # for the pin was a big help to me. The rear speakers were a worthwhile upgrade for my car which originally only had speakers in the dashboard. -
Help needed to fix rear speaker install
PaulE replied to PaulE's topic in 986 Series (Boxster, Boxster S)
Hey I'm not so smart after all, the clips and tool I bought are the wrong ones, so please don't buy them for this purpose. These clips are about 2/3 as long and about 1/2 as thick as the Porsche ones. I'm going away for a week and I'll get back on this when I get back. -
Help needed to fix rear speaker install
PaulE replied to PaulE's topic in 986 Series (Boxster, Boxster S)
I bought my parts and tool from www.Onlinecomponents.com. I chose them because they are in the US, I could purchase small quantities and I could get the pins and the tool from one place overnight. Some other websites had minimum quantities in the 1,000's, I think this site only required a $35 minimum which was no problem with the tool. They also have the AMP/Tyco part numbers so you can cross check them on the Tyco website here - http://catalog.tycoelectronics.com/TE/bin/...p;LG=1&I=13. Both of these sites both have drawings and very technical spec's for the parts. The German site I found originally is where I learned that these pins are AMP/TYCO and that site had mfr. part #'s. As I said, I ordered a few of 4 different pins. They are all identical in shape and size, but made of slightly different metals. On some you can clearly see they are bi-metal, with a brass or copper part and a silver part. Tomorrow I'll see which ones look closest to the ones on my car. This site's online chat support was also helpful, I asked them if they had the tool for these pins and they found the part # for me. This is what I ended up buying, the $60 item is the tool and the other items are all pins: Line Manufacturer Part No./Ref # Price 1 AMP / TYCO 964274-2 $.165 2 AMP / TYCO 964275-2 $.269 3 AMP / TYCO 964274-3 $.285 4 AMP / TYCO 539960-1 $60.89 5 AMP / TYCO 962876-2 $.147 -
Help needed to fix rear speaker install
PaulE replied to PaulE's topic in 986 Series (Boxster, Boxster S)
Hey, thanks for the information. How do you find a part number for something like that? I called Sunset Imports who I bought the speaker kit from and the parts person I spoke with didn't know of a Porsche part # for the pin or how to get it. A family medical emergency took me away for a few days, so please don't think I got what I wanted and it's see ya later! Before your last response and the medical emergency kicked in, I tried a google search for the Miboool, which led to another board which led to a German site that sells the tool and the pins, which led me to find out these pins are made by AMP/Tyco. I found a US site to order the AMP/TYCO pins and tool. They actually make quite a few different versions of these pins, all the same size but with different metals. I ordered 10 of 4 different versions they had in stock as well as the tool. Tomorrow I should be listening to my Boxster radio from front and rear speakers. I bought the tool as I don't think two paperclips will do it for me. I was using two micro screwdrivers and it didn't work so well. If anyone wants the website I ordered the pins and tool from or the AMP/Tyco part numbers I would be happy to provide them. I didn't put them in this post as a new guy and I don't want anyone to think I'm advertising anything. Thanks again from a new member. -
Help needed to fix rear speaker install
PaulE replied to PaulE's topic in 986 Series (Boxster, Boxster S)
Thanks for the replies. I tried Radio Shack, both online and going into a store. All of the pins they stock are "Molex" type, which isn't what Porsche uses here. If I had a name or manufacturer for the type of female pins Porsche uses here, I could find it from a Google search. I've found a lot of suppliers for all types of automotive electrical wiring connectors, but without their name, finding these exact pins is truly looking for a needle in a haystack. Originally I put the 4 pins at the end of the very long wiring harness into the outboard positions of the loose brown connector in your picture on the left. Then I thought that loose connector is meant to connect to the short extension if you have an amp. I believe the female pins on the end of the long wiring harness are meant to go directly into the outboard positions of the brown connector that is already attached to the radio, because otherwise there is no place to complete a circuit and connect the rear speakers to the radio. So I took the 4 female pins out of the loose connector, destroying that connector in the process, and inserted them into the outboard positions of the brown connector already at the back of the radio. 2 of the female pins went in ok, 1 went in with some difficulty, and the 4th pin would not go in all the way and eventually broke. The loose female pins I'm looking for are exactly the loose ones you have in the picture on the left. My kit did not come with any extra pins like those. I'm going to try calling Becker today. If I'm not successful, I'll take some pictures. PS, other than my little mistake here, this was a fairly straightforward project. The most difficult part was cutting out the outboard storage bins and the additional shaping required of the outboard bottom corners of the openings and the speaker grills so that the grills would fit flush in the outboard corners. Thanks again. -
Hello All, Yesterday I started and nearly completed installation of the rear speaker kit PNA-986-KIT in my 2003 Boxster S. My car has the basic radio with one disk CD player in the unit and only the dashboard speakers, no trunk mounted 6 CD unit, no amplifier or door speakers. I followed the Pelican Parts article on this topic and everything went fine until I got to connecting the rear speaker wire leads to the brown power socket on the back of the head unit. Even though I don't have an amplifier, I incorrectly put the four rear speaker female recepticle leads into the brown block to connect them to the additional piece of harness for the amplifier that came with the kit, instead of inserting them in the brown power socket that connects directly on the back of the radio unit. Although I tried to carefully remove the female recepticle rear speaker leads from the amplifier socket, I broke one and one of the others may also have been damaged. Is there anywhere I can obtain some of these speaker lead female recepticle terminal ends to finish my rear speaker installation? I've searched this forum and elsewhere on the internet without success. The closest thing I may have found is a Becker wiring harness with part number 1163.736-276. I've sent an e-mail to Becker's parts department, and I'm waiting to hear back from them. If my only option to obtain the female recepticle terminal ends I need is to buy that harness from Becker, ok. But in that case I'll still need instructions and the right tool to remove those leads so that I can add them to my rear speaker leads and insert them into the existing brown socket to the radio. Thanks in advance for any help or insight you can provide me in finishing this project.