Welcome to RennTech.org Community, Guest
There are many great features available to you once you register at RennTech.org
You are free to view posts here, but you must log in to reply to existing posts, or to start your own new topic. Like most online communities, there are costs involved to maintain a site like this - so we encourage our members to subscribe or donate. All subscriptions and donations go to the costs operating and maintaining this site. We prefer that guests take part in our community and we offer a lot in return to those willing to join our corner of the Porsche world. This site is 99 percent member supported (less than 1 percent comes from advertising) - so please consider an annual subscription or donation to keep this site running.
Here are some of the features available - once you subscribe RennTech.org
- View Classified Ads
- DIY Tutorials
- Porsche TSB Listings (limited)
- VIN Decoder
- Special Offers
- Paint Codes
- Registry
- Videos System
- View Reviews
- and get rid of this welcome message
It takes just a few minutes to register, and it's quality Porsche information at a low cost.
Contributing Members also get these additional benefits:
(you become a Contributing Member by subscribing or donating money to the operation of this site)
- No ads - advertisements are removed
- Access the Contributors Only Forum
- Contributing Members Only Downloads
- Send attachments with PMs
- All image/file storage limits are substantially increased for all Contributing Members
- Option Codes Lookup
- VIN Option Lookups (limited)


waterboy
-
Posts
26 -
Joined
-
Last visited
waterboy's Achievements
Member (1/1)
0
Reputation
-
$49.82 here Loren go ahead order yourself a pair, and after you crush your subframe post your pictures!!!
-
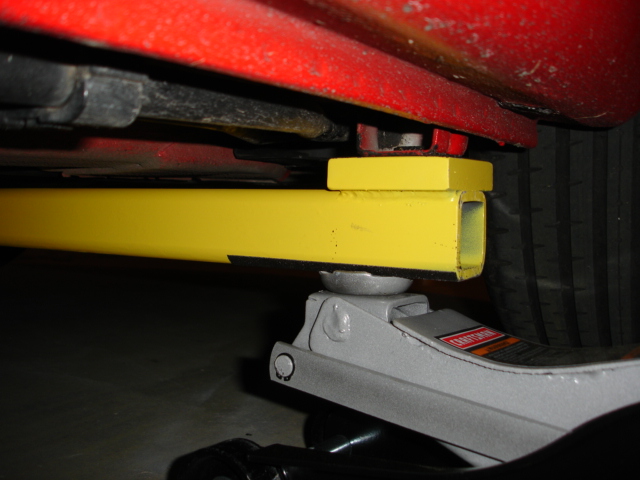
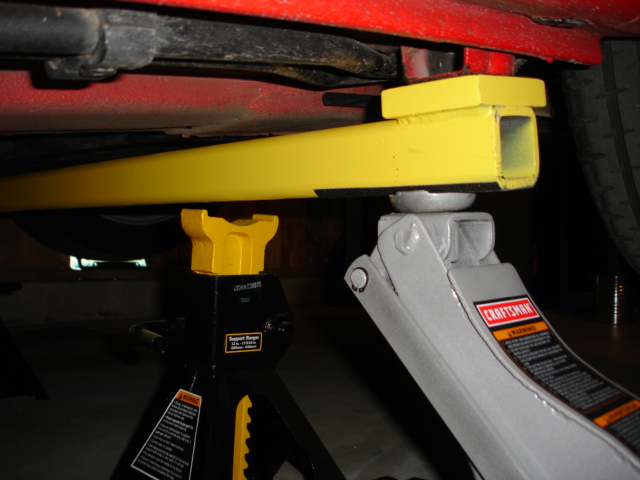
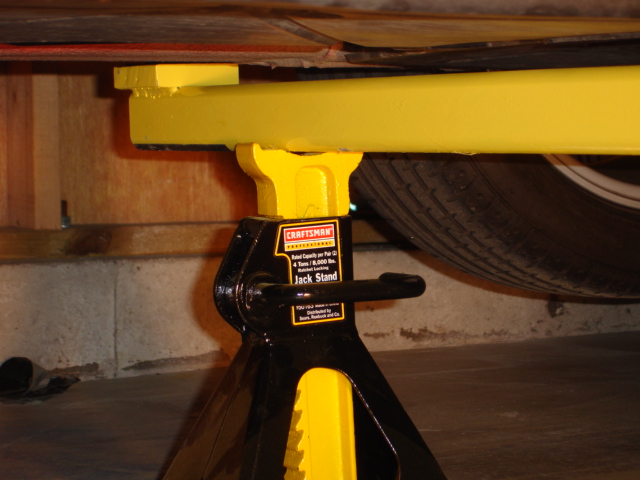
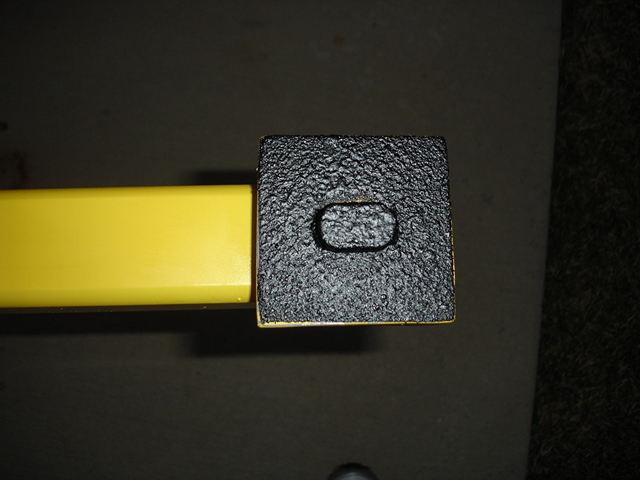
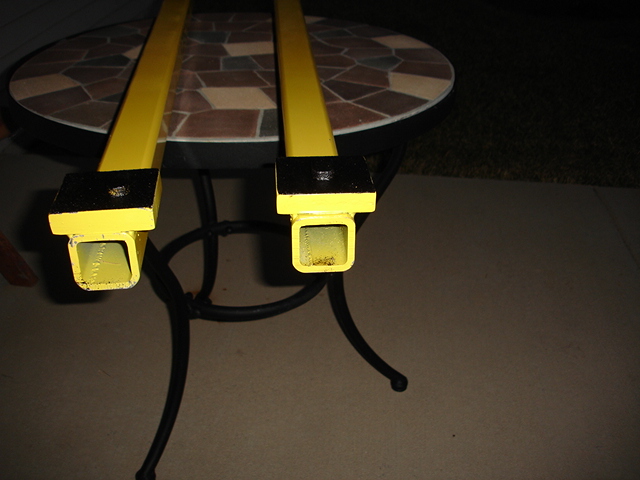
The part that goes into the slot on the car is a piece of 1/4 inch thick solid steel that was welded to the pad.
-
Jack It Up
waterboy replied to waterboy's topic in 996 Series (Carrera, Carrera 4, Carrera 4S, Targa)
Steve, I used top quality steel from fresh stock and paid $180.00. The welder that I used charged me $85.00 an hour. It took him 1 and 1/2 hours to cut and weld all the pieces together. Paint and decals were $30.00. So the grand total was just over $300.00. It was a bit more than I planned, but it's a one time charge. My local Porsche dealer charges $120.00 an hour so about 2 and 1/2 hours at the Porsche dealer. These will enable me to do a bit more than basic maitenance, and I know for sure I will get more than 2 and 1/2 hours out of them. Hope that helped. Jim I originally posted a question about the guage, I've since reliazed that it is included in the original post. Do you mind sharing how, and with what material, you coated the pads (the black material)? Tim. Looks like Rhino Liner or some other liner "paint". Looks like he also put the same on the bottom at the jacking points. Tim- the top pad is spray on (rubberized) undercarriage coat, and the bottom is Home Depot grip tape. The top pad would work better with grip tape. From one use the undercarriage coating has already "stripped away". Jim -
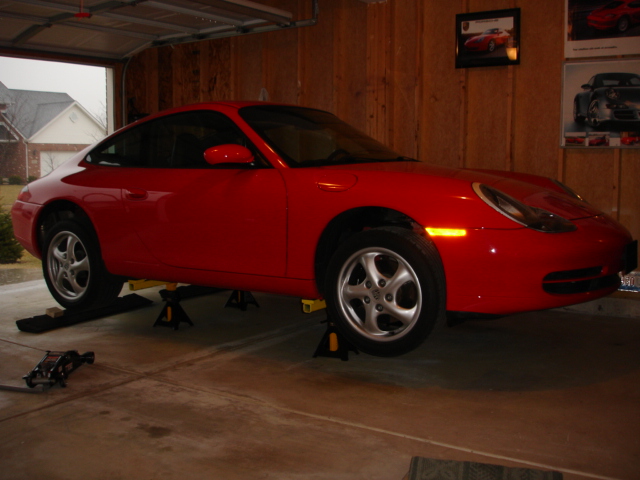
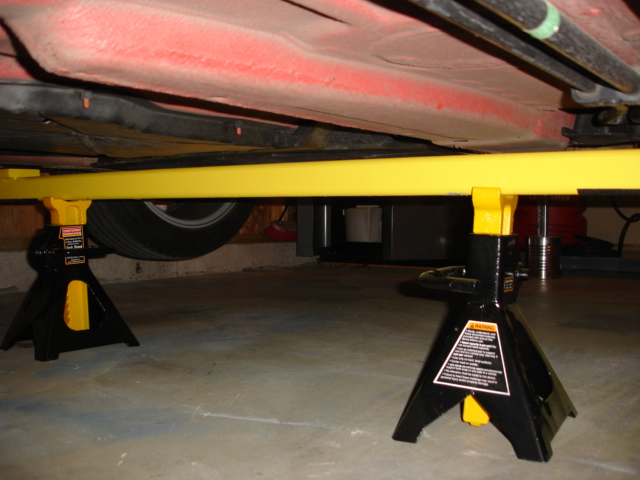
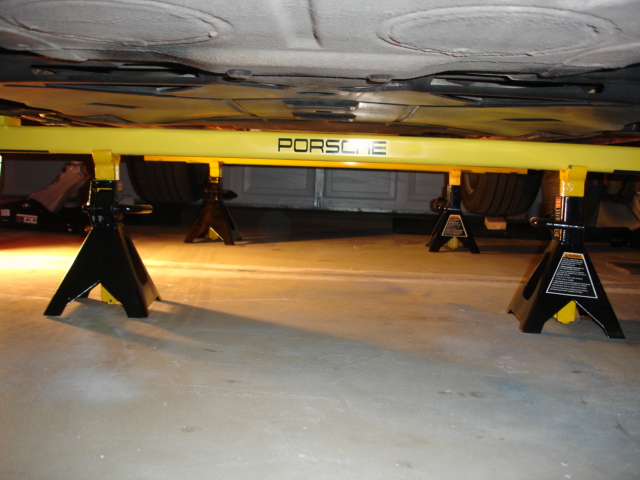
I chocked the back wheels and jacked the entire front of the car first. I used two floor jacks and raised the front corners in equal increments. So the first two jacks stands were under the front and the rear tires were still on the ground. Then I jacked up the back also in equal increments. So the car went straight up and straight down. The car was never leaning at a sharp angle. I do believe that you are correct, if you raise from side to side you will create such an angle on the opposite side that it might be impossible to get your floor jack under. That is why I don't think bars from front to back would work. With these bars the car is jacked up in more of a LINEAR method than a twisting one. I attached this picture of just the front end supported and the back wheels are still on the ground. Hope this helped. Jim

-
Hey guys- These new bars work great. There are a few ways you could use them. Here is how I did it today. [attac hment=16090:lift_007.jpg]
-
Jack It Up
waterboy replied to waterboy's topic in 996 Series (Carrera, Carrera 4, Carrera 4S, Targa)
Beautiful car!! -
Jack It Up
waterboy replied to waterboy's topic in 996 Series (Carrera, Carrera 4, Carrera 4S, Targa)
I considered front to back but there were some connectors that would have made me drop the bar even lower. With the ones I made you need a 3 inch ground clearing jack. I would have needed to by a new set of jacks with lower ground clearance. P.S. WAITING ON TRANS FLUID, AND FUEL FILTER. ACTION SHOT IN NEAR FUTURE!!! -
Jack It Up
waterboy replied to waterboy's topic in 996 Series (Carrera, Carrera 4, Carrera 4S, Targa)
Steve, I used top quality steel from fresh stock and paid $180.00. The welder that I used charged me $85.00 an hour. It took him 1 and 1/2 hours to cut and weld all the pieces together. Paint and decals were $30.00. So the grand total was just over $300.00. It was a bit more than I planned, but it's a one time charge. My local Porsche dealer charges $120.00 an hour so about 2 and 1/2 hours at the Porsche dealer. These will enable me to do a bit more than basic maitenance, and I know for sure I will get more than 2 and 1/2 hours out of them. Hope that helped. Jim -
Hello guys- I made these 2x2x1/4 inch square tubular steel bars with jack"pads" that fit my 996 stock jack mounts to the millimeter. The "pads" even have a male receptor to fit snug into the stock Porsche jack pad. The jack "pads" are 3/4 inch thick solid steel. That 3/4 inch dimension is important because it lowers the bar enough to clear any coolant lines or plastics that may be attatched to the undercarriage. One bar fits the front and the other fits the back. Now I can jack and support my car from any point along the bar. I painted them "speed yellow" and finished them with a Porsche decal from ebay.
-
Hello guys- I have a 99C2 with a 6 speed manual trans. I want to replace my transmission fluid, but before I start the job I would like to have an extra drain plug, filler plug and seals as a back up. I looked in the 996 part #'s catalog but did not have any luck. I also called Sunset Imports and they also were not able to find a part number for these plugs and seals. Does any body know the part numbers? Thanks
-
I just finished the job myself. I ordered the parts from Pelican Parts. If your parts are the same as mine 996-701-801-00 also 996-701-802-00 these are the two parts that go behind the holder/mount and the mount is part #996-701-107-00. All you need to do is use a long enough self tapping tapered head screw that will go through the plate holder/mount and the parts that attatches to the bumper. Once you tighten those screws your bracket and mounts should be tight. :D
-
Seal with pictures
waterboy replied to waterboy's topic in 996 Series (Carrera, Carrera 4, Carrera 4S, Targa)
Just finished the seal, 9nine6's advice was right on the money. Thanks 9nine6 :renntech: -
Seal with pictures
waterboy replied to waterboy's topic in 996 Series (Carrera, Carrera 4, Carrera 4S, Targa)
Oil will not pour out and the connector will have to be disconnected. It is possible to disconnect from under the car. just follow the wire up to the connector past a fastener to the chassis. if I remember right its a narrow connector that releases from the top of the connector....Be patient <_< should be a 10 min job once the car is on jacks Thanks for your advice. I did find the connection point and it does release from the top. -
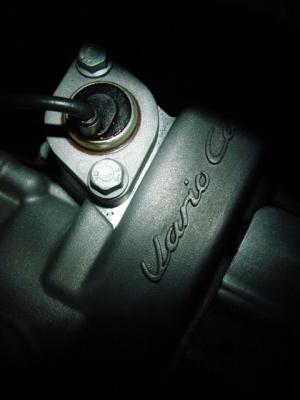
Hello guys- I have a 99 C2 and on the drivers side vale cover, where it says Vario Cam, there is a sensor. My seal around that sensor weeps oil a bit. I am looking at replacing the cover piece around that sensor, part # 996-105-223-52. As you can see the cover only has two bolts, but before I start unscrewing them, I would like some advice. MY FIRST QUESTION IS WILL OIL POUR OUT WHEN I UNSCREW THE BOLTS, AND DO I HAVE TO DISCONNECT THE WIRE FROM ITS CONNECTOR? (FOLLOWING THE WIRE, THE CONNECTION POINT IS FAR UP IN THE ENGINE COMPARTMENT AND VERY DIFFICULT IF NOT IMPOSSIBLE TO REACH.) ANY ADVICE WOULD BE APPRECIATED. THANKS Sensor on valve cover Seal that needs to be replaced
-
You can download a PDF of the cooling system parts list. The link is in the Links section here. Thanks Loren