Welcome to RennTech.org Community, Guest
There are many great features available to you once you register at RennTech.org
You are free to view posts here, but you must log in to reply to existing posts, or to start your own new topic. Like most online communities, there are costs involved to maintain a site like this - so we encourage our members to donate. All donations go to the costs operating and maintaining this site. We prefer that guests take part in our community and we offer a lot in return to those willing to join our corner of the Porsche world. This site is 99 percent member supported (less than 1 percent comes from advertising) - so please consider an annual donation to keep this site running.
Here are some of the features available - once you register at RennTech.org
- View Classified Ads
- DIY Tutorials
- Porsche TSB Listings (limited)
- VIN Decoder
- Special Offers
-
OBD II P-Codes - Paint Codes
- Registry
- Videos System
- View Reviews
- and get rid of this welcome message
It takes just a few minutes to register, and it's FREE
Contributing Members also get these additional benefits:
(you become a Contributing Member by donating money to the operation of this site)
- No ads - advertisements are removed
- Access the Contributors Only Forum
- Contributing Members Only Downloads
- Send attachments with PMs
- All image/file storage limits are substantially increased for all Contributing Members
- Option Codes Lookup
- VIN Option Lookups (limited)


londoner06
-
Posts
193 -
Joined
-
Last visited
Content Type
Profiles
Events
Forums
External Paint Colors
Downloads
Tutorials
Links Directory
Collections
Store
Posts posted by londoner06
-
-
There's an alternator DIY here:
http://www.renntech.org/forums/index.php?s...st&p=118847
You can also go to 'Search' and enter
+alternator +replace
It will pull all the threads that may be pertinent.
Regards,
Alex
-
I do not think that there's enough slack. Of course you could 'lengthen' the wires. Also, the switches on the right all have their raised area to the right,
the ones of the left to the left, the one switch would look awkward if moved to the opposite side. It's a Porsche after all, nothing is that far from the driver ;)
Alex
-
Thanks Ken.

Alex
Sorry, the reply came out 'in triplicate'
-
I have seen the DIY threads for performing the amberectomy, I do want to double check this:
• The piece that gets removed, as seen below (borrowed from Toolpants thread), which would be amber in my case, is just wedged in place, it's not glued in, correct??
• Is Xenonmods.com a good place to get the silver bulbs?
I am thinking going the Dremel-with-the-wand route, attaching a small rubber hose to a vacumm to clean up afterwards.
Alex
-
Looking at 996 Porsche™ 'The Essential Companion' you may be right on both counts:
• The 120 vs. 121 denotes RHD vs. LHD, the LHD ending in 0.
• In the transmission code the 6th digit is 1 for 'open differential fitted' and 2 for 'limited slip differential fitted'. The transmission plate will have digits 7-11 for the serial number. The 0 may be the first number but I don't know the S/N of my car's transmission.
Again, these are based on the 996 NOT the 997, so they could be wrong...
Alex
-
Michael, there are copies of the fuse assignments for different years here in case you need them:
http://www.renntech.org/forums/index.php?s...ost&p=67481
Hope you get things working.
Alex
-
Here's a diagram for MY99 996:
http://www.renntech.org/forums/index.php?s...ost&p=99259
If the window needs to be retrained check this post:
http://www.renntech.org/forums/index.php?s...ost&p=92771
Alex
-
Thanks Hobbes, it came right up.
Alex
-
Hobbes, excellent write-up!
The kit, what brand did you go with, model #? I know H7 is the right size.
I like the 'slim' fact so that it fits into the light housing, no need to pull wires and make holes in the housing, etc.
Alex
-
A:
The whole 996 series bonnet/boot design leaves a lot to be desired! I had a 1990 C2 (964) with the sensible engine compartment release on the door near the latch and the usual bonnet release. You're lucky you don't have the silver handles, give Porsche™ some credit for redesigning those! Do remember the emergency bonnet opening procedure because if the battery goes dead you can't access the battery with electric releases.
TIP: You can download a PDF manual from the 'Documents' menu. I find the PDF files so much easier to use since you can just use search to find what you need.
Where in Blighty R U?
Alex
-
:welcome:
First of all, it really helps to put the model and MY (model year) of your car on the post because there are so many variables.
My car being a MY2000 has the silver handles (mechanical) to open the bonnet and the boot. Later models went electrical. There is a DIY thread here that covers removing the part that you seem to be talking about:
http://www.renntech.org/forums/index.php?showtopic=7067
This part comes in different versions, depending on whether you have memory seats and of course if you have electrical release or mechanical. Of course I assume your car is RHD so you have to think 'mirror image' ;)
Just FYI, there is a diagram on this page that shows all the different parts and part numbers:
http://www.autoatlanta.com/model/996-99-05/807-03.htm
At least in the US Porsche™ only sells the whole unit, #9 in the diagram, and it's pretty pricey. I had to hunt a lot to find just one handle. It's not a hard DIY, as long as you have the right tool to loosen the M6 x 25 hexagon socket head bolts.
Anyway, welcome,
Alex
-
Orient, I have used it the 3M on the vinyl sun visors, it's safe on leather too??
-
:welcome:
Easiest thing is to do a search.
Click search and enter:
+engine +serial +number
The subject has been covered many times before.
Those look like these Carrera sideskirts: http://www.pelicanparts.com/catalog/shopca...tec996_pg24.htm
Usually the letter X at the end of the engine part number means it is a rebuilt.
Totally awesome ride,
congrats.londoner06
-
nstevo,
I feel for you guy, OK, I have had very good luck with Meguiars products. You might give the ScratchX a try (usually available at Pep Boys or Autozone):
You basically rub and rub until the product disappears and the finish looks shiny again. You can use it with a polisher like the Porter Cable to do whole sections, doing one section at a time:
You have to work from lightest to strongest. The next product I've used is the Speed Glaze 80. It's a bit stronger than the ScratchX but still easy on the finish:
I have found that hand applications are not as effective as using the Porter Cable, it really does a good job for applying wax/cleaners. Also you can call Meguiars and they can advise you over the phone.
Good luck and let us know how it goes.
Alex
-
-
Foster, the switches are not Porsche parts, look on the switches for a Audi/VW P/N, then google the number and I'm sure you can find a parts supplier online that sells them.
Alex
-
rexbd
:welcome:
• Here is a link to a hardtop lift: http://www.hoistlifts.com/porsche.html
• In the forums section look for 996 series > 996 DIY and mods, lots of ideas there, like the 'spoiler switch DIY', the 'blinking side marker DIY', the 'daytime running lights' DIY, etc.
• Washing/polishing suggestions here: http://www.renntech.org/forums/index.php?s...c=24205&hl=
• Eric at http://www.bumperplugs.com/BPindex.html has lots of goodies to dress up your new Porsche™, I have bought from him a new Silver centre console, a new ignition switch 'rosette' and painted bumperettes ( I think yours are already painted) His work is flawless.
• The front radiators need to be cleaned periodically, as well as the water drains, there are instructions for both in this website.
Congrats again on your Porsche™
Alex
-
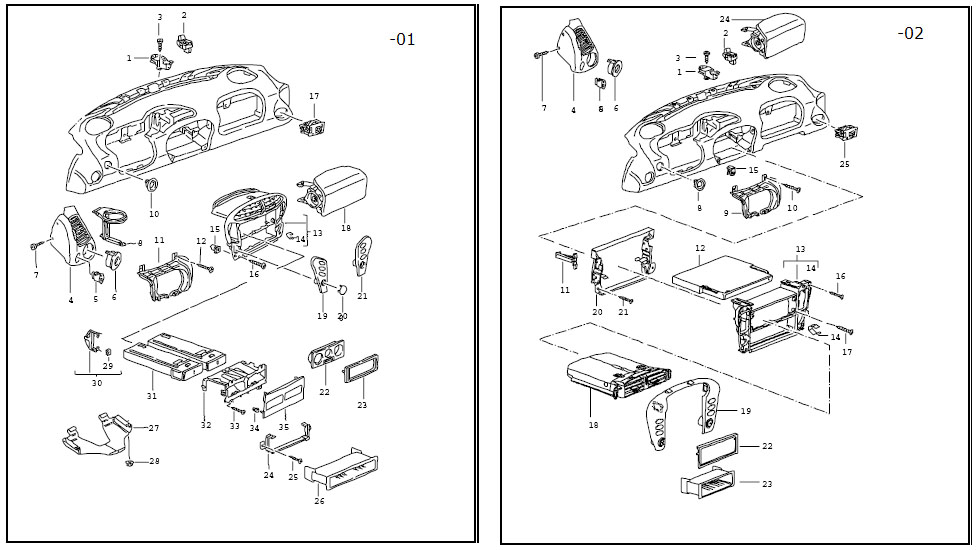
Foster, here is a diagram of the dashboard trim from the PET, one is -01, the other 02-. Post the # of the part you are looking for. If it is #19 or 21 post the interior colour as well.
Alex
-
Grover, that's what I'd like to have, access to a lift, you're lucky indeed ;)
I know in my 996 if I raise the car using the rear 'jack point' the front jack point raises to the point I can get a jack under it. I also use these ramps here to raise the car.
A lift would be ideal but my garage is too smal to install one :(
Alex
-
Foster, what does this part do?? What does it control?
Alex
-
Joel, best thing is to do a search:
+jack +points
You'll find several threads on the subject
Alex
-
So has anybody used the 'DoorDefender' magnetic ding protectors?
-
Has anyone tried the DoorDefender?
WEBSITE: http://www.doordefender.com/home.html
I realize it does not protect the car from vandalism like keying but looks like a clever product for protecting from parking lot dings.
Alex
-
Big_O, the boot removal has been covered before, if you put in:
+shifter +remove
you'll get a bunch of threads. I found this one that involves a 997:
http://www.renntech.org/forums/index.php?s...shifter++remove
There are sure to be others, hope it helps.
Alex


Moving Switch Locations
in 986 Series (Boxster, Boxster S)
Posted
There is a diagram of the different switches at this website:
http://www.autoatlanta.com/model/986-97-04/903-05.htm
You can talk to the folks at Sunset Imports, they can sort you out as well.
You can find out more about Homelink and other garage door opener DIYs by going to 'Search' and entering:
homelink
This subject has been covered many times before so there should be a lot of info.
Regards,
Alex