Welcome to RennTech.org Community, Guest
There are many great features available to you once you register at RennTech.org
You are free to view posts here, but you must log in to reply to existing posts, or to start your own new topic. Like most online communities, there are costs involved to maintain a site like this - so we encourage our members to donate. All donations go to the costs operating and maintaining this site. We prefer that guests take part in our community and we offer a lot in return to those willing to join our corner of the Porsche world. This site is 99 percent member supported (less than 1 percent comes from advertising) - so please consider an annual donation to keep this site running.
Here are some of the features available - once you register at RennTech.org
- View Classified Ads
- DIY Tutorials
- Porsche TSB Listings (limited)
- VIN Decoder
- Special Offers
-
OBD II P-Codes - Paint Codes
- Registry
- Videos System
- View Reviews
- and get rid of this welcome message
It takes just a few minutes to register, and it's FREE
Contributing Members also get these additional benefits:
(you become a Contributing Member by donating money to the operation of this site)
- No ads - advertisements are removed
- Access the Contributors Only Forum
- Contributing Members Only Downloads
- Send attachments with PMs
- All image/file storage limits are substantially increased for all Contributing Members
- Option Codes Lookup
- VIN Option Lookups (limited)


bigbuzuki
-
Posts
506 -
Joined
-
Last visited
-
Days Won
3
Content Type
Profiles
Events
Forums
External Paint Colors
Downloads
Tutorials
Links Directory
Collections
Classifieds
Store
Posts posted by bigbuzuki
-
-
Best way is to visually inspect and measure your pads and rotors, this will clarify your situation.
-
They say approximately every second pad change will render the rotor to miimum thickness.
Pad wear is obviously dependant on individual driving style.
I've heard of pads being shot after 6000 miles with aggressive driving habits.
-
I assume this is the brake pad wear indicator light you are referring to and not the brake sysytem malfunction light.

No need to replace the rotors unless they are down to minimum thickness.
This generally happens every second pad change.
You will damage the rotors if the pads are not changed soon since the light has come on.
Even so with the light on you can probably drive for another 300 miles before rotor damage will occur.
What you do have to replace is the brake wear sensor unit which puts your light on as it gets damaged once activated.
-
The PCM system can be also reset by an easier method instead of pulling fuses etc.
Simultaneously pressing the 1,4,8 numerical keypads on the PCM headunit will initiate a reboot of the system.
-
-
The fault codes apparantly stated that the antennas were shorted to ground.
Are all the antennas for the Kessy in the rear bumber area or are they located elsewhere?
I would like to carry out the resistance and power supply measurements as well.
Is there a dedicated fuse for the Kessy system?
Would Loren be able to provide us with a copy of the applicable wiring diagram?
-
Took the car to the dealer and they diagnosed the problem.
They changed the Kessy control unit and reprogrammed my keys.
I have the start function still working via the plastic dummy key, but unfortunately the door entry/exit function is still not working.
They have ordered new Kessy antennas to be fitted.
How likely is it that all the Kessy antennas are faulty?
and what would break them.Anyone have experience with this?
-
Thanks RFM.
The Durametric faults all the antennas as shorted to ground.
Since I have a right hand drive vehicle, is the under dash KESSY control box in the left or right side of my car?
Is it a matter of dropping the under dash cover to gain access?
-
My KESSY decided to stop working today
.I can start the car with the plastic control unit but cannot unlock or lock the car via any door handle/button.
Does anyone know how to get access to the KESSY control unit as I want to check out the connectors ?
Also the antenna locations for the KESSY would be appreciated.
Thanks.
-
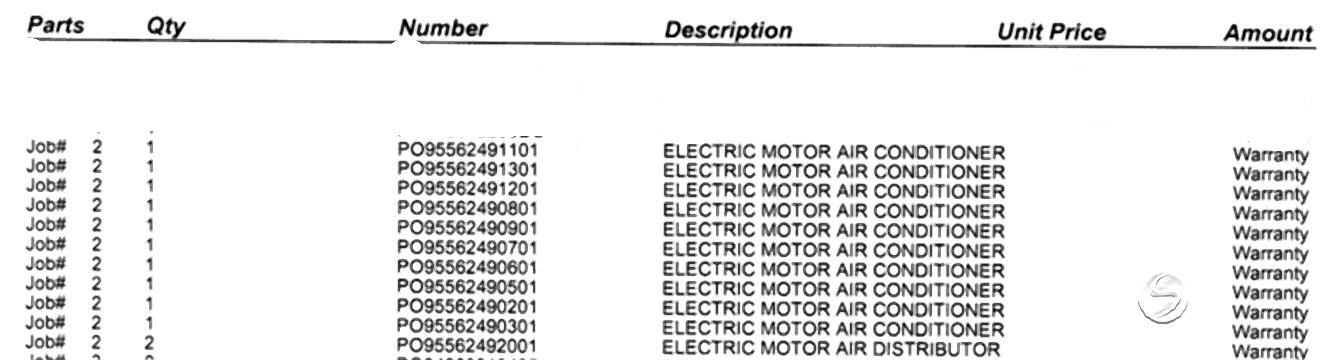
I just checked the repair invoice and it was actually 12 servos that were changed.
Below is the copy with the part numbers.
-
Sounds like the servo motors alright.
Mine had the same issues and the whole dash was removed to change all 12 (yes 12), servo motors.
No idea what it costs as mine was done under CPO warranty.
Good news is that once the servos were changed, the a/c system is perfectly quiet.
-
Don't be surprised if you are requested to change the disk rotors as well with the pad change.
They reach minimum thickness at approximately every second pad change depending on driving habits.
-
Good to see that you have sorted out most of the issues.
Reminds me of my initial woes with my 2003 CTT.
Once you sort out all the issues it is a pleasure to drive. I have 110,0000km on mine and is driving smooth and powerful.
Fuel efficiency will always be an issue when one is on the boost, but oh what fun it is.
The warranty will give you piece of mind. I have used it to rectify ALL my non routine maintenance items.
Use it to sort out the sloshing noises.
-
I had my cardan shaft replaced recently at approximately the same mileage as yours.
Mine was replaced under the CPO warranty, no questions asked.
I would ask the dealership to provide a written explanation of how it is NOT covered under the CPO warranty you have .
Can you try another dealer?
-
I had no light in the auto door position either as the slide contact of the switch was faulty.
Do the other lights above rear passenger doors light up with the drivers door open?
-
-
I had my coolant pipes replaced 13 months ago due to coolant leakage. Just when I thought life was good...Bang......1 month ago my car dropped all of its coolant on the ground.
Investigation revealed that there were two plastic T-pieces in the coolant system at the back of the engine, one of which had cracked.
The cracked T-piece was replaced along with the 2nd T-piece for preventative purposes. (CPO warranty picked up the tab :thumbup: )
Dealer tells me that they are starting to see an increased number of cars with these T pieces cracking.
Looks like they will be another money spinner for them.
I am not sure if these T pieces are installed on the non turbo Cayennes. They may not be an issue for the normally aspirated.
The part numbers for the plastic T pieces are: 955 106 323 50 and 948 106 035 51.
They are identified as "water hose" in the PET manual.
Get these changed without hesitation if you happen to be doing coolant pipe surgery on your Cayenne.
-
the installation should be fairly straightforward
1, the control unit is located under the dash near the foot brake
2, one antenna for each wheel under each wheel's housing liner (a little bit more work than the control unit)
3, ask a tire shop to install the wireless sender unit for all the wheels
4, ask a dealer to reprogram the control unit and related components
now just need to verify if the factory wiring exists for the control unit and antenna
total cost will probably be around $700 (assuming you can handle step 1 & 2)
If the prewiring is installed it would be a bonus for sure.
-
I previously had made some enquiries at the dealers to do the exact same thing your planning.
They all said it could only be done at the factory and was too complicated to install after the car was built. (Apparently the antenna wiring from each wheel well has to be run to the control box etc.)
I hope you prove them wrong as I would like to retro install myself.
Good Luck. :thumbup:
-
great, i will get the I7K4 set including the control unit, antenna, and sensors. :D
Does your 04 CTT have any prewiring installed from the factory for the TPMS or is this going to be a completely new installation?
-
The power supply that moves the mirrors is not what lights up the bulbs.
Confirm that you indeed do have power to the bulb contacts in the lamp socket with a multimeter. Also check the return path ground is ok (A wiring diagram would be handy at this point).
If no power at both sockets then you may have a programming issue.
-
Grab the actual glass portion of the mirror and gently lever it out from the inside edge with your fingers.
The glass will come forward and disengage from inside the housing revealing the globe socket behind it.
Be careful when the glass releases and not to pull too far as there are the heater/dimming wires on the back of the glass. ;)
-
I went with the Dension Gateway 500 with the new Wi-Drive add on.
One of the features of the WiDrive is that it enables your vehicle to become a mobile internet access point/station to all users in the car.
I also required iPod and USB stick capability for playing music and the Dension was the only product that also supported this USB functionality.
Highly recommended.
-
What's wrong with the recommended Porsche factory fill lubricant Mobil 1?


 .
.


Alcantara Interior In Ctt
in 9PA, 9PA1 (Cayenne, Cayenne S, Cayenne Turbo, Cayenne Turbo S)
Posted
My 2003 CTT has the Alcantara fitted.
This code is in my options list.
I3LH Door trim and side wall - all leather -- pillars/rooflining in Alcantara - PAG