Welcome to RennTech.org Community, Guest
There are many great features available to you once you register at RennTech.org
You are free to view posts here, but you must log in to reply to existing posts, or to start your own new topic. Like most online communities, there are costs involved to maintain a site like this - so we encourage our members to donate. All donations go to the costs operating and maintaining this site. We prefer that guests take part in our community and we offer a lot in return to those willing to join our corner of the Porsche world. This site is 99 percent member supported (less than 1 percent comes from advertising) - so please consider an annual donation to keep this site running.
Here are some of the features available - once you register at RennTech.org
- View Classified Ads
- DIY Tutorials
- Porsche TSB Listings (limited)
- VIN Decoder
- Special Offers
-
OBD II P-Codes - Paint Codes
- Registry
- Videos System
- View Reviews
- and get rid of this welcome message
It takes just a few minutes to register, and it's FREE
Contributing Members also get these additional benefits:
(you become a Contributing Member by donating money to the operation of this site)
- No ads - advertisements are removed
- Access the Contributors Only Forum
- Contributing Members Only Downloads
- Send attachments with PMs
- All image/file storage limits are substantially increased for all Contributing Members
- Option Codes Lookup
- VIN Option Lookups (limited)


toddel68
-
Posts
135 -
Joined
-
Last visited
Content Type
Profiles
Events
Forums
External Paint Colors
Downloads
Tutorials
Links Directory
Collections
Classifieds
Store
Posts posted by toddel68
-
-
Gruezi!
I read about people bending the respective pin on the 'Abgasklappen'-relay itself but you can do that just once and maybe back again. Otherwise it will just break. Maybe you can pull the relay and put some thin tape on the pin to isolate it and the re-insert.
Thorsten
-
i plan to upgrade to an aftermarket headunit. contrary to most, i actually prefer an audible warning that the car is armed and locked when i push the remote on the fob. will i experience my horn going off everytime i go through a bump if i dont tape off the portion mentioned in this thread? :( TIA
No, you will just not be able to tell anymore if any other surveilled contact (hood etc) is open since the horn will always go off when you lock the car.
-
I used about one liter( a quart ) for the last 13 000 kms. I That's during 1 1/2 years and with unfixed (minor)RMS! My clutch and the RMS are having a battle over which one of them will last longer...
Never had a car with such low consumption. The first year I used to pull the stick every time because I couldn't believe it. Car ist now at 73 000 kms.
Thorsten
-
You can also put some real sturdy tape on the left side of the new radio in the same spot as the plastic pad on your Becker unit was. Best is to use the same kind of plastic pad since the contact arm which you can see in the the left side of the radio bay tends to vibrate trough tape material. Happened to me - after a few months I suddenly had the horn go off everytime I locked the car. Another advantage is that this will keep the alarm active and it will still go off when somebody tries to steal your radio. (More important on cabs though since the motion detector might be off while the top is down.)
Thorsten
-
My neighbor had a similar issue, it was both the fact that the rear brake pads were worn to the numbs, and hat the rear left half shaft hub bolt was loose.
Thanks OE for pointing me to the brakes. Had the rear right wheel of and found the metal plate that is protecting the inner side of the disc was quite close to the disc. Found some marks on the inner side of the brake disc to that would indicate that the sheet metal would touch it sometimes. After a little bending to enlarge the gap the noise was gone on the last two drives. Still have to to see if this is permanent since I've been tricked by the ghost that lives inside my car before. Especially when it comes to fixing rattles...
Two weeks ago I ran over some piece of soil on the autobahn which hit hard under the rear right fender. I found no damage when I inspected the car after that but maybe that was when the grinding noise started. Not sure though how it could get inside the wheel to hit the brake assembly.
Thorsten
-
Hi, lately I've noticed some noise whenever I make a left turn. Don't know if that was present before I installed the PSE but then again I didn't use to drive around with my windows down before the mod ;-)
To me it doesn't sound like vibration or rattle but rather like some grinding noise. So far by just looking under the car without lifting it up I couldn't see anything that would likely produce such noise. Any ideas? I could live with it coming from the exhaust but if there was really loose I will of course have it fixed.
Thanks,
Thorsten
-
Sounds like your alternator failed. Happened to me last year on my 99C4.
-
Hello Toddel68,
I have been thinking about installing a PSE for some weeks now and I have been gathering all sorts of information via a number of Porsche forums. There's no denying that www.renntech.org offers the best information.
Within a few weeks I hope to start installing a PSE on my 996 C4 (November 1998). I have read that you also have a TSB in German on how to install a PSE. It would make the installation easier I think having both the English and the German version of the TSB, especially when having to do the electrical wiring.
So, could you do me a favour and, if possible that is, mail me a copy of the German version.
Thanks a lot,
jo996 (the Netherlands)
You have a PM
-
After finishing my PSE install I think I owe you guys a summary. Some of this has
been described in other threads before so I only wrote it to emphasize or confirm:
1. As some have written before the wiring of the relay is quite confusing until
you figure out that the pins named under section 2.4 of the TSB are those on the
SWITCH, not on the relay socket or carrier.
2. The relay carrier goes off and on much easier if you remove the bolt in the
upper left corner that holds the hinge. Who engineered this thing anyway?
3. As on all other cars the dim wire GR/BL/BR wire goes into slot 25 instead of 28.
Most of the time when I was was in doubt which bridge to us I was able to indentify a
wire of the same color coding which was already plugged in the bridge.
4.Terminal 15 - pin 2 is in fact three wires not two. Don't get confused. Funny that
the german TSB states the number of wires correctly.
5. I messed up big time when I tried to follow the instruction to "run the three
leads of the relay socket through any free slot in relay carrier 1, noting the
direction of installation of the relay socket". Plugging all the wires in after
inserting the cables from the FRONT of the relay left me with a relay socket on
the wrong side of the carrier. You have to know that the socket itself has to
be installed from the back of the carrier. Just wire the socket and then push
it in from behind and you'll be fine. Well, maybe it was just the language
barrier and completely my fault but sure cost me some time to get the jacks out again.
A very small screwdriver used for the screws in sunglasses hinges will help if
you don't have the special tool.
6. I did not remove any panels to route the wires to the engine bay except for
the sill cover around the trunk release levers. I did not remove the seat for this
but it sure comes in handy if you don't have a short allen wrench. Helps with the
relay carrier removal as well. Just tuck in the wires under the side panels and pull
SLIGHTLY to stretch them diagonally which keeps them there.
7. The exhaust removal took me quite a while. My car is built in 11/1998 and was driven
all year round. Was I expecting the WD40 to rebuild the bolts windings? An angle grinder
was used to remove the 6 bolts in 4 clamps.
Fortunately the 3 bolts holding each can where still in acceptable shape.
Had the rear bumper and the heat shields off for that removal. Don't scratch your bumper
like I did! Install was a breeze and I had no problems doing it alone using my knee
to keep it in position while fastening the bolts.
I did not reverse the bolts in the holders for easier futur removal because I felt it
would compromise safety if the nut ever comes off during driving.
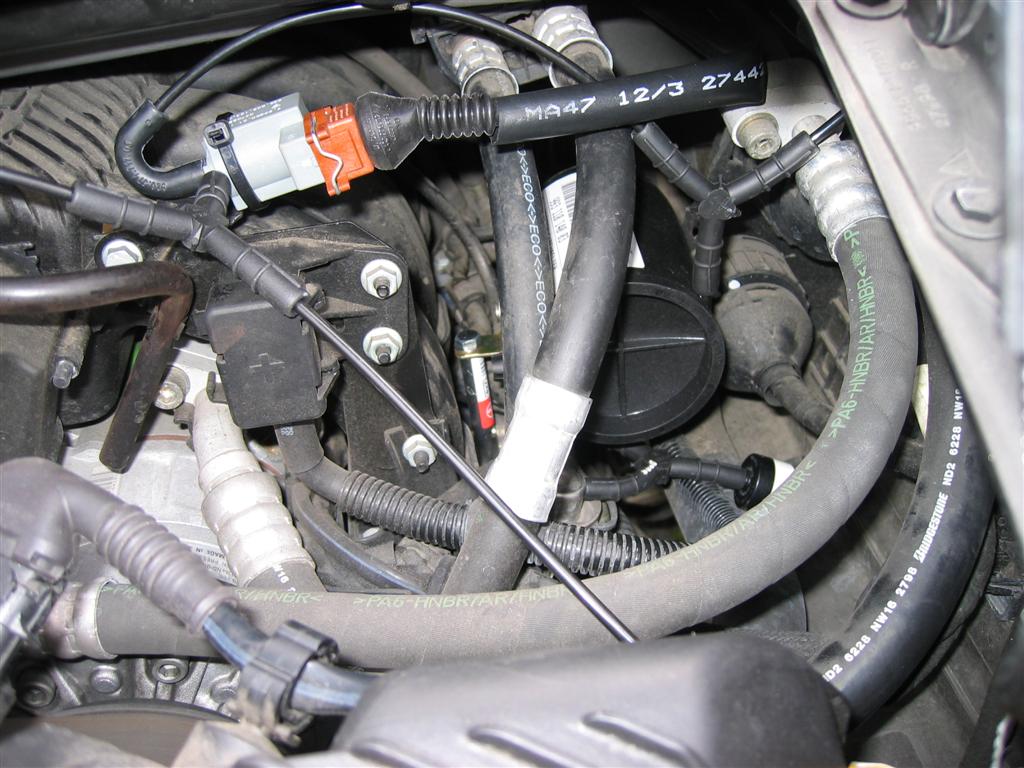
8. Vacuum install was really easy compared to the other two sections mainly because
that was only adding stuff not removing any stubborn equipment. I tapped the vacuum
line at a very easy to reach location near the tank's position . (See photo in first link)
I really recommend this since it also keeps the line to the tank short.
The last screw I tightened was the clamp on the connection betweeen teflon hose
and tekalan hose. Well, I should have had the air filter housing removed for that
but there was no way I would let this screw screw me.
I hope I could reassure some of the statements that were already made on this topic
and also added some new aspects. If you have any questions feel free to ask as
long as my memories are fresh.
Here are the links I used:
Location of 'vacuum' tank for PSE install, Anybody has a photo?
PSE Install completed, Couldn't have done it without Renntech!
Jeff's PSE Electronics Install Tips
PSE (Porsche Sport Exhaust) Install, w/o electronics
Need Help With Electronics Install For Pse, question of where two wires go
And the relevant TSB of course
Thorsten
-
I've finished the install and everything seems to work fine. The final work in the engine bay including the electrical connection took me only a little more than one hour. I used a regular M6x80 bolt and used a tool that I grabbed at the craftsmen supply as a spacer. Just had to cut off a few centimeters. Don't know the english word for it bit it had openings for 6/7mm hexagon bolt heads on both ends. (See Photo). The dealer was able to find the part no. for the vacuum relay holder ( 996 110 510 52 ) so I used that instead of messing around with another DIY-solution.
On the photo you will also see were I tapped the vacuum from. I just spliced in a Y-connector down ther below the tank.
Well the sound is awesome - I just have to get it through TÜV now...
Thanks to all of you helping me out with advice and support. :clapping:

-
First of all I have to say that I finally found the time to install the cans today. Again I wasted several hours because all the bolts were so rusted that I had to use the angle grinder to get the clamps off.
Made the neighbor's son shine up the tips while I was at it :D
Fortunately I had expected that and had new clamps at hand.
I still got to do the vacuum connections but was already rewarded when I fired up the engine. Wow what a blast- the sound is much better than I expected :clapping:
On the vacuum tank holder: I guess I just realized why I couldn't make out the location. I was looking for a higher point to attach the angled holder to. Since I don't have the bolt and spacer sleeve I didn't know what it looked like. Is it correct that the spacer sleeve is like a small metal pipe where the bolt is slipped in and that the angled hold is held between this pipe and the bolt-head? If so, I finally get the picture...
Thorsten
-
Keep in mind this chassis has almost 50K miles on it.
Unbelievable - I bet mine looked worse after 5 miles.
-
The guys are right. The cover around the trunk levers is the only part that I lifted a little to put the wires under. Have a look at the DIY for trunk lever exchange. If you tuck the wires under the panels they will slip under even more when you pull (straighten) them slightly. I didn't remove the seat though but then again I'm 20 years younger than Kim and OE is known for licking the underside of his car clean. :P
Just kidding - I almost broke my back because I didn't have the torx that was needed and everytime I see OrientExpress' car pictures I just envy him.
Thorsten
-
One of the best solutions to get a navi radio CD is to install the new Becker Indianapolis Pro. It's provided with a bluetooth telephone hand free system, and besides can reproduce MP3. It has an ipod connection too. The design is the same as Porsche radios (made by Becker)
Other than the earlier Becker units like the Traffic Pro Highspeed the display of the Indy cannot be inverted to match the Porsche display (dark background, highlighted letters).
Thus it's not really a perfect fit. So Becker saved 20 cents on the display and I'm not upgrading BT telephone and Ipod :-(
Thorsten
May be but this is not a very important stuff to me.
Well it was you who said the design was the same as the factory radio which is not true. There may be others who want the perfect match.
Thorsten
-
Instructions are not the problem (I was just hopping that AMAG Switzerland would give me a guide in french).
I just would like to have the confirmation that it is the grey electrical connector that needs the Audi/VW part 443.906.102.G (part that is not included in the PSE package and not mentionned in the instructions...) .
Yes it's a rubber boot that goes over the connector for the vacuum switch to protect it from dust and dirt. If you look around in you engine bay (upper left) you will find another connector that has it already. This just to make a perfect install out of nearly perfect one.
Thorsten
-
One of the best solutions to get a navi radio CD is to install the new Becker Indianapolis Pro. It's provided with a bluetooth telephone hand free system, and besides can reproduce MP3. It has an ipod connection too. The design is the same as Porsche radios (made by Becker)
Other than the earlier Becker units like the Traffic Pro Highspeed the display of the Indy cannot be inverted to match the Porsche display (dark background, highlighted letters).
Thus it's not really a perfect fit. So Becker saved 20 cents on the display and I'm not upgrading BT telephone and Ipod :-(
Thorsten
-
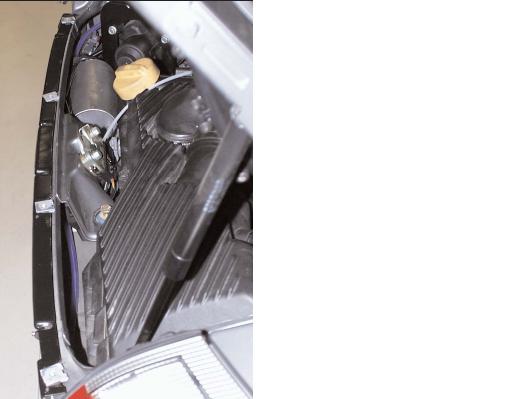
Thanks Charles, that's exactly what I was looking for. Shame on me: I already bookmarked this page preparing for the install but didn't realize that this photo was on there. Well, I'm not at home right now but I should be able to locate the mounting point with the help of the picture.
Thorsten
-
Hi,
I'm currently in the process of installing my PSE. The wiring is almost done but the location of the vacuum tank in the engine bay still puzzles me. ( Finally ended up using the OEM-part instead of Gemballa). The TSB makes it look like the mounting point is next to the battery terminal but there's nothing like a bolt there. Anybody who could provide me with a close-up photo of the tank installed on the holder?
Thorsten
-
I have almost all the parts you want as extras from my PSE install, everything but the grommets, sheath for electical connection and y-connectors. You are welcome to them. Unfortunatley, you are in Germany and I am in Chicago, USA. If you pay the shipping I am happy to send them. However, the parts are not that expensive so you may be better off just buying them locally. PM me if you want them.
Thanks again for the offer. I finally ended up with ordering the parts at my dealer which cost me about 95 EUR plus another 55 EUR for 4 new exhaust clamps. But I think that's still better than explaining to customs again why there's somebody in the U.S. who would send me auto parts as a gift...
Electronic install is already done and I'll be attacking the rest of the install within the next days.
Thorsten
-
I think mine works pretty well, after a number of sanity checks of both OBC and dipstick.
Same here with my 99 C4 but that's only valid for exactly leveled surfaces. Since I've found my garage floor to be perfectly leveled it has become my reference platform. You will notice big differences in readings when you check on on angeled driveway.
Thorsten
-
On the vacuum tank. If it will fit physically, then there should be no problem with "support" of the heavier tank. The factory tank is bolted to a very solid location.
On wire length to the engine compartment. The factory wires route across the back of the rear seats (left to right) then through the firewall and one third of the way back (right to left) across the engine compt to the vacuum switch. You can lay out your Gemballa wires in advance to see if they will follow this route. You can also splice in extensions if necessary. I see no problem, however, with taking any route that will get you to the desired location. If Gemballa has a better idea, use it.
The list of parts you mention is mostly one of minor pieces. I would be surprised if the total expense was high.
Good luck.
Thanks Kim, I have the Porsche harness to wire it up so I thought you would be able to tell me from you recent experience how much wire there was left when you entered the engine bay.
The Gemballa tank can be seen left to the oil filler cap on the photo. The stupif thing about the set is that the gender of the hoses and connectors are reversed compared to the OEM stuff. So the y-connectors are male (small diameter) and the hoses (which are silicone) are big which makes them incompatible with the OEM parts.
-
Hi, I finally bought myself a used PSE on Ebay. The exhaust came with the OEM wiring set but the Gemballa parts to hook it up to the vacuum supply. Since the installation is quite different to the Porsche install I have a few questions.
First of all the Gemballa vacuum tank is made of metal and quite heavy. It’s supposed to be installed in the engine bay left of the hood lock but I would rather choose the same location as in the original setup. Since the OEM tank looks like it’s made of plastic I’m not sure if the original tank holder will bear the weight of my Gemballa part.
Also Gemballa routes the wires for the switch over valve through a different rubber grommet at the lower left in front of the engine. I wonder if the wires would still be long enough to reach the mentioned position if I choose the ‘usual’ route.
I’m already thinking about just getting the missing parts and putting together my own Porsche set but I would need to get all the parts below and have no idea how expensive they are:
477 971 881 A Holder for vacuum tank
4x 928 574 717 03 Protective sheath bent
900 918 048 40 3m of Tekalan-hose
4x 999 512 069 02 hose clamps
2x 111 971 911 A rubber grommets
2x 917 355 021 00 teflon hoses with stainless steel mesh
3x 928 573 727 03 Y-connectors
443 906 102 G rubber boot for electrical connector
993 110 140 03 vacuum tank
Not wiring the PSE is not an option because unlike the U.S. we have to get an entry in the car’s papers after the installation of the PSE which will only be made if I bring in a certification of my Porsche dealer that the install was done correctly. Another good reason to buy the Porsche parts since the PSE is not supposed to be mixed with the Gemballa parts and I’m not really sure if my dealer would sign the certificate if I do a mixed install. I really envy you guys that you have no ‘TUV’.
Maybe there’s a member who chose not to wire up his PSE and wants to sell some of the above parts at a reasonable price. I have no idea what the shipping costs to Germany would be though. I guess it must be at least 25$.
I would really appreciate you opinion on this. Right now I’m not really sure which way to go but can’t wait to get my PSE installed. Just have to explain my wife why I would need to spend another day in the garage…
Thorsten
-
Here they are:
thanks, but i thought the pics might show exactly what they did so that i might consider doing somthing simalar mysellf as i cant seem to get rid of the noise as yet...and if it worked i would at least know what exactly is causing it!!
Nothing mysterious about it. Just insert a 10" piece of the grey rubber foam that is normally used to stop the rattle in the rear window between the overlapping lips of the door seal. If it works, glue it down. Done.
-
Here they are:you home yet thorsten? im really curious to see the pics.

OT: Around the Nürburgring in a van
in 996 Series (Carrera, Carrera 4, Carrera 4S, Targa)
Posted