Welcome to RennTech.org Community, Guest
There are many great features available to you once you register at RennTech.org
You are free to view posts here, but you must log in to reply to existing posts, or to start your own new topic. Like most online communities, there are costs involved to maintain a site like this - so we encourage our members to donate. All donations go to the costs operating and maintaining this site. We prefer that guests take part in our community and we offer a lot in return to those willing to join our corner of the Porsche world. This site is 99 percent member supported (less than 1 percent comes from advertising) - so please consider an annual donation to keep this site running.
Here are some of the features available - once you register at RennTech.org
- View Classified Ads
- DIY Tutorials
- Porsche TSB Listings (limited)
- VIN Decoder
- Special Offers
-
OBD II P-Codes - Paint Codes
- Registry
- Videos System
- View Reviews
- and get rid of this welcome message
It takes just a few minutes to register, and it's FREE
Contributing Members also get these additional benefits:
(you become a Contributing Member by donating money to the operation of this site)
- No ads - advertisements are removed
- Access the Contributors Only Forum
- Contributing Members Only Downloads
- Send attachments with PMs
- All image/file storage limits are substantially increased for all Contributing Members
- Option Codes Lookup
- VIN Option Lookups (limited)

Richard Hamilton
-
Posts
1,830 -
Joined
-
Last visited
-
Days Won
13
Content Type
Profiles
Events
Forums
External Paint Colors
Downloads
Tutorials
Links Directory
Collections
Store
Posts posted by Richard Hamilton
-
-
Richard is a wise old man.
Hey!! Less of the "old" please!!! :rolleyes: :rolleyes:
-
The Porsche PET shows leather paint. Might be worth having a word with the parts department of your dealer.
-
The order codes for RoW 986 Boxsters are 986311 and 986321. I can tell you that if you put the USA order code numbers into a UK car the OBC works just fine, so I expect Peter is right about 123456!
-
I used PIAA Superwhites before doing an HID conversion - they are still in the main beams. They produce a very white light, and might be what you are looking for.
-
Maybe you could find out if this company has a distributor in the US. They manufacture new blocks and have a 4.0L kit.
-
Trouble is, if you wire in a switch to cut power or earth, you'll probably get the warning light on the dash at over 75mph.
-
The spoiler relays are controlled by the instrument cluster. The manual switch is also connected to the cluster. The speed is read by the cluster, which signals the spoiler to deploy above a certan speed. Because it is all integrated, there isn't a simple way of rewiring it to bypass the speed signal. The only way you might possibly achieve what you want is to wire a separate switch direct to the spoiler relays. If you need the wiring diagrams, send me a PM or email.
-
-
Looks like there should be a supply voltage to Pin 2. Maybe this might help.
-
The P07xx codes seem to relate to tiptronic fault codes - seems crazy if yours is manual. Have you tried clearing the code to see if it comes back? (Not that I would know what to suggest if it does).
-
Was the hassle in getting the appropriate wires and connectors...?
Absolutely! I had terminals that I thought were right, but Mr Porsche made sure everything wasn't quite standard. We ended up tweaking every connector to make it fit. It ended up as a safe and secure installation, but I wouldn't recommend doing it this way. If Tim can make a wiring harness (and I know he has sourced most of the components) then it would make the project do-able. Without the harness it's a nightmare.
-
Well, thanks to Tim the cruise retrofit in my '98 996 is complete, with a lot of help from my friends at wrightune.co.uk. It works brilliantly, and I'm delighted with the outcome, but it wasn't without its problems.
Mechanically, everything was straightforward, but I didn't have the benefit of an original wiring loom, which is what caused the hassle. Therefore, I would not recommend tackling this project without a properly constructed wiring harness.
-
There was an article April last year in 911 and Porsche World about some guys who fitted a Mk2 GT3 front end to a Boxster. If you can get hold of a copy it shows some great pictures of the build. The finished result was superb.

-
Paul
I'd try cleaning the ICV as 058slb suggests. There is a thread on here somewhere, and Loren posted a picture of the location of the valve, which is attached to the throttle body.
Refresh my memory - is yours a tiptronic? I have a friend with a similar problem. It ticks over smoothly, but the revs drop and it stalls when he engages drive or reverse. Only when hot. He has cleaned the ICV with carb cleaner, but no improvement. I'll let you know what happens.
-
This appeared on the PCGB forum, so I thought I'd share it:
http://www.worldcarfans.com/spyphotos.cfm/...he-911-facelift
-
The "Summer Tires" TSB shows the standard wheel offsets and maximum spacer sizes. I would look at that, and get to work with your calculator!
-
Steering wheel is on the wrong side....
:thumbup: It's on the right side for me!!!! :thumbup:
-
If PCT know what they are doing, they should have a chance of rebuilding the box. The auto boxes are made by ZF, so if they know where to source them, parts are available.
Good luck!
-
The OBD2 Manual says:
P1124/P1126 - Fuel/air mixture is so lean that sensing has reached its rich threshold.
- Intake air system leaking
- Fuel pressure too low.
- Volume supply of fuel pump too low.
- Fuel injectors fouled.
P0130/P0150 - Oxygen Sensor Ahead of Catalytic Converter (Cylinders 1 . 3) - Intercore Short Circuit or Limited Voltage Increase
Fault conditions:
Crack in ceramic material
Reference air polluted
Short circuit in signal wire to sensor ground (intercore short circuit).
Fault area:
- Oxygen sensor
- Wiring harness
- DME control module
HTH
-
Tim
That's perfect - you are a star!
Could you share the number of the connector and pins you think might be right? I am hoping to get all the bits together during the next 3 or 4 days, and I'm keen to get started.
BTW, if you can put together a reasonably priced kit, they will sell like hot cakes. Do you want a UK distributor?? ;) ;)
-
Tim
I'm a bit confused. :huh: :huh: Firstly, my sheet 13 is a bit unclear, and I mistook the ground connection terminal to be F, and it is E. (It's clear on the Boxster diagram I have).
Even so, I have a nagging feeling that the earth connection is to the bottom-right pin in my photo (the one next to the small polarising rib). If you get a chance, could you confirm (or otherwise) that the brown wire goes to that pin?
What you are suggesting is a mirror-image of what I am now expecting - and you were looking in a mirror! :D :D
edit: I need to type faster - our messages crossed! - that's great - I think we are on the same page now!
-
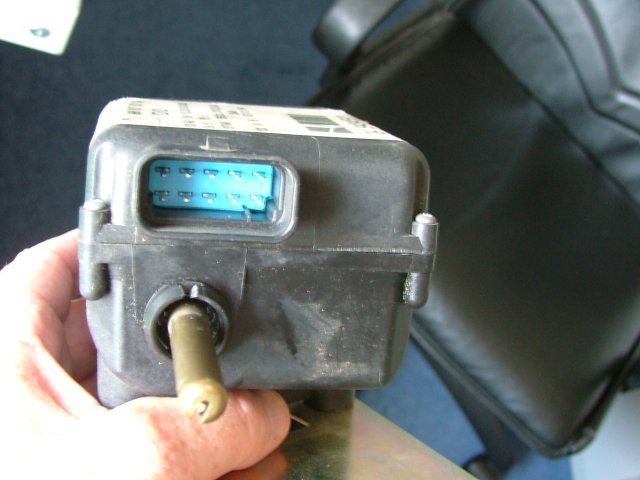
Tim
My cruise actuator arrived, but I have a snag. The pins on the socket are not numbered/lettered. Do you know which is which?
edit:
I took the top off the unit, and I am fairly sure that the bottom-right pin is the ground connector (F). Therefore, I THINK that the connections (as you look at the photo) are:
E D C B A
K J H G F
But it would be nice if you could confirm this.
-
Tim
Thank you so much. My car is RHD, and I will email you the diagrams.
edit: I found the bridge plugs on the relay support diagram, thank you. Colours look to be the same.
-
Tim
I have tracked down a used cruise actuator, pedal, bracket, etc, but no loom. The wiring looks fairly straightforward, but I wonder if you could give me some pointers:
1) Bridge Plug BS1 (Speedometer A - connected to plug 1/16 on the Cluster), shown on wiring diagram sheet 3. Where is this bridge plug located?
2) Plug X3/2 (Blue) (X2/6 on 996), shown on sheet 11 - is this located close to the Tiptronic control unit?
3) Bridge Plug BS14/2, shown on sheet 13 - did this exist on your car? Being a tiptronic, like mine, I suspect it wasn't fitted at the factory.
4) Were you able to get any numbers from the 10-pin connector plug?
I'm sorry if I am jumping the gun - maybe you are including this info in your DIY. If so, just tell me to be patient!! :-) :-)

Footwell lighting hack?
in 986 Series (Boxster, Boxster S)
Posted
Inspired by Chris, and using the same LED's that he used, here's what it looks like on a 996 coupe:
The only minor modification to original was soldering the wires to the circuit board of the interior light:
Looking at the connections in the picture, the one on the right is earth, and the one on the left is 12v.