Welcome to RennTech.org Community, Guest
There are many great features available to you once you register at RennTech.org
You are free to view posts here, but you must log in to reply to existing posts, or to start your own new topic. Like most online communities, there are costs involved to maintain a site like this - so we encourage our members to donate. All donations go to the costs operating and maintaining this site. We prefer that guests take part in our community and we offer a lot in return to those willing to join our corner of the Porsche world. This site is 99 percent member supported (less than 1 percent comes from advertising) - so please consider an annual donation to keep this site running.
Here are some of the features available - once you register at RennTech.org
- View Classified Ads
- DIY Tutorials
- Porsche TSB Listings (limited)
- VIN Decoder
- Special Offers
-
OBD II P-Codes - Paint Codes
- Registry
- Videos System
- View Reviews
- and get rid of this welcome message
It takes just a few minutes to register, and it's FREE
Contributing Members also get these additional benefits:
(you become a Contributing Member by donating money to the operation of this site)
- No ads - advertisements are removed
- Access the Contributors Only Forum
- Contributing Members Only Downloads
- Send attachments with PMs
- All image/file storage limits are substantially increased for all Contributing Members
- Option Codes Lookup
- VIN Option Lookups (limited)


RicksCarrera
-
Posts
43 -
Joined
-
Last visited
Content Type
Profiles
Events
Forums
External Paint Colors
Downloads
Tutorials
Links Directory
Collections
Store
Posts posted by RicksCarrera
-
-
Hi All
I am in the very final phase of a major project for my 2000 996 C2 cab with about 100k miles. I replaced the IMS, RMS, AOS, flywheel and clutch. A nice winter project!
As with most things porsche, one needs patience, because there is always a fair amount of reaching and feeling and the need for just the right combination of tool and angle to get the job done. Following the workshop manual and many different posters here at renntech and rennlist and from youtube, I put the car on jackstands 24" above the floor. A lift would be better. I pulled the transmission, clutch and flywheel. The top transmission bolt requires a u joint and two foot extension and you need to reach around both sides of the tranny in order to place the socket on the bolt. I had bought the very expensive LN engineering dual race IMS(for my car) for about $800 and the pro tool kit for about $350. The Tool kit made the setup of TDC and locking the cam and pulling the bearing and installing new bearing relatively easy. I used a basic CPVC type 4"plumbing cap and carefully drove new RMS to 13mm from crankcase flange. The AOS was a bear to remove in one piece due to original permanent hose clamps. I was able to remove old AOS and install the new one from under the car using new fuel line hose clamps for the two small coolant hoses and a ~11/4" screw hose clamp for the bottom bellows hose. I used the old AOS to practice just the right way to install the AOS into position. Re installing the tranny takes patience. You need to be methodical about lining it up with an equal gap between tranny and engine all the way around, and that the bolt holes are lining up. It took me a while but it came together. I did a flush/bleed of the clutch and brakes, the conventional two person way, and it worked like a charm, no power bleeder. Just do not let master reservoir fall below max because the clutch pickup is high up in the reservoir.
It is a big job, but doable. It was nice to be able go to work and leave it from time to time. I also had the tires dismounted and I am having the rims powder coated satin black for a new look.
Cheers Rick
-
Hi All
I just flushed/bled my clutch and brakes after reinstalling my tranny were I had disconnected the slave cylinder. I used the two person conventional method and it worked like a charm. I attached a clear hose from the nipple to a bottle where the hose end is emersed in fluid. Person one (wife) presses pedal, I open bleeder nipple and allow some fluid to flow, then close bleeder nipple then person one releases pedal, repeat. In the case of clutch pedal, person one returns pedal to normal position for the first few bleed cycles. I kept the fluid in the master full and had no problems, no power bleeder.
-
Hi Rod
The vertex instructional video shows how to pry the bearing seals out with a very small/fine screw driver type tool. It is that easy, and then simply repack with grease by hand. It is easier to repack the bearing when the flex disk has been removed and the shaft hangs down. With the tranny in neutral it is easy to turn the shaft. I am pretty sure thou, that the bearing seals can be removed and the bearing repacked with the flex disk and shaft connected.
-
I have two 2008 cayenne base, and the center support failed about the same time on both cars. I used the Vertex solution, because there is really nothing wrong with the shaft or the shaft bearing. Following the video tutorial, it is not a difficult job, thou it takes longer for a slow poke like me than the video tutorial would imply. In this order, loosen the flex disc bolts, remove the bracket support and cut away the original bracket, remove flex disc, clean the outer bearing surface, repack the bearing, install the new flex disc, install the new vertex support and bracket.
The weak link now becomes the bearing itself. There was very little or no grease in my bearings, and they were in good shape. Now they are repacked with grease and I hope the shaft lasts at least as long as a replacement shaft would have. One could even make a case for repacking that bearing from time to time, say every 50k.
-
Hi All
I am also looking at this lift (quick jack 5000xl) for my 911 and Cayenne. Regarding the lifting height, I read a max height of 21".
Is this enough height to change the clutch on the 911? Is there enough height at 21"to drop the engine and/or transmission.
many thx for any input.
Rick
-
Hi all
Can anyone tell me the correct size (Torx bit?) socket insert for removing the caliper? The manual calls it (NR.33 socket wrench insert, multiple tooth with pin guide). Thx.
Rick
-
Hi all
I have a 2000 996 cab. The top function is intermitant when using the switch, but works fine using the key in the door. I am thinking I have a faulty intermitant switch, or the ground at the park brake is intermitant.
When pressing the switch, the top either works or it does not work, it does not fail during operation. When the top does not function using the switch, the dash light still illuminates and there is a slow 'clicking' sound, so it seems the control module is getting power.
Does anyone know if, when using the key in door for cab top function, the ground is bypassed? If so, perhaps the problem is with the ground, and not the switch.
Thank you to anyone with thoughts on this.
Cheers Rick
PS I have topped the hydraulic fluid level
-
You need the workshop manuals. They detail pretty much any fault and the required service. Also the durametric does have a function for fault codes and a calibration function that works for me.
-
The 2008 model also has a a/c drain duct that protrudes through the firewall on the front passenger side. It can be reached from the engine compartment to the firewall on the front passenger side. It is a rubber duct/spigot the size of a straw with a flap that can stick closed which causes a backup of water in the air vent systems and water dripping on the carpet. No service is required, just reach in and ensure the duct can drain.
-
You absolutely can reach the ac/heater drain tube on a 2008 V6 Cayenne from the top. Lift the engine hood and reach for the tube which protrudes from the engine firewall ( passenger side top of the footwell ). Use a flashlight to help locate it, then reach for it. I did and the water came gushing out!
Cheers Rick
-
Hi I was also noticing a wet drivers side flootwell, not during rain. During my trouble shooting I noticed a little water dripping onto the footwell from above, but just a little, and not enough to make the footwell wet. I was worried that a water drain line from the heater/ac unit was leaking and a big job might be required removing the dash and glove box etc. to get at the ac unit. Further troubleshooting revealed that there was some water being pushed out the left rear passenger ac/heater vent at the floor under the drivers seat.
At this point I realized what was happening, and thank goodness it is very simple. The AC water drain was plugged causing the water extracted from the air in the ac/heater unit to backup and for some reason this water was mostly blowing through the left side plastic ac/heater vent lines and leaking at the low point in the drivers footwell with the remainder of the moisture pushing out the vent under the drivers seat. Some have this happen on the passenger side.
The ac/heater water drain is located on the passenger side footwell forward on the firewall. The drain slopes through the firewall and you can see it when you lift the hood and shine a light at the firewall on the passenger side. You can reach for the drain hose. There is a small flap. With my baby finger I lifted the flap and about a pint of water gushed out. Simple as that, plugged ac water drain cleared...no more wet floor.
Cheers Rick
-
Hi all
I am going to re and re the spark plugs on my 2008 V6 Cayenne. I have the shop manual but was wondering about the technique for pulling the coils...I don't want to break them.
Is this a straight out pull and how much force would be required. I do not have the special coil puller tool but was wondering if a coat hanger wire tightly wrapped around coil will work...I'll report on that.
Thx for any info.
Rick
-
Hello All
I was browsing online for brake pads and I noticed ceramic type pads that boast 80% less dust, and then the standard semi metallic. I have not inquired about whether rotors need to change, and I would not change rotors to accommodate new pads. Does anyone have experience with the ceramic type..are they compatible with steel rotors, how do they stop and wear and is there dramatically less dust?
Thx Rick
Thx to all that replied. I decided on the Hawk HPS semi-metalic and have changed both front and rear. I was able to reuse the sensors by prying them out carefully.
So far so good!
-
Hi all
As I contemplate between a 2009 Cayenne both the V6 and V8 and a 2009 Toureg V6 TDI, I'm wondering about long term (major) maintenance issues. Does either the V6 or V8 engine have a timing chain that does not require servicing? Any other general comments on reliability would be greatly appreciated. Thx
Rick
-
Many Thanks loren.
Rick
-
 Hi All
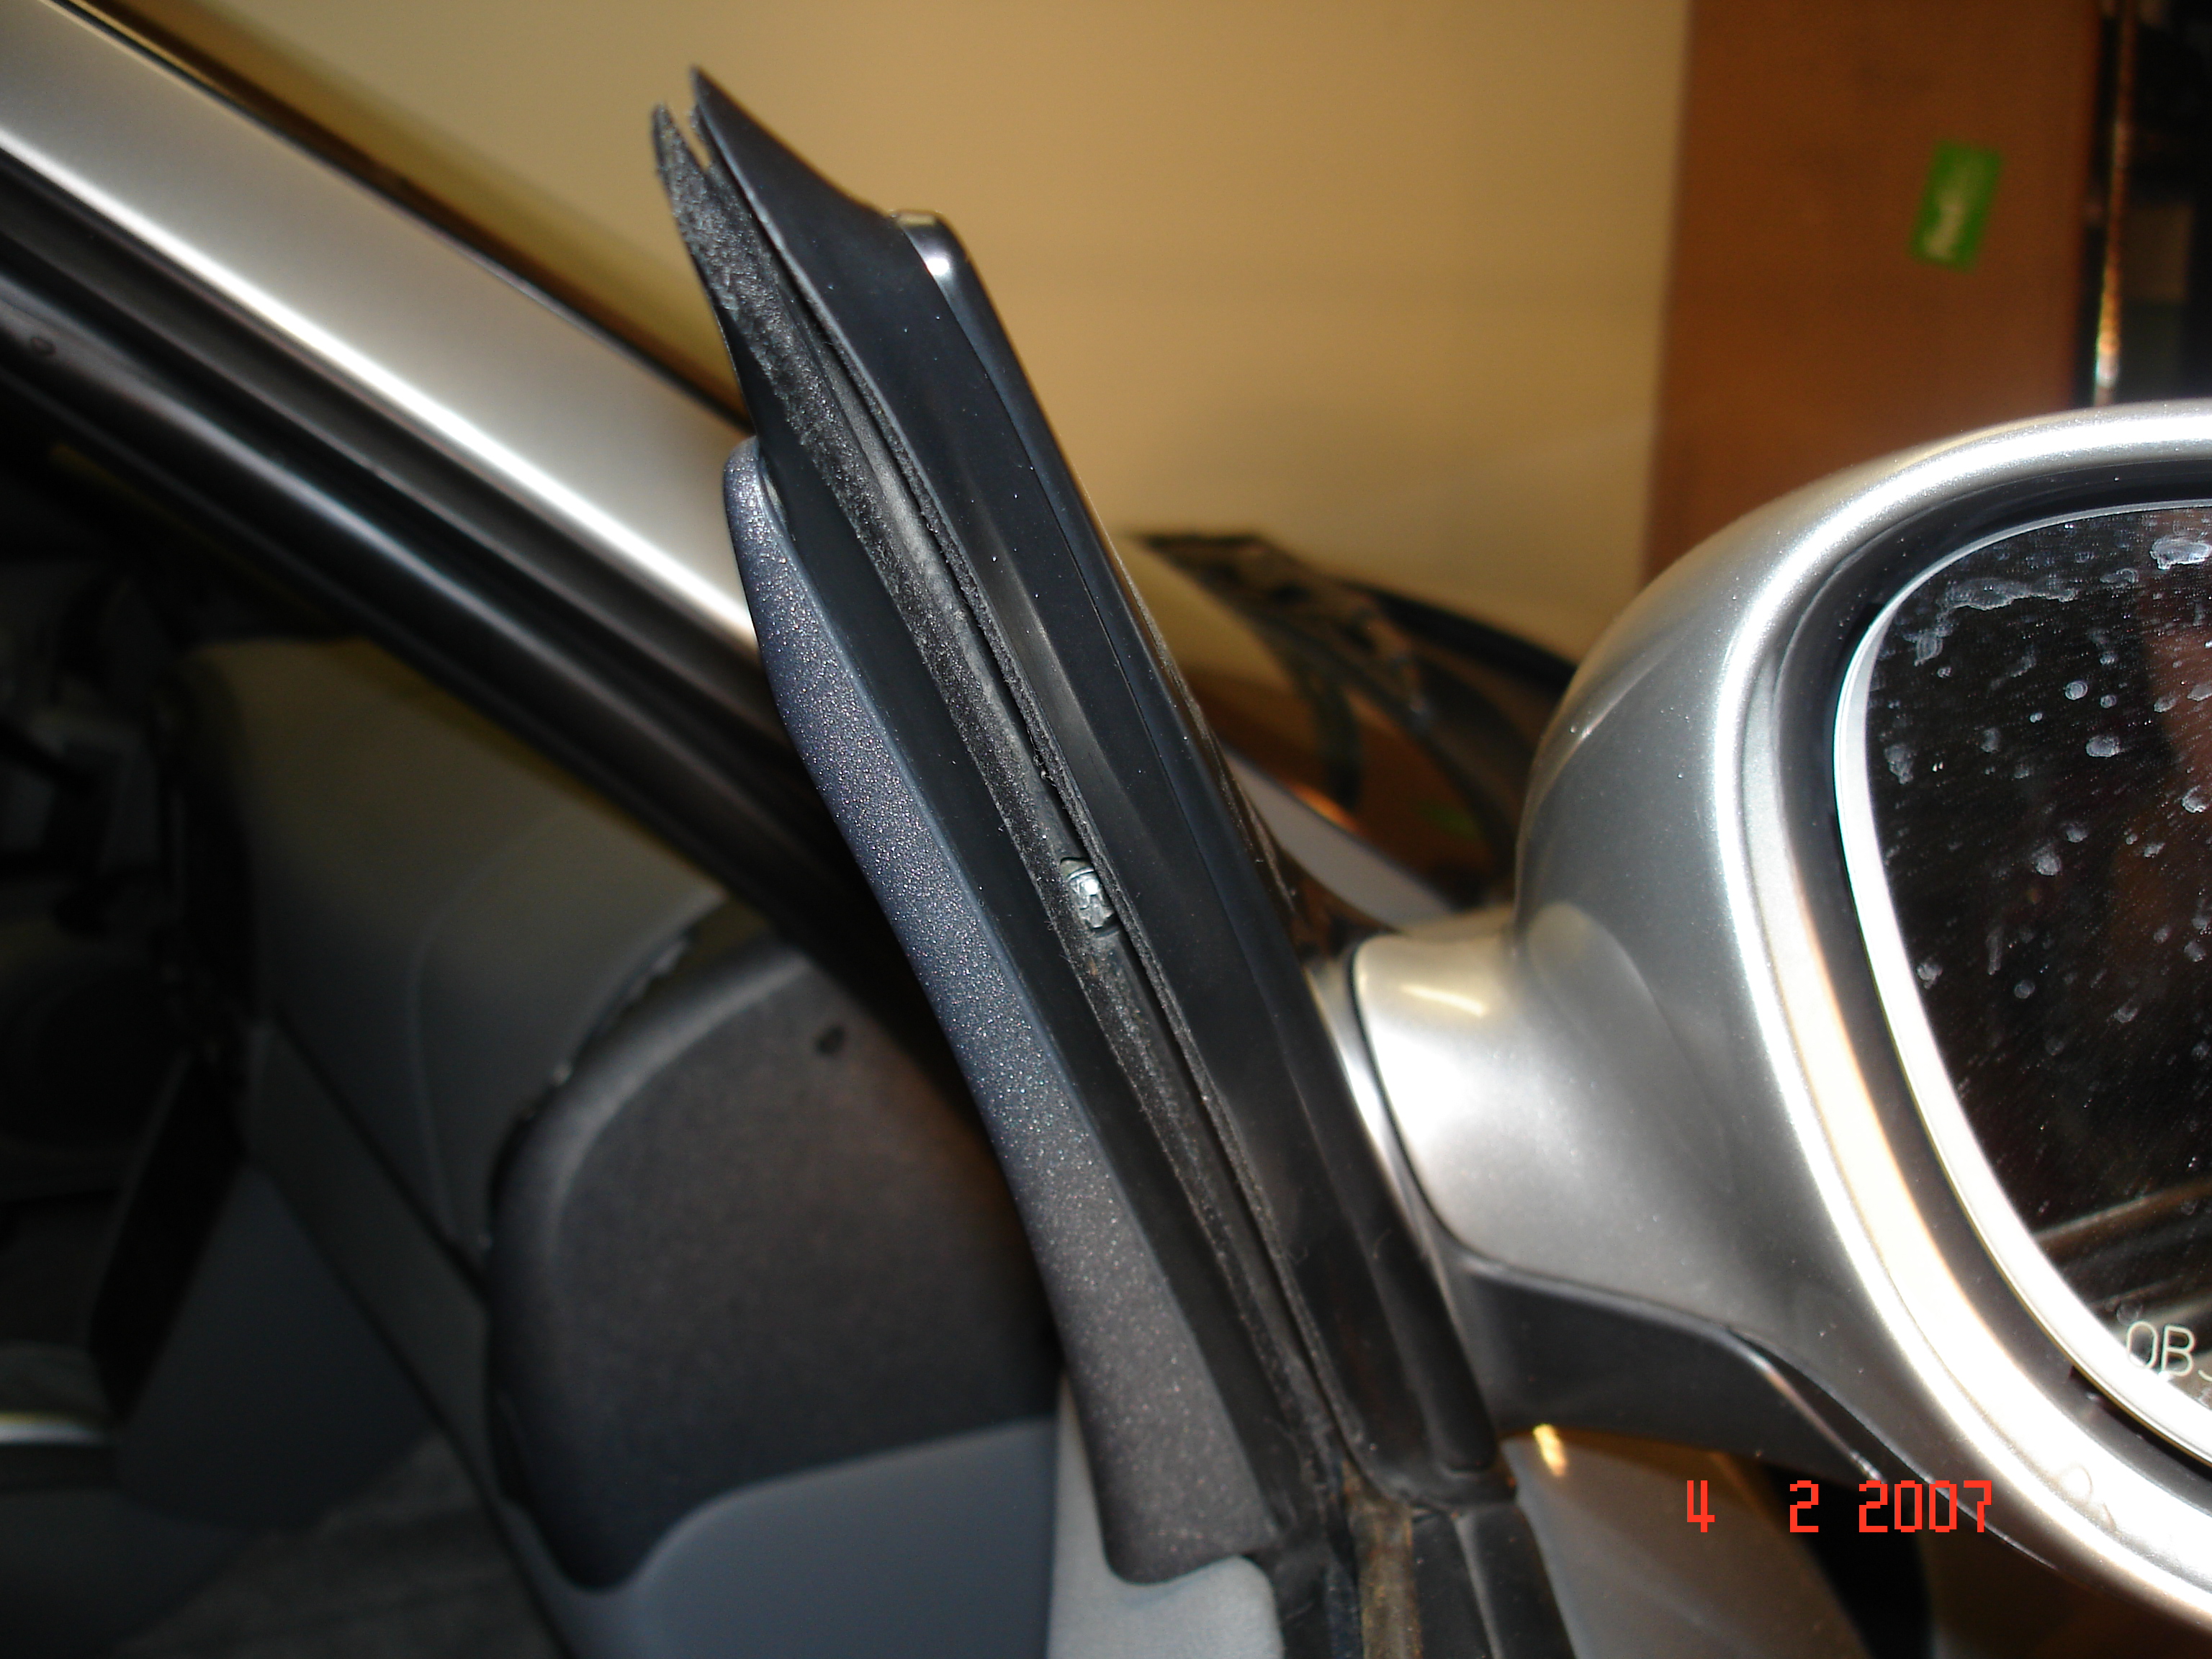
Has anyone experience with removing the side mirrors? I will attempt to attach pics to be more clear. There is a screw shown in the pic in line with the window that looks like would release the interior trim. I have the manual but there is no detail on how to remove that trim piece except to unclip, and same with mirror.
My question for anyone is how do you unclip the interior side mirror trim piece.
-
Hello all
I have a '99 C2 cab and would like to repaint the bumper and hood and have a clear bra (3m?) installed. Wondering how well the bra stands up after a couple of years and if rock chips show up on the clear bra?
Any recommendations if I were to change the front bumper?
Thx Rick
-
Hi All
Below is some of what the shop manual has to say on the convertible top function. The actual trouble shooting is quite specialized because special tools are required. It sounds like you may have a faulty micro-switch
I am having a problem with my top also, it is in the convertible top fully open (or down) position. When I actuate the top switch I get the click clack sound from the control module but no action. Recently I topped up the hyd fluid (as per Izzy's DIY)to correct an intermitant cab top function and the top worked perfect.
I have two questions for those who have moved the top by manual method;
If I put the top up by the emergency (manual) method, will the top need to be calibrated?
Does anyone know if the durametric code reading software can read and clear top function codes?
This is alittle long and no diagrams
911 Carrera (996) Convertible-top diagnosis
General information
Diagnosis
The monitoring of signals by the convertibletop
control module enables the system to
perform reliable, precise diagnosis. Further,
certain additional functions, such as e.g.
test of drive links and of input signals
can be activated using the Porsche
System Tester 2 and their
function checked.
General infonnation
Convertible-top control
Each single step of the opening/closing process
is only executed on condition that the preceding
step was performed correctly.
If a single step is not confirmed within a
given time, the actuation of the drive
motor is interrupted. The fault memory can be read out and
erased with the Porsche System
Tester 2. The diagnostic socket is
located below the knee guard
on the driver's side.
At the beginning of a process, the limit switch
or potentiometer values have a particular
configuration, which is examined
by the control module.
The control module monitors itself and
the connected components. The results
are read out via the diagnostic interface.
625_96
61 01 Diagnosis/troubleshooting, convertible top
Printed in Germany -II, 1998 99661Dl
61-D3Convertible-top diagnosis 911 Carrera (996)
Overview of convertible-top components
Rocker switch 1
2 Warning light
Micro-switch, latching hook (windscreen frame) 3
Micro-switch, convertible-top latch (convertible-top side) 4
Potentiometer I convertible-top interrogation 5
6 Control module
Micro-switch, convertible-top compartment lid (locked) 7
Potentiometer, convertible-top compartment lid interrogation 8
Micro-switch, left/right rear section flap up and down 9
The convertible top is actuated if:
Terminal 15 is connected via ignition.
The parking brake input is connected to ground (parking brake engaged),
No speedometer signals greater than 5 km/h (3 mph) are present.
Engine compartment lid is closed (input not at ground potential),
61 -D 7 61 01 Diagnosis/troubleshooting, convertible top
Printed in Germany -11, 1998 99661Dl
Fault memory
Overview of possible faults
1 Switch position implausible
2 Button short to ground
3 Convertible-top pot. fault
4 CTCL pot. fault
5 Timeout error
6 Calibration necessary
7 Supply voltage
8
8
61 -D 12 6101
99661Dl
Diagnosis/troubleshooting, convertible top
Printed in GenT1any -II, 1998Convertible-top diagnosis 911 Carrera (996)
Fault, Fault code Possible causes, elimination, notes
Test point 1
Switch position implausible
Fault code 01 This fault is only stored in the memory when an operation
has taken place
(button or comfort function with the key).
1. Check response of micro-switches of rear section flaps left and right.
A defective micro-switch must be replaced.
Refer to Servo No. 61 41 19
2. Check response of micro-switch in convertible-top latch.
If the micro-switch is defective, replace the convertible-top latch.
Test point 2
Button short to ground
Fault code 02 1. Check pin 1 to pin 4 for continuity (bitmap on "close" switch),
check button pin 2 to pin 4 for continuity
(bitmap on "open" switch).
2. Measure resistance of wires 1 and 2 to one another with
the ohmmeter. Display 1.8 -2.0 K .0.
. 6101
99661D14
Diagnosis/troubleshooting, convertible top
Printed in Germany -11, 1998
61 -D 14(;onvertible-top diagnosis 911 Carrera (996)
Fault Fault code Possible causes, elimination, notes OJ 0 , -.
Test point 3
Convertible-top pot. fault
Fault code 03 This fault is only stored in the memory if the voltage at the input
of the convertible-top potentiometer exceeds or falls below
the operating range.
1. Switch ignition off and remove ignition key. With test adapter 9619,
9636 and pin template 9636, measure the resistance of
the convertible-top potentiometer at row I, pins 12, 21
and 24 with the ohmmeter. If the display 00 .Q appears,
the convertible-top potentiometer must be replaced.
Refer to Servo No. 61 66 19
2. Switch on the ignition and measure at row 1, pins 12 and 21,
with the voltmeter; nominal value (display) 0.4 -4.4 volts.
If there is no voltage display, replace the control module.
3. Calibrate the convertible top
Test point 4
CTCL pot. fault
Fault code 04 This fault is only stored in the memory if the voltage at the input
of the convertible-top compartment lid potentiometer exceeds
or falls below the operating range.
1. Switch ignition off and remove ignition key. With test adapter
9619,9636 and pin template 9636, measure the resistance
of the convertible-top compartment lid potentiometer at row I,
pins I, 3 and 5 with the ohmmeter. If the display 00 .0. appears,
the potentiometer and drive motor must be replaced.
Refer to Servo No. 61 70 19
2. Switch on the ignition and measure at row 3, pins 1 and 3,
with the voltmeter; nominal value (display) 0.5 -4.4 volts.
If there is no voltage display, replace the control module.
3. Calibrate the convertible top
61 -D 15 61 01 Diagnosis/troubleshootin~~, convertible top
Printed in Germany -11, 1998 99661D14Convertible-top diagnosis 911 Carrera (996)
8
Fault, Fault code Possible causes, elimination, notes
Test point 5
Timeout error
Fault code 05 This fault is only stored in the memory if an electric motor is
actuated and does not reach the limit position within 6 seconds,
or the potentiometers of the convertible top and CTCL do not
show any change in voltage within 3 seconds.
To check the micro-switch input signals, select the input signals which
appear in the menu: Latch locked, Latch unlocked, Convertible top,
Convertible-top compartment lid side flaps, Latching hook. Actuate
the micro-switch manually (press it) to read the response in
the bitmap positions of the tester display.
-;~
0
192_98
If the convertible top is between "Convertible top closed" and
"Convertible top forward" and if the "Convertible top raised" input
is connected to ground (contact for micro-switch of convertible-top
latch does not lie against the top edge of the cowl panel and
does not switch), examine the tension of the convertible-top
covering using the left and right tension cables or, if necessary,
loosen by 1 or 2 turns so that the contact lies against the top
edge of the cowl panel and switches.
Diagnosis/troubleshooting, convertible top
Printed in Germany -11, 1998
6101
99661D14
61 -D 16911 Carrera (996) Convertible-top diagnosis
Fault, Fault code Possible causes, elimination, notes
193_98
If the convertible top is in the forward position (diagram) on closing,
check the response of the micro-switch -unlocked or not unlocked
(small diagram) -in the convertible-top latch.
If the micro-switch is defective, replace the convertible-top latch.
194_98
If the convertible top is in the rear position (diagram) on opening,
check the response of the micro-switch -unlocked or not unlocked
(small diagram) -in the convertible-top latch.
If the micro-switch is defective, replace the convertible-top latch.
61 -D 17 61 01 Diagnosis/troubleshooting, convertible top
Printed in Germany -II, 1998 99661D14Fault, Fault code Possible causes, elimination, notes
195_98
If the convertible top is in the centre front position (diagram) on closing,
check the response of the micro-switch -not locked or locked
(small diagram) -in the convertible-top latch.
If the micro-switch is defective, replace the convertible-top latch.
8
196_98
If the convertible top is in the centre rear position (diagram) on opening,
check the response of the micro-switch -not locked or locked
(small diagram) -in the convertible-top latch.
If the micro-switch is defective, replace the convertible-top latch.
61 -D 18 6101
99661D14
Diagnosis/troubleshooting, convertible top911 Carrera (996) Convertible-top diagnosis
197_98
If the convertible top is in the closed position (diagram) and the latching
hook has been actuated, check the response of the convertible top
(CTCl) micro-switch or adjust the Bowden cable of the central locking
hook in such a way that the micro-switch switches.
A defective micro-switch must be replaced.
Refer to Servo No. 61 81 19
If the convertible top remains in a position not described here:
6. Switch ignition off and remove ignition key. With test adapter
9619,9636 and pin template 9636, measure the resistance
of the convertible-top compartment lid potentiometer at row 3,
pins I, 3 and 5 with the ohmmeter. If the display 00 .0. appears
the potentiometer and drive motor must be replaced.
Refer to Servo No. 61 7019
7. Switch ignition off and remove ignition key. With test adapter
9619, 9636 and pin template 9636, measure the resistance
of the convertible-top potentiometer at row 1, pins 12, 21
and 24 with the ohmmeter. If the display 00 .Q appears,
the convertible-top potentiometer must be replaced.
Refer to Servo No. 61 66 19
61 01 Diagnosis/troubleshooting, convertible top
Printed in Germany -11, 1998 99661D14
61 -D 19
Printed inConvertible-top diagnosis 911 Carrera (996)
Test point 6
Calibration necessary
Fault code 06
This fault is stored in the memory after 1000 actuations or
if fault code 03, convertible-top pot. fault, or fault code 04,
CTCL pot. fault, is entered.
1. Read out and delete actuation counter 2.
2. A newly installed control module has not been calibrated.
3. Proceed as described in test points 3 or 4.
4. Calibrate the convertible top
Test point 7
Supply voltage
Fault code 07 1. Check the battery or alternator.
2. Inspect the plug connection on the control module for corrosion,
8
8
6101
99661D14
Diagnosis/troubleshooting, convertible top
Printed in Germany -II, 1998
61 -D 20 Germany -11, 1998
-
 1
1
-
-
Is this correct that the Durametric code reader software can read and clear proprietary items such as airbag lights? If so, awesome!
Thanks Rick
-
Hi All
To conclude, I was pleased with the gahnn seat cover kit. My seats look as good as new actually better, there is no vinyl on the side of the bolsters v the partial leather. The installer did an ok job of it, but the cautions on work quality in this thread above are wise. There are two small leather wrinkles that were not present on the original seat, but it might be something you would expect from 'real' leather seats. They look great. Total cost was 1350 for the seat kit and 300 labor for the re and re plus tax.
cheers
-
Mine has about 60k and had no issues. Love that car.
-
Hi
I just finnished a thread titled 'alternator bracket failure'. This may be a similar issue. Good luck
Rick
-
Hi all
I was reminded that I should finish this thread when I saw someone else post with what may be a similar problem.
The bracket that failed is part of the engine casing through which the cooling fluid moves.
I ordered my parts through Sunset (Jeff) and I cannot say enough good things about their service (and prices). I ordered the bracket and gasket (<$30) oil fill tube, Serp. belt, o ring for the vacum line and other miscellaneous.
I installed new oil fill tube. I cleaned and buffed the Alternator and reinstalled with new alt bracket. Reinstalled associated cooling hoses and vacum hose. Reinstalled new Serpentine belt. Changed the oil and filter, and following another thread here fully flushed the cooling system with distilled water(probably overkill) and replaced with 3 gallons of Dex cool.
I must say that I enjoy working on this car and that it all went together just as good as new.
Merry Christmas
Rick
-
Thanks for all the replies
I decided to order the seat covers from Gahh (link to the website above). They are 100% leather vs the partial leather so we'll see. I wanted to stay with the original look instead of going aftermarket.
I have bit the bullet and am crossing my fingers for the outcome and will post the result.
If I ordered the covers myself they would have been 1500. The installer I have chosen can buy them for less and he is charging me 1350 plus a somewhat steep 300 for re & re. I am alittle torn because I love DIY'ing my 996, but it is christmas and I did not have ready instructions to re & re these seat covers.
Anyways I'll post the result
Rick

Request for a vin check
in 997-2 Series (Carrera, Carrera 4, Carrera 2S, Carrera 4S, Carrera GTS, 911 Speedster)
Posted
Hi all
I am looking at buying a 997.2 and was wondering if anyone with a membership to carfax would be willing to search the vin for me?
If so, please PM me and I will forward the vin. Many thanks
Rick