Welcome to RennTech.org Community, Guest
There are many great features available to you once you register at RennTech.org
You are free to view posts here, but you must log in to reply to existing posts, or to start your own new topic. Like most online communities, there are costs involved to maintain a site like this - so we encourage our members to subscribe or donate. All subscriptions and donations go to the costs operating and maintaining this site. We prefer that guests take part in our community and we offer a lot in return to those willing to join our corner of the Porsche world. This site is 99 percent member supported (less than 1 percent comes from advertising) - so please consider an annual subscription or donation to keep this site running.
Here are some of the features available - once you subscribe RennTech.org
- View Classified Ads
- DIY Tutorials
- Porsche TSB Listings (limited)
- VIN Decoder
- Special Offers
- Paint Codes
- Registry
- Videos System
- View Reviews
- and get rid of this welcome message
It takes just a few minutes to register, and it's quality Porsche information at a low cost.
Contributing Members also get these additional benefits:
(you become a Contributing Member by subscribing or donating money to the operation of this site)
- No ads - advertisements are removed
- Access the Contributors Only Forum
- Contributing Members Only Downloads
- Send attachments with PMs
- All image/file storage limits are substantially increased for all Contributing Members
- Option Codes Lookup
- VIN Option Lookups (limited)


Skip
-
Posts
101 -
Joined
-
Last visited
Content Type
Profiles
Events
Forums
Exterior Paint Colors
Downloads
Tutorials
Links Directory
Collections
Classifieds
Store
Everything posted by Skip
-
As a follow on to this thread, I just found a replacement blower motor at Pelican (just the motor) for $124.95 USD (P/N: 911-624-151-02-PH). Pelican states that you just need to modify the plug as this is designed for a '73-'83 apparently, so that might be a heck of a lot simpler for those not so inclined to go through my steps. Enjoy.
-
So, this morning I crawled under the hood, removing the requisite fresh air plenum and blower. Easy enough to reach the back of the switch to flip the two wires around. Voila, switch lights up in all three positions. Now all I need to do is fog up the windows to test it out. I used both diagrams as well as downloaded the older manual 73-75 from Cannel UK which had a great additional diagram showing a front windshield defroster. Although the switch is slightly different and colour codes vary, the concept seems the same. The two diagrams from Loren, enabled the colour coding. Seems like the windshield relay is behind the front fuse box - not sure I want to remove that unless I have to - sooo, will go and try to create some humidity to clear. Thanks again to both.
-
Thanks to both of you. I'll look through each piece and give it a whirl in the morning. Will post results. Skip
-
Hi again, OK, so I've been working on the wiring to determine continuity for my defroster (car is 1984 911 ROW) which has both rear and windshield defroster I replaced the switch as it had a burn smell on it with the appropriate OEM switch. My question is this: the Bentley manual does not show a windshield defroster at all, and the only one I can find similar is the Pelican post for an 82SC. That said, the SC diagram shows only a 1,0 diameter Bk (black I believe) wire at point "III" and I have two different options: (1) single black wire or (2) a multiple connector with 2 x black and 1 x red/white wire. I believe it should be the single wire, but the strange thing is that no diagram shows a mixed red/white with 2 x black on it. The only remaining location for this connector would be point "15" which shows either 2 x 1,5 diameter black on the 82SC diagram or a single black in the Bentley Manual. The Bentley manual also has no connection at point "III", so I expect this is the front windshield connection. Final question relates to the orientation of the switch itself. It seems to have three different settings which I can't understand: (1) turn clockwise (2) pull on (3) pull on and turn clockwise Can anyone confirm what each should do? Thanks and Merry Christmas. Skip
-
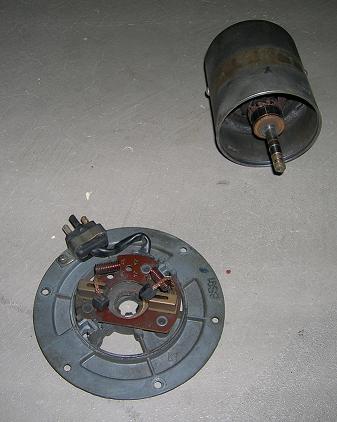
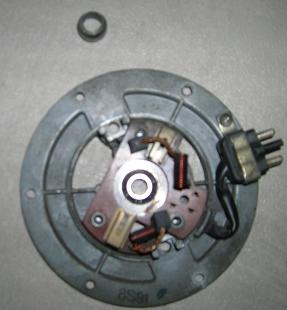
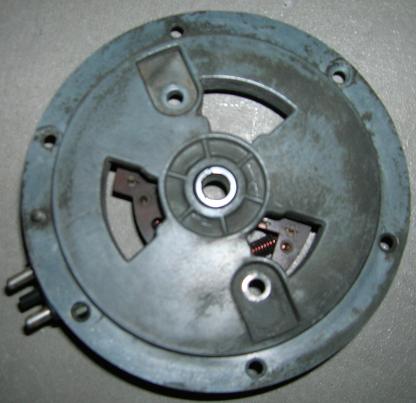
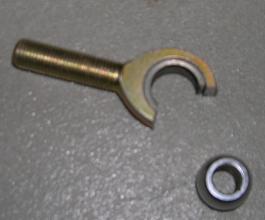
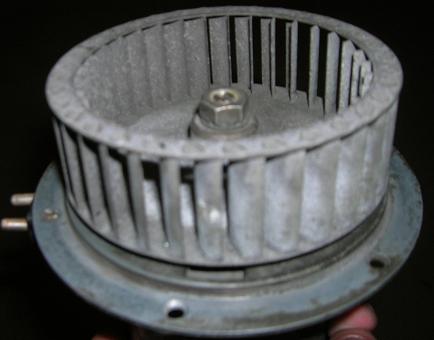
Well after a fair bit of running around, I managed to find an Aurora Rod End / Hime Joint? which I was able to cut apart and separate the hardened steel bushing (got that from General Bearing Service Inc in Ottawa, Ontario). I wasn't able to expand the 5/16 inch shaft diameter as no drill bit I could find, would hone the bushing (just chewed them apart). I found a local machine shop that was able to hone the inner diameter to 8mm (as per the main shaft) in less than an hour for $90 CAD. They also repressed the bushing into the plate so I simply had to reverse my disassembly to put it back together. Only challenge was not losing the small pressure 'c' clamps in the basement. The heater seems to work again, with no noise eminating from the motor. Have attached a couple of pictures for general situational awareness. I may make a recommendation to Pelican to perhaps see if they could stock such an item. Thanks again. Skip

-
Thanks for the efforts. I managed to get the blower motor apart after fighting a little with the blade fan. Will take it to a local bearing repair shop to see if their response is the same, hope not though - expensive little thing, although I did find a used on at dC Automotive for USD 225. As soon as I get confirmation from the shop, I'll post the result for others as well. Thanks again. Cheers. Skip
-
Forgot to add (blower part number is 965-624-151-00.
-
I just pulled the engine blower motor out as it was making significant noise when I engaged the automatic heater. I removed the fan blade assembly and removed the rear cover screws. Seems like the bearings are shot where the motor passes through the upper round plate beside fan assembly. I noted that replacing the motor assembly is in the $550 range, which seems somewhat excessive for simple bearings. The motor works well, so am just wondering if anyone has changed the bearings on the motor before and whether it is in fact possible. We have a local bearing place that I was planning on going to when it opens on Monday. Any thoughts? Thanks.
-
Just wanted to add some details for others who may have a similar problem, as I believe I've resolved this issue. I ordered a Weltmeister Short Shift Kit as well as replacement bushings for both the base of the shift rod (ball socket 911- 424-139-00) as well as the bushing for the linkage shaft (friction ring 911-424-224-00). Although the ball socket wasn't too bad, the friction ring was in four different pieces laying below the linkage. The challenge I had was trying to remove the conical set screw (901-424-229-00) from the base of shift rod head. This is a small allen socket and I just couldn't get the angle without starting to strip the screw head. I had a new screw but decided not to try my luck. Instead I made a small incision across the width of the friction ring (thick rubber) in order to allow it to wrap around the gear shift rod. I then carefully pressed it into the bearing bracket (930-424-031-00). After lubricating all moving parts I reassembled. I bought allen (pan-head screws) at a local fastner store to replace the regular bolts that came with the short shift kit. Figures it made sense to put in similar parts (although slightly longer ones were required (from length 20 to 35 mm in order to allow extra plate which came with the short shift kit to be bolted down). All in all a great fix and now the gears are solid with no slippage. Alignment was easy after this using the standard methodolgoies descibes in many other posts. The shorter throw takes some getting used to however. Thanks to all for your recommendations.
-
Have recently completed adjustments on clutch cable as well as on the foot pedal. Gears had improved, but suddenly yesterday, I had a great deal of difficulty in lining up 1st and 2nd gear. It was as though they weren't there. No problem finding 3rd / 4th and 5th and Reverse. Initially I thought that the shift coupling between the rear seats had slipped, but it was still tight. I followed the instructions on how to Improve Shifting off the Pelican Site (same as in my Bentley Manual), by loosening the clamp, rotating the coupler counter-clockwise looking to the rear of the car, and the shifter left in line with 1st & 2nd gear, so it is "pre-loaded?" I then tightened the clamp once again, but then 5th and Reverse wouldn't engage. After several attempts I've found a balance, but reverse and 5th remain difficult if I don't go through several other gears first. Could this be the bushings that are worn out also causing this, or perhaps I'm not adjusting it properly? Any ideas would be appreciated. Have also order a short-shifter and new bushing set just in case from Pelican.
- 1 reply
-
- 1
-

-
Finally managed to get some time to reply. I purchased the 1.0 and 1.2 mm feeler guages in order to get the right tolerances identified in my Bentley manual and was able to adjust the cable quite significantly. Also replaced the clutch cable rubber boot which was torn (required ordering and then a second readjustment, but GTG). (1) There is a dramatic reduction in grinding and sticking coming out of gears, but some still remains. Could this still now be an indication of syncrho mesh problems? (2) My local dealership stated that if I brought just the transmission in over the coming winter they could likely do an after market repair, but could give me any idea on cost "until he saw it". Does anyone know what type of cost this could add up to? Thanks Skip
-
Thanks to both. I'll check that this weekend. I hope it's an adjustment issue vice clutch or synchro mesh. Will advise what I find.
-
1984 ROW 911. Periodically, when driving (normally slower speeds - 2nd and 3rd gear), I depress the clutch pedal but have a difficult time pulling shifter out of gear. Then if it does release, it's associated with a large clunk in the transmission. Doesn't happen all the time, but concerned about clutch or transmission issue. Have replaced the transmission fluid twice now, with no change in issue. Could this be a signal for a new clutch assembly or perhaps the external clutch release mechanism? Thoughts? Thanks
-
Interesting idea - I guess that way it gives you a leverage point. Thanks - will look at that options also.
-
Great thanks - unfortunate, but better safe I guess.
-
I have a leak at the rear most oil return tube on the driver side. It's a two piece tube already with a circlip and the leak is coming from the crankcase seal side. I have a replacement two piece tube, but recommendation is to remove the heat exhanger - bolts are quite rusty on the engine block, so am concerned about breaking them off unnecessarily.Any recommendations? Thanks
-
I'm trying to remove the main oil cooler on the right side of the crankcase to replace the seals as there is a leak at the base where it enters the crankcase (opposite the S-tube from oil tank. I can access the bottom bolts without removing the heat exchanger and I think I can get to the upper ones by removing the air intake box. My question is, can the oil cooler be removed without (a) lowering the engine - as recommended in Bentley Manual; and (B) taking off the heat exhanger? Any help would be appreciated. Thanks
-
Thanks for the response - how do I tell which part of the year my '84 RoW was built (i.e. whether it's an '83.5 or early '84)? The car appears to have a CAT with the O2 Sensor installed (including the wire to the engine bay, but nothing else to the DME). Does that make sense? Would the CAT be doing anything if the O2 sensor is not connected?
-
That makes so much sense - it is a RoW German vehicle and the relay only has three termainals vice the six for buzzer and seat belt warning connectors. I don't have access to the RoW electrical wiring diagrams as the Bentley Manual I have only gives US/CA options from what I can tell. Would those be available somewhere perhaps? Vielen Dank. Tschüss.
-
I got mine for an '84 911 through Retro Motor Works in Seattle - but it was about $90 new - couldn'g get it through the dealer.
-
I had a similar issue and the issue revolved around the two fuel lines (cloth coated leading from the tank ventilation box (small square plastic box between the tank and fill pipe). These were supersaturated with gas and when I replaced them - the smell disappeared. I also replaced the rubber tank pipe sleeve that fits between the fuel door and the interior of the luggage compartment - it also connects to an overflow drain on the bottom. That was easiest replaced by removing the fill pipe and fitting it in from the fender well. There is also a round tension ring at the top that holds it in place.
-
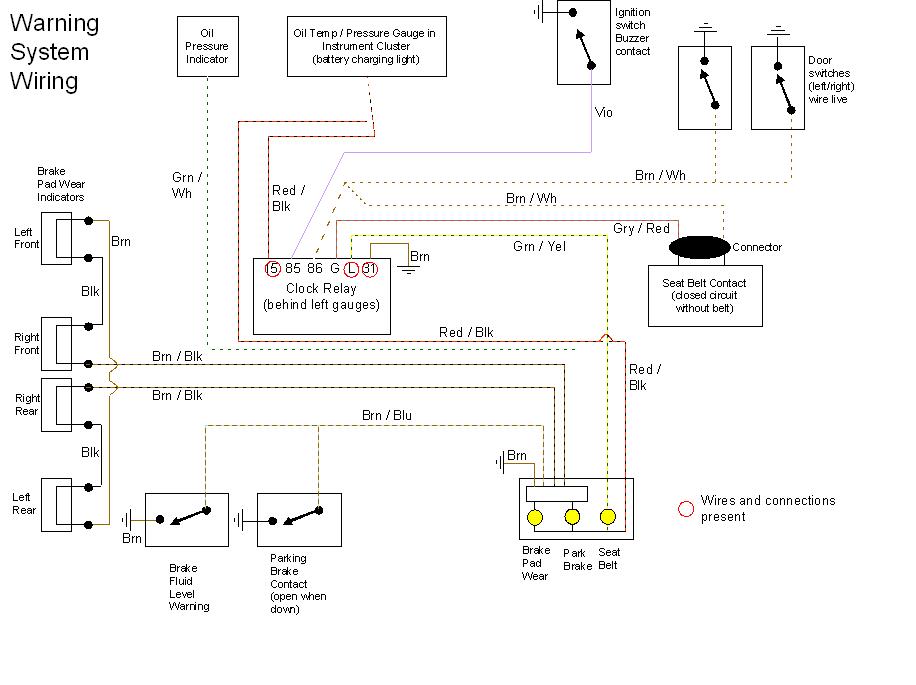
Managed to get the light to go out finally by changing the door switch on the driver's side and did further troubleshooting to determine where the seat belt wiring was. Dug through the dashboard to find the warning relay behind the left gauges and using the Bentley manual determined the following connections should exist from the relay: 15 (red/blk wire instrument cluster), 85 (vio wire to buzzer switch), 86 (brn / wh wire to both door switches and seat belt connector), G (gry / red wire to seat belt connector), L (grn / yel wire to warning light - seat belt side) and 31 (brn wire to ground) only actually has 15, L and 31 wires connected and available. 1. 85 - no wire to the buzzer switch, although it seems to have the two connections beside the ignition switch; 2. 86 - no brn / wh wires to door switches nor seat belt connection although the door switches turn the dome light on and off as appropriate; and 3. G - no gry / red wire to the seat belt contact. Also, the relay is a 911-618-102-01 actually doesn't have the 85, 86 or G connectors (nor are they on the harness side), although when I look up the parts manual the car should have a 911-618-102-00 which has these connection. The car is an ROW, but according to PET 7.1 with my VIN, it should have the second connector. Also, the parking brake light doesn't come on even after cleaning the contacts and confirming continuity between the warning light and the brake connector. Have put together the diagram as best I can figure and am attaching it - hopefully it makes sense to someone.
-
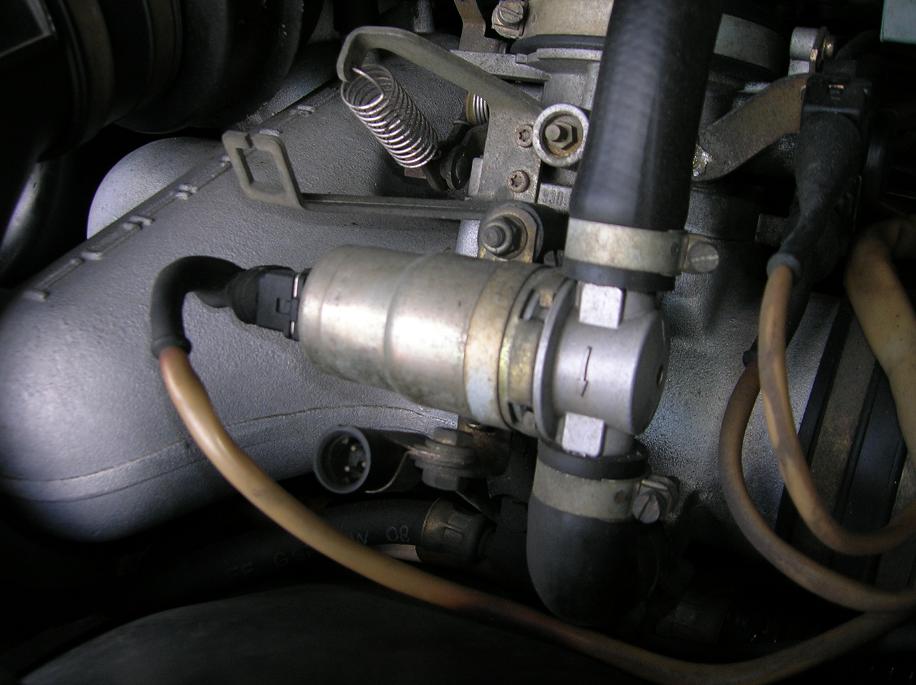
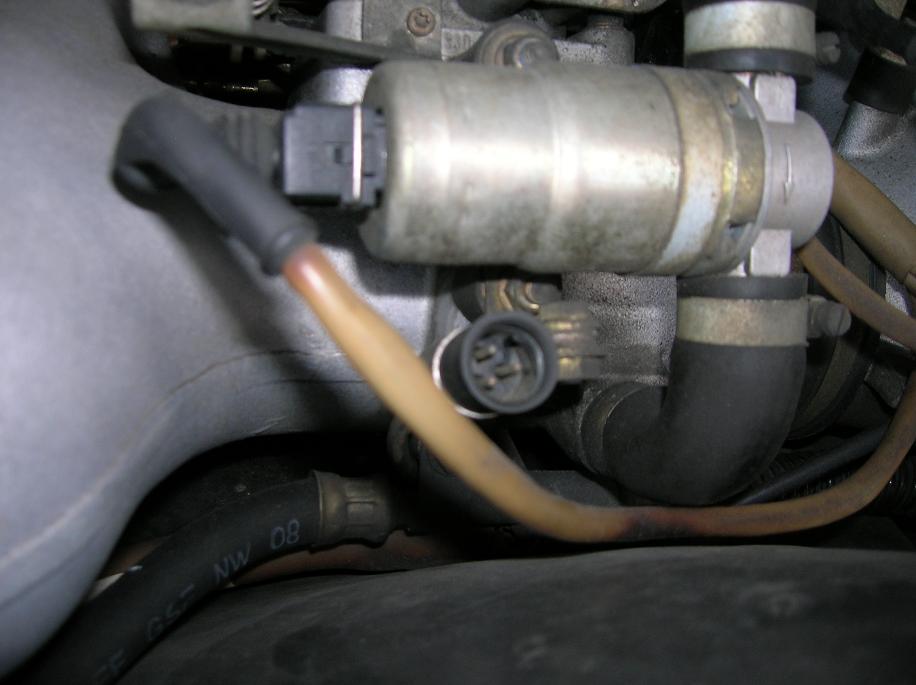
This is a test connector for your O2 sensor. It chould be covered with a rubber plug. Gerry Interesting - as I'm missing the main DME --> O2 sensor link as well. Could this be it, although if it's a test connector, likely not. Thanks.
-
Hi, Am trying to figure out what a 3-pin connector (all male pins) is for on what I believe to be the Idle Speed Control Valve on the top of the engine (1984 911 Targa 3.2 Li). Am enclosing two pictures of different angles. There do not appear to be any spare wires in the area either. Thanks Skip
-
Thanks - will do that this weekend then.