Welcome to RennTech.org Community, Guest
There are many great features available to you once you register at RennTech.org
You are free to view posts here, but you must log in to reply to existing posts, or to start your own new topic. Like most online communities, there are costs involved to maintain a site like this - so we encourage our members to donate. All donations go to the costs operating and maintaining this site. We prefer that guests take part in our community and we offer a lot in return to those willing to join our corner of the Porsche world. This site is 99 percent member supported (less than 1 percent comes from advertising) - so please consider an annual donation to keep this site running.
Here are some of the features available - once you register at RennTech.org
- View Classified Ads
- DIY Tutorials
- Porsche TSB Listings (limited)
- VIN Decoder
- Special Offers
-
OBD II P-Codes - Paint Codes
- Registry
- Videos System
- View Reviews
- and get rid of this welcome message
It takes just a few minutes to register, and it's FREE
Contributing Members also get these additional benefits:
(you become a Contributing Member by donating money to the operation of this site)
- No ads - advertisements are removed
- Access the Contributors Only Forum
- Contributing Members Only Downloads
- Send attachments with PMs
- All image/file storage limits are substantially increased for all Contributing Members
- Option Codes Lookup
- VIN Option Lookups (limited)


Skip
-
Posts
101 -
Joined
-
Last visited
Content Type
Profiles
Events
Forums
External Paint Colors
Downloads
Tutorials
Links Directory
Collections
Store
Posts posted by Skip
-
-
After some troubleshooting on the wiring side, I am trying to determine the wiring location to the seat belt connector for driver's seat. I have located the two pin male connector on the seat belt receptacle, but no wiring beyond that through the tunnel, nor to what I can determine the clock / emergency warning circuit to be. The clock works fine. As a secondary question, does the brake warning link to the parking brake or only the brake pad wear circuit, as it goes out one the engine is running with the parking brake engaged or not.
Thanks
Skip
-
I found the O2 sensor and connector in the engine bay, but no opposite wire to the DME unit. After opening up the connector at the DME unit, I confirmed all the connections, and no connector nor wire exists for the O2 Sensor. The car runs fine, although I can smell what I consider rich fuel from exhaust. Is it critical (better...) to have the connection for the sensor in an '84 911? If so, what is the best method to re-establish the link, as I doubt fishing through the conduit is viable?
Thanks
Skip
-
Thanks - found them.
-
Vielen Dank
-
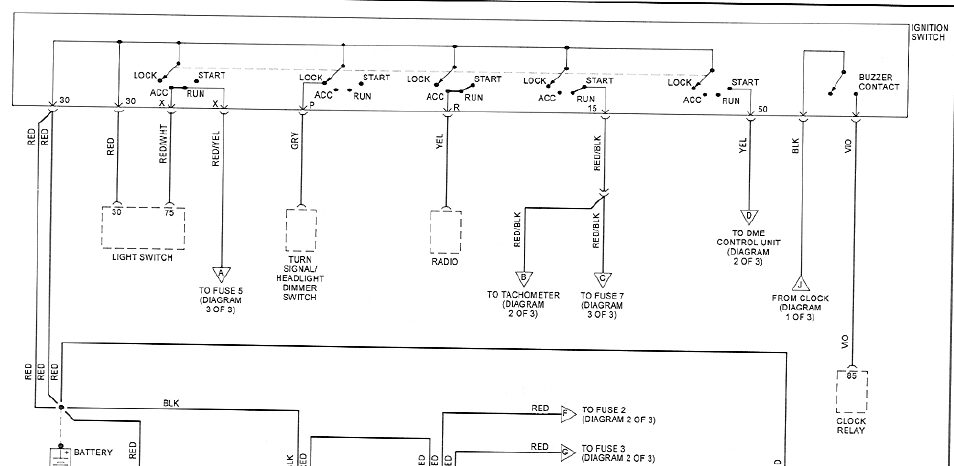
When I turn the key in the ignition to the first position (which I would assume is the accesrory position, the instrument lights come on and the fuel pump starts up. Is there a way to get power - i.e. to the radio, without the ignition actually being on, or is this normal for an '84 911?
Thanks Loren, I'll have to see where the connection is. Appreciate it.
The radio should be on in the accessory position.

-
When I turn the key in the ignition to the first position (which I would assume is the accesrory position, the instrument lights come on and the fuel pump starts up. Is there a way to get power - i.e. to the radio, without the ignition actually being on, or is this normal for an '84 911?
Thanks
-
Hi,
I have an '84 Targa and the crossover is attached to the passenger door panel inside the pocket also, but the screws to remove it are on the back of the panel - I had to remove the panel to get access to the screws (two of them). Good luck.
Hello,1989 Targa with factory component speakers in the doors.
I would like to know how to remove the speaker crossover network from the doors. Do I need to remove the door panel?
Thanks,
Bob
-
Have been trying to figure out how to remove the knee bar in my RoW 911. The Bentley manual says to remove the screws on the door side of the bar, but mine has no such screws (none visible). Could this be clipped on somehow, or could I simply be missing something?
Thanks
-
Have been working through a few wiring traces and used the Bentley Publisher manual as ref as well as some from posts. I'm finding that there are additional wires that look OEM, but aren't listed anywhere in my book that I can find (some are disconnected too). Just wondering if the wiring harnesses are the same regardless of RoW or US?
Thanks
-
windshield comes out to get to those fasteners out
better plan on a new glass,too
Rats, I was hoping that wasn't the case. Sounds pricey just to remove the dash board... Maybe I'll trace from below instead (might just take longer).
-
here is what I have
Thanks magcuda (and thanks for the efforts Lionel). Will be going to town on this as soon as my part arrives in the mail, but will trace the wires to ensure they have no shorts in the meantime.
-
If I remember correctly, the upper starter bolt is a 12mm allen type socket.
Hi Thanks I kept feeling around looking for a 17mm nut the same as the lower fixing. I now know what to feel around for.
Many thanks wvicary.
Regards Lionel :D :renntech:
Mine was a 10mm Allen Wrench on a 3/8" socket that I used. The only way to easily access (somewhat sarcastic) the upper bolt was over the top of the transmission - seems odd, but there's a heck of a lot more space than directly from the front. This way I could guid the socket into place by feel rather than simple trial and error.
Hi Skip. Thanks for your reply. Yes mine happens to be a 10mm too. Phew what a job! I still havent managed to get the allen bolt loose.
I have tried with the 3/8 sockets but it is to tight to move. I bought a 10mm 1/2 socket but the long extension is to long and of course the short extension is to short??
I dont know where to go from here Ill have to try and think of some thing.
Thanks again Lionel
The only thing I can think of is perhaps an impact wrench (air compressor type to loosen) or a multiple of short extensions on the 1/2" drive). Just be careful of course. You'll probably need to use a universal joint as well.
-
I'll have to dig out my old work shop manual and try and find the wiring diagram. I'll try and get to it asap.
Thanks a lot - may save another meltdown if I don't screw it up.
-
So, I've begun my electrical tracing of wires (after a headlight switch meltdown) to ensure that everything is where it's supposed to be and to track connectors that don't appear to have a home throughout the vehicle.
(1) In my Bentley manual for my 1984 911, it states to remove the screws at the end of the knee bar (in the manual it shows these screws), but I don't seem to have those on either left nor right of my vehicle - any ideas on how to remove it in lieu of these screws?
(2) Further it states to remove the upper dash by removing the vent screws (I can see those), and then the windshield before removing the dash. This seems a little anti-intuitive just to remove the dash. Is it necessary to take the window out first - hope not?
Thanks
-
If you didn't have a fault with the headlights or switch before this don't you think the fault might be in the area of the bulbs you replaced? Maybe something got connected wrong when you changed out the instrument bulbs.
I guess that's possible, but I don't recall changing any wires or plugs per say, just added the small bulb into the socket that was fit into the back of the tachometer and high beam light. They worked appropriately when I put them in. There do appear to be some connectors floating around that don't appear to have a home (so I've placed electrical tape across them until I can trace them either by the wiring diagram or manually over the winter.
I've also ordered a replacement switch via eBay (US $40 vice $205 at other store site) - hope it works out - same part number and all.
Would you know the correct positions for each of the wires that come off the back of the light switch? I was deliberate in marking them, but some were "fused" to say the least.
-
If I remember correctly, the upper starter bolt is a 12mm allen type socket.
Hi Thanks I kept feeling around looking for a 17mm nut the same as the lower fixing. I now know what to feel around for.
Many thanks wvicary.
Regards Lionel :D :renntech:
Mine was a 10mm Allen Wrench on a 3/8" socket that I used. The only way to easily access (somewhat sarcastic) the upper bolt was over the top of the transmission - seems odd, but there's a heck of a lot more space than directly from the front. This way I could guid the socket into place by feel rather than simple trial and error.
-
Batteries have a group size relating to their physical size,mounting tab/tabs,top post or side post and post location,etc. There is no way to upgrade to a ATO style fuse block that I know of. You can put dielectric grease on the fuse tips and re-tension the fuse tabs also. Best of luck with it all and let us know how it turns out.
Thanks. Will do.
OK, so I checked the fuses and they seem to have power on both sides of the fuse, did some housekeeping none the less however (also noticed some higher than allowable fuses in some areas, which I corrected to specs).
Removed the headlight switch and voila - source of that glorious burned electrical smell - see attached picture (not a pretty sight). Have cleaned up and replaced the end connectors to the wires which were attached and have noted the locations of each - however based on the fact that something shorted out, I'd love to know exactly what fits where to ensure they're connected correctly. I have checked my Bentley shop manual and can't seem to find a specific reference that sould show the back of the plug with some 10 connections (that I can notice due to minor meltdown). The car starts up fine still without the switch, but of course none of the lights work without it. Best location for buying another one - any ideas?
-
Batteries have a group size relating to their physical size,mounting tab/tabs,top post or side post and post location,etc. There is no way to upgrade to a ATO style fuse block that I know of. You can put dielectric grease on the fuse tips and re-tension the fuse tabs also. Best of luck with it all and let us know how it turns out.
Thanks. Will do.
-
I'm worried about this "electrical smell" you mention. Re-check the fuses using a test light. The fuse array in the older P-cars is famous for looking fine but not conducting current due to corrosion at the fuse tips. With the ignition key on test for power at both ends of the fuse, if you have power at one end but not the other the fuse is open or a poor connection.
As for the battery, you should be more concerned about the group size. The correct group size will have somewhere around 650 CCA. Be sure the battery cables are sound and no poor connections at that end.
OK thanks. I'll test each of the connections on the fuses in the morning. I managed to charge the battery to about 50% and used the charger start feature to get it going - that part seemed to work but the headlights do not - I think that's the area under the dash where the smell is. I have disconnected the battery negative terminal until I can check it in the morning, so I don't short anything else nor kill the battery either.
I noticed several wires leading to the positive terminal as well, so will tidy those up also and trace them back as I expect they are after market additions but should go through fuses either way if they don't have inline ones.
Based on the fact that the fuses are the old bullet type, is there a way to change them to more modern ones or is that tempting fate also?
For the battery, I'm not sure what you mean by "group size". I understand the 650 CCA however.
Thanks so much for your help - I am enjoying this regardless.
-
What is the state of battery charge? What circuit had the blown fuse?What was the original fault with the starter that caused it's replacement?
The battery is at 100% charge - no problems that I can see there.
The blown fuse was the power windows fuse, but I believe that was an error on my part working on a trim issue where I forgot to disconnect the battery terminal.
As for the starter, the benix I think it's called (solenoid?) was disengaging after start up and therefore was grinding with the fly wheel kicking it out. The car started perfectly with no grind after installing a reconditioned Bosch starter that I bought from Pelican.
I'm also trying to figure out what battery type is supposed to be in the car. The manual I have says 88 amp hours, but that's all. When I try to go to buy a battery, I'm asked what are the cold / warm cranking amps required, and I can't find that information anywhere (no sticker remaining on the battery I have. Am currently trying to charge the battery.
-
I had to replace the starter on my 1984 911 a couple of days agom started up great. Later I replaced some of the instrument bulbs and an interior dome light. Went out this morning to start her up but could smell that lovely burned electrical smell. Inserted the key and nothing - no oil warning light no radio light no click - just silence. Checked the fuses and one was blown but the strong smell was inside the car predominately. Pulled the electical harness connector off the back of the ignition switch and confirmed voltage on the two posts marked with "30" as per the manual. Checked some continuity to the radio etc from the electrical harness connector and there is continuity. I've read a couple of the other posts ref corrosion on the fuse points but that doesn't appear to be it. I'm not sure if there is an easy test to see why absolutely nothing is functioning - is that a sure sign of a particular fault (less the smell)?
-
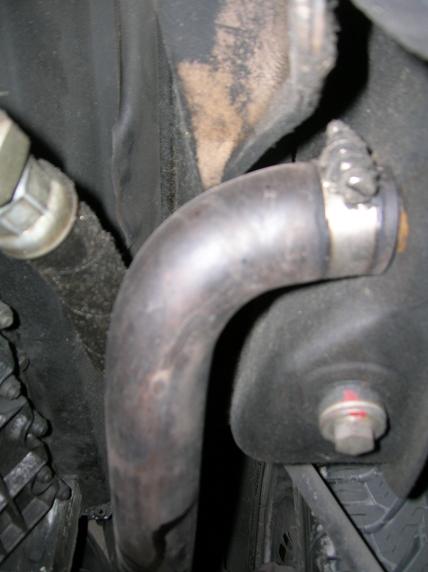
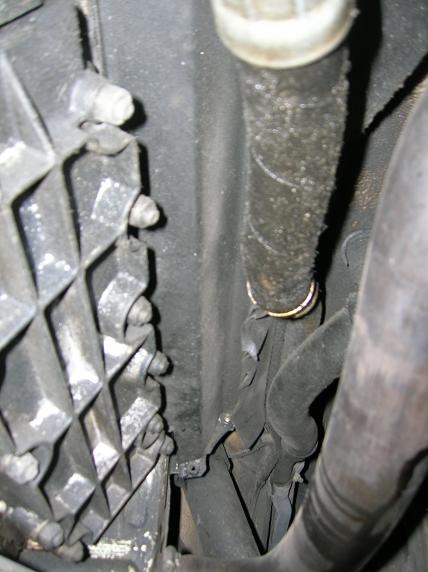
Am enclosing three pictures which show the specific hose with the leak that I currently see as well as reference pics to where it's situated.
In the first picture (page 170-8 from what I believe is the Bentley Repair Manual), that is the S-hose I'm referring to. If you look to it's immediate right in the picture, that's the hose that's leaking at both connections from what I can see, but I think the recommendations to clean the engine to determine if that is the actual source, is probably the best bet, to ensure I'm not wasting unnecessary effort in replacing parts. Might try to take a picture of the specific part of the car if I can get a good shot and then post it.trying cam hose again -
In the first picture (page 170-8 from what I believe is the Bentley Repair Manual), that is the S-hose I'm referring to. If you look to it's immediate right in the picture, that's the hose that's leaking at both connections from what I can see, but I think the recommendations to clean the engine to determine if that is the actual source, is probably the best bet, to ensure I'm not wasting unnecessary effort in replacing parts. Might try to take a picture of the specific part of the car if I can get a good shot and then post it.
trying cam hose again -
I think I understand, although I don't have the A/C Compressor, but I think I see what you mean concerning keeping a counter hold. If this is part of the oil system though, how come the oil won't ooze out when I disconnect the hose - is it not under pressure, or does it only fill with oil when the engine is running?
no need to drain the oil, the right side is the harder side as you have the A/C compressor to deal withone end of the hose is a banjo fitting, use new crush rings
the other and is a nut and Ferrel set up
the important thing is to counter hold the sending unit block so it doesn't loosen up
then you will need to replace those crush washers also


Warning Circuit
in 911, 912 Series
Posted
It's a 1984. Which connection do you think is wrong? Back of the warning circuit board or somewhere else perhaps?
Thanks