Welcome to RennTech.org Community, Guest
There are many great features available to you once you register at RennTech.org
You are free to view posts here, but you must log in to reply to existing posts, or to start your own new topic. Like most online communities, there are costs involved to maintain a site like this - so we encourage our members to donate. All donations go to the costs operating and maintaining this site. We prefer that guests take part in our community and we offer a lot in return to those willing to join our corner of the Porsche world. This site is 99 percent member supported (less than 1 percent comes from advertising) - so please consider an annual donation to keep this site running.
Here are some of the features available - once you register at RennTech.org
- View Classified Ads
- DIY Tutorials
- Porsche TSB Listings (limited)
- VIN Decoder
- Special Offers
-
OBD II P-Codes - Paint Codes
- Registry
- Videos System
- View Reviews
- and get rid of this welcome message
It takes just a few minutes to register, and it's FREE
Contributing Members also get these additional benefits:
(you become a Contributing Member by donating money to the operation of this site)
- No ads - advertisements are removed
- Access the Contributors Only Forum
- Contributing Members Only Downloads
- Send attachments with PMs
- All image/file storage limits are substantially increased for all Contributing Members
- Option Codes Lookup
- VIN Option Lookups (limited)


xmac
-
Posts
178 -
Joined
-
Last visited
-
Days Won
2
Content Type
Profiles
Events
Forums
External Paint Colors
Downloads
Tutorials
Links Directory
Collections
Store
Posts posted by xmac
-
-
The baffle maintains oil near the pickup so that there is no interruption, but the oil outside will still slosh. I have the LN add-on with the windage tray that is supposed to further help. From what I gather from Jeff, I bought a +2qt oil pan to run less oil on the track by underfilling. LOL
Mac -
Updated images:

-
Thanks for the info and inputs. I am working on a revised graphic. Posting soon.
-
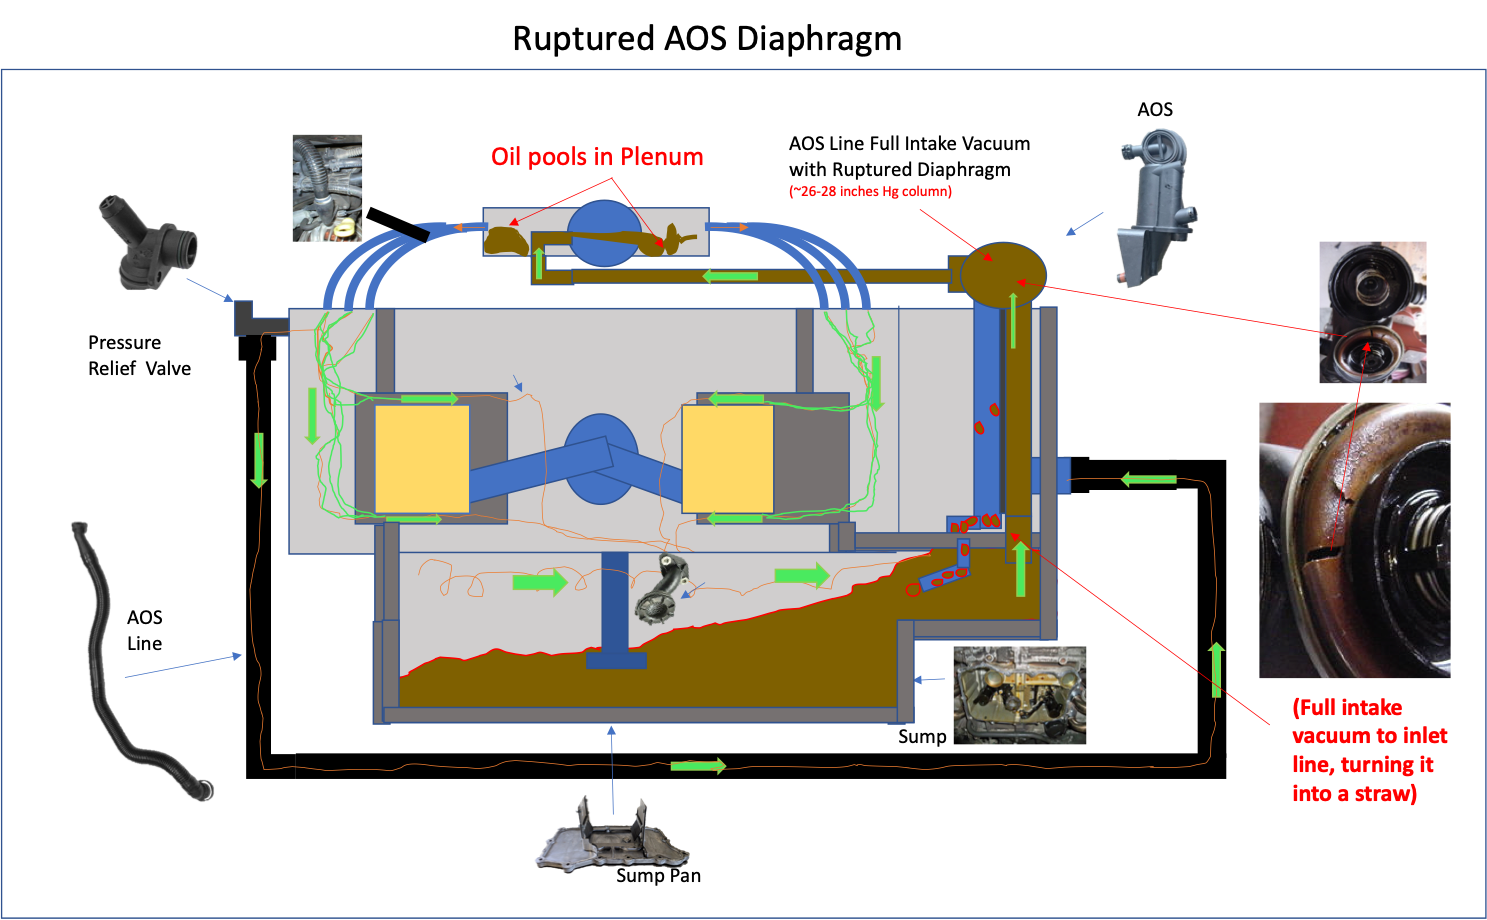
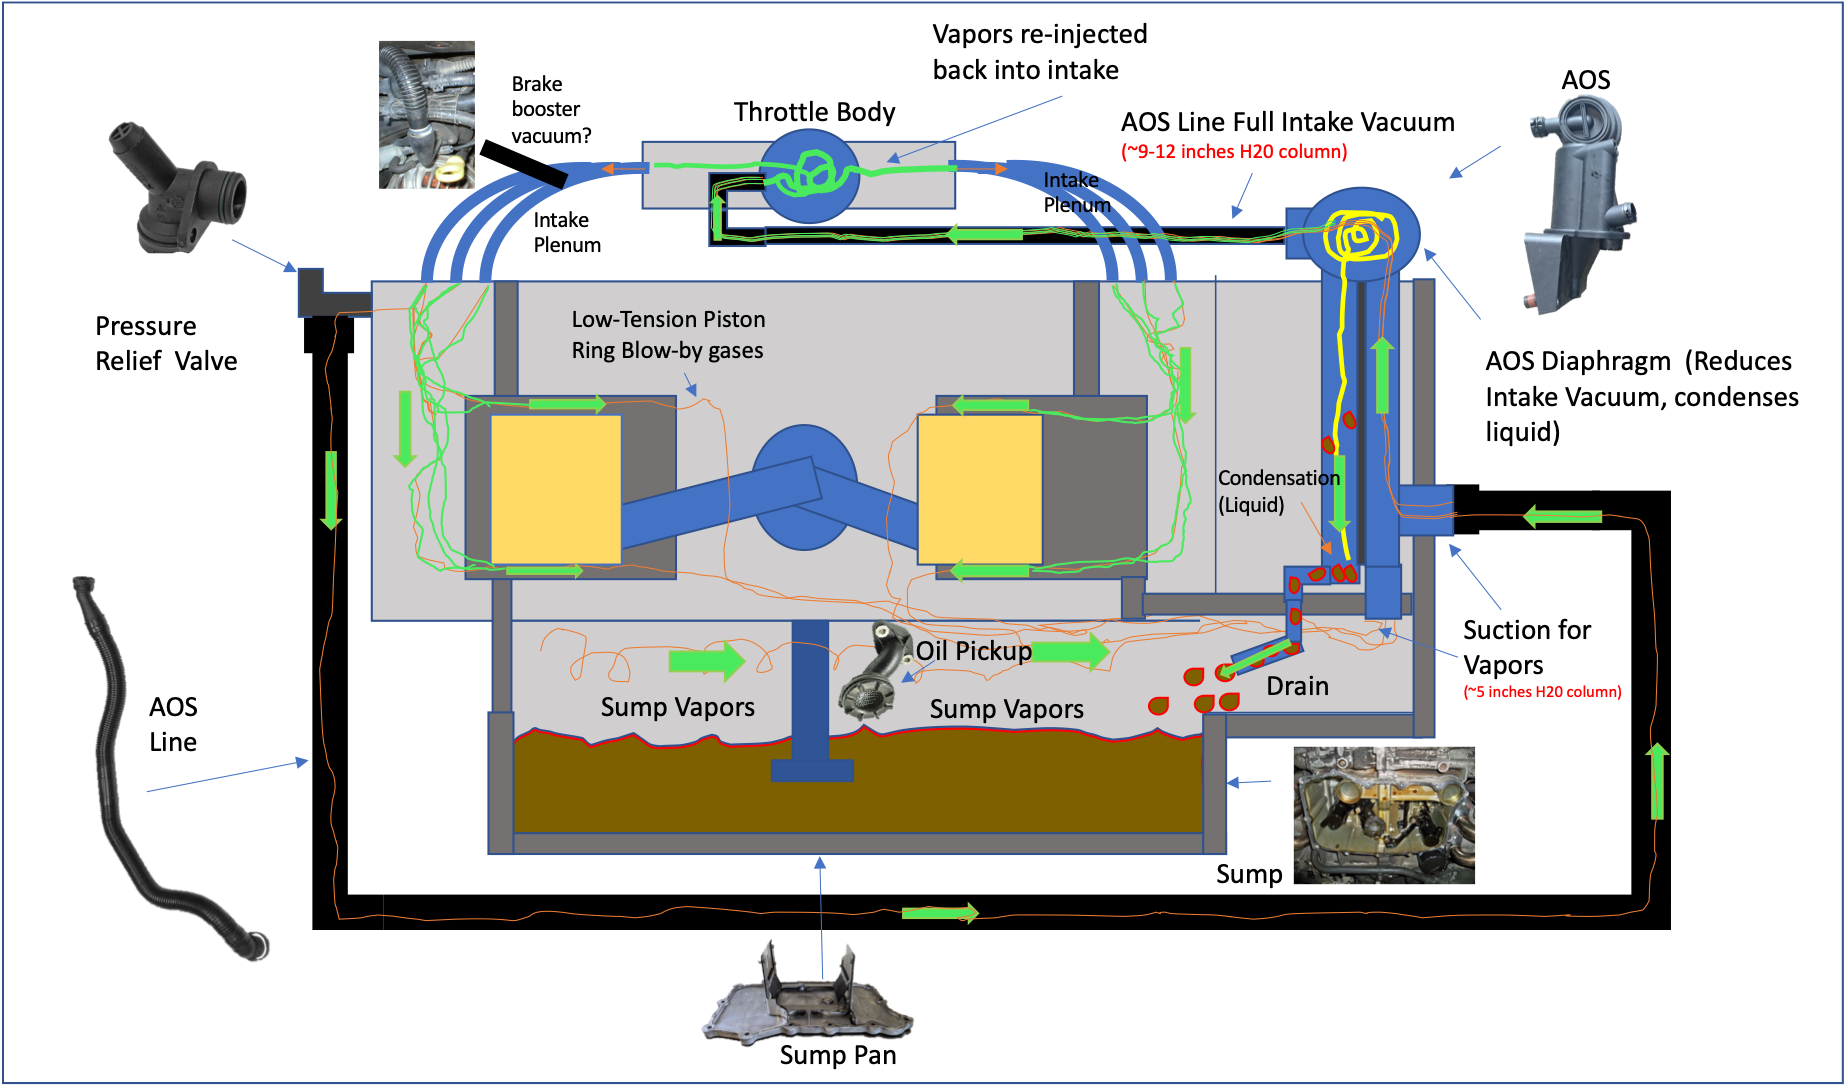
I've had issues with oil ingestion issues on a track boxster with a 996 3.4 engine swap and an LN +2qt deep sump. The AOS was replaced with the real Porsche part but the white smoke problem continues. I contemplated AOS deletion over the motorsports version given there are many posts noting the super expensive motorsport version will fail as well and others that simply plugged the lines, noting it was purely emissions related.
However, one post made me rethink when someone mentioned the AOS helps seal the low-tension piston rings used in M96 engines and that the mechanism is used to collect and reburn blow-by gases. I made a diagram to help me better understand why the engineers put in there in the first place and also figure out how oil actually gets sucked up. We know if it wasn't needed, Porsche would have removed it to save weight (like they do in every aspect of the car).Looking for validation that the diagram is correct and and changes edits needed. Thanks in advance.

-
Answering my own question:
In case someone needs it in the future, the shutoff valve needs to be connected to a switch 12V source on one end and the other into the DME pin 7 (yellow/brown) wire, not to ground as I had it. It appears there is ~-6V on the DME that reduces the voltage on the solenoid to a net of 6V (if a +12V source is used) and when the evap system pressure test happens, it adjusts the -6V to 0 so that the valve now sees a full 12V and actuates.
-
I need help clearing two codes due to a 3.4 engine transplant in a 1997 986 I just purchased. I have two OBD codes P0447 and P0453 related to the the shutoff valve and fuel tank pressure sensor used in 1998+ cars. I found several other posts noting 1997's do not have wiring nor support the 1998+ fuel leak check hardware so I am taking the challenge to find alternatives to clear them for good.
I have searched high and low and unable to find signal details the 1997 DME flashed with 99 996 3.4l map. Has anyone measured the voltage from pin 7 to ground on:
1997 DME remapped with 3.4l map (I measure a little over +6V for DME pin 7 to ground when nothing is connected)
I thought I could easily clear the P0447 (open circuit) by simply connecting a 996-605-201-01 shutoff valve with a 12V source to pin 7 on the DME since both 97 and 98+ DME wiring diagrams show pin 7 as "AAV VALVE." However, after installing, P0447 goes away but code P0448 (short circuit) appears. The valve resistance is ~25.5 Ohm and toggles open and closed with a 9V battery so I don't think it is a bad valve. What is the pin 7 current or voltage signal the DME is expecting?
Thanks!
-
I had similar symptoms with a light but noticeable oil slick floating and yellow sludge in the coolant reservoir and then emulsion in the oil filler hose and cap. I replaced my air/oil separator (AOS) and after that, no emulsion and no oil slick anymore - and I check it regularly.
Coolant runs through the head of the oil separator. Another location where coolant and oil run in close proximity is the heat exchanger adjacent to the starter. Some coolant/oil heat exchangers (all-metal) have been reported to fail too but less of a risk. I did not cut my AOS open to prove there was seepage, but I probably should have.
-
While they will likely bolt up fine - I have no idea if it will pass smog tests as the later style cats got different O2 sensors.
If you decide to try it let us know if you can pass CA smog.
Wow, O2 sensors - I hadn't even thought of that angle for possible issues. Thanks for passing that along Loren. Are the bung sizes are the same? I may roll the dice on the set of cats considering the price.
-
Did several searches and could not find the answer if both the headers and cats can be swapped going from 3.6l to a 3.4l. For thread completeness, there several threads noting that you can put 3.6 mufflers on a 3.4, connecting to 3.4l cats. I use bypass pipes so mufflers are not part of my equation.
My goal is to buy a used second set of catalytic converters to be modified with new 200 cell guts, but keep the stock parts just in case I want to revert back to fully stock in the future or have trouble at visual inspection. There seem to be more 2002+ exhaust parts available and came across a 2003 set but I have a '99.
1. Do 3.6l cats bolt onto 3.4 headers without any mods required (no need for 3.6l headers)?
2. If I replace both the headers and cats from a 3.6l onto my 3.4l, will they bolt right on and all brackets fit without any mods?
3. If I have to do a swap back to the original 3.4l cats with 3.6l headers on, would they fit on the headers, or would I have to put the original 3.4l headers back on to get them to fit?
For reference, I pulled part numbers for both cats and headers:
Catalytic Converters:
3.4l [M96.01/.02/.04] ('98-'99 / -'99 -> '00 -> '01-)
3.4l LEFT
996-113-021-53 / 996-113-021-56 -> 996-113-031-01 -> 996-113-031-02
3.4l RIGHT
996-113-022-53 / 996-113-022-56 -> 996-113-032-01 -> 996-113-032-02
3.6l [M96.03] (2002-2005)
3.6l LEFT
996-113-031-03
3.6l RIGHT
996-113-032-03
Exhaust Manifold/Headers:
3.4l [M96.01/.02/.04] ('98-'01)
3.4l LEFT (1998-2001) 3.4l RIGHT (1998-2001)
996-111-101-52 996-111-102-52
3.6l [M96.03] (2002-2005)
3.6l LEFT 3.6l RIGHT
996-111-101-53 996-111-102-53
X51
3.6l LEFT 3.6l RIGHT
996-111-101-40 996-111-102-40
edit: Simplified part # section and added color
-
It's the stock standard version AOS from Sunset Porsche. The old one was also stock.
1. Can you confirm the part number used is a 996.107.023.55?
2. Copied from the Pelican AOS Tech Article: "When the air-oil separator fails, the intake manifold vacuum will draw into the crankcase and the levels will reach 9-12 inches or more."
3. I would replace it with another new one since it is not worth saving the $150 for the problems it will create. At a minimum, I would take the new one out it out to test the non-coolant ports with a mityvac.
-
996 cable/wire sheathing seems to be tasty to critters. I had something eat through my knock sensor cable, but nothing a precision soldering iron can't fix.
If you don't have the pinout, let me know and I can snap some pics for you. The connectors are brittle so be careful when taking them apart. Probably obvious, but also make sure you plug in black to black plug and gray to gray plug when putting them back together.
-
I'm running a 295/30/18's on the 10" ET65 Sport Design wheels. They fill out the wheel nicely, no rubbing on a 99 C4. 295's are generally spec'ed for 10"-11" widths.
-
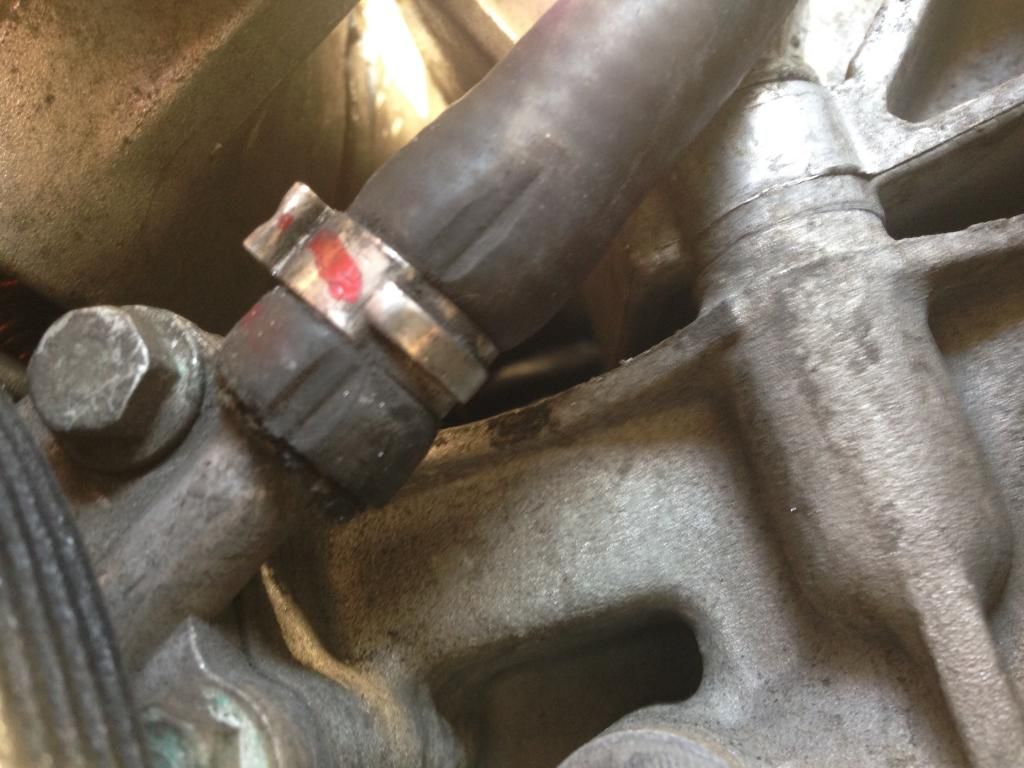
While doing some other work, I noticed belt rub on a coolant line just above the lower left idler pulley. I have a '99 so I have the special TIS bracket/guide to help with belt slip but that goes in a different location. Anyone else seen this? All pulleys are in great shape with no slop. The belt is only about 1 year old made by ContiTech.
Picture of the rubbing and one with the pulley removed.
-
Had this happen to me. I used some needle-nose pliers and plastic o-ring pick to grab it then pull it up and over the lip. Take your time so you don't rip it.
-
Can you explain a little more as to the harness issue?
-
Super glue it. Then try to pull it apart. You will be surprised how strong the glued part is.
I used to glue the engine mount isolation dampers on Norton heads with it and they never broke in the same place again.
I'll give it a try.
-
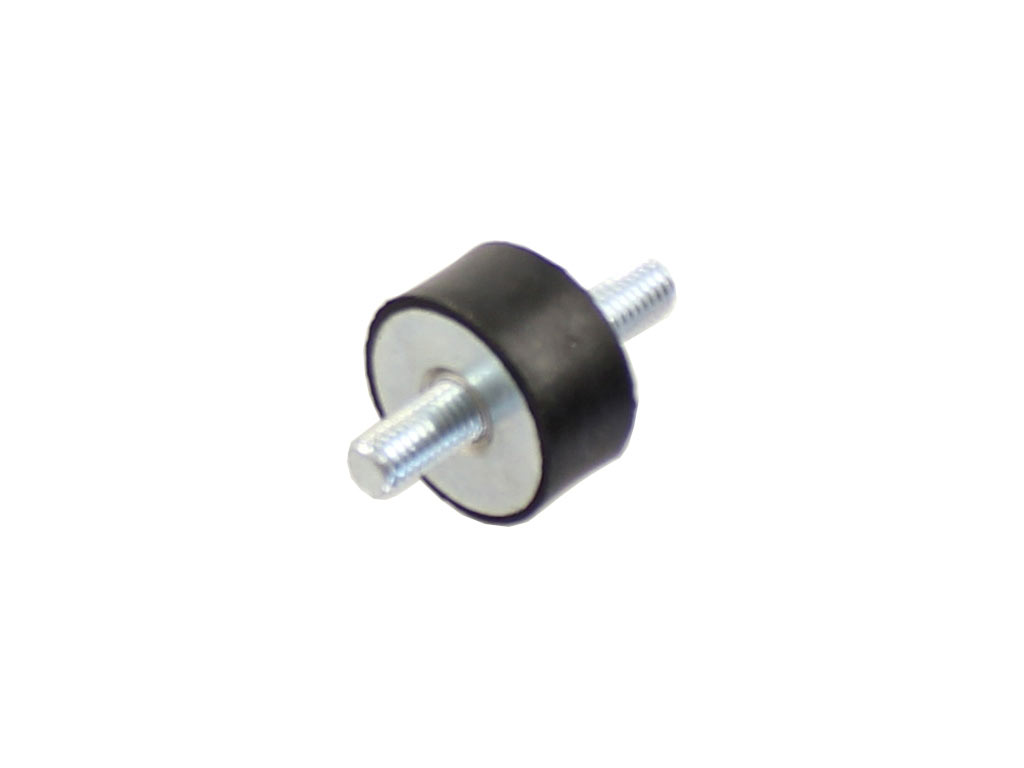
During some maintenance, I broke the "bonded rubber buffer" bolt that has threaded portions on each side of a round rubber cylinder and holds the bottom left of the throttle body. I purchased the replacement which had been superseded from 93011057901 to 99970326500. Unfortunately the new part is much longer and won't fit in the spot. Do I need to replaced the small metal bracket to match??
Here is a picture of the part I broke (rubber ripped in half)
and here is what arrived
-
I just used the OEM style tool to reset the timing of my cams over the weekend. Both side looked to be very close but. 1-3 had been. Showing a12 degree deviation and 4-6 a 3 degree deviation. When I used the tool the deviations were apparent. I don't have the engine back in the car yet as I am doing ceramic IMS bearing, the Direct Oil Feed. IMS flange, the latest RMS seal and a few other items. I hope to finish things up and have the engine back in by the weekend and. I am anxious to see if my deviations are gone.
Any update?
-
In troubleshooting a rich at idle, lean at speed issue, I replaced my MAF with a yellow boxed one. As far as I know the one replaced is the original. Since there are so many knock-offs, I used a reputable vendor and double-checked the authenticity. Essentially, you download the TecIdentify app on your smartphone and scan the 2D barcode. After scanning you get a green verification or red problem screen.
Look for the seal on the box with codes and Bosch Hologram:
Download, the tecIdentify app
Find the 2D barcode on the other side of the seal and scan it:
Look for a green square in your verification page of the app:
You will notice the code submitted matches includes the 3 groups of codes printed on the seal (3YBJP4 K31BTN C1WCGD) and the last group of characters is duplicated in the hologram.
Hope this helps folks make sure they are not buying junk parts.
-
 1
1
-
-
Ignore prior post but here is a reference picture:
-
I would try to force the failure to help narrow it down. Buy a box of 7.5A fuses and try to force it to blow by replacing it, then one-by-one immediately adjust mirrors, seats, then the top. All of them have motors that could have a problem.
-
It is a standard righty-tightly lefty-loosy. I would chant that at least 10 times then twist it counter-clockwise.
In all seriousness, they typically seal well. Leave it clipped into the air filter box when you try to remove it. You can use a rubber strap wrench (no damage to cap) or worst case some channel locks. If it is one of the old style yellow caps, you can update it to the newer black one for about $12 - PN 99610703552.
-
Thanks Mac and Dave - appreciate the replies. However, the "resistor structure" on the 996 C4S fan is pretty different from the C2 996 resistor - part looks completely different and is stuck to the back of the fan assembly, rather than hanging down like a cigar. Anyway, I'm pretty sure it is still doable without removing the rads, might try next weekend.
Sorry, too quick on the keyboard. Looks like it is an integrated part of the fan assembly. If it was me, I would remove the front bumper to get full access and then clean the radiators while removed.
-
Go to the 996 DIY Tutorials and look under the Common Fixes section.


AOS Diagram
in 996 Series (Carrera, Carrera 4, Carrera 4S, Targa)
Posted
Thanks for the tip. I just ordered a Robinair 75240