Welcome to RennTech.org Community, Guest
There are many great features available to you once you register at RennTech.org
You are free to view posts here, but you must log in to reply to existing posts, or to start your own new topic. Like most online communities, there are costs involved to maintain a site like this - so we encourage our members to subscribe or donate. All subscriptions and donations go to the costs operating and maintaining this site. We prefer that guests take part in our community and we offer a lot in return to those willing to join our corner of the Porsche world. This site is 99 percent member supported (less than 1 percent comes from advertising) - so please consider an annual subscription or donation to keep this site running.
Here are some of the features available - once you subscribe RennTech.org
- View Classified Ads
- DIY Tutorials
- Porsche TSB Listings (limited)
- VIN Decoder
- Special Offers
- Paint Codes
- Registry
- Videos System
- View Reviews
- and get rid of this welcome message
It takes just a few minutes to register, and it's quality Porsche information at a low cost.
Contributing Members also get these additional benefits:
(you become a Contributing Member by subscribing or donating money to the operation of this site)
- No ads - advertisements are removed
- Access the Contributors Only Forum
- Contributing Members Only Downloads
- Send attachments with PMs
- All image/file storage limits are substantially increased for all Contributing Members
- Option Codes Lookup
- VIN Option Lookups (limited)


ukchris
-
Posts
122 -
Joined
-
Last visited
Content Type
Profiles
Events
Forums
External Paint Colors
Downloads
Tutorials
Links Directory
Collections
Classifieds
Store
Everything posted by ukchris
-
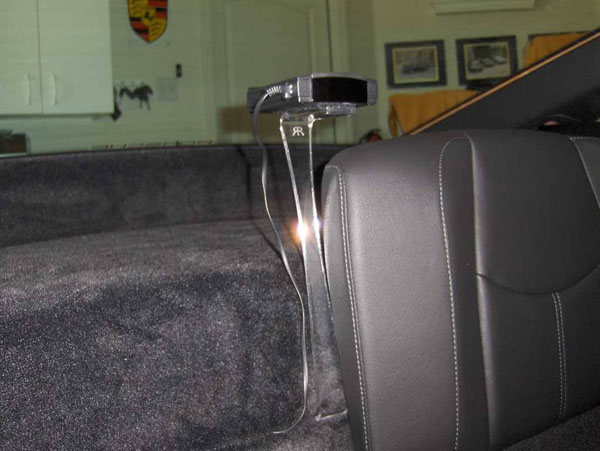
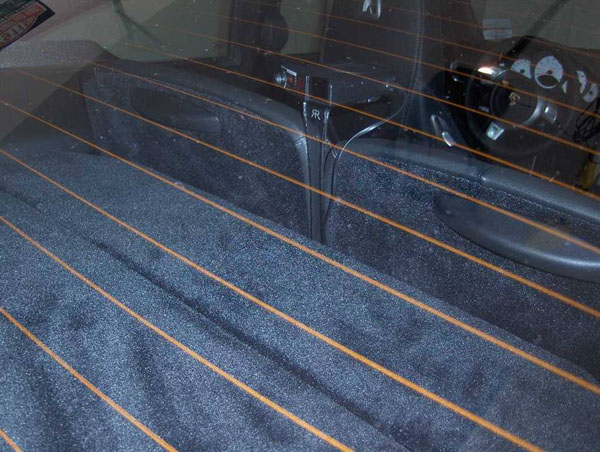
Radar Detector Mount (Long, several pictures)
ukchris replied to ukchris's topic in 986 Series (Boxster, Boxster S)
They finish up around $45... the logos were only on my first test piece and I dropped the idea before getting any copyright calls. I'm about to test two different designs, a slim single leg version and a smaller version of the inverted Y. I've also done one for a 99x recently, I'll attach a picture. Chris.
-
Serach ebay with "carrera batwing" Chris.
-
Did you change the filter on the head unit? When I had mine there for a while I couldn't read the display, it turns out the filter is polarized and for a few dollars Becker will exchange it for one polarized such that it can be read clearly at that angle.
-
Removing the Rear View Mirror Mount
ukchris replied to ukchris's topic in 986 Series (Boxster, Boxster S)
Apply heat and you will crack the screen. Take it to an autoglass agent, they can remove it by using a garot type wire in the same way they remove bonded windscreens Glyn Thanks Glyn, I called one glass place and they wouldn't even try for fear of breaking the glass, I'll try some more. It was also suggested that the glue could be dissolved with a acetone solution maybe. When I mentioned heat I was thinking more a warm day rather than applying excessive heat :) Cheers, Chris. -
Okay, say I want to remove the mount from the windshield, the mirror is easy enough to remove but once it's off I also want to remove the button. From searching I've come across two suggestions, either get the area warm then give it a twist with a wrench or try to dissolve the glue with acetone. If I try this I think I'll try the second one first as I am nervous about a loud cracking sound following the first siuggestion but thought I'd check in first to see if anyone has tried this and how it worked out. Chris.
-
Did you get your gauge faces installed? Did you just swap the faces or do the whole cluster? If you did the whole cluster what did you do about the mileage? Also did you have any issues aligning the needles afterwards? I'm playing with making my own gauge faces, I have a 97 cluster on my bench as a test rig but I doubt I'll ever fully reassemble it. I'm in no rush to take my cluster apart jsut yet..! Here are some pictures of my experiments so far, the problem I have is that the faces I've made are too translucent and do not illuminate properly so that is going to be phase two! Chris. Blue Brushed Carbon Red Yellow
-
Valentine 1 Custom Mirror with Color LEDS WOW
ukchris replied to Cayenne17's topic in DIY Articles - Cayenne - Mods
I think the issue is finding a convenient place for the remote display that is easy to glance at without having to look away from the road too much and is also convenient for the mute switch. I have the display in my mirror in my Boxster as I didn't like the other mounting locations and it also enabled me to mount my V1 in the back between the seats, I prefer it there so it isn't as obvious to potential thieves when I'm parked. It's a personal choice, each to their own. Chris. -
Found them in an old email, for an 03 onwards the parts should be: 996.613.505.10A05 - Stalk Cap (Cruise) 996.613.507.10A05 - Stalk Cap (Wipers/Washers) For up to 02 the part numbers are slightly different as they would then be the gloss finish. Chris.
-
They are separate parts, if you search the forum you should find the numbers. I can post them later in the week when I get home but I'm sure someone will chime in before then. If you call Sunset Porsche they'll know the numbers... they'll be cheaper too. Chris.
-
Hi Nick, I used 996.613.219.10EWC on my 03 Boxster S so I can't really comment on that but I can confirm you have to run power and ground, both are easy though. The power can come from a wire tab behind the fuse box and for the ground there is a convenient screw behind the cluster that is often used for OBC anyway. Chris.
-
Antenna connector in A pillar?
ukchris replied to deliriousga's topic in 986 Series (Boxster, Boxster S)
Bringing back the dead here... Where did you find the adapter? Thanks, Joe You can buy them online at Crutchfield.com althought hey were expensive, about $25 each IIRC, I got mine from my local Tweeter store, I think I paid $25 for the pair. I'd think most car audio places should have them or be able to get them. -
I was at a TSBL gathering last weekend in CT, one of the guys there has done this. He said all that was needed was to run a single wire from the cluster to the engine compartment and replace one sensor on the engine.
-
Mine got a little upset too, I changed the country coding to D which I assume is Germany and the horn would beep and the doors lock and unlock followed by a rash of codes. Ooops, I think I'll live without remote control windows!!!
-
...Any one have a PST2 in CT/NY
ukchris replied to Nick_USA's topic in 986 Series (Boxster, Boxster S)
Nick, send me an email. There's a tech session in CT on Saturday, 20+ Boxsters, come along and get it all sorted out... :) Chris. -
Thanks Richard, I'm going to a Boxster meet this weekend so I might play around a little while I'm there. Were the option you were changing under the alarm module? Chris.
-
I have my DME coded as a Boxster S, 986320. What I'm wondering is what needs changing to make it think it's a European car, is there a code variation? As I understand it the Euro 986 has a fwe little things ours do not like auto-windows from the remote, I thought it would be interesting to give this a try. Is there a code or am I on a wild goose chase? Ir can my car do the auto-window thing already? (As I udnerstand it holding the key unlock button on a Euro car will unlock the car then open both windows). Chris.
-
Plus the "small order fee" which basically means you may as well order a phone harness while you're at it!
-
I'm intruiged as to how and why you changed your cluster. All 986 clusters contain the original OBC functionality although it was updated later. Do you see the simple OBC display with regular LED digits or the one with the more advanced dot-matrix style display? Or do you see nothing at all? It seems odd that you would be getting airbag warnings, do you have airbag deactivation installed for a child seat or similar? Chris.
-
Where are you located? I did the stalk swap on my 03S a few months ago, it's quite straightforward, overall it should take a couple of hours at most. I had the same two stalk setup as you and switched to the four stalk, I added Cruise Control as well as OBC at the same time. I believe the four stalk unit is actuallt cheaper than the three stalk so you may as well look at adding cruise control although your posts seem to suggest you have a 987, I don't know if anyone has done it on a 987 so far but would think it should be the same. Cruise control would need to be enabled using a PST2, probably by a dealer. You'd need to buy the stalk, the wires for the harness and connectors, total cost for parts is about $200. If all you want is an easy way to control OBD you can also run wires from the harness to simple switches and not bother with the stalk but it isn't as neat a solution in my opinion, you do however still get all of the functionality. You should post where you are located, the year and model of your car as well as any relevant options. Chris.
-
I think you'll find that in an 03 it is much, much easier than what Ed had to do. When Ed first did this he had to wire it all up back to the DME, all of that wiring is in place in newer cars which makes life much easier, here's an abbreviated list of what I did with advice and guidance from Richard, Charlie and Loren: 1. Disconnect the -ive terminal and wait 5-10 minutes. 2. Remove the airbag 3. Mark and remove the steering wheel 4. Remove the steering column cover 5. Swap the stalk set over 6. Remove the cluster and run the new wiring to the cluster connectors 7. Run the 12v cable down to the fuse box 8. Reassemble everything Then, assuming cruise has been enabled with the PSt2 you should be all set. The main instructions I followed were the original ones for swapping the stalk set over for OBC, they are good although some of the screw sizes are off in places. My notes earlier in this thread were intended to supplement those. What I don't know are differences in a manual gearbox, you'll need someone else to chime in on that although I suspect the DME probably knows already as there is a clutch switch already in place for starting the car, I would think it would tell from that when the clutch was depressed (or the brake). Thinking as I type... that must be the case as my cruise turns off when I brake without doing any mods. I think if you do the same as I did you'll be all set. Where are you located by the way? I was lucky that when I hit a couple of puzzling steps Charlie responded very quickly on the board. I'd happily share my email address, instant messenger and phone number if you wanted to have someone to call on for moral support, there's nothing worse than being in a quandary with your car in bits! Chris.
-
I did the mod on my 03S, went from a 2 stalk to a 4 stalk. It's pretty straightforward, make sure you have all the wires (the 009 and 010) and assemble the harnesses in advance and you're ready to go. Make sure you have a 24mm socket for the steering wheel nut and put the connectots in (on the yellow cables) with the spring clip outwards, then you have a chance of removing them if needed and they will not short on each other. Oh... I should mention... my car is Tiptronic so no clutch switch, not sure if that is needed or how it is done, sorry. Chris.
-
There's a guy sells them on ebay. Must be fiddly as they are tiny little surface mount LED's. I can't seem to find the listings now but there were around a few weeks ago I'm sure. Personally I'd mount the unit somewhere that is recessed or shaded instead, much easier. Chris.
-
Removing the logo panel in the door sill...
ukchris replied to ukchris's topic in 986 Series (Boxster, Boxster S)
Ahh okay, thanks chaps. I'll put the illuminated logo project on hold!! :) -
Removing the logo panel in the door sill...
ukchris replied to ukchris's topic in 986 Series (Boxster, Boxster S)
I'm getting a bit confused so I just wanted to confirm I'm explaining myself clearly, when the door is open and you look down at the sill there is a plastic over and inset in to it (in my 03S anyway) is a rounded rectangle/oval piece about 10" long that says "Boxster S". It is recessed in to the plastic door sill, I can get my fingers in the gap around it but don't want to risk pulling it (yet!). I'm a little confused as you and Loren both said it wasn't recessed, I can try and take a picture later. In understood that in a C4S this panel may be illuminated too, hence why I thought there may be wiring access underneath it. Chris. -
Removing the logo panel in the door sill...
ukchris replied to ukchris's topic in 986 Series (Boxster, Boxster S)
Just had a look, mine is definately recessed, no idea how deep or what is underneath it though. I guess I'll have to have a go at it and see. I thought I remembered once upon a time seeing a picture of wiring running under there, maybe it was Ed's original cruise hack where he had to run wiring front to back.