Welcome to RennTech.org Community, Guest
There are many great features available to you once you register at RennTech.org
You are free to view posts here, but you must log in to reply to existing posts, or to start your own new topic. Like most online communities, there are costs involved to maintain a site like this - so we encourage our members to donate. All donations go to the costs operating and maintaining this site. We prefer that guests take part in our community and we offer a lot in return to those willing to join our corner of the Porsche world. This site is 99 percent member supported (less than 1 percent comes from advertising) - so please consider an annual donation to keep this site running.
Here are some of the features available - once you register at RennTech.org
- View Classified Ads
- DIY Tutorials
- Porsche TSB Listings (limited)
- VIN Decoder
- Special Offers
-
OBD II P-Codes - Paint Codes
- Registry
- Videos System
- View Reviews
- and get rid of this welcome message
It takes just a few minutes to register, and it's FREE
Contributing Members also get these additional benefits:
(you become a Contributing Member by donating money to the operation of this site)
- No ads - advertisements are removed
- Access the Contributors Only Forum
- Contributing Members Only Downloads
- Send attachments with PMs
- All image/file storage limits are substantially increased for all Contributing Members
- Option Codes Lookup
- VIN Option Lookups (limited)


peter-pa31
-
Posts
47 -
Joined
-
Last visited
Content Type
Profiles
Events
Forums
External Paint Colors
Downloads
Tutorials
Links Directory
Collections
Store
Posts posted by peter-pa31
-
-
Install pics to assist others in the future.
I would do, but there are so many good DIYs with pics already, that I think I would just be wasting space and confusing the issue. I would be happy to post pictures that add to the existing information. If there are any aspects of the install that anyone would like to get more info on and/or pics, just let me know and I will be glad to add.
-
That is awesome! Any pics to post???
Pics of the mod or the car? The mod is not much to look at, and the car is a very pedestrian C4S - no visible mods (except for the clear side markers that I added so I won't pulled over by the asthetics police) :D
-
I got the full install of the PSE completed this weekend (electronics and all). I just wanted to thank everyone who contributed DIY information on this project. I would never had contemplated doing this on my own without the wealth of information available here. This is truly a great forum.
-
996 610 117 00 Support - retail $1.59 (as of Sept 2005)
900 377 010 09 Nut M6 - retail $0.21 (as of Sept 2005)
BTW... I really think you want to find that nut - the last thing you want in a fuse panel is a metal nut bouncing around. ;)
Thanks!
I agree about the nut. I removed the fuse holder and the relay carrier looking for it before I reconnected the battery. My guess is that it fell between the soundproofing and the carpeting. I will spend some more time tomorrow looking for it.
I'll be kicking myslef for some time. It really was a boneheaded move on my part.
Thanks again for your help.
Pete
-
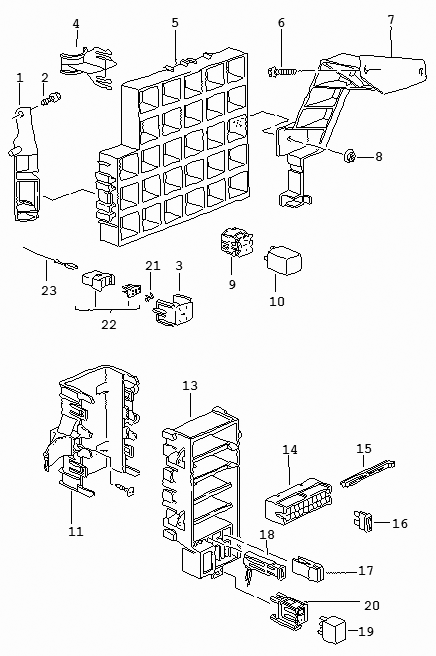
Item number 1 is the bracket, and #8 is the nut.
Thanks Loren.
Pete
-
After completing the wiring for my PSE install, I was putting back the fuse carrier. I dropped the nut that secures the front (right) side of the carrier and had to take the carrier out again to search for it. Upon removing the carrier, I had released the snap closure on the left side of the carrier, but I must have pulled on the carrier at to great an angle because I sheared off the plastic bracket that is connected to the side wall of the car. In addition, I never found the nut. :oops:
So I fell like a complete idiot, but I was wondering if anyone knew what is required to replace this bracket, and what the part number is for an '04 C4S. Also, is there a specific part number for the nut?
Thanks.
-
Well, the PSE mufflers are installed. Leaving the fittings loose made aligning the tailpipes a breeze. The PSE sounds great!
There is a bit of an acrid smell at the rear of the car after the first test-drive. Is this normal with a new set of mufflers, or am I burning something? :unsure:
-
Loren, Orient, Navin,
Thanks for the input. I'll loosen everything up tomorrow and get it right. I read the DIY and I thought I could get away with cheating a bit. I should have known better.
Oh well, I guess I spend an extra 30 or 40 minutes under the car. I shouldn't complain - it is a nice tonic after a long day at work.
Pete
-
I have installed the first of the PSE mufflers and will tackle the other one tomorrow night. Are there any tricks to getting the tailpipe aligned properly? It is hanging too low. Except for the V-band, I left all of the clamps loose. I tightened the V-band because I thought it would be tough to get at it once the muffler was in place.
Thanks.
Pete
'04 C4S
-
Thanks for your advice.
I am going to opt back to stock mufflers and will leave the headers where they are as you have suggested.
Haven't quite decided on the filter but leaning toward OEM as well.
I have an 04 C4S with under 3K (car was first registered in 5/05). I have the PSE on order, so I will have a low milage set of OEM mufflers. I can't guarantee exactly when they will be available, but it should be in the next few weeks. Also, I don't know if they will fit your car, but I am sure that others here will know. PM me if you are interested.
-
I am far from an expert, but I have charged some auto A/Cs recently. I think an expert would tell you that the only truly correct way to charge the system is to have a set of gages that will give you both the high and low pressure sides of the system simultaneously. These numbers can be compared with the specs for your system and the appropriate charge can be applied.
In practice, I have found that the cheap (~$20) low pressure side gages that are sold at most auto supply stores are good enough to get a reasonable charge. The gages that I have seen are usually marked in both PSI as well as yellow/green/red arcs. The goal is to charge the system from the low pressure side while the compressor is running and have the gage read somewhere in the green arc. One of the obvious drawbacks of this is that you can not read the charge while adding refrigerant, so you need to add it in small increments and then check the pressure. Note that the pressure reading is only meaningful if the compressor is running.
-
I checked my Crutchfield paperwork and I did use the Euro Adapter. Just check the pictures on their website and get the correct male and female connectors.
-
I don't have the paperwork here, so I can't be sure, but I think that I used the Euro Antenna Adapter OEM F to Motorola M, from Crutchfield when I installed an FM modulator on my CDR-23. I think this will work for an install of an Alpine.
As for the wiring harness, I am not sure.
I will try to dig up the paperwork this evening.
-
I am far from an expert, but the CDR-23 in my car has a fiber-optic connection between it and the amp. This makes it impossible to install a new head unit without changing the amp (and running new wires).
-
Like a standard car bra, it protects the parts of the car that are most likely to be damaged by stones, etc. It is a clear film that is permanently applied to the front bumper, front portions of the hood, headlights, mirrors, etc.
Just a quick note - it's not permanent. It can be removed at any time without any damage to the paint. I strongly recommend having it removed professionally though.
Yes, your are quite correct. By permanent I really just meant that it was not like a standard bra that can be taken off at will.
-
Thanks for the info. I actually had the work done by them earlier this week. I am very pleased with the outcome. I was not only impressed with their work, but also the amount of time they spent talking with me about various options, and their knowledge on the various products was very helpful.
The company is Clear Image. I think that they have a few locations in northern NJ, southern NY. The number I have is 973-207-7000.
-
Like a standard car bra, it protects the parts of the car that are most likely to be damaged by stones, etc. It is a clear film that is permanently applied to the front bumper, front portions of the hood, headlights, mirrors, etc.
-
I am looking for a shop that does clear bra installations in Northern/Central NJ (or surrounding areas). Does anyone have a recommendation? Thanks.
Peter
-
This is the only "adult" aftermarket radio I found and put in my car. The display color is selectable and the amber matches perfectly with the other interior dash displays. For what its worth... good luck.
http://www.onlinecarstereo.com/CarAudio/Pr...ProductID=13364
Thanks for the info. This looks like a potential alternative. Does the unit have an AUX input?
-
Your install looks great, I'm just concerned about taking that much of the car apart! I've done it in other cars, but i am reluctant in this car. You are correct about the new radios being a step backward. I am considering getting an older CDR-220 so I can upgrade the whole system (amp, speakers, etc) without having to use an ugly aftermarket radio.
BTW your posting of your install was very helpful as I was not aware of the phone power connector available in the center stack. With the help of your post, I was able to get the correct part from Becker so that I dont have to cut any wires. Thanks!
-
I am about to do a similar install in my 04 C4S. I am curious how you routed the wire from the modulator to your ipod. I saw the post where the ipod connection was made by routing the wires through the ashtray, but I don't think I want to go that route. I was thinking of possibly flush mounting a jack in the back of the storage bin in the bottom of the center stack. It would then be only minimally visible when I the ipod is not plugged in. Also, if I want to go back to complete stock, I would just need to replace the bin.
Finally! Thanks to some input from a variety of forum members, I finally got a hardwired modulator working well in the MOST equipped P. I've been screwing around with it on an off for months.Bottom line is I can set the iPod at about 80% to 90% volume (EQ off) and run the Becker up to max (40) without overdriving the amp. The sound quality with mp3 coded at 192 kbps is very comparable to the same tracks played on the source CD in the Becker. The bad news is the only reason for this similarity is P's "hi fi" is a piece of crap. Which means seeking a solution for an aux line directly into the optical bus is not going to get you much more than a long wait and a lot more $'s. Or, you can spend $10,000 on a whole new system and listen to mp3 going through $5 worth of audio circuits in the iPod in a listening environment akin to a fish tank..
If any of you are interested here's some information that may be of assistance:
1) Don't use the dock connector. It will overdrive the amp. You're stuck with the headphone jack. Disconnecting the antenna amp or the antenna lead didn't cut it, I had to use the headphone jack.
2) EMI is a major issue/shielding is a challenge. For the patch cord between the iPod and the mod, forget about the Shack or any of the mobile audio sources. I tried the Shack, SIK and Belkin. The best result was about 60% iPod volume before the amp went unstable. I finally used a Klone patch cord (american-digital.com) and it was the determining factor in getting more output.
3) The audio side is an easy install. The power side is a pain. Again EMI and unshielded wire running all over the place. For the iPod, run off the battery is the only suggestion I can come up with. For the modulator, crank the Becker to max volume, turn on the mod and keep moving the wires around until you get the least interference. I started with a latching relay and an elegant install. I ended with the modulator plugged directly into the switched side of the cell phone tap and no switch. If you'd like to discuss this further drop me a line. I have a shoe box full of various bits and pieces to circumvent the EMI and all failed miserably.
4) Try to purchase a modulator with a steel case and the RCA jacks case mounted as opposed to lead mounted. I used an Audiovox which gave me the steel case but I had leads to deal with. At some point I'll cut them off and take the Klone into the mod. Again, EMI.
5) Overall I'd rate the sound quality as ok. Our DSP BMW blows it away with the iPod feeding it through the dock connector and using the Belkin unit. The outdoor speakers on our porch (B&W drivers driven by an old Onkyo) blows them both away. The living room system makes you want to never listen to audio in a car again.
PSE Install completed
in 996 Series (Carrera, Carrera 4, Carrera 4S, Targa)
Posted
Here are some URLs
http://www.funcarsonline.com/ubbthreads/sh...true#Post108035
http://www.belladessa.com/auctions/exhaust/exhaust.htm
http://www.renntech.org/forums/index.php?showtopic=6
http://www.renntech.org/forums/index.php?showtopic=6173&hl=
I found all of these discussions to be very helpful, some of them contain links to wiring diagrams and other instructions. I am reasonable with a wrench, but far from an expert and I found the project to be fairly straightforward. I would pay particular attention to the discussions regarding potential errors in the Porsche instructions for wiring the jumpers in the relay carrier.
It took me a total of about 10-12 hours to install the whole thing. A lot of this was learning about the car - this was the first time I worked on a Porsche. If I had to do it again, it would likely take much less time.
Please let me know if you have any specific questions, I would be happy to help.