Welcome to RennTech.org Community, Guest
There are many great features available to you once you register at RennTech.org
You are free to view posts here, but you must log in to reply to existing posts, or to start your own new topic. Like most online communities, there are costs involved to maintain a site like this - so we encourage our members to subscribe or donate. All subscriptions and donations go to the costs operating and maintaining this site. We prefer that guests take part in our community and we offer a lot in return to those willing to join our corner of the Porsche world. This site is 99 percent member supported (less than 1 percent comes from advertising) - so please consider an annual subscription or donation to keep this site running.
Here are some of the features available - once you subscribe RennTech.org
- View Classified Ads
- DIY Tutorials
- Porsche TSB Listings (limited)
- VIN Decoder
- Special Offers
- Paint Codes
- Registry
- Videos System
- View Reviews
- and get rid of this welcome message
It takes just a few minutes to register, and it's quality Porsche information at a low cost.
Contributing Members also get these additional benefits:
(you become a Contributing Member by subscribing or donating money to the operation of this site)
- No ads - advertisements are removed
- Access the Contributors Only Forum
- Contributing Members Only Downloads
- Send attachments with PMs
- All image/file storage limits are substantially increased for all Contributing Members
- Option Codes Lookup
- VIN Option Lookups (limited)


pzinszer
-
Posts
19 -
Joined
-
Last visited
Content Type
Profiles
Events
Forums
Exterior Paint Colors
Downloads
Tutorials
Links Directory
Collections
Classifieds
Store
Everything posted by pzinszer
-
*HELP* BoxterS 98, roof will not open
pzinszer replied to adriano's topic in 986 Boxster Convertible Top Issues and Solutions
Paul: Nice Pics! It's a good sign that you got the light to go out. Try to duplicate that result when you get the top moving again. I would go with option 2 and "rethread" the gear from the opposite side. If the cable twists, it's because the gear is not engaging and it's jammed. You can spin the drill at a lower speed, but be sure that the drill is at its lowest torque setting regardless of the speed...that will help prevent breaking or fraying the inner cable. IIRC, the top latch does not play a role in the closing procedure, other than on a '98 it allows you to raise the windows fully closed after you close the latch. It would not hurt to try reversing (or temporarily removing) the B-pillar microswtich and try the sequence over, starting at the service position and using the measurement as you did in the last photo from your post. Otherwise, use the drill to get everything lined up correctly again. Regards, Maurice. Maurice I have been able to open and close the top twice today - The first time - the gears on both sides were engaged, for both attempts, so none of those issues, in the service position I removed the micro switch on the B-Pillar (to see if it would open rather than close - the top continued to close, so I reattached the switch) and closed the top - the light 'Top Open" remained on. Second time, top closed, light went OUT - TA DA!!!! - I turned the ignition key off - then back on - light is still off. Suggestion from here would be appreciated. Regards, Paul -
*HELP* BoxterS 98, roof will not open
pzinszer replied to adriano's topic in 986 Boxster Convertible Top Issues and Solutions
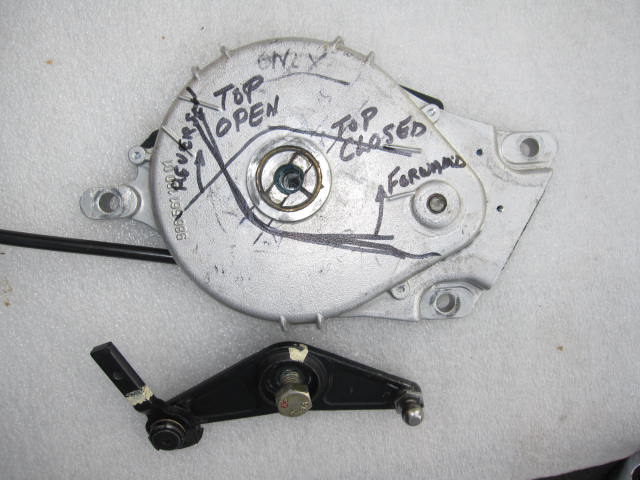
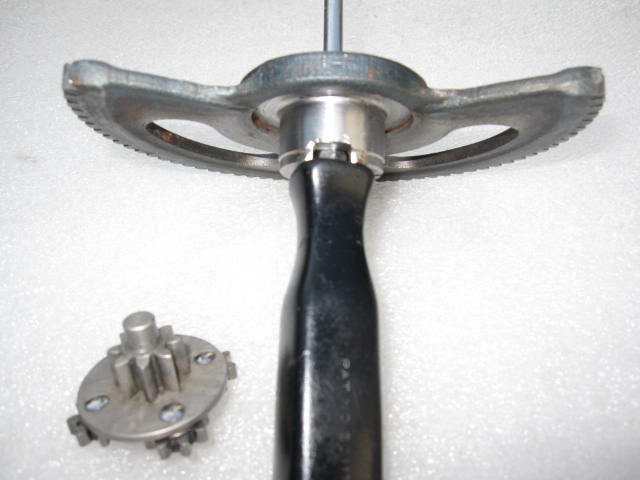
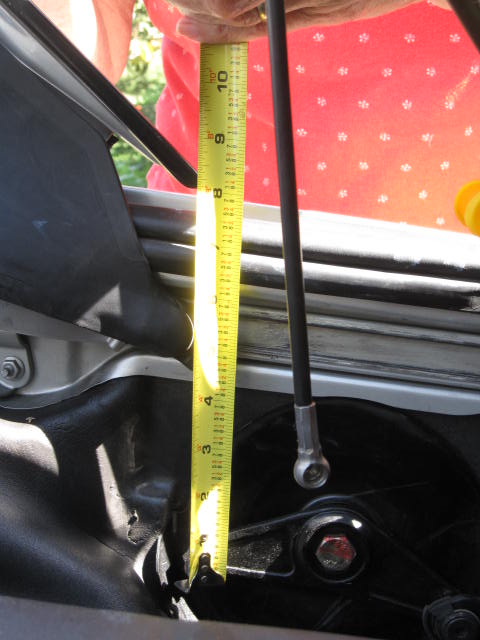
Paul: If the motor is running AND the cables are spinning BUT the V-levers are not turning, then it does sound like it went past the 50th tooth in the half-moon gear. The reason you did not hear any loud noises is because, IIRC, you now don't have the black "hydraulic" pushrods connected. That means that the black pushrods will not pull the half-moon gear back with the usual loud bang. To investigate further, you can either try to reverse the direction of the electric motor by manipulating the B-pillar microswitch while the switch on the dash is pressed or, if it won't spin, use the cordless drill to move the V-levers in the opposite direction, until the teeth engage again. Regards, Maurice. Hello Maurice Let me start with my most recent activities. With the top in the service position, switch attached to the B-Pillar and using a long thin stick as the shim between the clam shell and the frame (this was much better than trying to use my hand, because my focus was strictly forward) for the lever switch on top of the motor. I pushed the button on the dash and the top closed perfectly (removing the stick with about 1/2" clearance for the top to close). And the most remarkable part - the idiot light "Top Open" light went OUT. I latched the top (thinking it might be part of the closing process), then open the latch and pushed the open button - the top open light came back on - the motor did not run. That is where things are right now - so advice from this point would be appreciated. Now for the interm - remember the motor ran but there was no motion - both V levers were free/loose, so using the drill the left side rethreaded with no problems - the right would not(this side was the problem before), and the cable contorted like a snake looking for a victom to squeeze, looping around and slipping/releasing the energy at the point where the cable joins the first spriral gear. I have been here before so, I removed the right transmission, took it apart, cleaned it and started to test it. Can you handle some pictures? - well, here they come. First picture is the right transmission, upside down (sorry) the end with the 2 bolt holes are forward on the car, the top bolt hole is lowest in the picture and is hard to see on the car particularly when looking from above. The large V bat wings are the top of the V Lever at the positions that it loses it's gearing, the arrows show the direction of rotation of the gear when engaged and the forward (clockwise) reverse (anticlockwise) refer to the direction that the drill must be turning. The second and third pictures show the 50 tooth gear and what I believe is the culprit for not 'rethreading'. The picture does not show it well, but the right first tooth is rather polished. For the third picture, looking from the other side the polished tooth is now on the left side. The polished tooth is larger than the partial tooth on the opposite side - the smaller tooth fed into the gears easily. In 'playing' with this gear, I noticed that when it would jam, if I tried again but 'reoriented ' the teeth it would sometimes catch, I also believe that the speed of the drill maybe too fast and a slower cable speed may help. So next time it goes off the 50th tooth this option 1. Option 2 is to disconnect the arm going forward to the top at the bolt and rethread the gear from the other side, option 3 ... filing the tooth. Option 4 has something to do with dynamite. I do understand why they went to a B version transmission. Maurice, I am sure you have notice that I am not able to multi-task (notice my finger on the lever on the motor and watch the top close and stop pushing the button on the dash and watch for the 'top open' light - I was unable to do it -the long stick shim going up to the front seat aided this operation greatly). Well, as it relates to measuring and matching both sides to next use the motor - following your diagram and measuring up from the center of the ball to the rubber on the edge of the frame required 2 hands and lots of adjusting for sight of the tape - top and bottom. I tried using a carpenters tape, pulling the L at the end of the tape on the bottom of the ball and reading the top was easier for me (I adjusted for metrics and diameter of the ball - but I think what matters is that both sides are the same). Picture 4 is my wife measuring the distance from the ball to the rubber on the frame. Again thank you, advice would be appreciated. Regards, Paul Notice that I have also learned to downsize picture sizes - will it stick? Not likely.
-
*HELP* BoxterS 98, roof will not open
pzinszer replied to adriano's topic in 986 Boxster Convertible Top Issues and Solutions
Paul: In step two, only remove the black "hydraulic pushrods"...you want the front pushrods still connected so that the B-Pillar part of the frame still presses/releases the B-Pillar microswitch. You should depress the black lever microswitch either by hand or by manually operating the clamshell so that it depresses it at the right moment...experimenting with earlier or later depressing of the switch. The advantage is that if the top gets stuck in the closed position, you can either try to reverse the motor by manipulating the B-Pillar microswitch or by using the drill as the cables will be easily accessible without the clamshell closed down tight. The worst case is that the ball cups will break, but that may not happen because at the point where the top is all the way open or all the way closed, the end of the V-lever to which the pushrod with the plastic ball cup is connected is already on its way back past the maximum pressure position (because of the continued rotation of the V-lever). If the V-lever goes past the last tooth, it will simply stop spinning because it is no longer being pulled back one tooth by the force of the black pushrod. You can then re-engage the half-moon gear by spinning the drill in the opposite direction while helping the V-lever slightly until it engages that first tooth. This exercise is meant to determine whether, by keeping the switch depressed, the light will go off a split second later, without locking the top down so as to make the "works" inaccessible. Regards, Maurice. Maurice I believe I understand the configuration of the 'the works' for the top, and will proceed. About the test, my sense is that this may take some repetition (and the configuration of the top will allow this). I am away for several days, but will report back to you with the results as I return. Thank you. Paul Maurice I set the top up as you described - in the service position. Then pushing the dash button the top closed, and the dash light went out briefly (I think I removed my finger from the lever switch on the motor - the top open idiot light come back on and even when again pressing the lever switch and closing the latch the light remains on). And the motor will not function. OK, so I wanted to open the top and rerun this experiment. So I removed the micro switch from the B-Pillar, in order to open the top - the motor runs but nothing is moving.(I checked to make sure the cables are in the motor) There have been no unusual noises or motion during this operation. Could I have run off the other end of the 50 tooth gear - if I did I guess the V Lever will have some freedom in it, I'll investigate that. Any ideas would be appreciated. Regards, Paul -
*HELP* BoxterS 98, roof will not open
pzinszer replied to adriano's topic in 986 Boxster Convertible Top Issues and Solutions
Paul: In step two, only remove the black "hydraulic pushrods"...you want the front pushrods still connected so that the B-Pillar part of the frame still presses/releases the B-Pillar microswitch. You should depress the black lever microswitch either by hand or by manually operating the clamshell so that it depresses it at the right moment...experimenting with earlier or later depressing of the switch. The advantage is that if the top gets stuck in the closed position, you can either try to reverse the motor by manipulating the B-Pillar microswitch or by using the drill as the cables will be easily accessible without the clamshell closed down tight. The worst case is that the ball cups will break, but that may not happen because at the point where the top is all the way open or all the way closed, the end of the V-lever to which the pushrod with the plastic ball cup is connected is already on its way back past the maximum pressure position (because of the continued rotation of the V-lever). If the V-lever goes past the last tooth, it will simply stop spinning because it is no longer being pulled back one tooth by the force of the black pushrod. You can then re-engage the half-moon gear by spinning the drill in the opposite direction while helping the V-lever slightly until it engages that first tooth. This exercise is meant to determine whether, by keeping the switch depressed, the light will go off a split second later, without locking the top down so as to make the "works" inaccessible. Regards, Maurice. Maurice I believe I understand the configuration of the 'the works' for the top, and will proceed. About the test, my sense is that this may take some repetition (and the configuration of the top will allow this). I am away for several days, but will report back to you with the results as I return. Thank you. Paul -
*HELP* BoxterS 98, roof will not open
pzinszer replied to adriano's topic in 986 Boxster Convertible Top Issues and Solutions
Paul: Sounds good so far... Your starting position should be the equivalent of the service position, then lineup the steel ball of the rear of the V-lever according to the measurement in the DIY. The black lever microswitch appears to be working correctly according to your description. There are 5 wires coming out of the plug to the electric motor, with two of the wires being the same color: Brown/Black. The thick brown wire is the ground wire for the motor. The thick green wire is the power wire for the motor. The thin brown wire is a ground for the switch One of the thin brown/black wires goes to the central alarm control unit. The other thin brown/black wire goes to the convertible top relay where it acts in conjunction with the B-Pillar microswitch (the "comfort close" feature which involves that slight time delay to turn off the light and cut power to the motor). (The following assumes that your convertible top double relay is functioning properly): That last issue that I recall you having with the idiot light not going out is a tough one to diagnose on the early transmission set-ups. With the later transmission set-ups it's easy to test because you can operate the transmissions with all four pushrods disconnected, as you watch the V-levers continue to turn until you see the idiot light turn off, and with no fear of that half-moon gear snapping back (because there is one continuous 360 degree gear and because it's disconnected). With the early transmission set up, you must still rely on the B-pillar microswitch being depressed and released by the convertible top frame and the black lever microswitch being pressed and released by the clamshell and then wait for those magic fractions of a second for the light to go off. In order not to end up with the clamshell closed tight and the top stuck again, I had an idea that you may want to try. Set up the V-lever in the correct position as described above, and then only connect the front pushrods, and do not connect the black hydraulic pushrods (you can remove them totally for now so they don't get jammed against the foam drain tray, etc...). When you press the electric button on the dash, the V-levers will move the canvas part of the top through its cycle. The clamshell will not move and you can operate it manually as someone is pressing the button on the dash. That will give you the luxury of testing the point at which the light will go off and I believe that the plastic ball cups will not be subjected to additional pressure as they will have just gone past their maximum position and at that point the steel ball on that end of the V-lever will have already started to move away from its maximum pushing position as the V-lever keeps rotating. Remember, the clamshell opens and goes back to its maximum back position (45 degrees) at the very beginning and at the very end of each cycle. The B-pillar microswitch will still be getting the signal by being pressed by the frame of the canvas part of the top, and the black lever microswitch will be pressed by the clamshell as you move the clamshell manually and close it on top of the switch at the appropriate time in the cycle. If you experiment by pressing the black lever microswitch earlier or later in the cycle, you may succeed in figuring out the correct timing of the parts such that the light will go off and cut power to the motor. Let me know what you think and if this makes sense to you. Regards, Maurice. "Holmes, that's quite a devilish plan that you have concocted" Maurice, let me see how much of it I understand and can execute. First, the purpose is to put the top in an environment where it can be moved without my locking the clamshell down again (by going past the last tooth on the gear). As for the steps, here goes: 1 - put the top in the service position. 2 - remove the strutts - both top and bottom. 3 - using the dash button close the top (at the same time putting presure on the motor lever switch at the right moment - hum?) - Let me remind you that twice I open the top using the drill and closed it using the motor with no affect on the light- the last time it did go past the last tooth on the gear so at least one side was tight. But the dash light was still on. You caution me about the plastic ball caps and the v lever, I am not sure how/what I should be careful of - worst case the gears will go past the last tooth, right? In fact, my question to my self is, if the top did not sense that it was closed, why did it stop - I now have doubts that maybe I stopped pushing and that is why it stopped, but I am fairly sure that after that the button would not engage it further. Regards, Paul. -
*HELP* BoxterS 98, roof will not open
pzinszer replied to adriano's topic in 986 Boxster Convertible Top Issues and Solutions
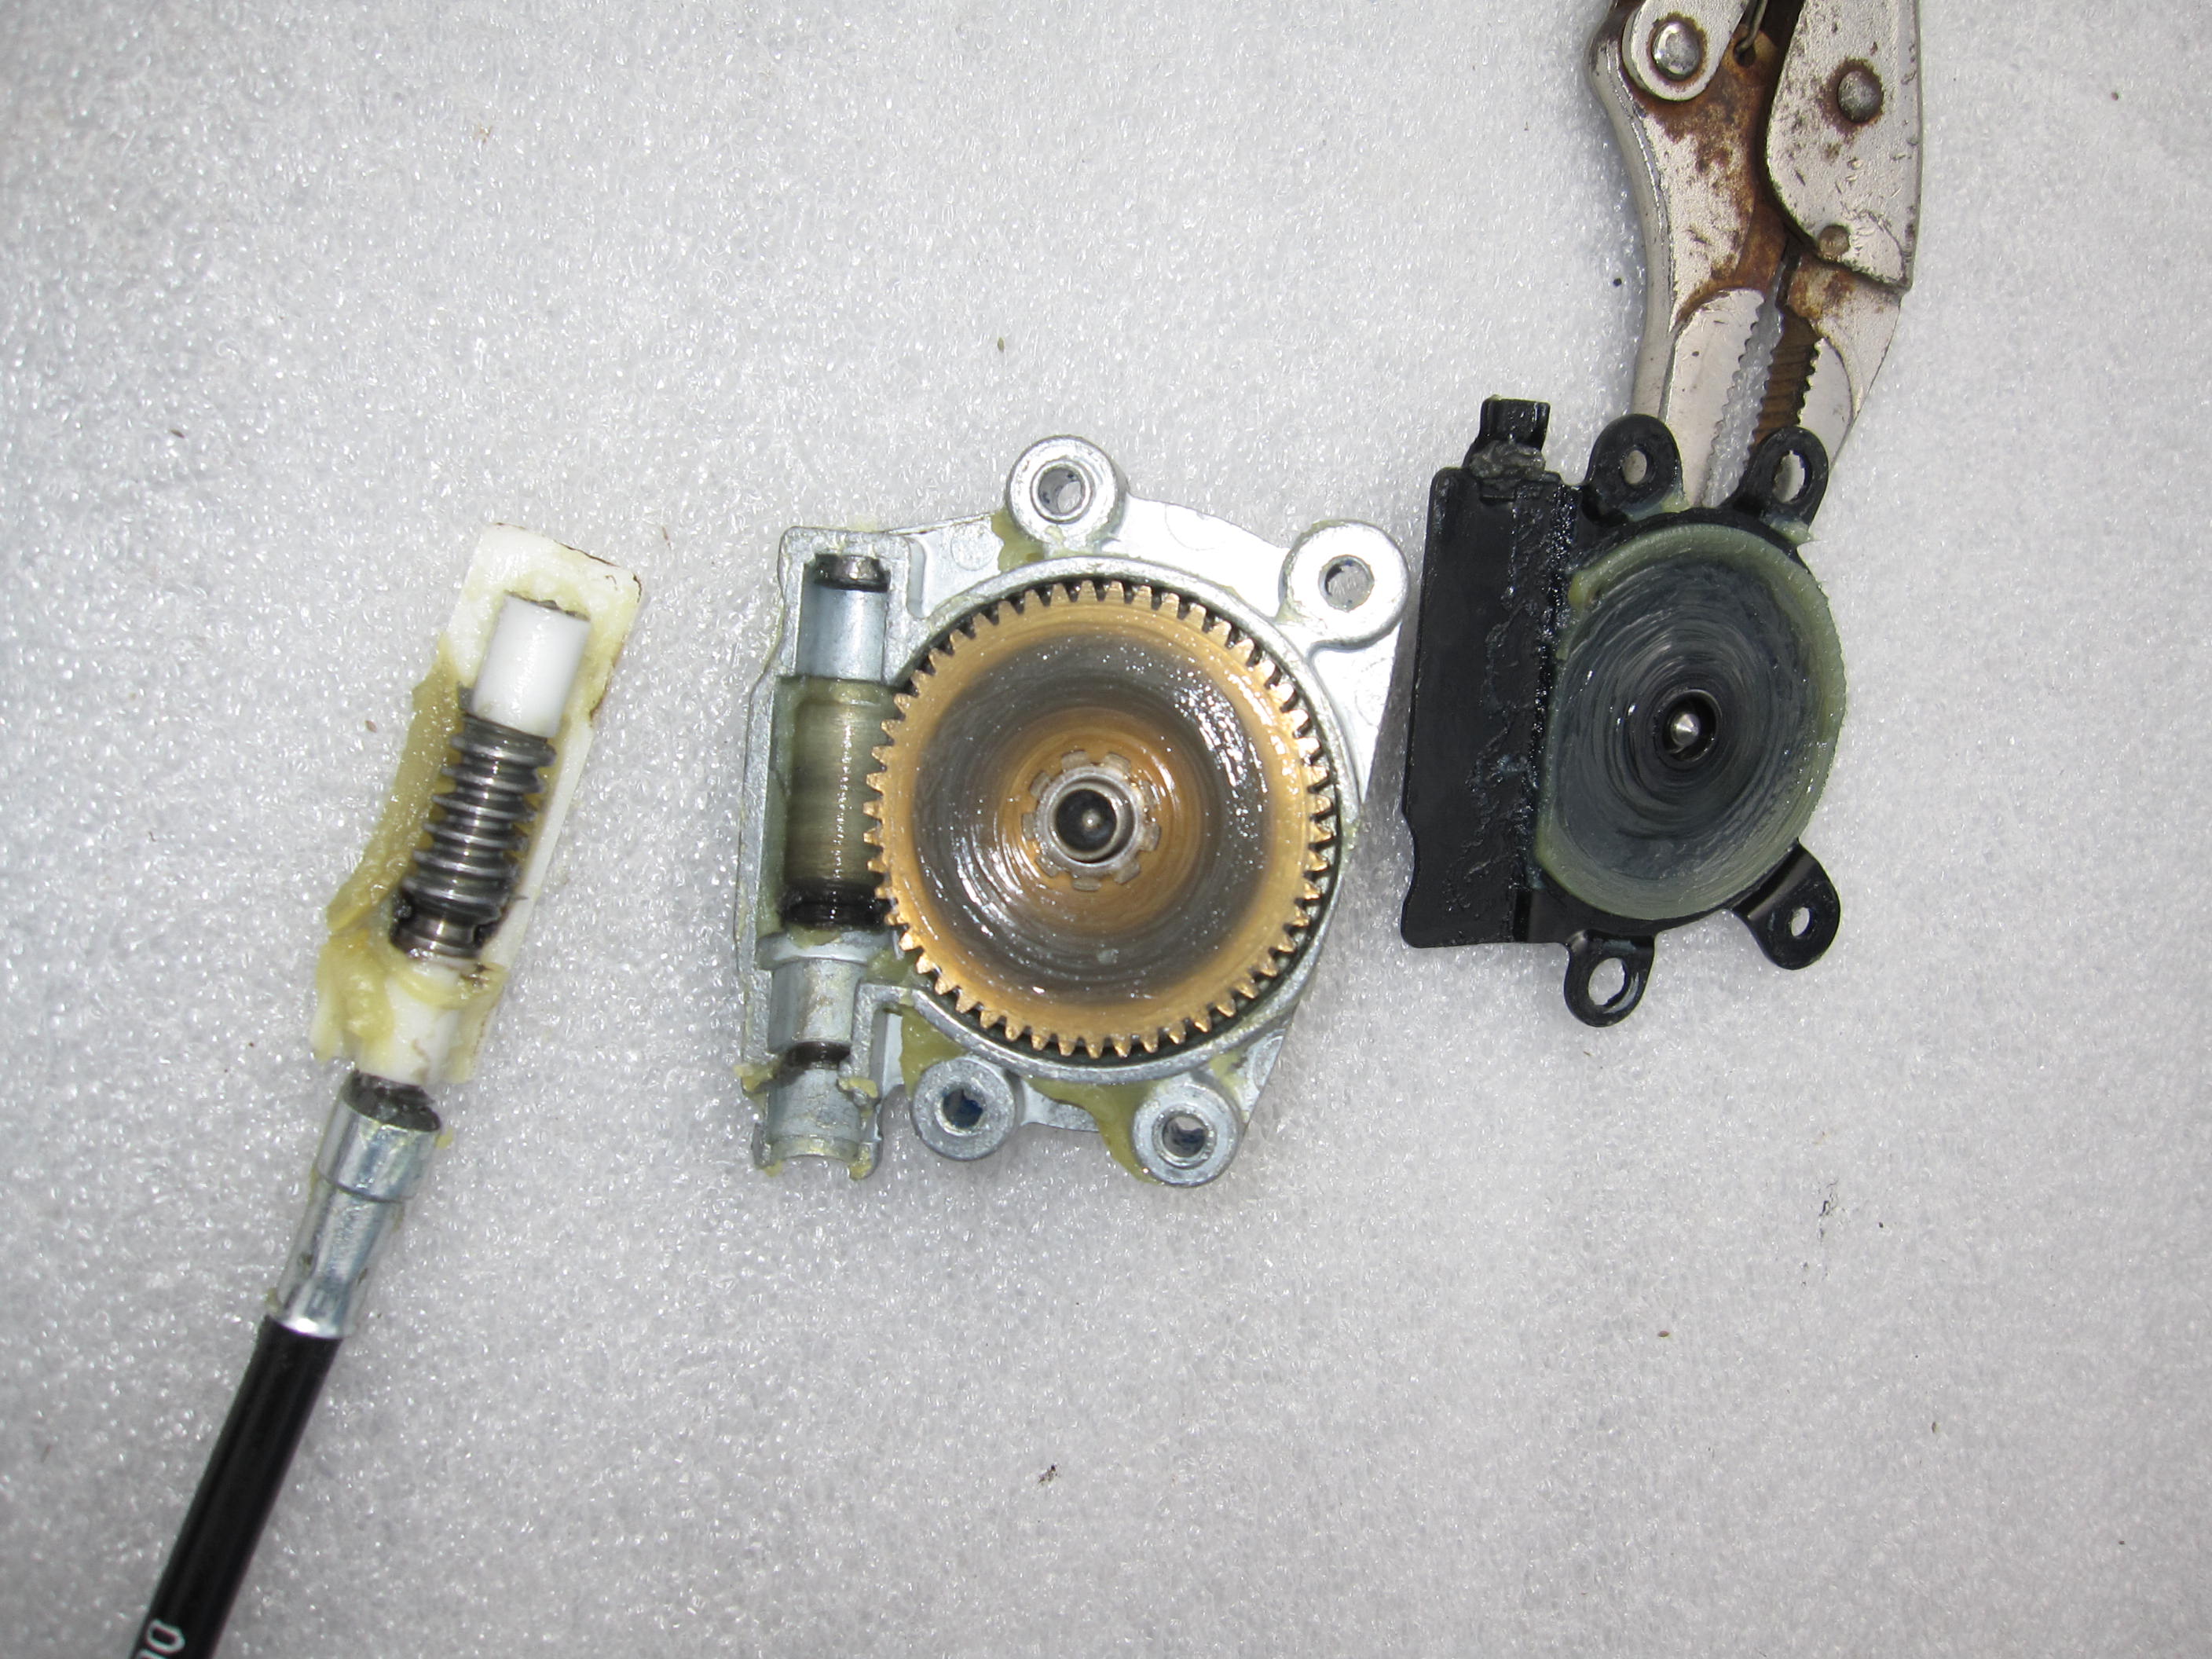
Paul: Those photos are worth a thousand words! The one of the extensions to get at the 19mm bolt that holds the V-lever onto the transmission is priceless! The other photos are good closeups and don't reveal any broken parts and look okay and well lubricated, except for the half-moon gear having gone past the 50th tooth. A good starting point would be to reassemble the transmissions one step at a time and testing the operation each time to verify that it is working as it should. First use the cordless drill (LOWEST torque setting) and connect it to the end of the inner cable that normally goes into the side of the electric motor. Spin the cable with the drill and observe the worm gear to make sure that it turns, in both forward and reverse. Once you have established that the worm gear is properly being driven by the cable, then reattach the worm gear onto its housing and use the drill again to verify that the brass gear is turning...again in both directions. One common trouble spot is the black plastic cover (with the 4 small blue loctited bolts) which warps or cracks and allows the worm gear to sort of "pop-up" and thus not drive the gear. If that all works, position the half-moon gear manually such that there are two or three teeth engaged. Then reassemble the worm gear housing and the brass gear onto the transmission and reinstall the black plastic cover over the half-moon gear and use the drill again. At this point, you should be able to see the keyway of the half-moon gear turning and should familiarize yourself with the direction of rotation that the particular direction of the drill produces and you can then set the half-moon gear so that it starts out with a few teeth engaged. Then you will know which direction you can drive the cable on each side to make sure that you are not going past the 50th tooth. At that point, if you are sure that the transmissions are being driven properly by the cables you can reinstall the transmissions onto the studs on each side of the car and then test the operation, again with the drill. Once you have reached that point, refer to the dimensions in the photo at the PDF part III, at page 39, here: http://sites.google.com/site/mikefocke2/installinga'03-'04glasstopandframeona'97 Use that as a starting point to synchronize the transmissions, and follow the instructions on that page to estimate when the top is being operated in an even fashion from side to side. Regards, Maurice. Hello Maurice You like all those extensions, do you? They included both 3/8" and 1/2" and 2 flex joints to get to the side wall and the bolt in the V lever - all that I had, but it did work well, - when pulling and tugging up close was unsuccessful. I examined and cleaned all of the parts - and found nothing that was even suspicious (with exception of some wear on the first tooth of the 1/2 gear with 50 teeth). So I greased and reassembled them, tested and put them back on the car. Which is where I am at present. I have copied the materials about getting both sides of the top to be synacronized, and it looks very direct. I did not move on because there is an electrical issue that is unresolved and I don't know how the roof should be positioned to proceed with the electrical issued. I tested the switch on top of the motor for the top. Using the 2 center wires (of the 4) at the plug to the motor (the outside wires were heavier gauge, so I expect there were used to power the motor - so I used the center ones). With the top up and switch lever up, there is a continuous circuit through the switch. With modest depression of the switch a little more than 1/16" the circuit is broken. I am concluding that it is functioning as intended? As always I am indebted to you and your advice would be appreciated. Regards, Paul -
*HELP* BoxterS 98, roof will not open
pzinszer replied to adriano's topic in 986 Boxster Convertible Top Issues and Solutions
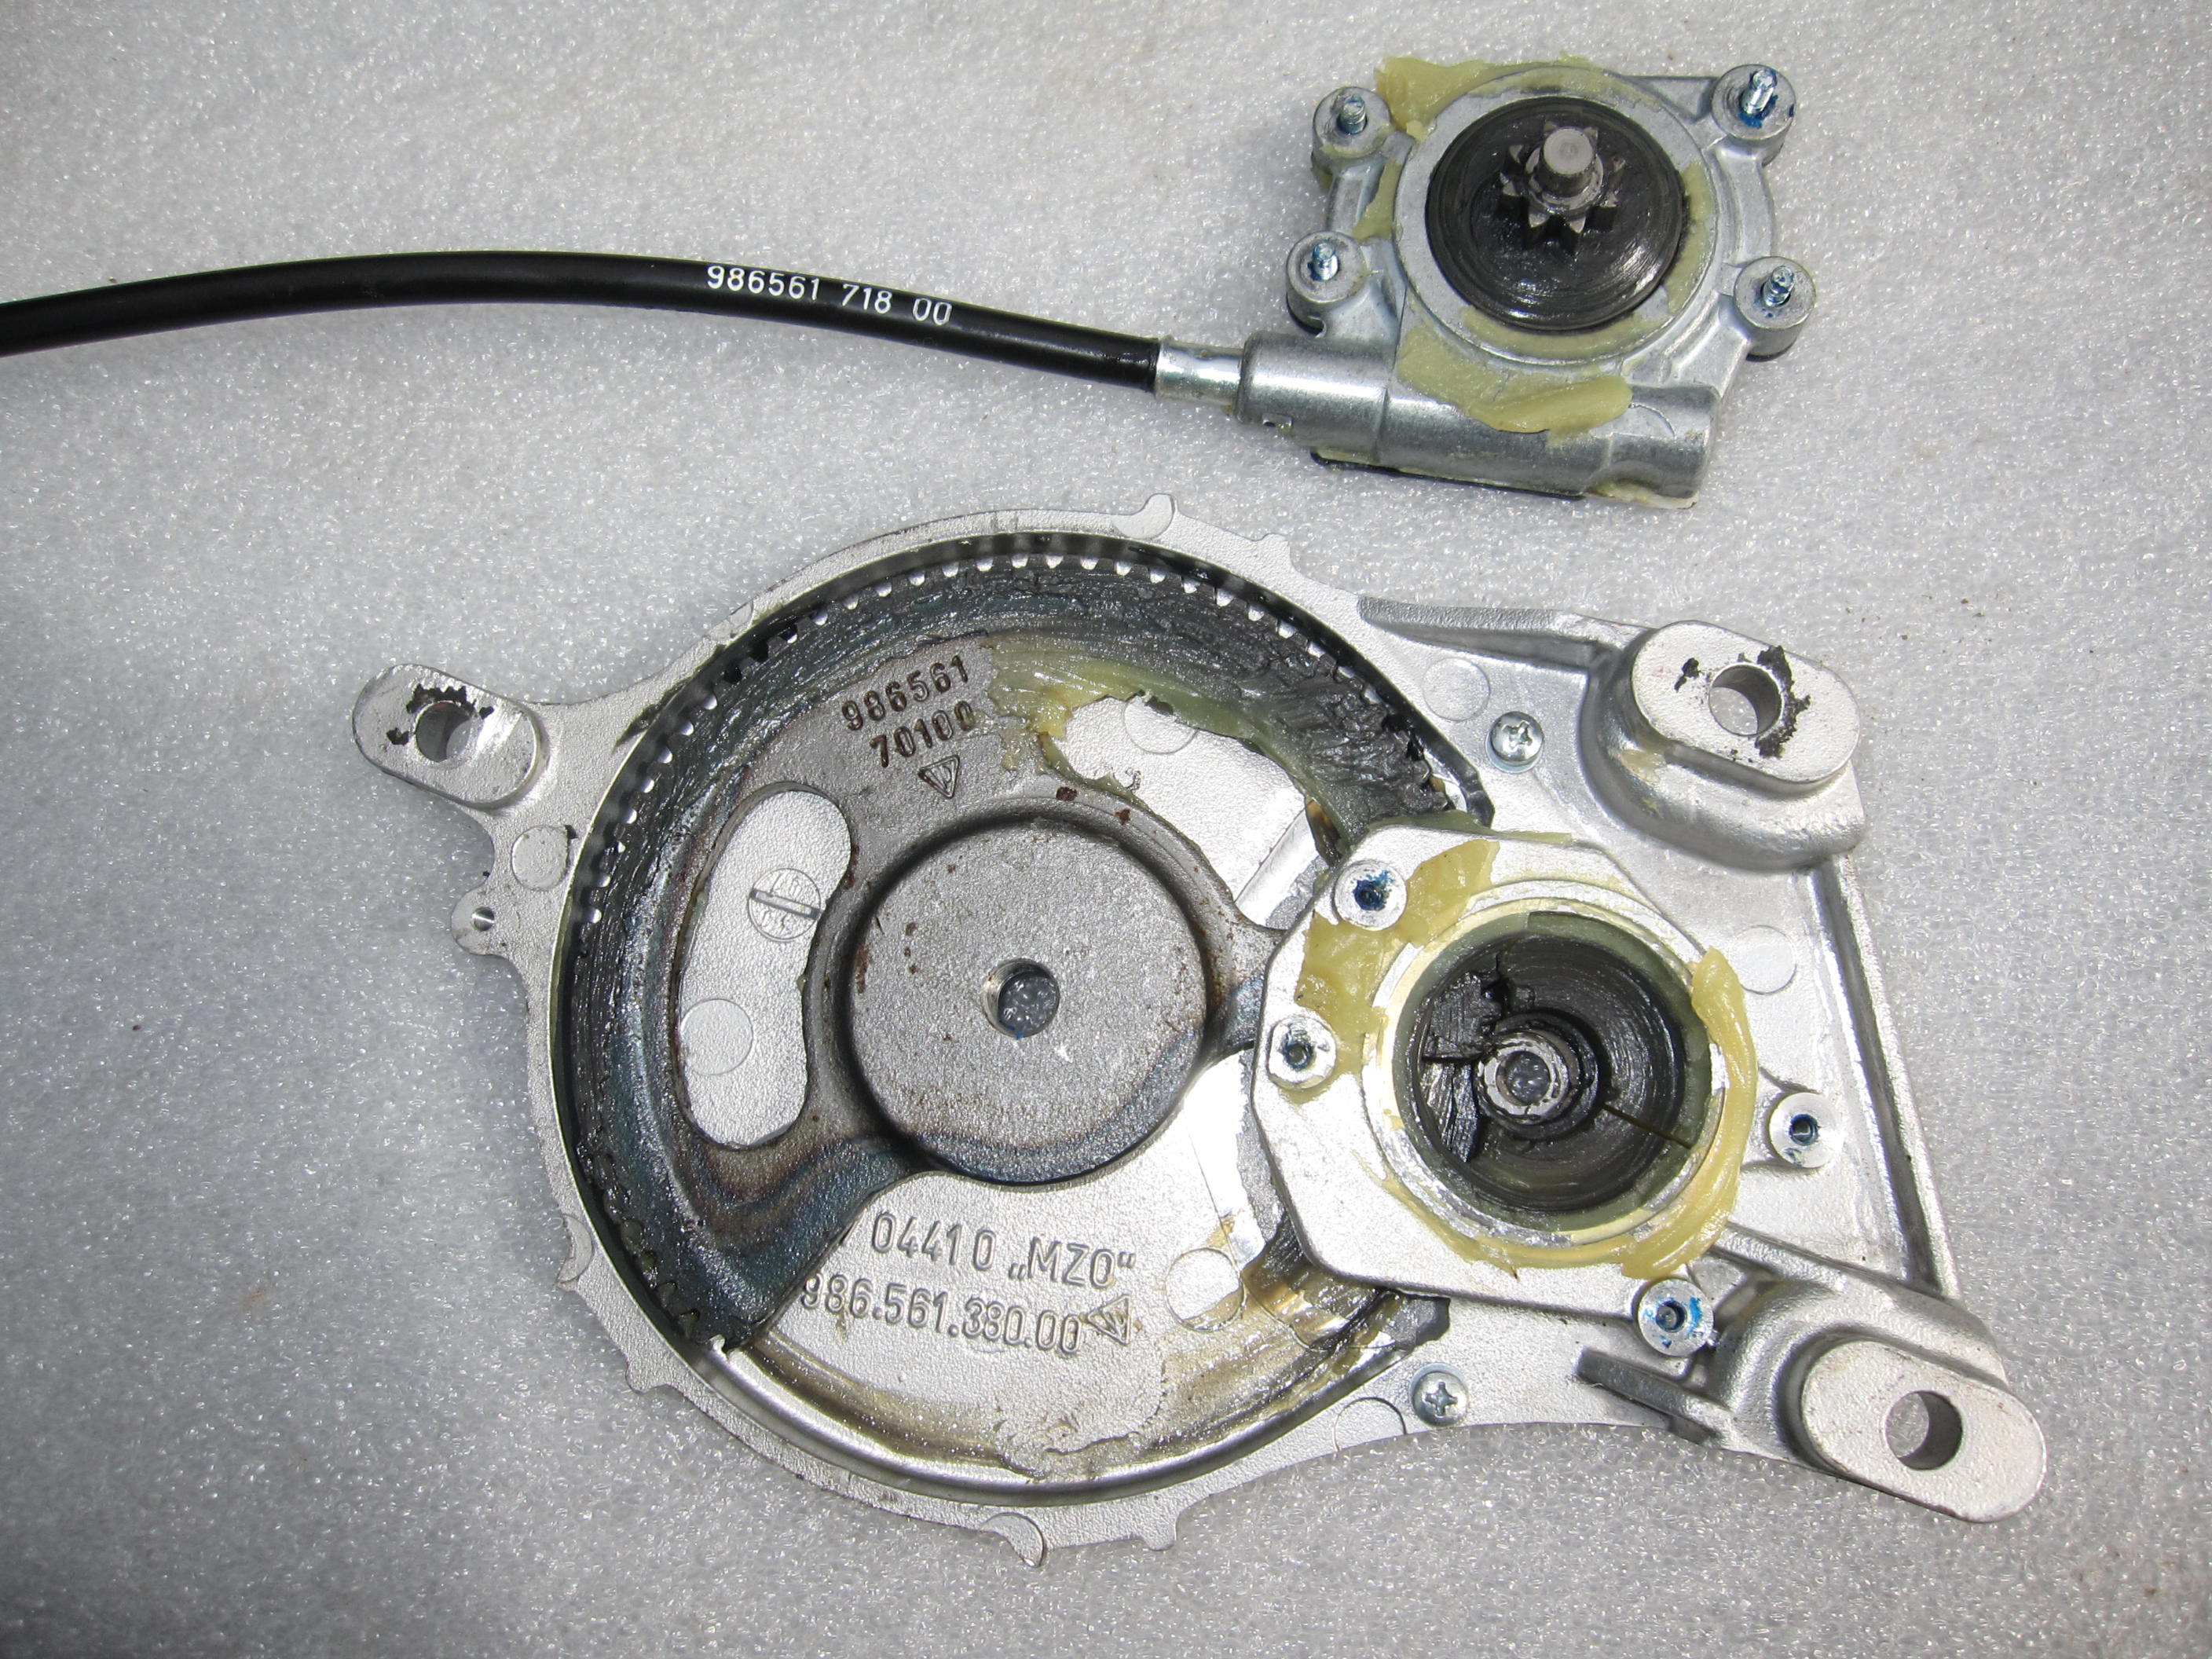
Paul: This time, nothing posted...no pictures, no text. Regards, Maurice. Maurice Sometimes a guy is having just too much fun! Ok, Let me try again to post that picture. I think it is there (I reduced the picture file size and increased the transmission speed) - point, was that it was much easier to move the rachett to the center of the engine area using extensions and turn the bolt. Then I was able to get the clam shell in the service position, and I marked the arms with 'white out' for reassembly, pulled off the aluminium arm from it's fixed arm, pulled back the water guiding materials (to the drain holes) to get at the 3 nuts holding transmission to wall of car. I then removed 'the works', open it up and opened the transmission between the cable and the gear - all looked ok. Let's see if pics will load. They aren't loading -too large a file - I don't know how to 'dumb them down' so I will try to send then as additional independant replys. Ideas at this stage would be appreciated. Regards, Paul Maurice This pic is of my disassembly before removing the gears from the car wall. p Maurice This is a picture of the main gears - as they came out - they appear to have gone past the last tooth. p p Maurice Here's the transmission - cable to brass gears. p
-
*HELP* BoxterS 98, roof will not open
pzinszer replied to adriano's topic in 986 Boxster Convertible Top Issues and Solutions
Paul: This time, nothing posted...no pictures, no text. Regards, Maurice. Maurice Sometimes a guy is having just too much fun! Ok, Let me try again to post that picture. I think it is there (I reduced the picture file size and increased the transmission speed) - point, was that it was much easier to move the rachett to the center of the engine area using extensions and turn the bolt. Then I was able to get the clam shell in the service position, and I marked the arms with 'white out' for reassembly, pulled off the aluminium arm from it's fixed arm, pulled back the water guiding materials (to the drain holes) to get at the 3 nuts holding transmission to wall of car. I then removed 'the works', open it up and opened the transmission between the cable and the gear - all looked ok. Let's see if pics will load. They aren't loading -too large a file - I don't know how to 'dumb them down' so I will try to send then as additional independant replys. Ideas at this stage would be appreciated. Regards, Paul Maurice This pic is of my disassembly before removing the gears from the car wall. p Maurice This is a picture of the main gears - as they came out - they appear to have gone past the last tooth. p p
-
*HELP* BoxterS 98, roof will not open
pzinszer replied to adriano's topic in 986 Boxster Convertible Top Issues and Solutions
Paul: This time, nothing posted...no pictures, no text. Regards, Maurice. Maurice Sometimes a guy is having just too much fun! Ok, Let me try again to post that picture. I think it is there (I reduced the picture file size and increased the transmission speed) - point, was that it was much easier to move the rachett to the center of the engine area using extensions and turn the bolt. Then I was able to get the clam shell in the service position, and I marked the arms with 'white out' for reassembly, pulled off the aluminium arm from it's fixed arm, pulled back the water guiding materials (to the drain holes) to get at the 3 nuts holding transmission to wall of car. I then removed 'the works', open it up and opened the transmission between the cable and the gear - all looked ok. Let's see if pics will load. They aren't loading -too large a file - I don't know how to 'dumb them down' so I will try to send then as additional independant replys. Ideas at this stage would be appreciated. Regards, Paul Maurice This pic is of my disassembly before removing the gears from the car wall. p Maurice This is a picture of the main gears - as they came out - they appear to have gone past the last tooth. p p -
*HELP* BoxterS 98, roof will not open
pzinszer replied to adriano's topic in 986 Boxster Convertible Top Issues and Solutions
Paul: This time, nothing posted...no pictures, no text. Regards, Maurice. Maurice Sometimes a guy is having just too much fun! Ok, Let me try again to post that picture. I think it is there (I reduced the picture file size and increased the transmission speed) - point, was that it was much easier to move the rachett to the center of the engine area using extensions and turn the bolt. Then I was able to get the clam shell in the service position, and I marked the arms with 'white out' for reassembly, pulled off the aluminium arm from it's fixed arm, pulled back the water guiding materials (to the drain holes) to get at the 3 nuts holding transmission to wall of car. I then removed 'the works', open it up and opened the transmission between the cable and the gear - all looked ok. Let's see if pics will load. They aren't loading -too large a file - I don't know how to 'dumb them down' so I will try to send then as additional independant replys. Ideas at this stage would be appreciated. Regards, Paul Maurice This pic is of my disassembly before removing the gears from the car wall. p
-
*HELP* BoxterS 98, roof will not open
pzinszer replied to adriano's topic in 986 Boxster Convertible Top Issues and Solutions
Paul: This time, nothing posted...no pictures, no text. Regards, Maurice. Maurice Sometimes a guy is having just too much fun! Ok, Let me try again to post that picture. I think it is there (I reduced the picture file size and increased the transmission speed) - point, was that it was much easier to move the rachett to the center of the engine area using extensions and turn the bolt. Then I was able to get the clam shell in the service position, and I marked the arms with 'white out' for reassembly, pulled off the aluminium arm from it's fixed arm, pulled back the water guiding materials (to the drain holes) to get at the 3 nuts holding transmission to wall of car. I then removed 'the works', open it up and opened the transmission between the cable and the gear - all looked ok. Let's see if pics will load. They aren't loading -too large a file - I don't know how to 'dumb them down' so I will try to send then as additional independant replys. Ideas at this stage would be appreciated. Regards, Paul
-
*HELP* BoxterS 98, roof will not open
pzinszer replied to adriano's topic in 986 Boxster Convertible Top Issues and Solutions
Paul: Don't be timid! It's "only" a Boxster! LOL! If you tried to post a photo, it did not take as I can't see any photos in your post. You can now easily (relatively speaking, because it's not under pressure) pry off the black hydraulic pushrod from the V-lever. The easiest way to disconnect the front pushrod is by unbolting the 10mm bolt with the fat washer that holds the two pieces of that pushrod together, but BE SURE TO MARK where it connects so that you can duplicate the exact length (Nail Polish or White-out). Also make sure that you take some photos for your reference of the V-lever and its position on the transmission threaded bolt hole, as it is possible to install the V-lever 180 degrees off. If you install the V-lver upside down, it will be very difficult to diagnose the problem. You can test the black lever microswitch with a multimeter, as it's only a simple on/of switch. Try posting more photos...you may be skipping the "add to post" step after you have downloaded the photos. Regards, Maurice. -
*HELP* BoxterS 98, roof will not open
pzinszer replied to adriano's topic in 986 Boxster Convertible Top Issues and Solutions
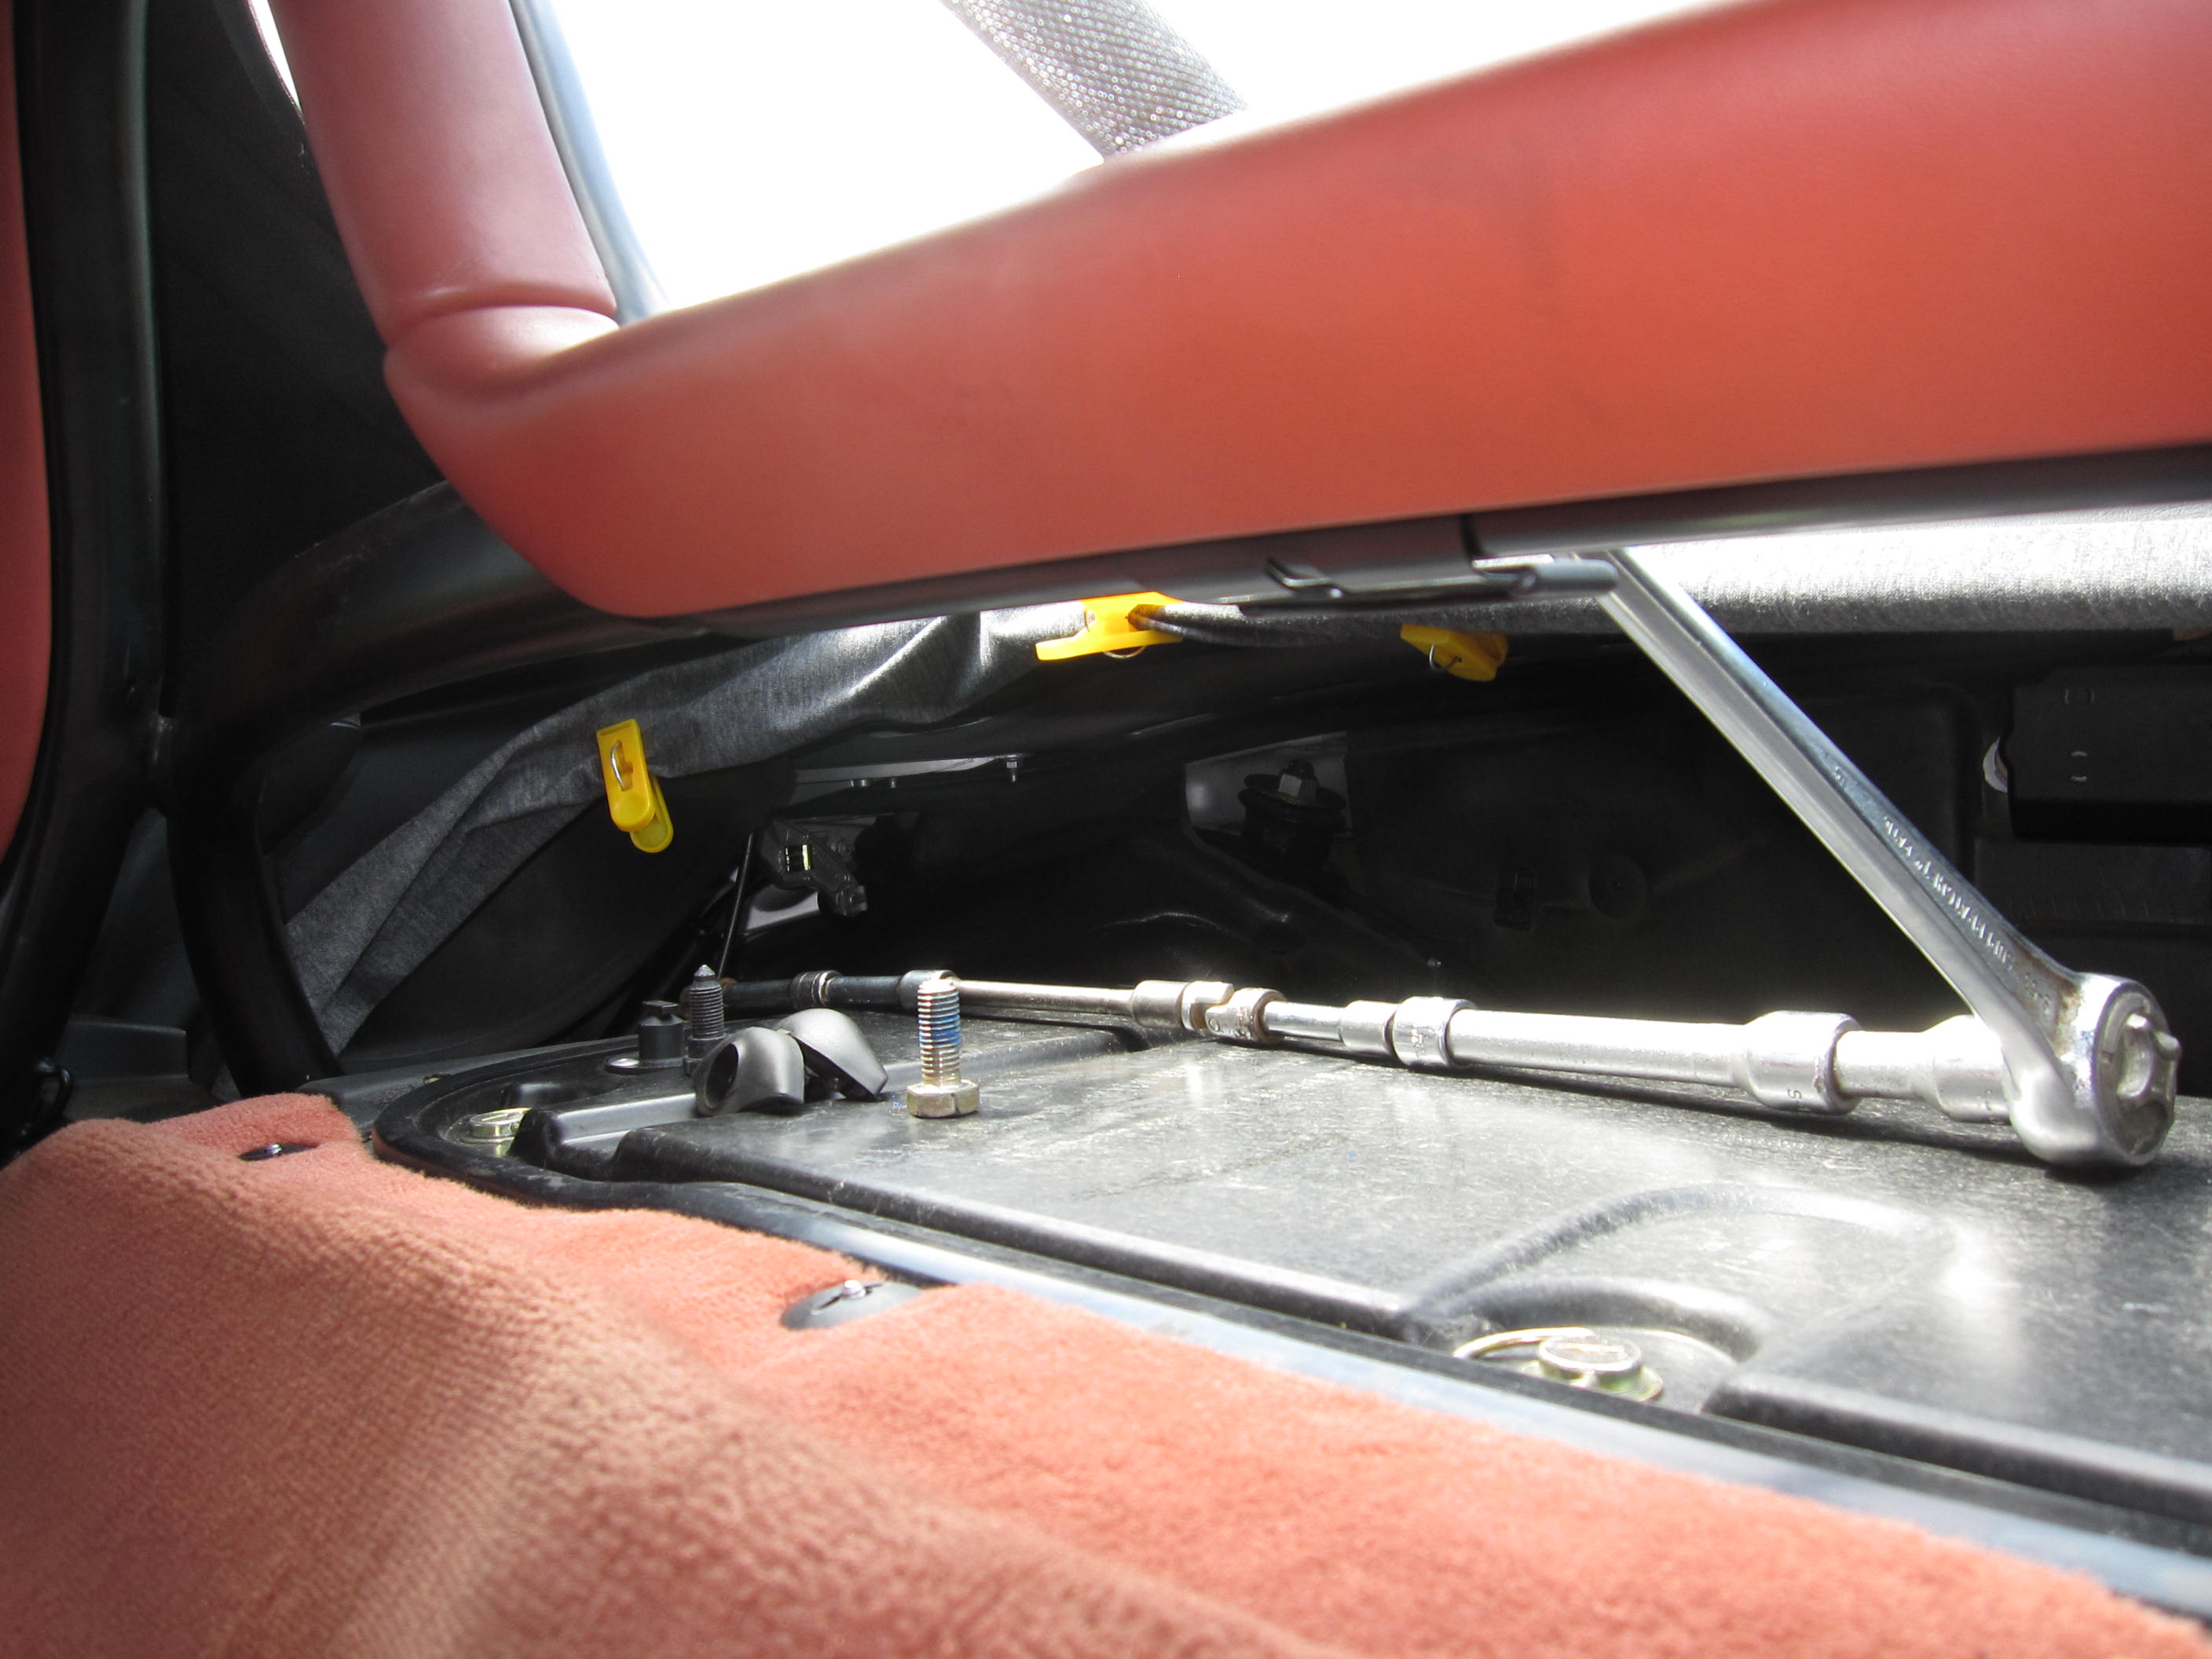
Paul: I'm not 100% sure, but IIRC if the driver's side opened as it should with the drill in reverse, the passenger's side may be a mirror image (i.e., try it with the drill in the forward direction). In any case, if you hear that loud pop, it's most likely the sound of the half-moon gear going past the 50th tooth and then being pulled back by the "hydraulic" push rod. There is no magic button that will automatically open the top, unless it's all functioning properly. You will have to get the top in the service position so that you can access and assess the various parts of the mechanism. There are a number of ways to get the top open when it is stuck in the closed position, none of them "a piece of cake" because of the restricted access. I had posted on DIY procedure on Mike Focke's website which generally works really well, but still requires contortionist skills and working, intact cables and transmissions. If your cables are broken or the V-lever is not being turned by the transmission on the passenger's side, you will have to resort to disconnecting the V-lever from the pushrods on that side (black hydraulic pushrod will release the clamshell, and the front pushrod with the plastic ball cup on the end will release the canvas part and frame of the top). The difficulty with the black hydraulic pushrod's connections (at the V-lever and at the body-colored arm that supports the clamshell) is that they are under tremendous pressure when the clamshell is closed down tight. One way around this is to reach in there with a 19mm socket (1/2 drive for leverage) and unbolt the 19mm bolt that holds the V-lever onto the transmission on that side. It's on there with a fair amount of torque from the factory (58 ft/lbs, IIRC) AND some blue Loctite, so don't worry about really yanking on it to get it off. That bolt is easily located at the center of the V-lever. Be careful when you get to the point where the 19mm bolt comes off, as the V-lever will "jump off" because of the torque from the black hydraulic pushrod pulling on the clamshell. Once you get that V-lever off, you can easily undo the pushrod connections on both ends of the V-lever, and then you can just turn the driver's side with the drill and help along the passenger side manually and you'll have the top in the service position. At that point, all the relevant parts will be accessible and we can figure out what the problem is. Take photos. We like photos, and they help a lot in figuring out the problem from a distance. Regards, Maurice. Hello Maurice I am timid with this car (as I am sure you can tell) - with the decompression of the strutt, I had visions of body parts and car pieces being thrown into the neighbors yard. I am delighted to report that that did not happen. getting the V lever bolt out was a challenge - at first I tried to get my rachet between the B-Pillar and the bolt, with no luck and as I went for a longer leverage there was less room to work - so I removed the seat belt attachment on the B-Pillar - still no success. Then I got all my rachet extensions and two flex joints and brought the wrench over to the center area of the back - the bolt easily turned, and almost a disappointment, the strutt was free without my noticing. The attached picture was meant to show the battlefield: 2 shims on top of the lever on the motor the yellow clothes pins that I use to hold the curtain out of the way the rachet and the extensions that I used to get to the middle of the back area the V lever bolt (silver with blue bolt-lock)and the bolt (black) and rubber housing from the seat belt attachment I will now detach the lever arms from the V-Lever (my guess is that they can be easily pried from the lever) and then using the drill on the left side put the top in the service position. Then I will dig out the 'works' and report my findings with pics. Can I test the lever switch on top of the top motor? Thanks, and regards. Paul -
*HELP* BoxterS 98, roof will not open
pzinszer replied to adriano's topic in 986 Boxster Convertible Top Issues and Solutions
Paul: It is entirely possible that the black lever microswitch may be faulty or that your convertible top double relay is not processing the signal it receives from the black lever microswitch properly. You should test the microswitch or replace it. When I (and others) successfully got the light to go out at the end of a cycle by progressively adding more shims, it was always at the end of the "ROOF OPEN" cycle, with the top tucked in under the clamshell and the clamshell closed securely over it. At the end of the "ROOF CLOSED" cycle, the results have been mixed and some had to resort to watching the clamshell get to a snug position and then let go of the switch. So for now, try adding the shims when your are opening the top. If your top is all the way up and closed, you can get it to open by operating the drive cables with a cordless drill. All that is required is that you reach under (and/or through) the rollbar, pull up on the upside-down u-clip on each side of the electric motor and pull each cable outboard to expose the inner speedometer-type cable inside. Then connect each cable in turn into the chuck of the cordless drill (LOWEST torque setting) and observe the direction of the V-lever and the movement of the leading edge of the top on that side to see if it is starting to pull open the top. If it is, keep spinning it until you get 2 or 3 inches of movement on the leading edge of the top and then alternate by doing the same thing, in the same direction, on the other side. Keep alternating until the top is completely open. (If the movement is in the wrong direction, stop and put the drill in reverse). That will allow you to get the top in the service position to get the best access to the V-levers and the rest of the "works". When you are ready to test it, line up each of the V-levers according to the measurements given here: http://sites.google.com/site/mikefocke2/installinga'03-'04glasstopandframeona'97 Go to the Part III PDF, then follow the instructions at the bottom of page 38 and the measurements given in the photo at the top of page 39. Regards, Maurice. Maurice The top is totally closed -I attempted to put it in the service position(opening the top) -the right side (passenger) has not moved, and now the cable in the drill turns with a modest pop (forward direction of the drill) - it started with more resistance (but the cable or teeth in the cam or others parts apparently gave way). This is the side were a loud pop did occur earlier in my appprentiship with this adventure. The drivers side (left) opened as it should (drill direction was reverse). My guess is that the next step is to get at the mechanics on the right side, to get them to function then return attention to the apparent electrical switch issue. I would appreciate guidance - I am a big guy so getting at these components from the 'back seat' area with the top closed and all the curtains and shrouds covering things make it a challenge. With all of Porsche's engineering isn't there a magic button somewhere that will automatically open the top? - Right, that's the switch on the dash that says "top open". Thanks for your patience. Regards, Paul -
*HELP* BoxterS 98, roof will not open
pzinszer replied to adriano's topic in 986 Boxster Convertible Top Issues and Solutions
Paul: I'm having trouble keeping your scenario and that of Alan's straight! LOL!!! Now that you have the two sides synchronized (evident by a completely level clamshell, easiest to measure when the clamshell is only one or two inches from completely down), try to get the light to go out only at the end of the completely open cycle. To do that, you have to add the shims, but the B-Pillar microswitch has to be connected and installed in its place. The distinct "pop", if it sounded like a loud metal thunk, is probably the half-moon gear going past its 50th tooth and being pulled sharply back by the force of the black "hydraulic" pushrod (either one side or, if you are 100% synched, possibly both). If you break just the plastic ball cups, I can PM you a source that will sell just the plastic ball cups, without having to buy the entire pushrod assembly from Porsche. Looking forward to see what you discover. Regards, Maurice. Maurice Wait ---for sure you can juggle 3 balls in the air at one time, you seem able to do it all the time - actually it's not tough Alan, has this heavy English brogue and uses words like spanners and windscreen and I sound like a regular upstate NY banana farmer. My top is up, so visabliity is very limited - however I worked my way through the levers and arms of the opening mechanics by hand, I tried to push/pull and checked that all ends were connected and I found no loose/or extra pieces - I am concluding that the 'pop' did not result in apparent issues with these mechanics. I reconnected the switch on the B-Pillar. - Closed the top latch. I progressively added shims to the switch on top of the motor - the open top light on the dash remains on. (if this switch were failing, would it not explain the dash light remaining on?). Of course I am guessing but with the battery low (when I tried to open the top) it might explain why it only engaged but did not move. I have greased the slide but the area immediately behind the slides would not be affected, so immediate resistance would be expected (I think Alan mentioned a spray, that may get behind the slider). Again thank you. Regards, Paul -
*HELP* BoxterS 98, roof will not open
pzinszer replied to adriano's topic in 986 Boxster Convertible Top Issues and Solutions
Paul: Try adding two or three more shims to see if you can get the light to go out. Pressing on the black lever microswitch does not give you the same effect because there is an "after-running time" (which is what you are trying to trigger earlier) and because it's interconnected wit the position of the lever on the B-pillar microswitch and, indirectly, the V-levers. The only adjustment possible at the B-Pillar microswitch is by altering the bend of the small silver arm that contacts the frame of the B-Pillar so that it contacts it sooner or delays the contact until the top frame is further along its arc of travel. It can sometimes be used to reverse the direction of travel of the top when necessary because of a malfunction. Greasing the channels will make the operation smoother. What you noticed regarding the alignment of the top of the clamshell ends with the surrounding bodywork (if I understood you correctly) is most likely due to the two V-levers being out of synch. The clue there is that the piston on the driver's side if fully retracted and not showing any bright metal. That shows that the clamshell is not being pulled down as tightly as on the other side because the V-lever on that side is not at the same degree in its rotation. Compare the two positions of the V-levers to confirm that. If you can use a voltmeter, I will dig up a step-by-step troubleshooting diagram that I obtained from the factory manual and post it here. Regards, Maurice. Maurice There you are! Wonderful - after my last posting there were no new comments and I thought I was again out in the wilderness of Boxsterdom - but I did notice that somewhere you were posting responses - but they were not "showing" on my screen - so another accomplishment finding the second page, now you are back - amen and thank you. An update, I lowered the left side (drivers) clamshell to match the right, with the B-Pillar switch removed and one shim in place I connected the 2 cables in the motor and with latch released tried to lower the top (oh, dash 'top open' light was still on, with latch closed) - motor engaged/torqued but did not turn at this point (several times) - 'what the heck' I tried to close the top (already closed - tight) motor engaged (same as lowering)however there was a distinct 'pop' at which point I stopped and went and kicked a tree and haven't explored what I heard. But when 'closing up' noticed that the windows were funky (up/down movement) which in the past has meant low battery - so I recharged the battery - this may explain the motor engaging but not running - my concern is that if as you suggested earlier if the v levers are over rotated I could break all the ball connections. Today is cooler to work inside the car, I will check for any loose components and report findings - again thank you. Regards, Paul -
*HELP* BoxterS 98, roof will not open
pzinszer replied to adriano's topic in 986 Boxster Convertible Top Issues and Solutions
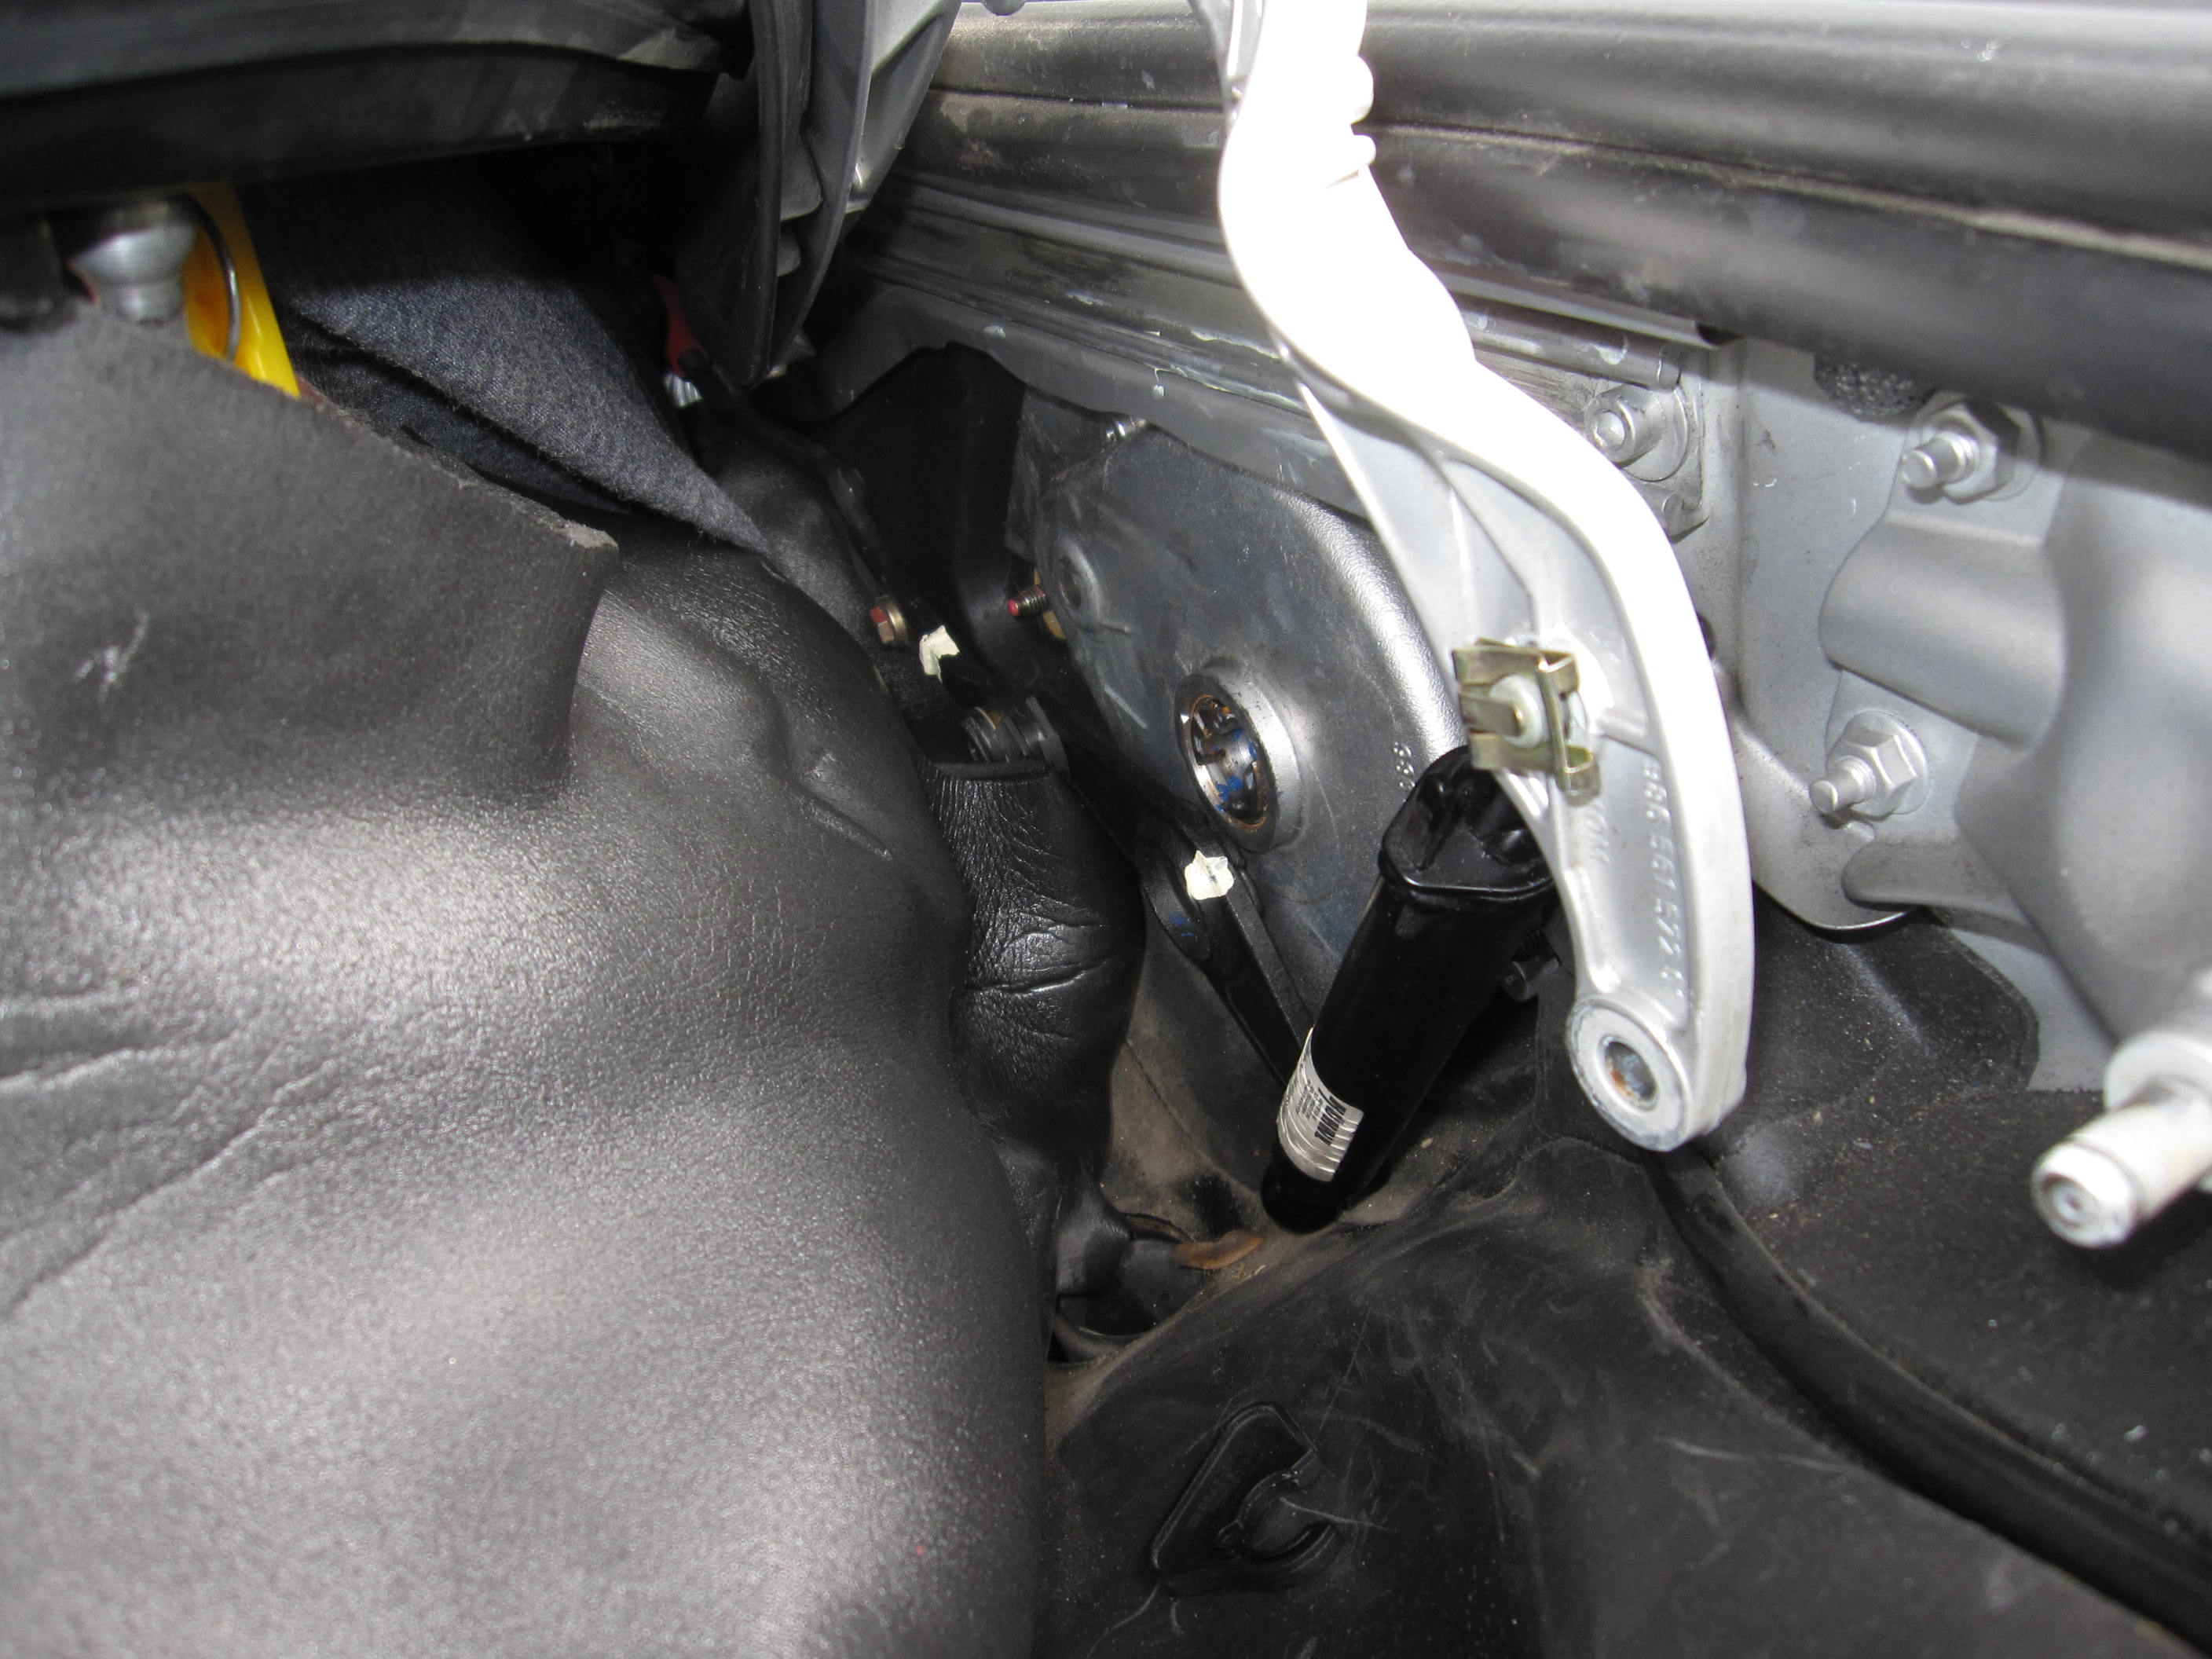
Paul: On '97's to '99's, what happens sometimes (because of the design of the V-levers and the half-moon gear inside the transmissions and/or the location of the B-Pillar microswitch) is that the V-levers "over-rotate" and the system jams and won't start to operate. To determine if you are in this category, check to see if the dashboard lights (or any other lights) dim when you press the "top open" switch. If so, that is what is going on. This may also be what is causing your "top open" idiot light to remain on. With the shim under the clamshell lid, did that result in the "top open" light going out at the end of the open cycle only (i.e., not the same result at the end of the closed cycle)? If your lights don't dim when you press the button, you could try to manually pull/push the little silver lever on the B-Pillar microswitch as that should reverse the rotation of the V-levers (if they are not over-rotated). Also, you mention "the" microswitch in latch assembly. Note that there are two microswitches inside that assembly and that it is sometimes difficult to see whether the one with the parallel strips has a hairline crack. A magnifying glass can help or you can test it with a multimeter. I don't think that your problem is being caused by either of the two microswitches inside the latch assembly. One lowers the windows and the other allows power to be supplied to the electric motor. (Sorry for the late reply, but my computer crashed and was out of action for a few days). Regards, Maurice. Maurice Thanks for the advise and encouragement. - the lights do not dim when the 'top open' switch is pushed. - using a shim had no affect that I noticed, the top open light remained on. - please assist with directions to the B-Pillar microswitch(s) I am not familiar with them - I will try to reverse the process. Two other events have presented themselves - I was successful 2 times opening the clamshell to the service position (and then closed it using the motor)on the 3rd attempt there was resistance when up about 1" and I did not force it, continuing to use the drill I returned it to the closed position. You mention possible over rotation with the V levers and I wonder if this might be a symptom. Also, reexamining the latch assembly micro switches, it appeared that one end of the column of the switch that rotates was backed out of it's position (due to inadequate material on the bottom to keep it in - a little ridge) - I took it apart and put a slight twist in the metal band/spring that holds it in place and put it back.I believe that it is physically functioning as intended - I have not tested the circuit. Any ideas from here? (sorry for the long delay in responding - my computer has been down) Paul Paul: Try progressively adding shims that are 1/4 inch thick, one at a time, until you get the light to go out. The B-pillar microswitch is located inside of the half-cylindrical carpeted plastic panel that is behind your left shoulder as you sit in the driver's seat. You have to remove the panel to get a good look at it. From the inside of the passenger compartment (behind the outboard side of the driver's seat), remove the semi-circular carpet-covered plastic trim panel from around the base of the roll bar. This trim panel is attached with an 8mm bolt at the top (just loosen it, you don't have to remove it completely) and there is a Phillips screw near the bottom that is well hidden in the carpet covering. The 8mm bolt at the top is located near the forward driver's side corner of the carpet/foam engine compartment cover. The Phillips screw is about 6 or 8 inches from the floor and just forward of the firewall. Remove the panel. To completely remove the panel, disconnect the defroster hook up near the base of the panel, and you will see the B-pillar microswitch about 2 inches down from the knuckle of the B-Pillar along the driver's side door jamb. Here is a photo of the B-Pillar microswitch behind the panel, with the panel just pushed aside after being unbolted: In this photo, the red arrow points to the little silver lever that makes contact with the base of the B-Pillar frame...The yellow arrow points to the one little torx screw that is holding it in place...The white circle shows the approximate location of the 8mm bolt that must be loosened. From the description you gave of the repair you have made to one of the microswitches inside the latch assembly, it sounds as though you may have resolved the problem with that switch (which allows power to flow to the electric motor). Also, inspect the guide channels in which the lowest part of one of the arms (on each side) supporting the clamshell to make sure that they are properly lubricated. If those channels are completely dry, the movement of the clamshell will be impeded. Here is a photo of one guide channel (located above the V-lever): Note that the steel ball at the base of the arm supporting the clamshell has been pulled out and you can now see the black plastic slider that the steel ball rides on. White lithium grease or Krytox is a good lube here). Regards, Maurice. Maurice Following your instructions, I: - inserted shims, one at a time, got up to 3 (together they measured +5/8") this had no effect on 'top down' dash light - using my finger, I could push the lever into the case as far as it would go, again with no effect. - I found the B-Pillar microswitch, probed it some, but did not remove or adjust it (it wasn't apparent how it got set/adjusted, so I was concerned about changing it's present 'setting'. (however, the metal probe does hit the top of the plastic case, so I doubt that it could be adjusted any more in that direction). - I greased the both guides - they were absolutely dry. Two items - earlier you ask me if the 'top down' light dimmed when the switch was pushed (it didn't) - I did this without the cables inserted into the motor - I did not hear the motor (I did listen) - should I try this again with the cables attached to the motor(did I say that I had to cut the metal ferrils off the end of both cables, due to the plastic coating expanding and covering the end of the cables). - while greasing the slides I noticed differences between the sides of the clamshell. Passenger side: external metal work meets well, inside the hydraulic strut shows about +1/2" of bright metal in addition to the black painted metal, and the black cable is slack. Drivers side: externally the clamshell is about 1/4" above other metal, internally, the hydraulic strut shows no bright metal, the black cable is tight. Again thank you. Regards, Paul -
*HELP* BoxterS 98, roof will not open
pzinszer replied to adriano's topic in 986 Boxster Convertible Top Issues and Solutions
Paul: On '97's to '99's, what happens sometimes (because of the design of the V-levers and the half-moon gear inside the transmissions and/or the location of the B-Pillar microswitch) is that the V-levers "over-rotate" and the system jams and won't start to operate. To determine if you are in this category, check to see if the dashboard lights (or any other lights) dim when you press the "top open" switch. If so, that is what is going on. This may also be what is causing your "top open" idiot light to remain on. With the shim under the clamshell lid, did that result in the "top open" light going out at the end of the open cycle only (i.e., not the same result at the end of the closed cycle)? If your lights don't dim when you press the button, you could try to manually pull/push the little silver lever on the B-Pillar microswitch as that should reverse the rotation of the V-levers (if they are not over-rotated). Also, you mention "the" microswitch in latch assembly. Note that there are two microswitches inside that assembly and that it is sometimes difficult to see whether the one with the parallel strips has a hairline crack. A magnifying glass can help or you can test it with a multimeter. I don't think that your problem is being caused by either of the two microswitches inside the latch assembly. One lowers the windows and the other allows power to be supplied to the electric motor. (Sorry for the late reply, but my computer crashed and was out of action for a few days). Regards, Maurice. Maurice Thanks for the advise and encouragement. - the lights do not dim when the 'top open' switch is pushed. - using a shim had no affect that I noticed, the top open light remained on. - please assist with directions to the B-Pillar microswitch(s) I am not familiar with them - I will try to reverse the process. Two other events have presented themselves - I was successful 2 times opening the clamshell to the service position (and then closed it using the motor)on the 3rd attempt there was resistance when up about 1" and I did not force it, continuing to use the drill I returned it to the closed position. You mention possible over rotation with the V levers and I wonder if this might be a symptom. Also, reexamining the latch assembly micro switches, it appeared that one end of the column of the switch that rotates was backed out of it's position (due to inadequate material on the bottom to keep it in - a little ridge) - I took it apart and put a slight twist in the metal band/spring that holds it in place and put it back.I believe that it is physically functioning as intended - I have not tested the circuit. Any ideas from here? (sorry for the long delay in responding - my computer has been down) Paul -
*HELP* BoxterS 98, roof will not open
pzinszer replied to adriano's topic in 986 Boxster Convertible Top Issues and Solutions
My 1998 Boxster top will not open - I have been following the earlier advise and I am now lookinjg for further guidance. I have been following a list Maurice gave: check 2 fuses,handbrake shows and windows lower, check lights on dash and I got to the stage of checking the motor - so using a drill I raised the clamshell to the service position, then reinserted the cables and using the dash switch the conv. roof lowered (I also tried to reverse it while in mid course and it would not reopen) - so the motor closed the top. The dash convertible top light is still on (my thought is that it doesn't know it is closed) and I put a shim under the lever on the motor at the clamshell). So, I then removed the micro switch on the top of the windshield - it looks good - Any advice would be appreciated, can I test the switch? Thanks. Paul