Welcome to RennTech.org Community, Guest
There are many great features available to you once you register at RennTech.org
You are free to view posts here, but you must log in to reply to existing posts, or to start your own new topic. Like most online communities, there are costs involved to maintain a site like this - so we encourage our members to donate. All donations go to the costs operating and maintaining this site. We prefer that guests take part in our community and we offer a lot in return to those willing to join our corner of the Porsche world. This site is 99 percent member supported (less than 1 percent comes from advertising) - so please consider an annual donation to keep this site running.
Here are some of the features available - once you register at RennTech.org
- View Classified Ads
- DIY Tutorials
- Porsche TSB Listings (limited)
- VIN Decoder
- Special Offers
-
OBD II P-Codes - Paint Codes
- Registry
- Videos System
- View Reviews
- and get rid of this welcome message
It takes just a few minutes to register, and it's FREE
Contributing Members also get these additional benefits:
(you become a Contributing Member by donating money to the operation of this site)
- No ads - advertisements are removed
- Access the Contributors Only Forum
- Contributing Members Only Downloads
- Send attachments with PMs
- All image/file storage limits are substantially increased for all Contributing Members
- Option Codes Lookup
- VIN Option Lookups (limited)


Dharn55
-
Posts
845 -
Joined
-
Last visited
Content Type
Profiles
Events
Forums
External Paint Colors
Downloads
Tutorials
Links Directory
Collections
Classifieds
Store
Posts posted by Dharn55
-
-
By the way, jacking the front end of the car up won't do much good unless you get it 2-3 feet higher than the rear. I just had my whole coolant systems apart to remove the "pudding" from an intermix problem. This included removing all the hoses and the radiator, and cleaning out all the tubes that run from the front of the car to the back using an electricians pull tape and rags. The tubes run up pretty high under the car and then up into the engine compartment. To get the nose up higher than the top of the tubes in the engine compartment it would take 24"-36". Raising it less won't hurt, but it won't help much.
-
Got mine at Tooltopia, $103 shipped. Here is a link
http://www.tooltopia.com/index.asp?PageAct...amp;ProdID=8249
-
Kind of a pain to get at. particularly the one on 1-3 side (drivers side). Plan on a couple of hours labor, sensor lists for $238 but you can get it much cheaper.
Here is Pelican's listing for the sensor:
http://www.pelicanparts.com/cgi-bin/ksearc...;FILTER_TOOL=ON
and the o-ring which you shoud also replace.
http://www.pelicanparts.com/cgi-bin/ksearc...;FILTER_TOOL=ON
I would also check with Sunset Porsche, their pricing is always good.
-
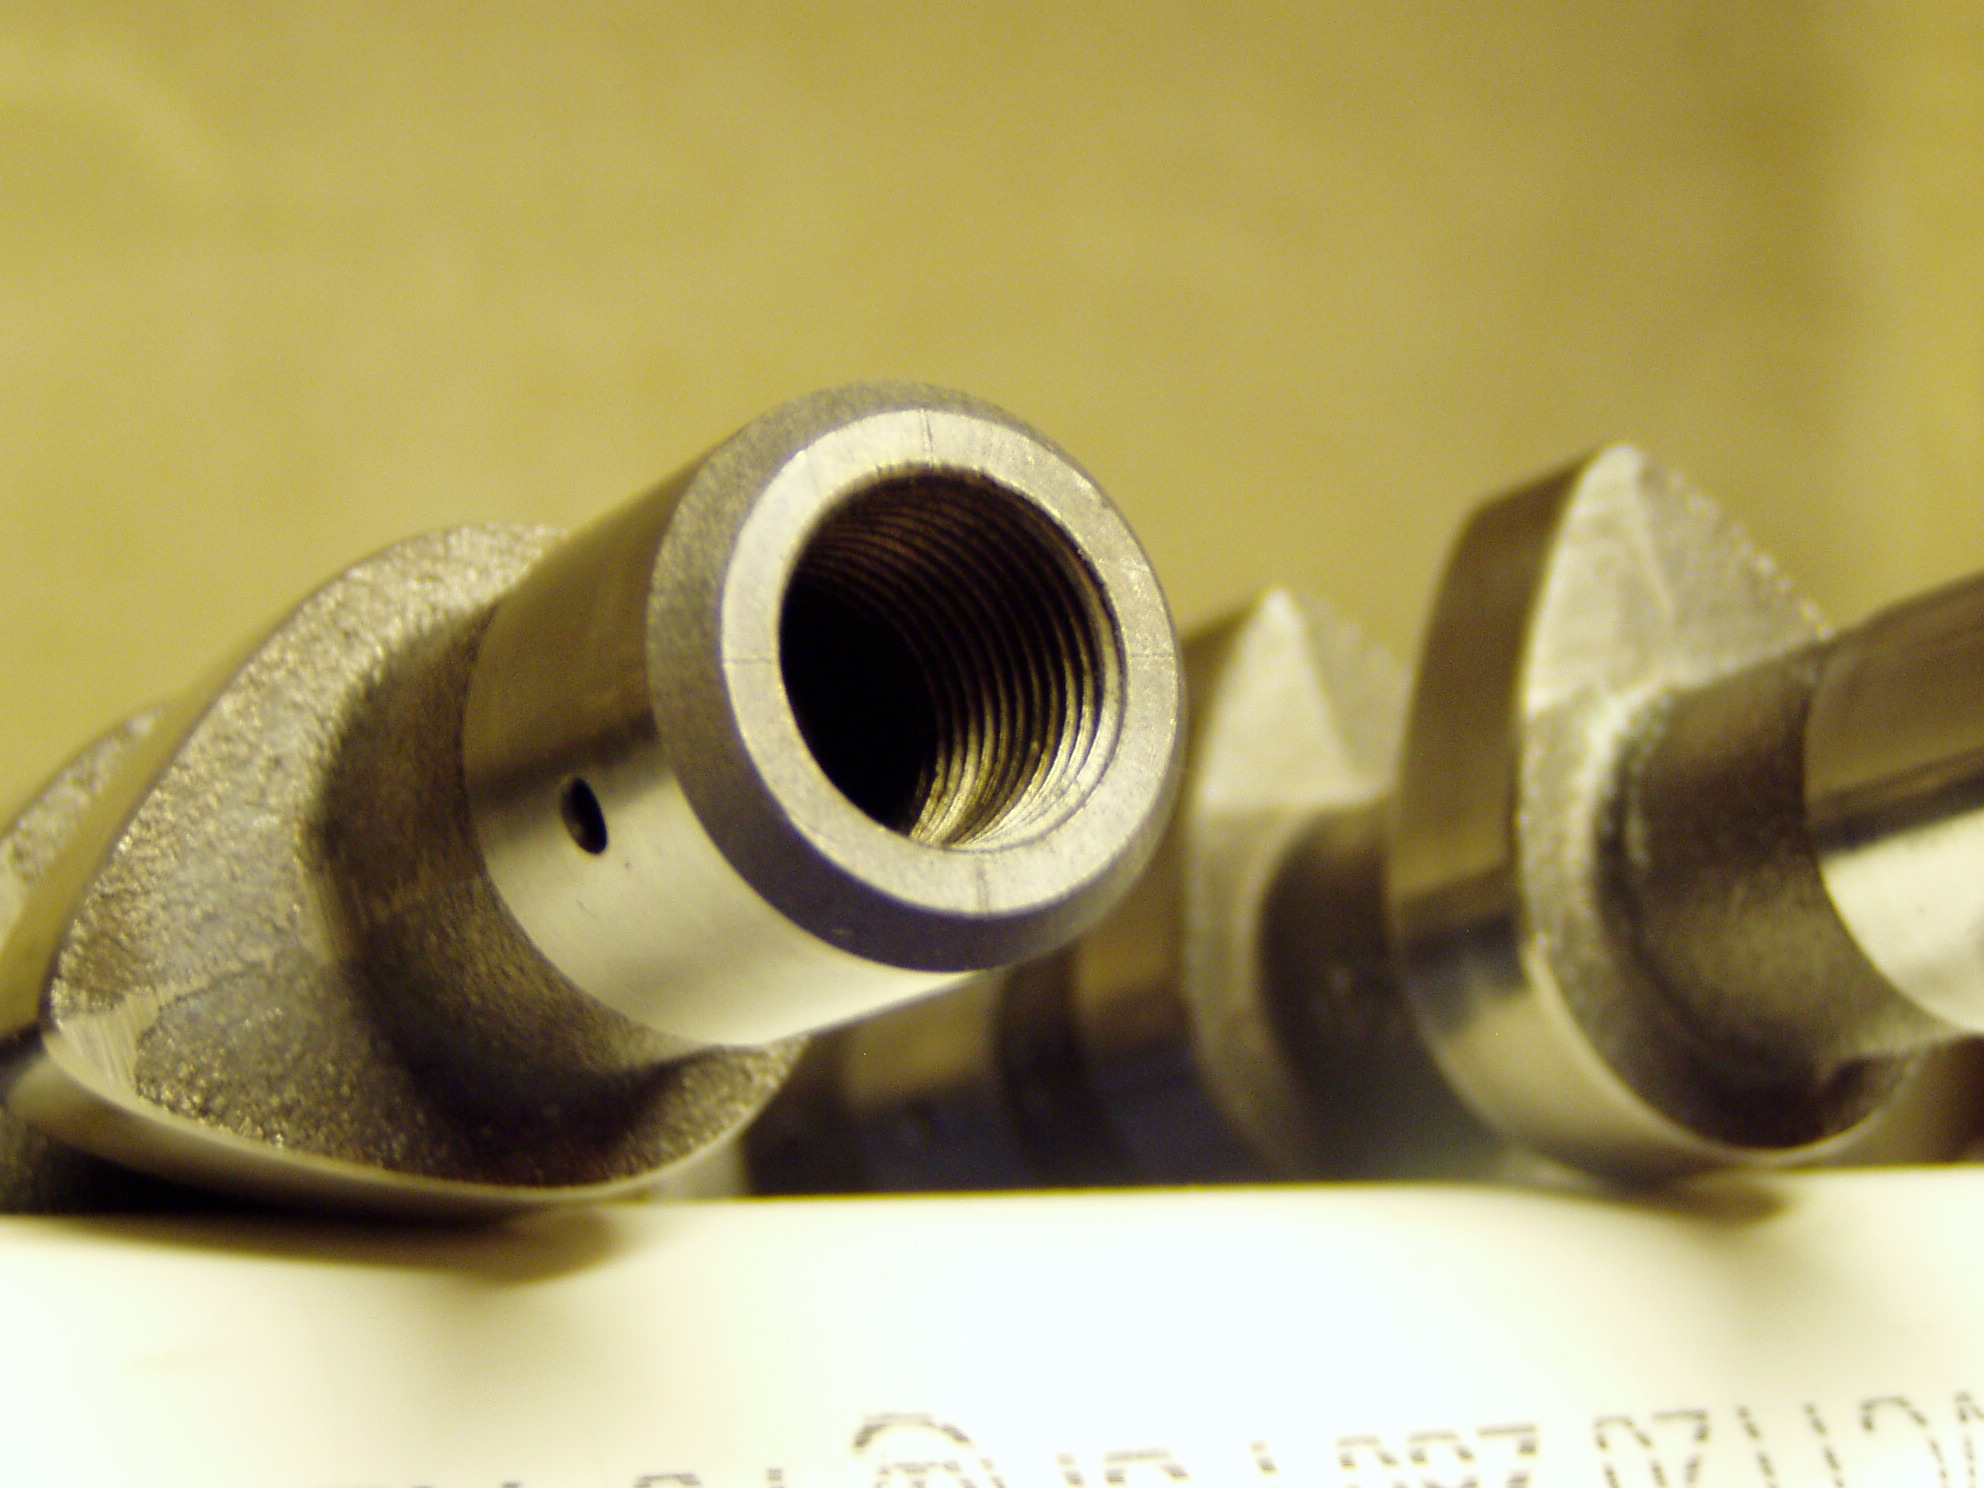
Here is a close-up of a cam with the expansion plug blown out. Notice the shoulder inside the cam where the diameter of the hole gets smaller. It is only about .2-.2.5” inside the chamfer on the end of the cam.

Here is a picture of the expansion plug that came out, and the cam cover plug. Notice how shallow the expansion pug is, only about 1.8” deep. This cap is pressed into the end of the cam, and the widest part is the top/hollow end, so it needs to go all the way into the end of the cam so that the widest part is beyond the chamfer. You don’t want to reuse an expansion cap as they are pressure/interference fit, and once they lose their shape/diameter reuse is very dangerous. All the domestically available expansion caps I found (from Dorman and other) were 2.5+” deep, so that the widest part would not be far enough in the properly fit, this is because of the shoulder inside the cam. And Porsche will not sell just an expansion cap.
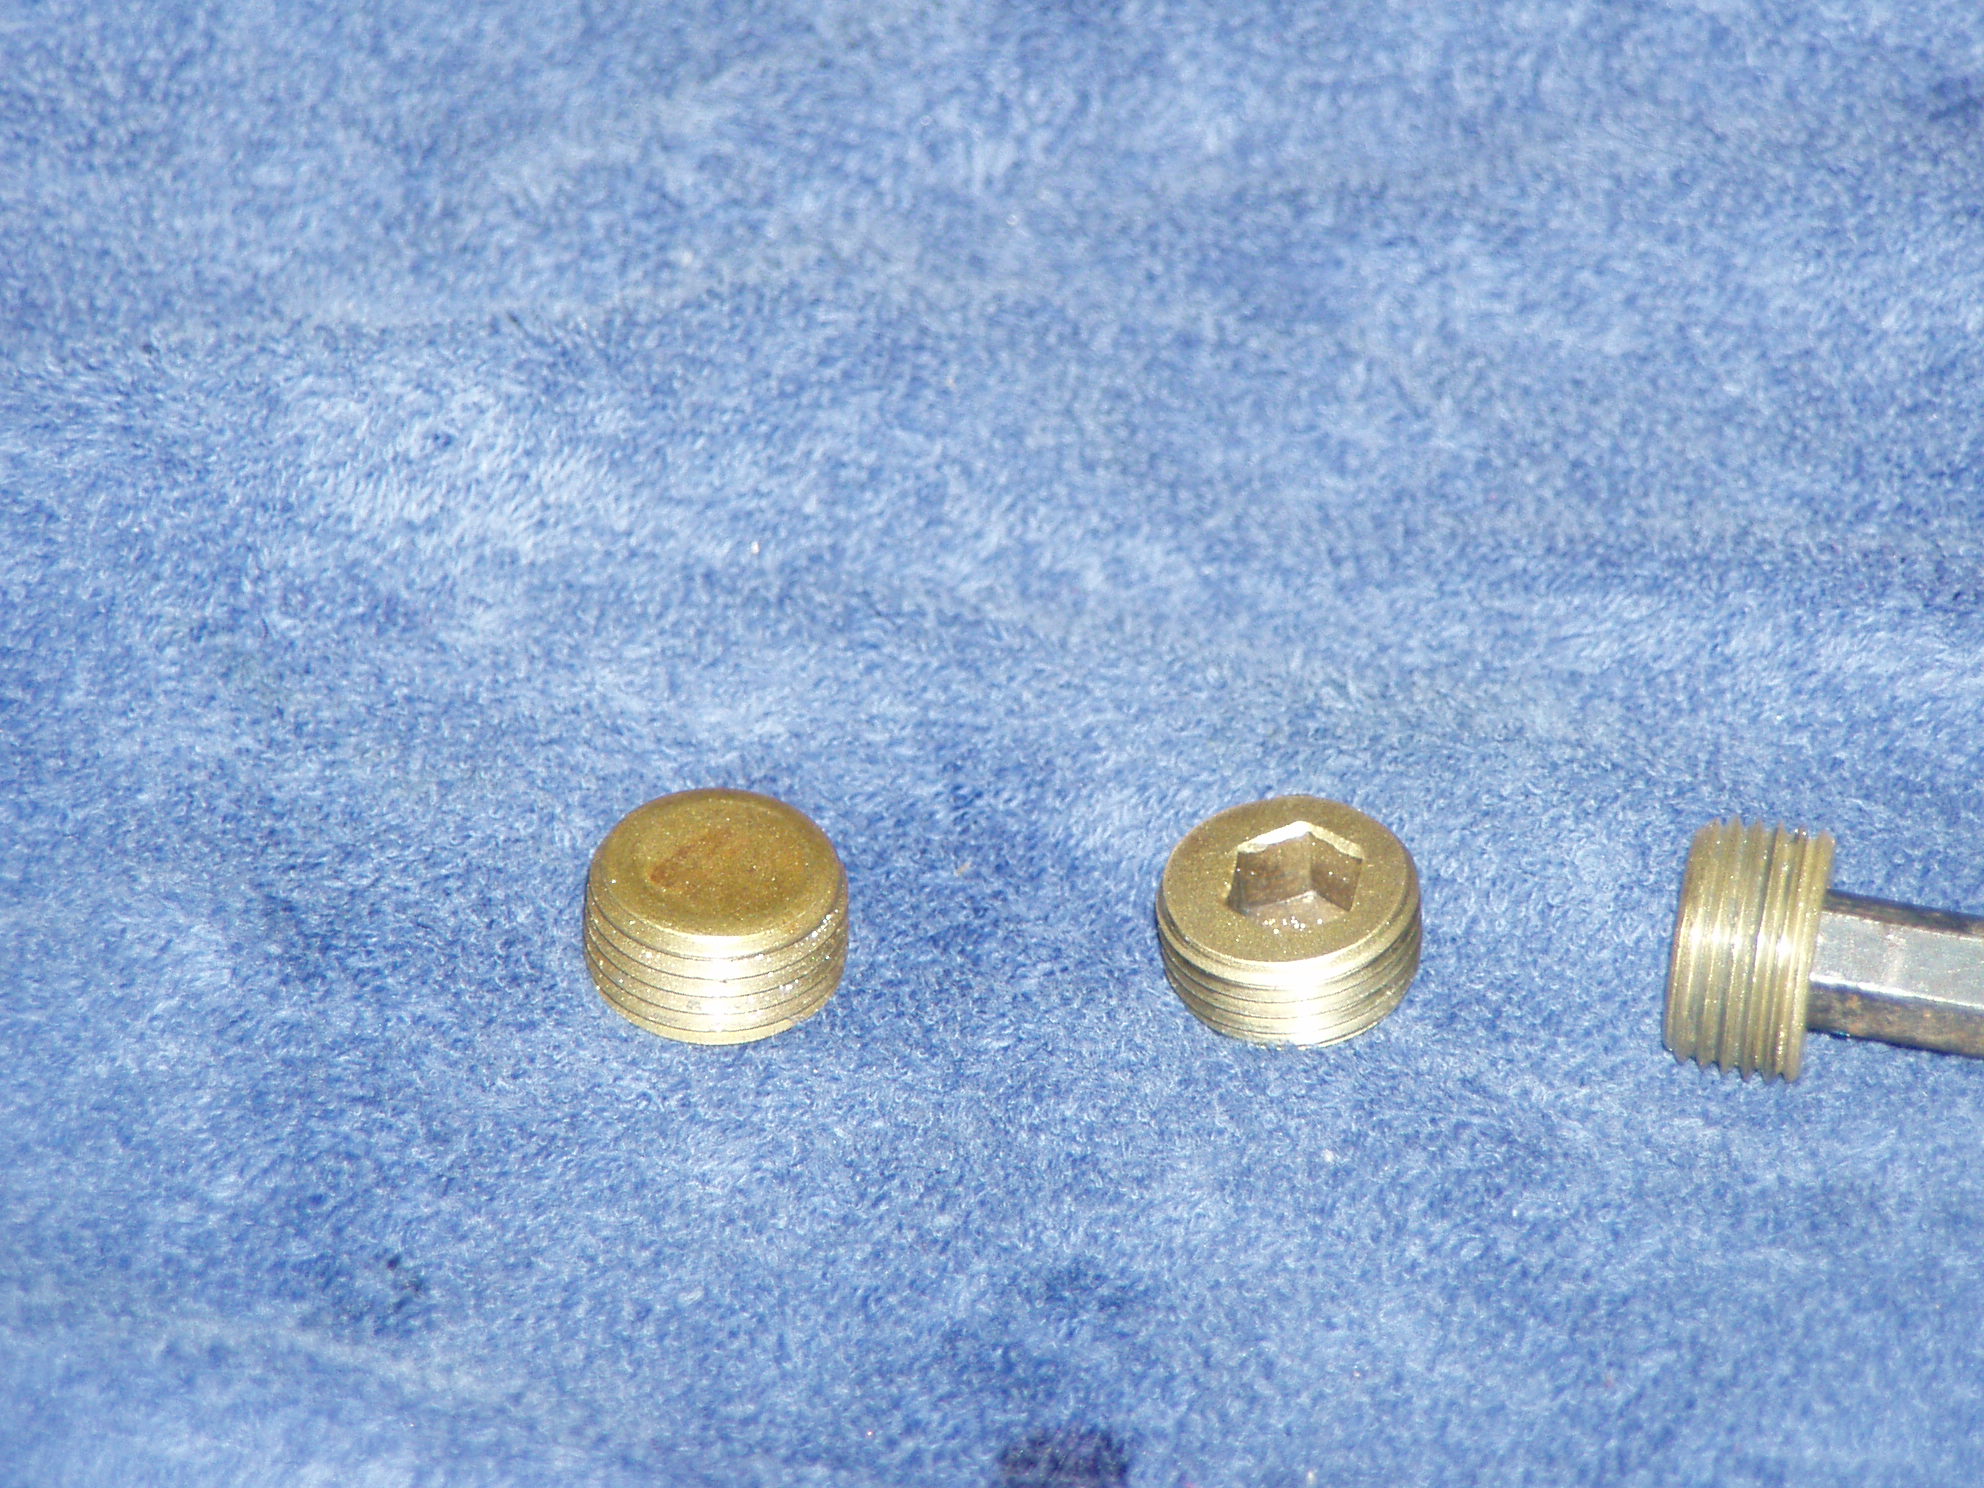
Here is a close-up of the cam with the end drilled and threaded. Notice the hole in the bearing area. This feeds oil to the bearing/journal at the end of the cam, so it is critical that the hex plug not interfere with this hole/oil flow. So the depth of the hex plug is critical.
Here is a picture of the hex plugs. The machine shop used standard, easily available plugs and shortened them so that they would not interfere with the oil passage.
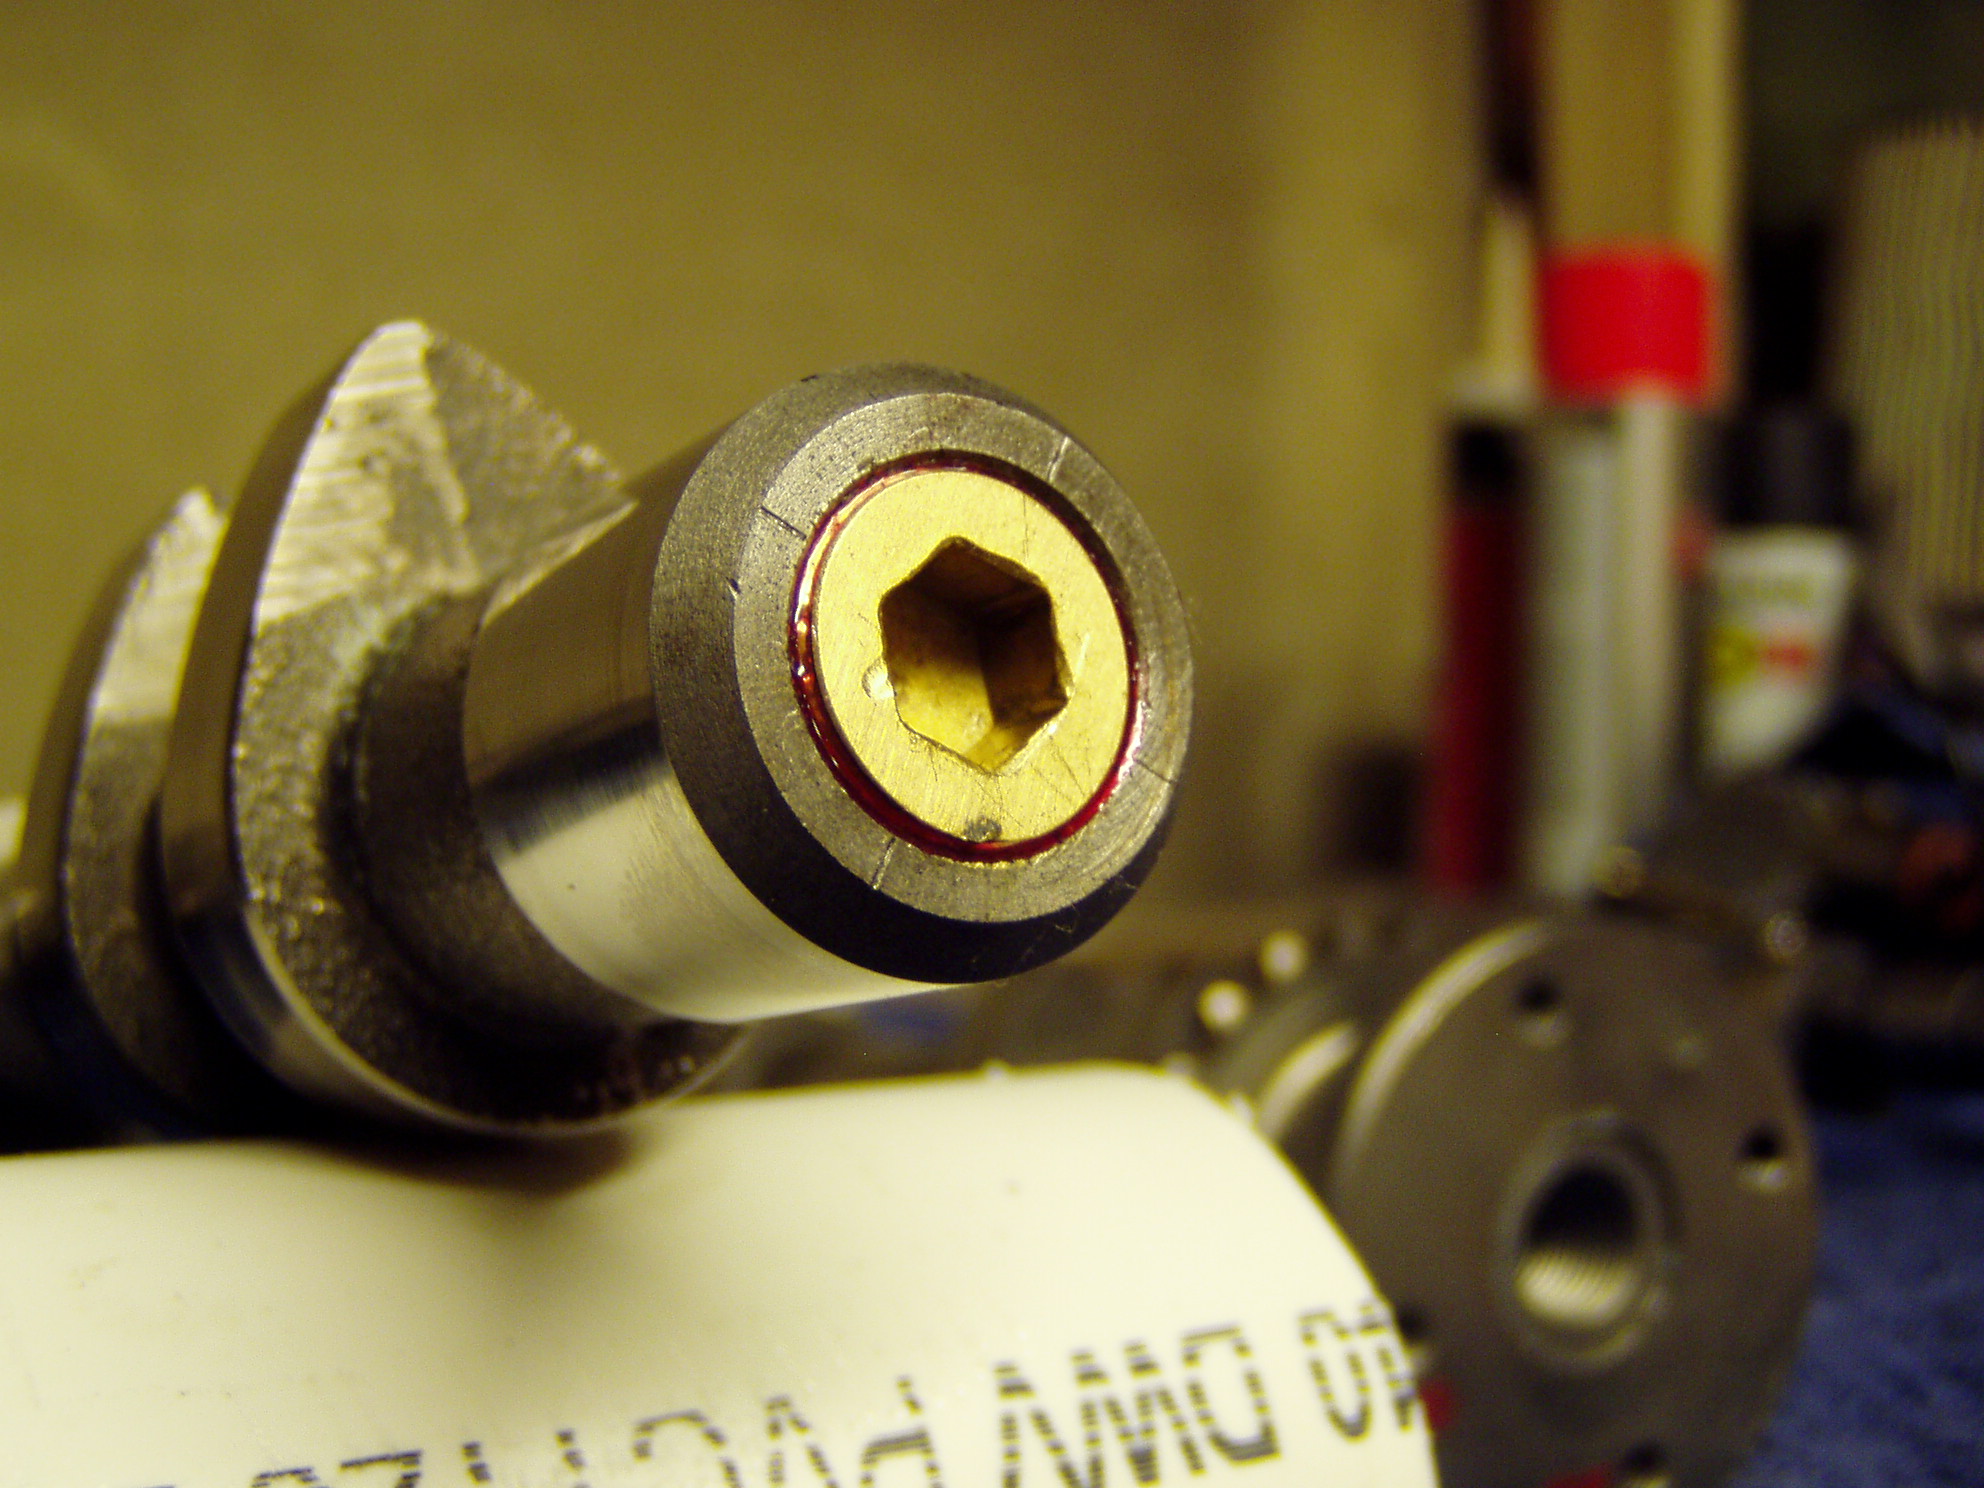
Here is a close-up of the cam with the hex plug installed. Notice the Red Threadblocker used to secure the hex plug in the end of the cam. I am going to modify my home made tool so that it will fit into the hex of the plug to hold the cams. I am not really worried about it pressing against the hex plugs, with the thread and threadblocker it is not coming out.
Here are a couple of pictures of the other ends on the intake cams with threads and plugs
I thought i would be putting the engine back together and back in the car this weekend, but some parts were delayed until next week, sent by ground by mistake, they were supposed to be overnighted for delivery yesterday or today, kind of frustrating.
-
Another update on the saga on my intermix problem and the repair of the engine. Those of you who have been following it will remember that I had an expansion plug blow out of the end of a camshaft and have been struggling with that problem. Finally sent the cams out to have the ends drilled, threaded and plugged.
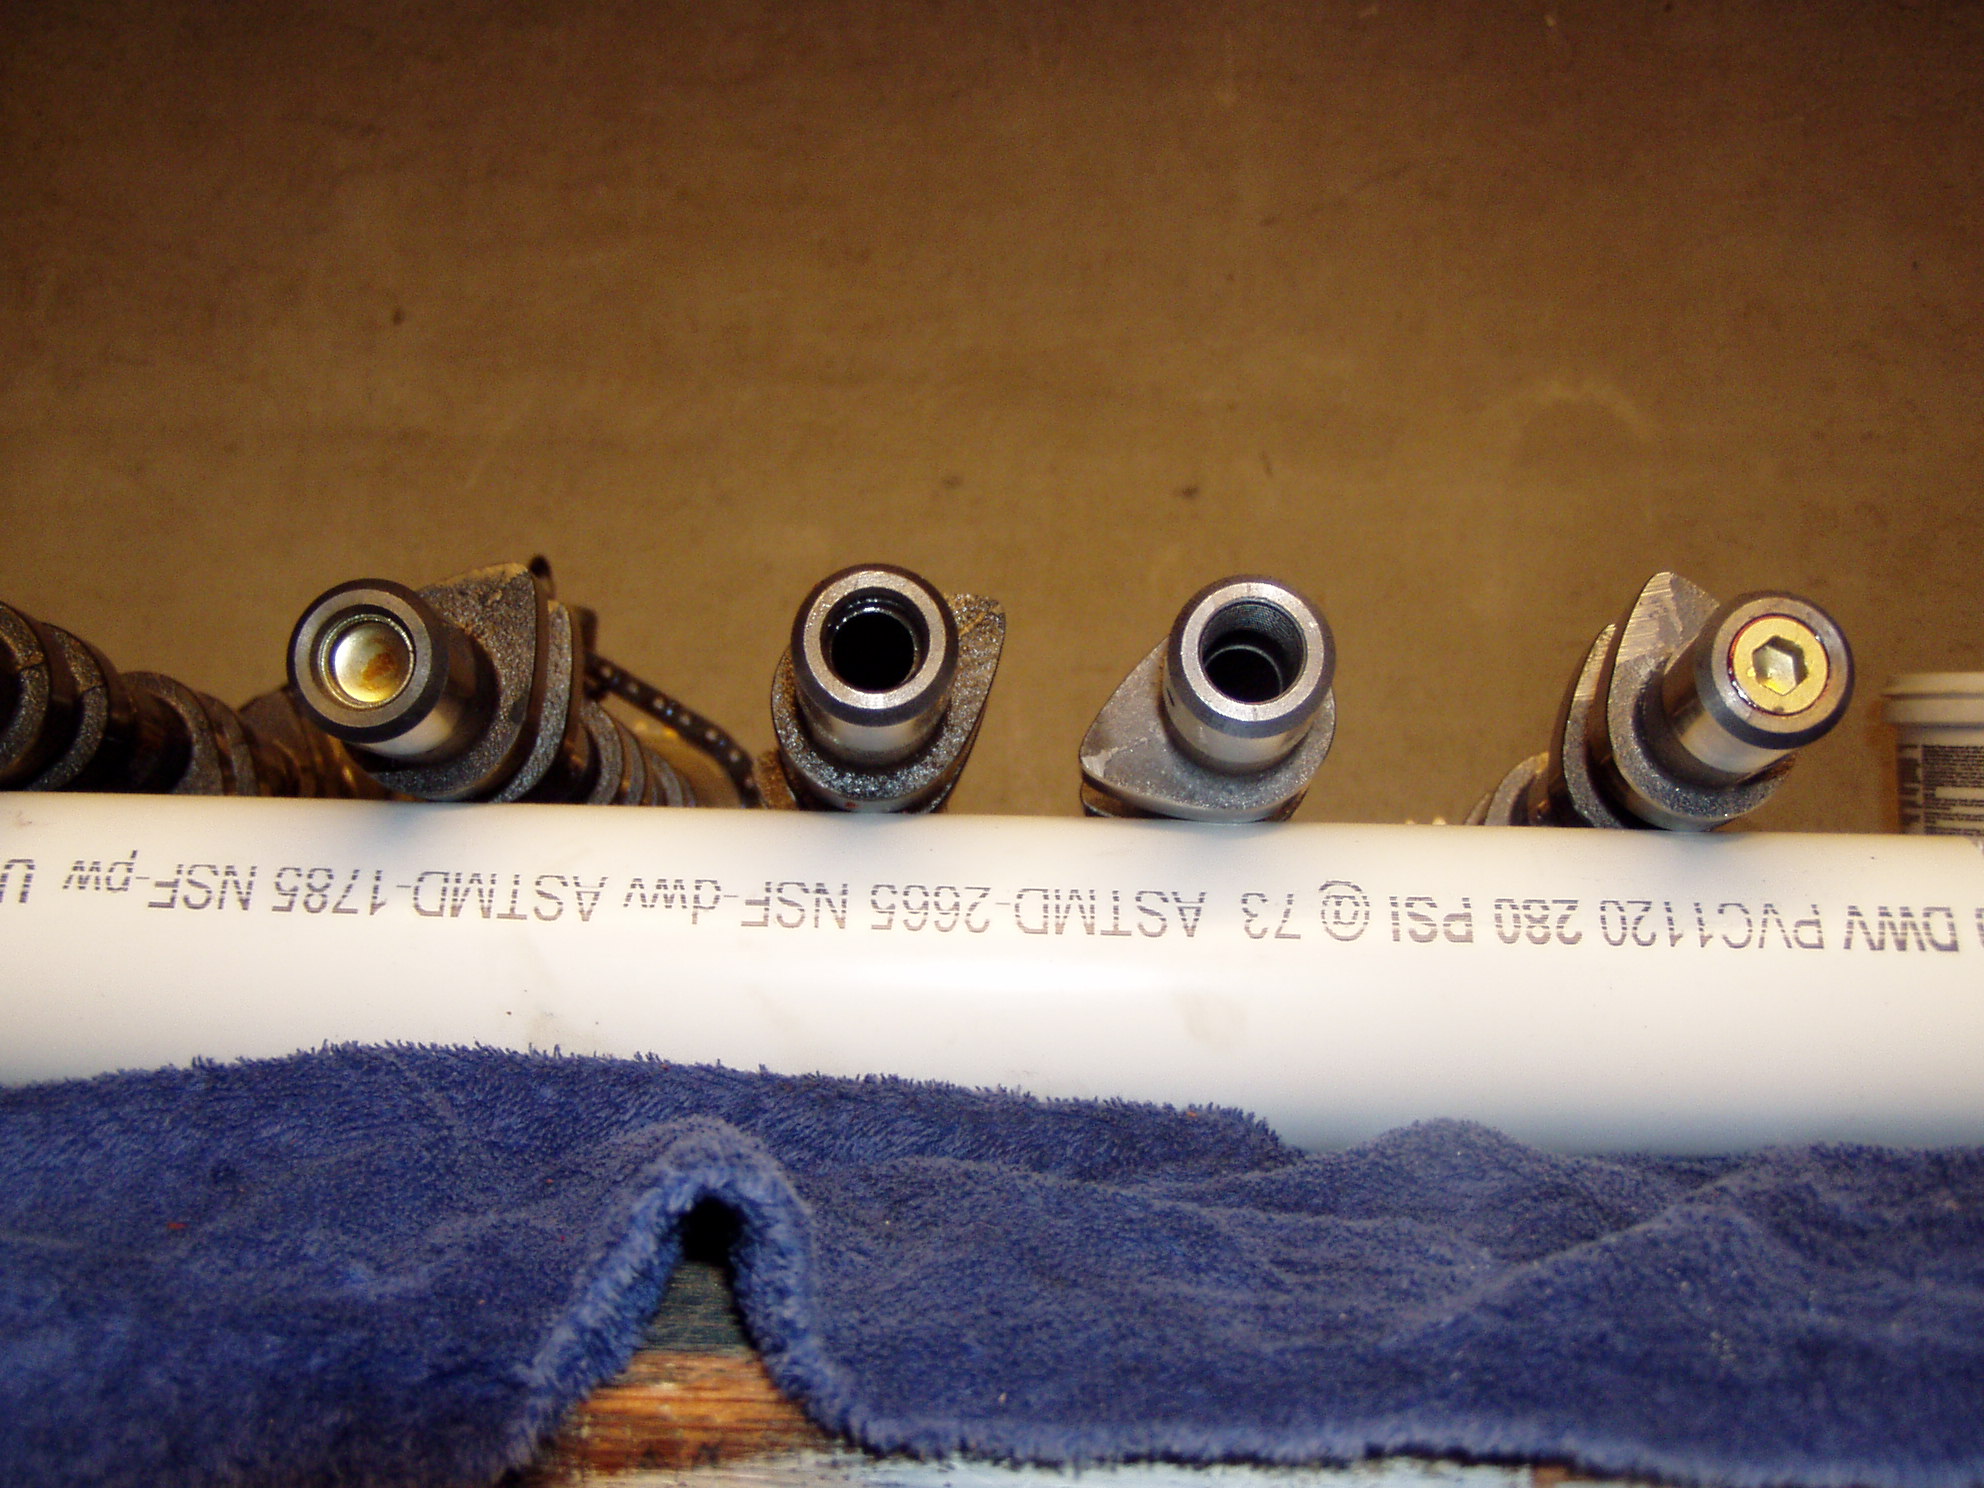
Here are pictures of the camshafts. The first shows four intake cams, on the left is a cam with the expansion plug in place, the next shows a cam with the expansion plug blown out, the next is a cam that has been drilled and threaded, and finally a cam with the Hex plug installed.
Here is a close-up of the cam with the expansion plug in place. In this case the plug has not been “deformed” by my home made tool.
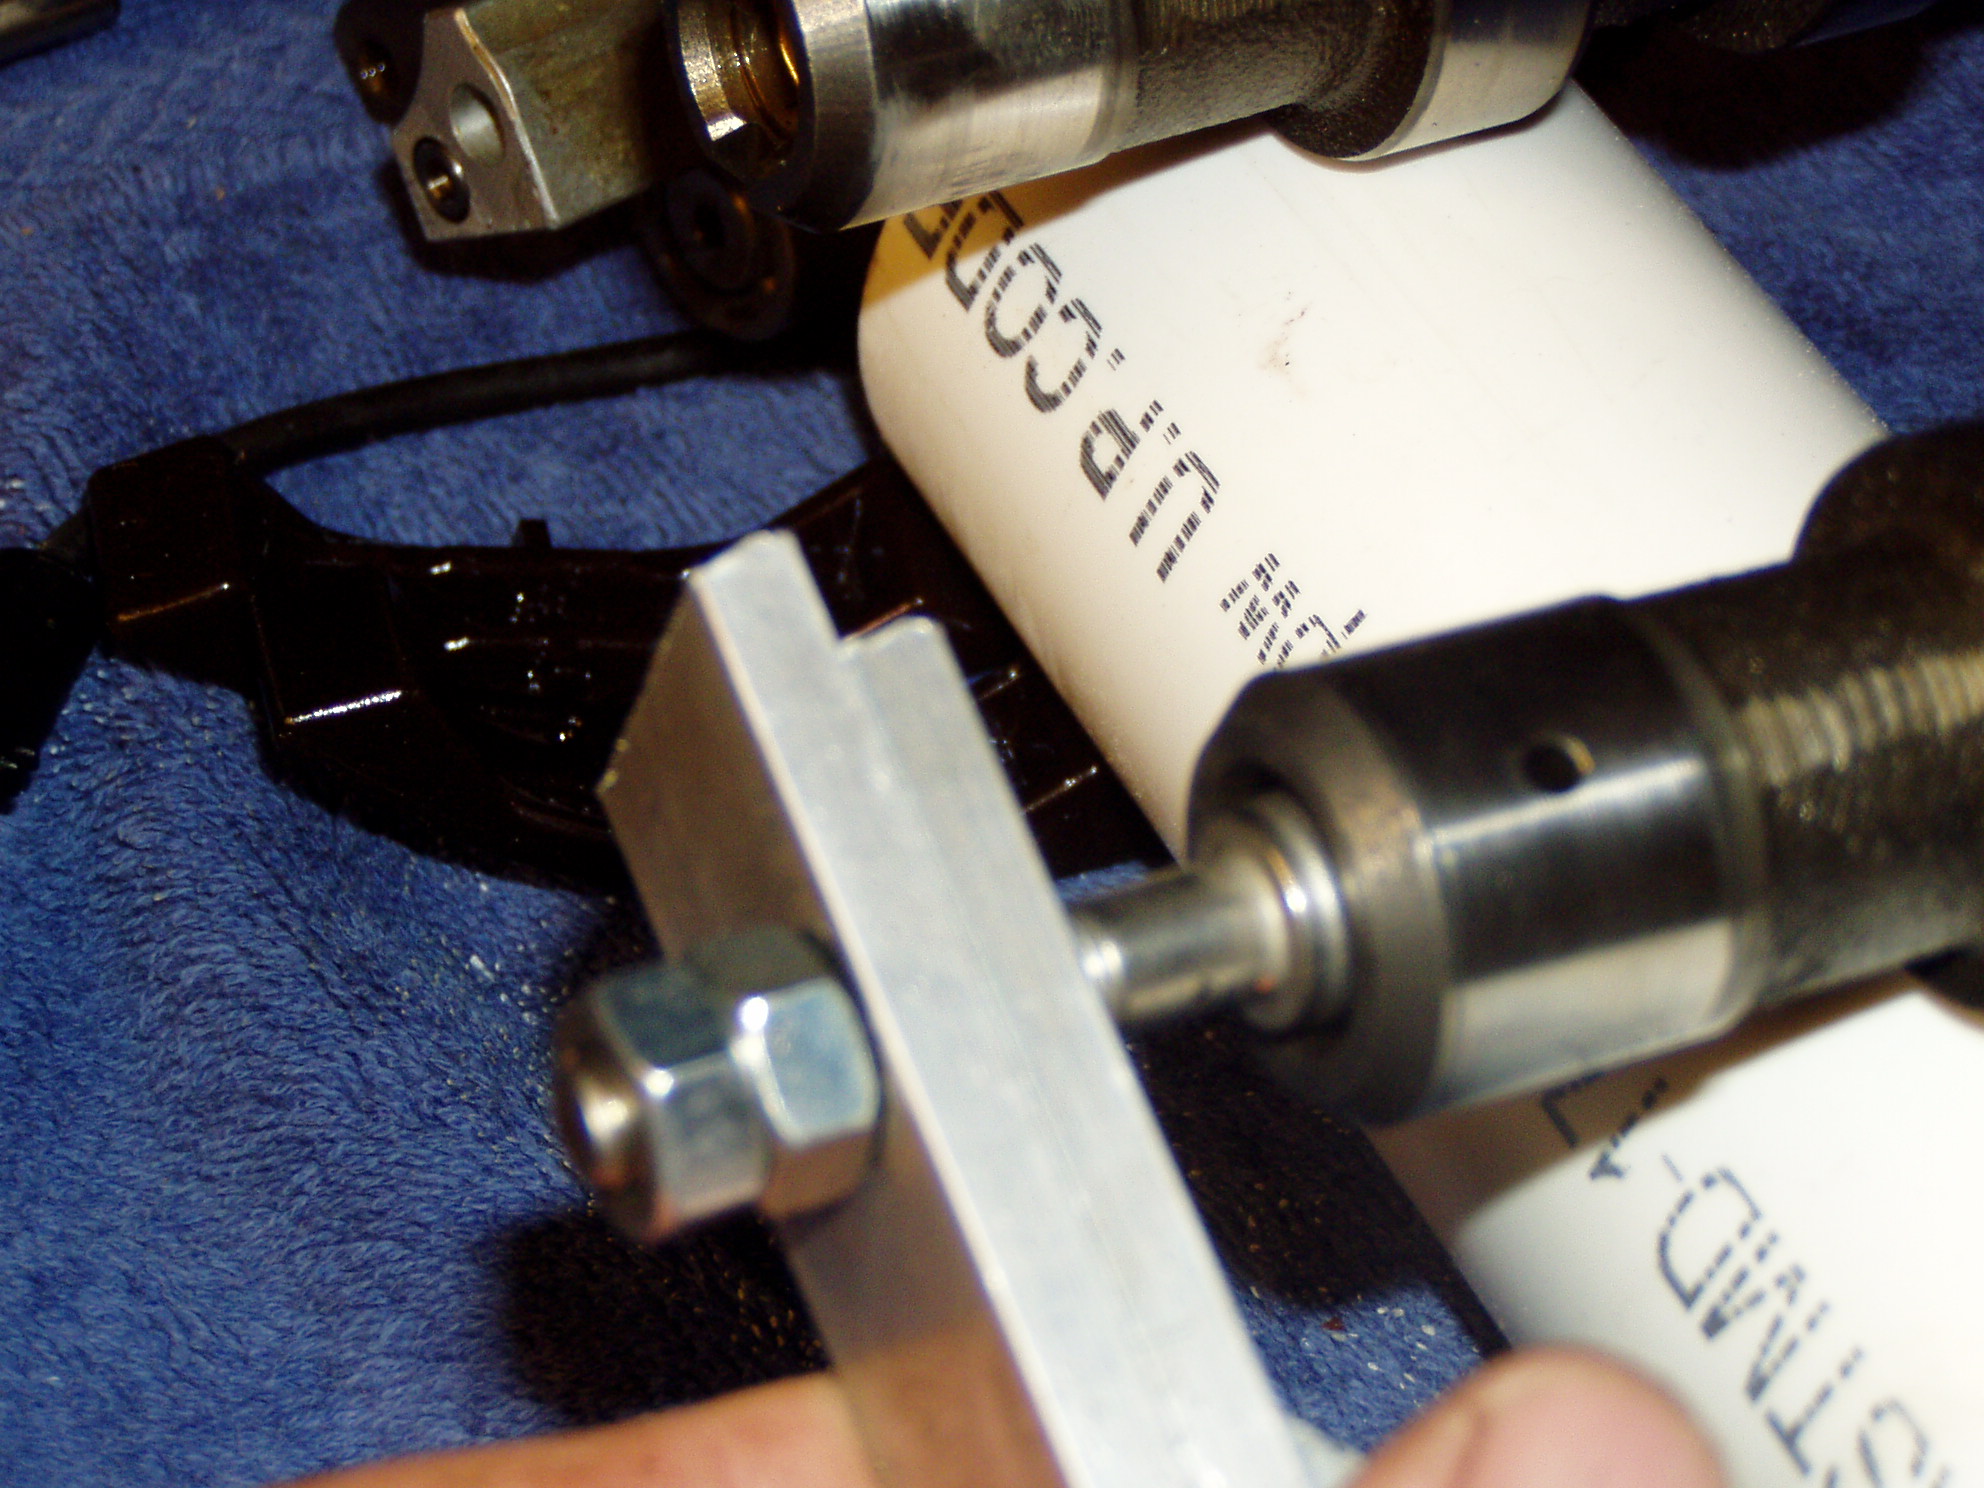
Here is a picture of my home hade tool. The tool fits in the end of the cam to hold down the cam when the cam cover is removed. The manuals give specific instructions on the depth/setting of the bolts that fit into the end of the cams. I did not think this was critical, not even being aware of the expansion plugs, so I screwed my bolts pretty far in, pressing against the expansion plugs. I believe this was a major mistake.
Here is a picture of the tool inserted in the end of the cam with the plug in place. The hex driver bolt I used is actually small enough to fit inside the expansion plug. I think it should be a larger size head, so it fits into the end of the cam, but not into the expansion cap, However there is not much room beyond the expansion cap. I have not seen the factory tool to see the size of the bolt heads on it.
-
Checked with Sunset, the tool 9612 (cam allocator is $478 and is in Germany so a month away. Baum Tools seels almost an exact repica for about the same price. ZDmax has a substitute for $216. It turns out that the two cams are set relative to each other by the chain, the tool is used to move the cams relative to the IMS/Crankshaft.
The problem witht the plugs is that they can only be about .18 inches deep. There is a shoulder in the hole on the end of the camshaft and the widest part of the plug has to fit weel into the end. All the plugs I found werre .25+ inches deep, so that the widest part of the plug would not go in far enough before hitting the should in the end of the cam.
-
I have a question about the use/purpose of the Porsche Cam alignment tool 9612 ( and the equivalent tools available from Baum Tools, ZDmax and Pelican). The descriptions say that the tools is used to secure the intake and exhaust cams in relation to each other when setting the cam timing. However, the relative position of the cams to each other seems to be controlled by the number of chains links on the sprockets and the cam tensioner/solenoid. You cannot change the relative position of the cams to each other once the chain is set on the sprocket. It seems that the real purpose of this tool is to set the position of the cams to the sprocket on the intermediate shaft chain, and thus the position of the cams relative to the crankshaft. Is this really the case?
This comes up for me on my project repairing the intermix problem on my car. For those of you who have been following my on-going project, after having the cracked head fix and reinstalling it, the car started up but blew an expansion plug out of the end of the 1-6 intake cam. The cams are actually hollow and carry pressurized oil to the journals on the cams. Each end of the cams has an expansion plug, and on occasion these can blow out, which can lead to a complete loss of oil quite quickly. In any case I caught mine if a few seconds and shut the engine down. It is not advisable to reuse the old expansion plug as it has already been deformed and could blow out again. Porsche does not sell a replacement plug ( they will only provide a new cam for $800+ as opposed to the plug which costs less than a dollar) and the plugs available in the US are the right diameter, but are two deep to go into the cam far enough to hold. I searched and searched but could not find a properly sized plug. So I found a used set of cams. When I removed the cams I marked the position of the sprocket from the IMS chain on the exhaust cam flange so that I could put everything back in the exact same position. However when removing the intake cam from the cam assembly, the chain came off both cams, so I had to reinstall the chain based on the colored links and marks on the cam. I did not think this would effect the marks on the exhaust cam flange and the IMS chain sprocket, but now when the engine is set at TDC and the marks are aligned, the cam groove is not straight up and down. So I want to make sure that the cams are set correctly relative to the crankshaft.
I have devised another way to rotate the cams to set the position, but I am perplexed that the sprocket and flange don’t seem to line up the way they did before. Any thoughts on this?
-
The problem with the IMS is not so much the seal as the bearing. Yes the seals have been updated, I just put the new Porsche flange and seal on my IMS in my 2000, but the bearing is still the same. LN Engineering has a bearing upgrade (also a full IMS upgrade, but that required tearing down the engine). In 2000 Porsche used the dual row bearing, and the replacment of these is more of a challenge than the single row bearings, although LN will have special tools for this soon (they say). I could not wait as I wanted to get my car back together. A eaking seal can be a sing of a bearing starting to go bad, but not always so, and bearings good bad without a leaking seal. Porsche hasw never really solved the problem with the bearing, depsite revising it a few times.
-
I dom't have a remanufactured engine, rather I had an intermix caused by a cracked hed and chose to fix the head. The car should be back on the road soon. However, I am one who strongly believes that the number of failed engines is a pretty high percentage, and that Porsche has been trying to hide the real number of failures and the source(s) of the failures. I also think that there have been a significant number of reman engines that have failed.
However, the problem with talking to Jake Raby, or just about any other mechanic is that the engines they tend to see are the failed ones, not the good ones. So of the thousands ( and I believe that there have been thousands of the engines go bad) of engines that have been replaced, the ones Jake sees are the ones that have failed again, not the ones that keep running. So the perception you get is going to be skewed by that.
The only way we could all really have reasonably good numbers on failed engines, and the casues of the failures is if Porsche would share this information, and that isn't ever going to happen.
-
WOW! I have heard of cracks in liners, but never in 2-3 liners at one time. The issue you face now is a Porsche reman engine or another source. If you want to get an engine from Porsche, and to get the core credit back, you can't diassemble the engine, that is their policy. I believe it is because they really don't want the public to know what causes failures. The core is also supposed to be "rebuildable" but I have not heard of Porsche not accepting one that was not torn down. I guess to reject one would require that they disclose what is wrong with the core.
Some other sources also have core charges, rebuildable cores, etc. I think Jake Raby/Flat6 innovations is about $15,000 with new liners, IMS and lots of other improvements, and with the price of a reman from Porsche these days (at least for a 3.4) I would go that route if possible.
-
Seems like a good deal on this engine if the description is true. However, remember that if you have to replace the valve cover you have to replace the head too. The head and cover are line bored for the journals that hold the cams so they are matched pairs.
-
Here is a listing for a 996 airbox on Ebay. It should have the MAF housing as part of it. Starting bid is only $10.00 plus shipping. Alot cheaper than the dealer. Hope this helps.
http://cgi.ebay.com/ebaymotors/Porsche-996...sQ5fAccessories
Good luck!
-
Yes you can replace the valve guides. Talk to John Edwards at Costa Mesa R&D. He just did the repair of my cracked head. It was at the exhaust valve spring seat and in repairing it he replaced the valve guide for this valve. The guides themselves are about $20@. You could probably get a local shop to do the replacement, but it would bew nice to have someone who has worked with one of these heads before.
-
Please excuse the typo in the thread heading, but check out my thread on the intermix problem I experienced:
http://www.renntech.org/forums/index.php?s...mp;#entry142577
Porsche wants everyone to think that a new engine is the only alternative when anything happens to a M96. But that is not the case, altough it is incredibly profitable for Porsche to sell the Reman engines, which don't really address all the problems found anyway. There are several other posts on my project, but your problem may be fixable for only a few thousand dollars. My cost for parts and fixing the cracked head is less than $1,500, I did my own labor.
-
Just curious how your happened. Did your pop out when you were using the car, when you were working on it or what? There are actually quite a few of these plugs in the engines and they are all just pressed in.
-
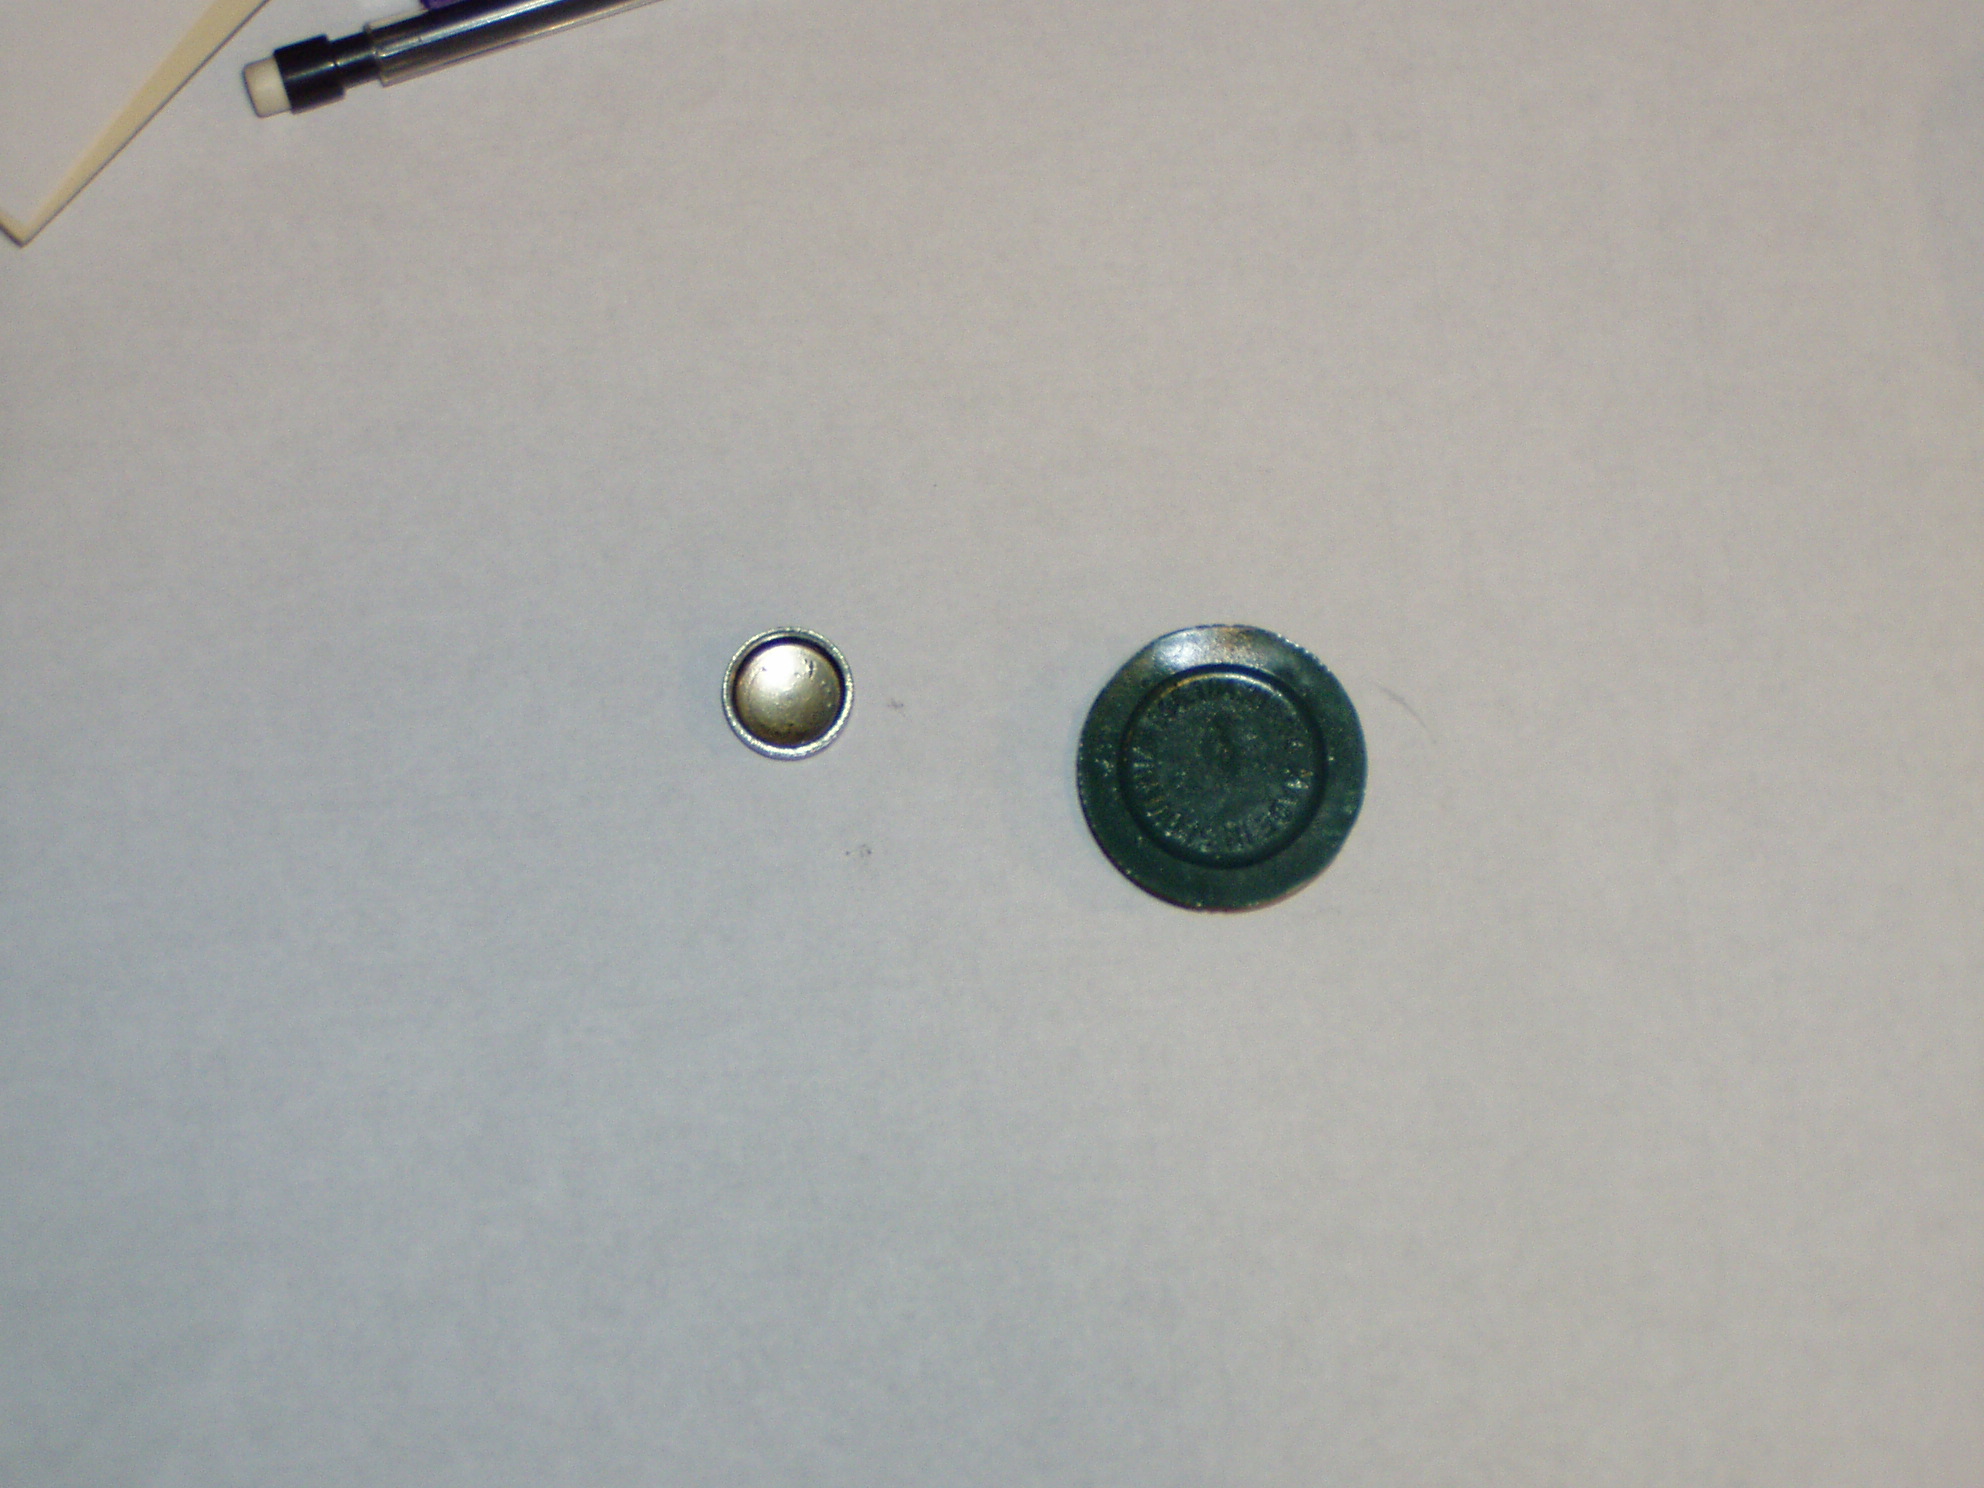
Oh Boy, another major problem! Replaced the pulse sender today and got the engine back in the car. The good news is the engine started right up. The bad news is within 15 seconds or so I had a major oil leak. The green cam plug for the intake cam on the 1-3 head that was fixed had popped out. I was not too surprised at this because in reassembling the engine I had noticed a problem. When I went to put in the cam plugs I found that the hole for this cam plug was distorted. In looking closely at the head I saw that it appeared to have been dropped and slightly bent at this location. I then looked at the FedEx Ground box and saw the damaged to the box that I had not noticed. As an aside the shipment was insured for $500, but I don’t know if or how to collect from FedEX. In any case, it was very hard to get tis plug in as the head was bent in slightly at this location. It had not affected the cam journal so I decided to go ahead in install the plug and see if it leaked. If it did I assumed that I could dremel the hole round or have it machined.
Initially I thought that it was jut this plug coming loose. But when I looked at the puddle of oil I found the small metal cap that is in the picture next to the green plug. This is obviously one of the plug used to seal off oil and water passages in the head. It had come out with the oil. However, at the location of the cam plug/cam journal there is now way a metal plug from elsewhere in the head could get out at this spot
So I talked to John Edwards at Costa Mesa R&D and he had a cam there and confirmed that the cams have plugs in both ends. The plugs a about .590” or 15mm. he said that you can buy them at a NAPA store and reinsert one with a wood or metal drift. He did not think I would have to take it to a machine shop, but could do it jut by putting the engine of the ground to have good access to the end of the head. It had to be the oil pressure when this cap cam out that forced out the cam plug. I only expected I might have a slight leak, not oil pouring out of the engine. I am thinking that the plug could have been damaged by the cam holding tool that I fabricated as it allowed the bolt that went into the end of the cam to push against the plug.
Any one have any experience with this?
I am going to take a break for a few days, as I have been spending a huge amount of time on this in the afternoons and evening, and we are going out of town tomorrow for a wedding ( I had hoped to drive the car to the wedding, but that isn’t going to happen). Next week I guess I will drop the engine again ( with the practice I have had in the last two drops I have it down to about 3-4 hours) and try to put in a new plug. May not be as major a problem as I first thought, but what a hassle!! (or an adventure).
-
Wanted to upgrade my il from the typical Mobil 1 0W-40 to a 5W-40. However the only one I find is for "Turbo Diesel Trucks" and does not have the CL rating. Anyone familiar with this issue?
-
This was a known problem in the arlier 996's. Haven't heard of it much in later years. You might find interesting reading at the attached link:
http://www.hartech.org/docs/buyers%20guide...%20part%202.pdf
This covers alot of years of Porsches, but has alot of info on the M96 engine. a big part of the problem is the "open deck" technology used in the M96/M97 engines. The new 997.2 engines now have closed deck technology and eliminated the IMS.
Also checf out LN Engineering and Flat Six Innovations. AThey work together on resleeving engines. and AutoFarm in England does them.
Is the car still warranted? If so it should be covered. If not the fact that it was dealer serviced may help some, although with Porsche's current financial problems some say they are trying to avoid any warranty claims.
Good Luck.
-
Tested the sensor, seemed to be defective, so I began the "removal." Remember this is a 9 year old car that has been through alot of winters. First the bolt that holds the sensor was frozen. It is a 5mm hex drive bolt (indented). So tight that the hex driver twisted and stripped the head. fianlly got it out with a screw extractor. Then tried to get the sensor out. No way!! It was so crroded in that the head of it (plastic) snapped off when I tried to pry it off. Then i tried to drill it for a screw extractor. No luck, that metal/magnet is really hard. Could not get it out anyway. So, out come the engine again! Decided that this was easier for me than trying to get the bolts out of the bell housing and dropping the trans by itself (though I know this can be done as I had my clutch changed 2 years ago). The good news is that I started to drop the engine at 5:00 this eveing and had it out and the trans off before 9:00. Not bad for working in my driveway on jackstands. the firt time i worked on it for several days. Now that I know how everything comes off it went really quickly.
Now for the stupid part. It is hard to get at the slave cylinder bolts when the engine/trans is up, so I decided to wait till I lowered it a few inches for better access. But I was working quickly to be sunset, and I forgot. My son and I were sliding the engine/trans out from under the car when I felt resistance. Looked and there was the coil of tubing leading to the slave cylinder stretched tight and kinked. SUTPID, STUPID STUPID!!! Guess that is what I get for trying to work so quickly. Alot of frustration in trying to get my car running again.
Now back to the sensor. To get it out I had to separate the trans from the engine, then remove the pressure plate and flywheel (another set of bolts to be replaced). Then I had access to the sensor from the inside. I actually had to bat on the thing with a hammer from both sides. Man the mother was stuck in there. Basically it finally came apart into pieces, i was able to get the magnet core out, then the plastic sleeve came out. I don't know how tight they are supposed to fit, but I don't know how you would remove one with the engine in it they are meant to fit this tight. Guees I will see tomorrow when the sendor arrives. I had it overnighted from Vertex, which had the lowest price i could find for the sensor ($109 vx $195 at the local dealer and 1 week away), but the overnight shipping was $45.00. Thought i would go for it, now I need the tube/hose that I stretched. Maybe one fo the dealers in the area will have one in stock, probably not though, then maybe Sunset or Suncoast
The Saga Continues.
-
Loren - Thanks so much, I am going to try this now.
-
The speed sensor fault is showing up whether the sped sensor is connected or not, so I am thinking that either the sensor or the connector/wiring is faulty. Hopefully the sensor as the wiring is hard to access. Do you know of a way to test either the sensor or the wiring?
-
I will check the sensor connection. I know it was connected, but may have come disconnected when the engine was being jacked up. As for the magnet on the flywheel, there was a series of "teeth" (not the starter ring) behind the flywheel that pass the sensor. I did not really see a magnet, just these "teeth" which I thought were the interface with the sensor. Am I wrong?
-
I removed them on my 2000 996 which had lots of rust and corrosion. The bolts actually came out pretty easy, although I have read of eople breaking them off. then you might have to use an extractor, possibly coil them. the bigger problem amy be the bolts that connect the header to the cats. I did not remove these as they were completly corroded, and looked like they were studs welded to the cats, I did not want to take the chance of breaking them. there are lots of member who have put on headers, they may have more advice for you. Good Luck!
-
Seem to have fuel in the lines although I can’t hear the pump running. I did purge the air out of the system.
Ran my Durametric and came up with some fault codes as follows:
1. Motronic
a. PO336 Porsche fault code 10 Engine Speed Sensor
Open
2. Alarm
a. 48 Airbag signal acknowledged
Status not Present
Frequency counter 11
b. 60 Central Locking limit position
Locks not reached
Status not Present
Frequency counter 9
c. 33 Interior Sensor Faulty
Status not Present
Frequency counter 2
d. 21 W Lead (DME Immobilizer)
Status not present
Frequency counter 1
e. 49 K Lead
Status not Present
Frequency counter 5
f. 18 Power Windows
Status Present
Frequency counter 127
I am wondering if either the Motronic fault or the Alarm fault for the 21 W Lead (DME Immobilizer could be keeping the engine from starting. Any Ideas?


Coolant flush with vacuum fill tool
in 996 Series (Carrera, Carrera 4, Carrera 4S, Targa)
Posted
Call ahead, in the states neither carry it but they can order it.