Welcome to RennTech.org Community, Guest
There are many great features available to you once you register at RennTech.org
You are free to view posts here, but you must log in to reply to existing posts, or to start your own new topic. Like most online communities, there are costs involved to maintain a site like this - so we encourage our members to donate. All donations go to the costs operating and maintaining this site. We prefer that guests take part in our community and we offer a lot in return to those willing to join our corner of the Porsche world. This site is 99 percent member supported (less than 1 percent comes from advertising) - so please consider an annual donation to keep this site running.
Here are some of the features available - once you register at RennTech.org
- View Classified Ads
- DIY Tutorials
- Porsche TSB Listings (limited)
- VIN Decoder
- Special Offers
-
OBD II P-Codes - Paint Codes
- Registry
- Videos System
- View Reviews
- and get rid of this welcome message
It takes just a few minutes to register, and it's FREE
Contributing Members also get these additional benefits:
(you become a Contributing Member by donating money to the operation of this site)
- No ads - advertisements are removed
- Access the Contributors Only Forum
- Contributing Members Only Downloads
- Send attachments with PMs
- All image/file storage limits are substantially increased for all Contributing Members
- Option Codes Lookup
- VIN Option Lookups (limited)


987_RDC
-
Posts
251 -
Joined
-
Last visited
-
Days Won
1
Content Type
Profiles
Events
Forums
External Paint Colors
Downloads
Tutorials
Links Directory
Collections
Store
Posts posted by 987_RDC
-
-
BTW fixed a similar "rise" in my rear seat area recently. Drop the back seats and remove the two phillips screws. I bet the tab on the rear cover under the carpet area has broken off. That causes the rear piece to flex up. I removed all the screws from the piece and took it out. Used e6000 glue and glued a washer to the broken plastic (and remaining piece I found). Allowed the back to be bolted in nice and flush.
-
I believe the last microswitch in the closing sequence is the one on the top of the Lid Drive Motor. This is shown on the last page of the PDF. You should be able to visually verify that the switch is being depressed by the latch sliding mechanism when the top is up and the lid is closed. (must remove the rear carpet first).
Thanks for the tip. I had originally verified the microswitch functionality with manually pressing and then moved on. Your post had me remove the carpet behind the rear seats so I could clearly see the final latch. It didn't move as expected.
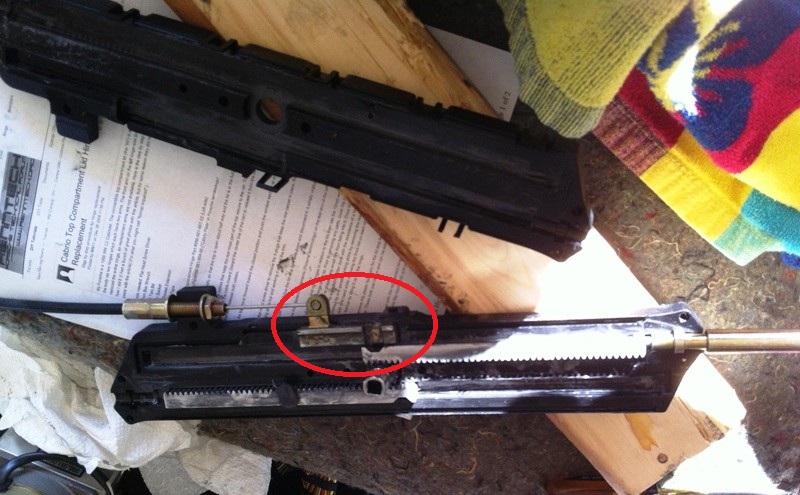
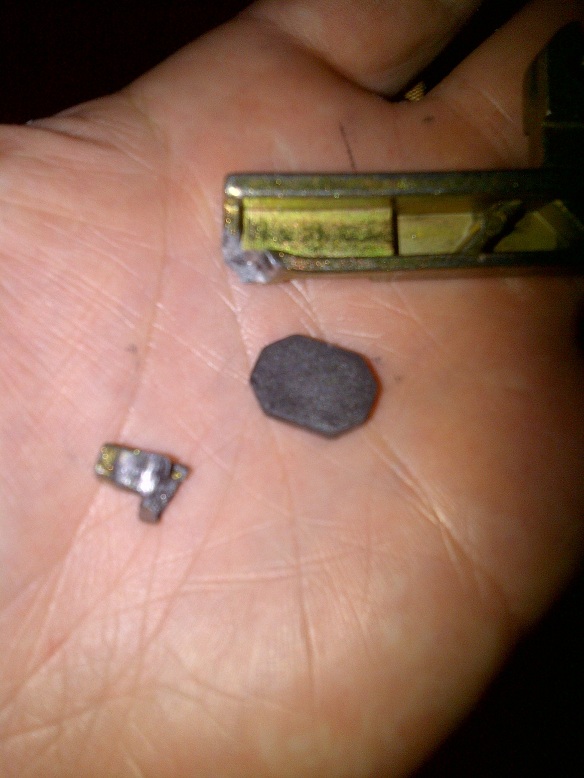
Seems the metal "foot" from the final latch has broken off. This slider is inside the clamshell drive and engages with the black metal piece after the foot piece starts the sliding motion. Thus the back latch never completes.
Borrowed img from another member's rear drive dis assembly: (part circled in red)

My piece with the "foot" snapped off that begins the last latch travel, the black piece engages with the slide drive after foot catches.
Hoping I can get help from friendly fellow Cabriolet owner to get a replacement part....
I also took apart the roof latch and adjusted the microswitch which detects touching the roof to be more sensitive, then adjusted the rear tension cables such that they are not "flopping" the roof down onto the frame but barely allowing the microswitch to be triggered.
Anyway. Hoping this thread can be a one-stop-shop for future Cabriolet owners facing the various issues causing issues. (beyond basic fluid replacement)
-
 1
1
-
-
Update: The latch cover did solve the final switch problem and allows back windows to rise. But roof halts half way (Both directions) using the instrument button.
I can execute a calibration using PIWIS and the top goes from fully tucked away, travels all the way to the up position and the latch extends. But it doesn't attempt to latch, it just reverses and goes back to fully closed and clamshell covered/latched. PIWIS reports a timeout. Can others confirm calibration sequence should be like this?
I've manually checked all the micro switches with "input values" display on the PIWIS. The latch microswitch is functional and does confirm clamshell fully closed. Also if I halt the calibration (beyond halfway) I can confirm the dash switch fully closes the roof (roof latch microswitch activates). Back windows roll up and everything buttons up.
From roof fully retracted: Dash button opens clamshell, both flaps drop but roof fails to rise. (confirmed flaps switches indicate they are both down)
From roof deployed: Button rolls down windows, raises the clamshell and roof beings to move back. Halts halfway.
Help?
My next steps are to remove and lubricate the side flaps and also inspect the convertible top potentiometer. Perhaps that is bad or got knocked loose. Anyone have info on flap removal? Found potentiometer diagram on http://www.cabriolethydraulics.com/_pdf/Carrera_DIY,Inspection_Removal,Shipping_02_21_12.pdf which shows how to remove the hydraulics.
-
Where can I find a 900g bottle? Seems everything at the local stores is tiny and full of lots of crap I don't need. I already put correct PAG oil into the compressor. (empty system and yes will vac first)
-
I believe I need the $9 latch cover since the final switch is not being pressed. This is in line with the error code of Timeout, only after going through the entire process.
996.561.787.000.1C (remove old remnants, snip circles and glue into place on top of metal latch)
-
I was in the process of removing the windshield(defroster) vents because the wood trim has completely delaminated and I broke one of the small clips on the center piece which holds alarm LED. I knew it was inter-linked together with the vent, but even with being careful I broke one side.
Does anybody know the part number for this piece and how difficult is it to replace?
TIA
What are you replacing the wood trim with? Mine is suffering from same fate. I bought a new dark root wood passanger side trim in grey but don't have the drivers side.
-
Repairing my convertible top this weekend. Things went well with the fluid install (was dry from previous owner).
I attempted the calibration via PIWIS, top goes through the entire process then stops before it tries to latch. Reversed and then complains of Timeout. Which microswitch would this be? Also where do I find the potentiometer to verify ohm at start?
Seems this should help me but still interested in folks feedback on possible issue: www.welton-village.org.uk/porschesofttopp.pdf
-
Sounds like cracked ignition coil. Remove and inspect, swap it with another coil to confirm. (if fault follows that pack)
-
Not to be a grave digger but Seafoam addeed to my oil solved a ticking sound I was hearing at idle on the 1,3.5 side. I knew shouldn't be there as I didn't hear the same on other bank. Added to oil and let it idle, then did a oil change.
-
The car should hold 25+ inches of vacuum indefinitely if the system is sealed. We typically let cars sit under vacuum for 15 min. as a final leak test before refilling them.
I had the snap-on from earlier use on domestic cars but Uview looks like a great tool. I guess I need to check the front radiator tubes also since not sure if pulling vacuum past the thermostat. That could explain the system quickly returning to atmosphere. Adapter arrives this weekend.
Adapter did the trick. O-ring was leaking the vacuum. Sucked up the coolant out of 6 gallon water jug I got off amazon. Chilly
-
What is torque spec for #4 and the bolt below that?
-
Pelican has a kit. Installed it in my 1999 Cab.
-
The cover looks like the original color of the top and the top looks like a lighter blue. IMHO
I agree, seems top was replaced by eBay special.
Option D, Circle cap PN: 99655545700
Last three would be color. If black I think it is A03.
Though your pics look blue IMO. (G10 if Metropole blue)
-
Easiest: Updated Becker all-in-one cable: BAS.iPOD
Or
Also seen some people recommend the: BLAU/8-POD2 or 3 (if needing another AUX) (Install info, http://www.discountc...s/blau8-pod.htm)
Or
- Phone power cable – p/n 5001.524-276
- Audio/telephone cable kit - p/n 1319.116-276 [Read that alternatively can use Blitzsafe adapter to charge newer devices: 764244 26241]
Radio pin out : http://mysite.verizon.net/mark00/sitebuildercontent/sitebuilderpictures/004-2.jpg
-
I've been using the 5w-40 Pennzoil Euro spec (for higher ZDDP than mobile 1). Good results so far in sunny CA.
-
The car should hold 25+ inches of vacuum indefinitely if the system is sealed. We typically let cars sit under vacuum for 15 min. as a final leak test before refilling them.
I had the snap-on from earlier use on domestic cars but Uview looks like a great tool. I guess I need to check the front radiator tubes also since not sure if pulling vacuum past the thermostat. That could explain the system quickly returning to atmosphere. Adapter arrives this weekend.
-
How long does a vacuumed coolant system hold the vacuum?
I got my system to 25 in/vac but wouldnt hold for long. Thinking it is the crappy "o-ring over hacked off radiator neck" adapter I tried to fab up. Just ordered a universal radiator adapter (1DXN1 or MV4506 instead of Snap on priced:YA4505) for my SVTSRAD262A kit.
-
Interested in the same thing. Anyone confirm 3 or 2 button remotes working for 1999?
Nothing to release on a MY1999.
You still have a manual release on MY2000 and older cars.
The electronic release for front and rear lids came in MY2001.
I understand that. But does the unlock still function? Seems the 2 and 3 button remotes are less expensive to order.
-
Interested in the same thing. Anyone confirm 3 or 2 button remotes working for 1999?
-
You need to buy them from a dealer - as well as all 99 supplements.
Ok thanks. Let me know if I should edit post to remove previous link to old ones.
-
Ah yes further reading I found that recommendation has been updated to 120*. Seems I am fine with the 67 ft/lbs I torqued my set.
BTW those manuals do not have the incorrect 90* recommendation. It was poster above. Manual lists as noted 67 ft/lbs.
Where are the updated manuals?
-
Checking the 996 engine manuals at (link removed)
Seems Engine 1 pdf lists flywheel ft lbs at 67 on page 116.
I recall having to use a breaker bar to take off the flywheel bolts so suprised they are only on 17 ft lbs + 90*
-
Hopefully it is the oil cooler. One word of caution is to not buy a used oil cooler as replacement. (might be obvious)
-
Sounds like you had intermix originally which killed your last AOS and any future one since the mix eats plastic seals. If your oil isnt milkshake then you might want to pressure test the oil cooler.
Seeking Advice on the Rollbar Cover Area
in 996 Series (Carrera, Carrera 4, Carrera 4S, Targa)
Posted
I had my top in service position and already had the back carpet out, thus I was able to get to all the screws in the back area also. You might need to pop the tension straps and remove rear carpet to get to the back parts. I highly recommend E6000 glue and metal washer to re-create the bolt hole to hold the top properly.